The Black Rat

Chat to do with your MX5/Miata/Eunos Garage Ride(s).

Moderators: timk, Stu, zombie, Andrew, The American, Lokiel, -alex, miata, StanTheMan, greenMachine, ManiacLachy, Daffy

The American
Forum Guru
Posts: 1525
Joined: Fri Jun 29, 2012 9:23 pm
Vehicle: NB8B - Turbo
Location: Brisbane, Qld. Previously Perth WA
Contact:

Re: The Black Rat

Postby The American » Mon Feb 22, 2021 11:47 am

PaulF wrote:Funny coincidence - I recently applied for that exact night course.


I have good memories of it. I think the people doing the teaching had a lot to do with it. They were a few retirement age career tradesmen who were so generous with their knowledge and experience.

User avatar
ManiacLachy
Forum Guru
Posts: 3266
Joined: Mon Jan 13, 2014 2:35 pm
Vehicle: NB SE
Location: Brisbane

Re: The Black Rat

Postby ManiacLachy » Mon Feb 22, 2021 12:39 pm

I've considered seeking out a course like that. It would be super interesting and a great skill to have.

The American
Forum Guru
Posts: 1525
Joined: Fri Jun 29, 2012 9:23 pm
Vehicle: NB8B - Turbo
Location: Brisbane, Qld. Previously Perth WA
Contact:

Clutching at plastic...

Postby The American » Tue Mar 09, 2021 1:46 pm

The clutch install took a little longer than I expected, thanks to the plastic alignment tool - I could not get it to work for me.

Image

I spent half a day mucking about with the plastic alignment tool and muttering. It simply could not provide accuracy of the central positioning to support sliding the gearbox home.

Image

Thank you to Sonke for loaning me this cut off input shaft - it did the job of aligning the plates and the spigot bearing in seconds.

Image

I'm going to make myself one of these when I have the innards of my broken 6 speed back.

The American
Forum Guru
Posts: 1525
Joined: Fri Jun 29, 2012 9:23 pm
Vehicle: NB8B - Turbo
Location: Brisbane, Qld. Previously Perth WA
Contact:

Open wide and say, aaaaahhhh....

Postby The American » Tue Mar 09, 2021 1:56 pm

With gearbox finally attached, and most of the ancillaries in place, the engine and gearbox went back in on Monday.

Image

Image

Next jobs on the list:

- Refit tailshaft, PPF and shifter
- Bleed clutch system (has a new flexible line to replace the squiggly hardline)
- Make and fit fuel lines for to and from the fuel rail to the FPR and return line.
- fit radiator and finalise reroute piping
- fit intercooler and fabricate intercooler pipework
- Extend IAT sensor wiring to the new IAT location (exit of intercooler)
- Mount ignition coils
- Mount oil filter block and make lines
- mount oil cooler and make lines

So many jobs left to do!

The American
Forum Guru
Posts: 1525
Joined: Fri Jun 29, 2012 9:23 pm
Vehicle: NB8B - Turbo
Location: Brisbane, Qld. Previously Perth WA
Contact:

Intercooler pipework for the TSE EFR

Postby The American » Fri Mar 19, 2021 5:52 pm

I've been tinkering away on the intercooler piping over the last week or so, and the results are pictured below

Image

Image

The hotside is in 2" aluminium and the cold side is in 2.5", with the silicon elbow that transitions to 2.75" for the throttle body. I am far from a pro TIG operator, but these will do.

I still need to weld the IAT sensor bung into the cold side near the exit of the intercooler, and then will work on trimming all of the OEM plastics to fit around the pipework.

FYI - the cheapest source of bends I could find came from Plazaman directly via their online shop.

User avatar
plohl
Racing Driver
Posts: 1922
Joined: Wed Oct 14, 2009 12:13 am
Vehicle: NA8
Location: Brisbane

Re: The Black Rat

Postby plohl » Sat Mar 20, 2021 7:35 am

Looks good dude!

Did you go somewhere to get the beads rolled?
Cheers,
plohl

Red_Bullet
Speed Racer
Posts: 3119
Joined: Tue Mar 11, 2014 8:33 pm
Vehicle: NA8 - Supercharged
Location: Brisbane

Re: The Black Rat

Postby Red_Bullet » Sat Mar 20, 2021 7:39 am

Nice tinkering, it can be hard to think spatially like that. Self taught at TIG?

User avatar
Lokiel
Forum legend
Posts: 4126
Joined: Thu May 28, 2009 2:39 pm
Vehicle: NB SE
Location: Brisbania

Re: The Black Rat

Postby Lokiel » Sat Mar 20, 2021 2:25 pm

Nice DIY work on "The Cobra" (intercooler plumbing/welding) - it looks and works MUCH better than lots of short pipes, silicone couplers and matching crimps.

I made mine with all the bits & pieces as a template, then paid a welder to weld-up the same piece using aluminium pipes I provided - it wasn't as expensive as I feared and fitted perfectly. Without the additional "middle" silicone crimps and slightly thicker silicone couplers, there's a lot more room in those cramped areas so it was worth the welding cost IMO.

Which 2.5-2.75" Silicone elbow did you use?

I used AeroFlow's elbow since its 2.5" leg is longer than most but I did have to trim the 2.75" end a bit to clear the top radiator hose.
Don't worry about dying, worry about not living!
Garage Thread: http://www.mx5cartalk.com/forum/viewtopic.php?f=57&t=76716

User avatar
Lokiel
Forum legend
Posts: 4126
Joined: Thu May 28, 2009 2:39 pm
Vehicle: NB SE
Location: Brisbania

Re: The Black Rat

Postby Lokiel » Sat Mar 20, 2021 2:33 pm

plohl wrote:Looks good dude!

Did you go somewhere to get the beads rolled?


I have a couple of bead rollers if you ever want to borrow or use them at my place.

The first one I bought was from Hare&Forbes and bolts onto a bench - unfortunately it's better suited to 3" and above.

I then bought a small one from eBay that fits in a vice and does a good job with 2" and 2.5" aluminium tubes.

A word of warning though - if you haven't done it for a while, practice on a scrap piece first to get your bead the correct distance from the end and that you're rolling the pipe evenly so that it starts and finishes at the correct spot. It's not hard to get right but you'll kick yourself if you screw up a finished product.
Don't worry about dying, worry about not living!
Garage Thread: http://www.mx5cartalk.com/forum/viewtopic.php?f=57&t=76716

The American
Forum Guru
Posts: 1525
Joined: Fri Jun 29, 2012 9:23 pm
Vehicle: NB8B - Turbo
Location: Brisbane, Qld. Previously Perth WA
Contact:

Re: The Black Rat

Postby The American » Sat Mar 20, 2021 6:55 pm

plohl wrote:Looks good dude!

Did you go somewhere to get the beads rolled?


Thanks Shane!

I have a bead roller that I got of a guy on facebook marketplace. It took a few practice runs to work out how to get the best out of it, but it does the job ok if used slowly and taking care to 'steer it' along the first crease you made.

The American
Forum Guru
Posts: 1525
Joined: Fri Jun 29, 2012 9:23 pm
Vehicle: NB8B - Turbo
Location: Brisbane, Qld. Previously Perth WA
Contact:

Re: The Black Rat

Postby The American » Sat Mar 20, 2021 7:01 pm

Red_Bullet wrote:Nice tinkering, it can be hard to think spatially like that. Self taught at TIG?


long, long ago, I did a TAFE course that included an evening of TIG. MIG is what I have used for most of my welding in the past. I have been watching youtube 'how to's' mostly from this you tube channel https://www.youtube.com/channel/UCcxlBLmujrjTVSSUkzZ2Jlg called The Fabrication Series. He explains things well. I've also been practicing with lots of bits of aluminium extrusion and some pipe sections. I find it quite hard to be consistent because I don't have a great bench to work on - it's at an awkward height.

The American
Forum Guru
Posts: 1525
Joined: Fri Jun 29, 2012 9:23 pm
Vehicle: NB8B - Turbo
Location: Brisbane, Qld. Previously Perth WA
Contact:

Re: The Black Rat

Postby The American » Sat Mar 20, 2021 7:39 pm

Lokiel wrote:
Which 2.5-2.75" Silicone elbow did you use?

I used AeroFlow's elbow since its 2.5" leg is longer than most but I did have to trim the 2.75" end a bit to clear the top radiator hose.


Thanks Lokiel! I also used the Aeroflow elbow and also trimmed the 2.75" end of it to move the assembly closer to the engine and away from the swaybar. I originally planned to use a straight reducer and an aluminium bend, but I discovered that the 2.5" aluminium bend takes up a lot of space to make the turn, and the reducer is not the most efficient space user either - together they were just too bulky, so I switched to the silicon elbow for the coupler. The same at the turbo outlet - I had planned to use a straight coupler with an aluminium 45 degree bend to make the first turn downwards, but the combination was just too long to set the next bend up for success (so the first 45 off the turbo is also silicon).

I measured the cast aluminium elbow on the White Mouse which makes a single tight turn of approximately 110 degrees. It is an AVO item, and has an integrated port for the air temp sensor. I contemplated ordering one of these along with the rest of the cobra, but it was going to be about $400 just for half the pipe work I needed, so I stuck with the MYO plan.

I've got enough bits left over to make up the pre-turbo intake piping, which I would like to route into the front passenger bumper cavity (I think that is the path the factory SE charge pipe takes).

The American
Forum Guru
Posts: 1525
Joined: Fri Jun 29, 2012 9:23 pm
Vehicle: NB8B - Turbo
Location: Brisbane, Qld. Previously Perth WA
Contact:

bung in a bung

Postby The American » Sun Mar 28, 2021 10:12 pm

The last part of the intercooler pipework was a bung for the IAT. As per previous posts, my TIG skills are a WIP, but will be up to the job. The factory wiring for the IAT is over on the passenger/lefthand side of the care in the side of the factory airbox. The NB8B uses separate plugs for the airflow sensor and IAT sensors. I unpicked the harness back as far as the three plugs that mount near the throttle body and extended and rewrapped the IAT wiring so that it follows the intercooler pipe down and around to the bung next to the outlet of the intercooler. My electrical terminal pin crimping skills are also a wip.

Image

I didn't grap a 'below' shot of the intercooler piping on the cold side, because the pathway (çobra style) is pretty common place. The hotside pathway is a little tighter with the Trackspeed EFR and following Trackspeed's suggested pathway. This is what it looks like from underneath (you don't really see it from above):

Image

Image

These photos were taken with the suspension at full droop, and there is plenty of clearance to the swaybar. On full lock (turned in or right) there is also plenty of clearance.

The American
Forum Guru
Posts: 1525
Joined: Fri Jun 29, 2012 9:23 pm
Vehicle: NB8B - Turbo
Location: Brisbane, Qld. Previously Perth WA
Contact:

(brackets)

Postby The American » Sun Mar 28, 2021 10:25 pm

Now that the car is "in one piece" I have been working on the last 10% of tasks to get the car completed. These are time consuming and fiddly jobs, that mostly involve making brackets and finding ways to fit things into ever-reducing free space.

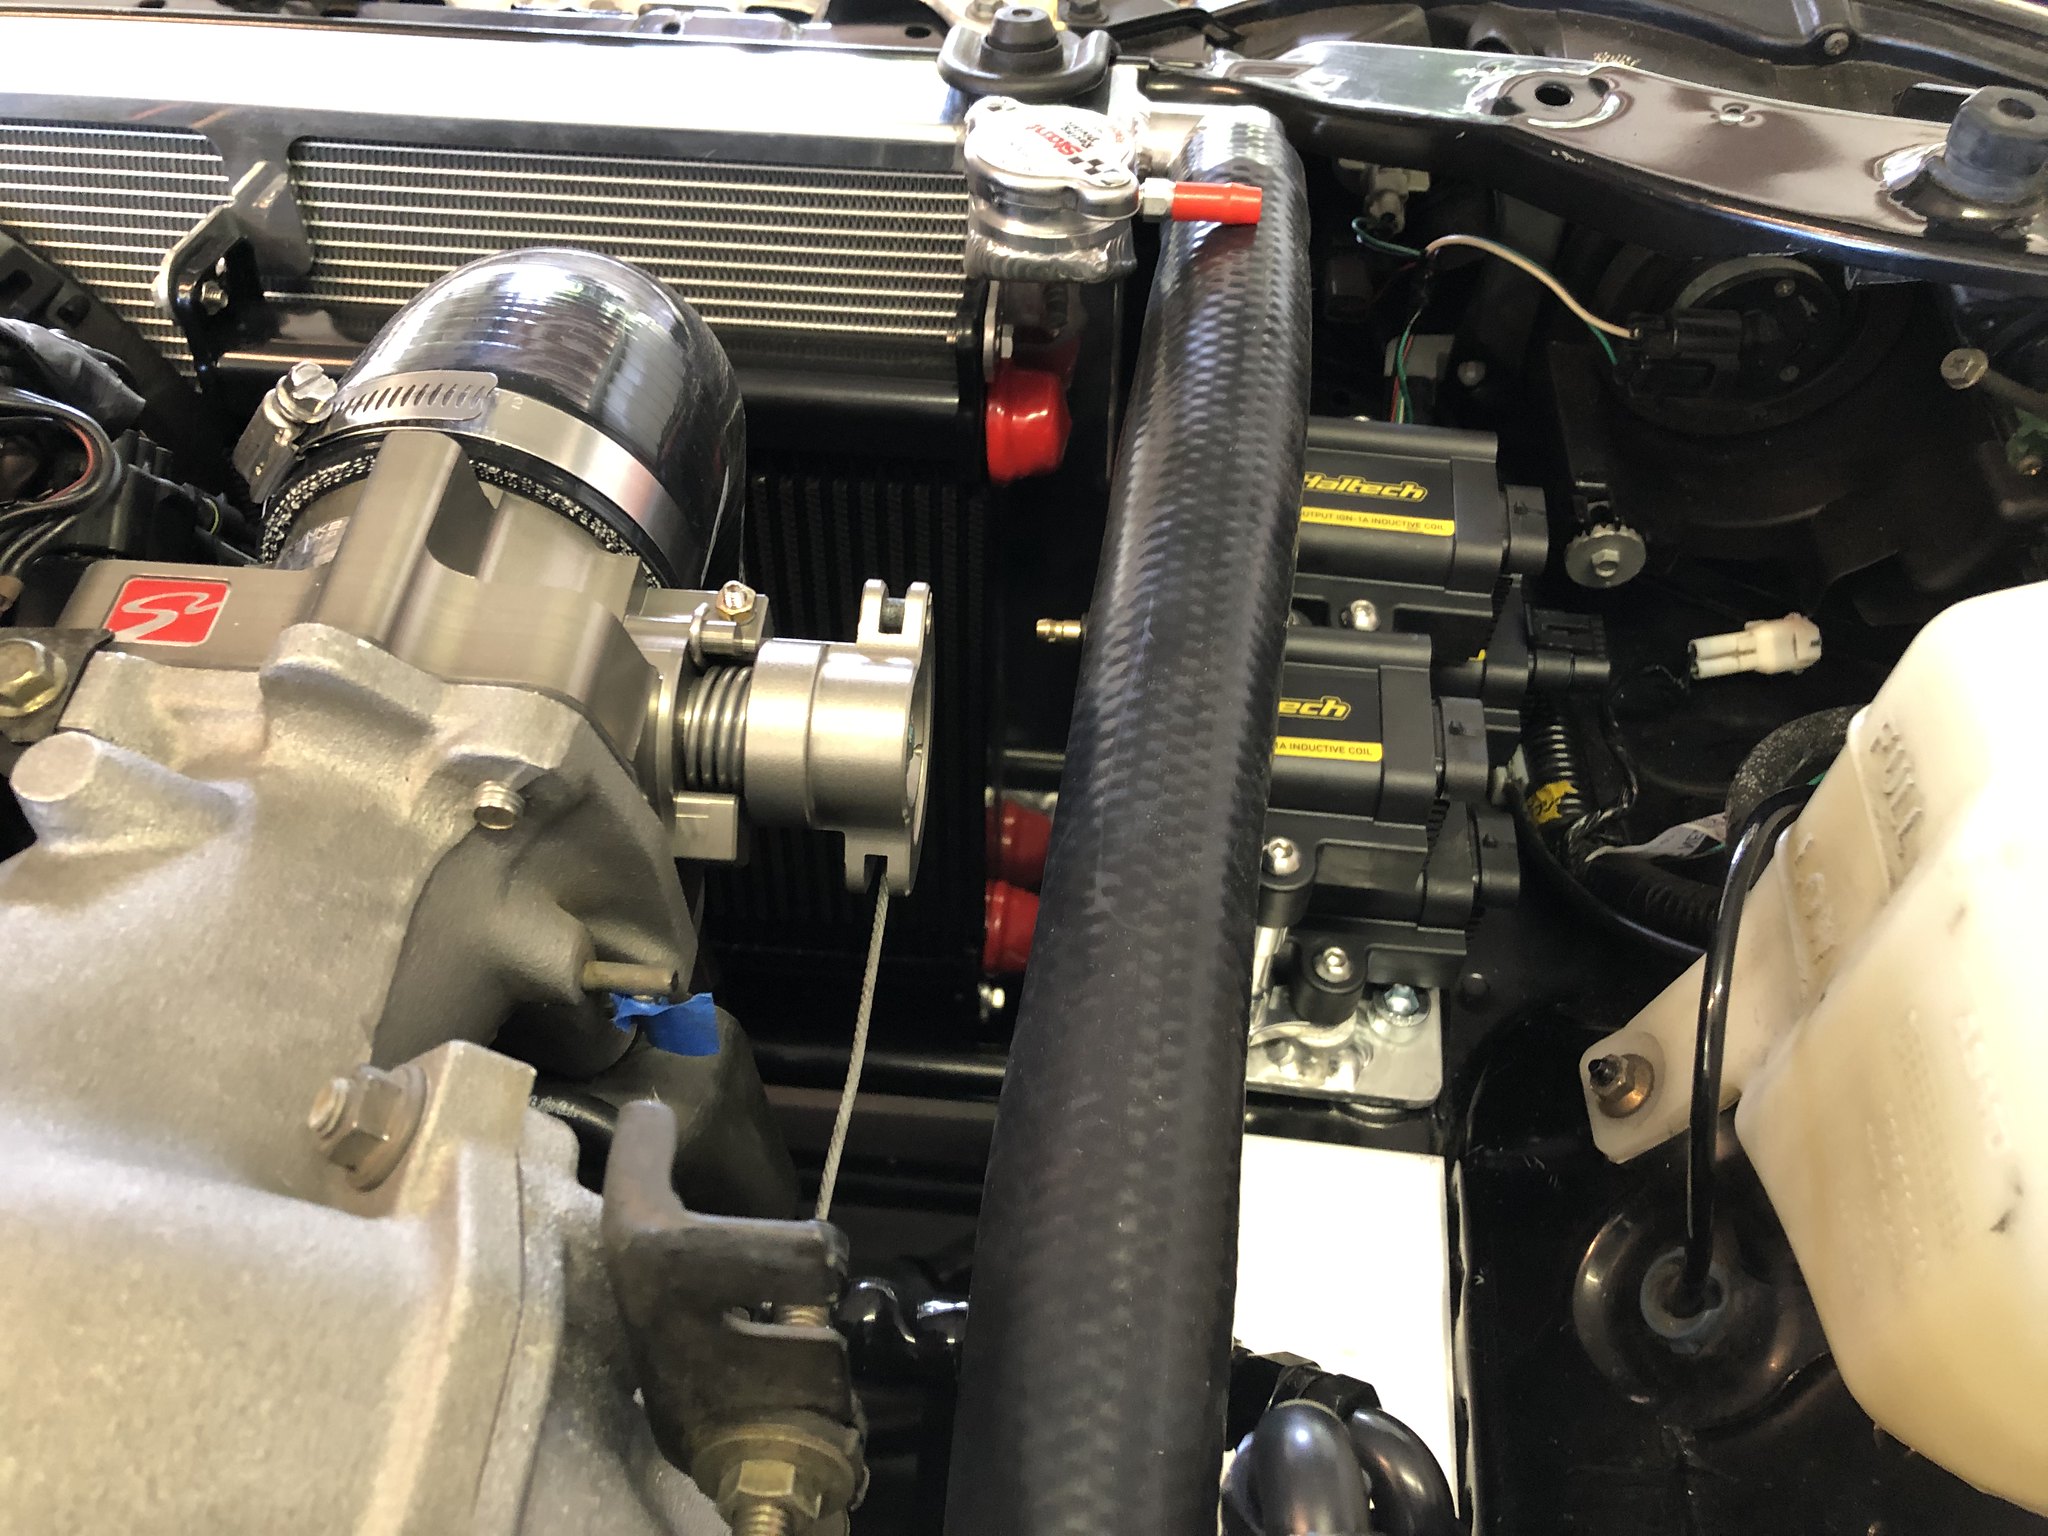
The IGN-1a coils are mounted, with a purchased mount and a bracket to make the mount mountable:

Image

Image

The oil filter block now has a home, also on a home made bracket:

Image

The wideband controller, now lives under the windscreen wiper motor, on a bracket that makes use of a spare captive nut in the inner guard (and handily spaces the flat housing off of the non-flat inner guard):

Image

And the ECU is now hanging happily on a bracket under the dash (I was planning to use the passenger airbag space for the ECU, but making that work seemed more complex and less accessible than making use of some redundant studs off the firewall in the underdash space.

Image[/url]

Image

The American
Forum Guru
Posts: 1525
Joined: Fri Jun 29, 2012 9:23 pm
Vehicle: NB8B - Turbo
Location: Brisbane, Qld. Previously Perth WA
Contact:

Win of the day

Postby The American » Sun Mar 28, 2021 10:37 pm

The Black Rat has not had a batter in it for 9 months or so, and the driver's window has been sitting down for access purposes. I needed to wind it up, so in went the battery which has been sitting on trickle charge. The windows only work with the car in the 'ón' position which also causes the fuel pump to prime. I can't say I was planning to test the fuel system for leaks at that moment, but I am pleased to say that not a drip or a wiff came out where it should not when the pump cycled.

It's a win, because there are 17+ new connections making up the return style system, which is a lot of opportunity for a fail.

Incidentally, the fuel pressure regulator with gauge installed, was reading 70 PSI when priming.


Return to “MX5 Garage Chat”

Who is online

Users browsing this forum: No registered users and 50 guests