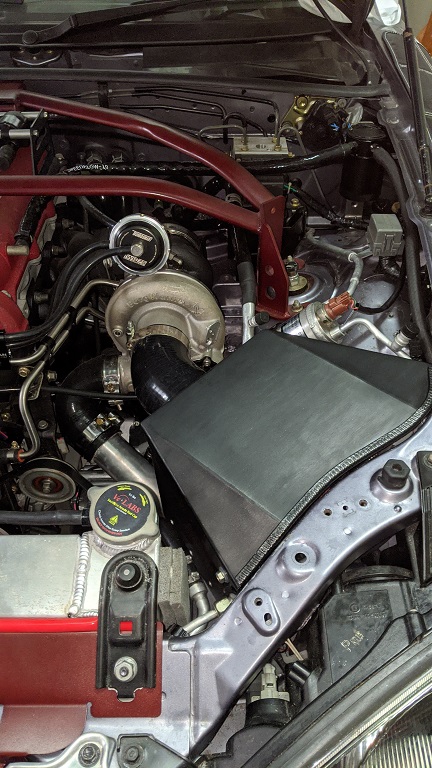
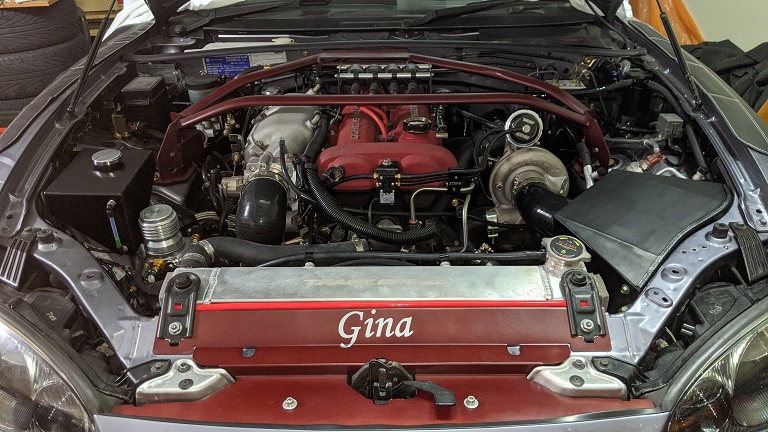
Lokiel's "Gina" (2004 Titanium SE)

Chat to do with your MX5/Miata/Eunos Garage Ride(s).

Moderators: timk, Stu, zombie, Andrew, The American, Lokiel, -alex, miata, StanTheMan, greenMachine, ManiacLachy, Daffy

User avatar
Lokiel
Forum legend
Posts: 4126
Joined: Thu May 28, 2009 2:39 pm
Vehicle: NB SE
Location: Brisbania

Re: Lokiel's "Gina" (2004 Titanium SE)

Postby Lokiel » Wed May 20, 2020 2:35 pm

ManiacLachy wrote:
Lokiel wrote:Don't worry, I know where you're coming from


Good to know I didn't ruffle any feathers, certainly not my intent. I'm with the others, I love how you think out your projects, and present them with great information and illustrations. That must add some time to the posts. I plan to "borrow" from many of your developments in time.

My car hasn't dríven properly in over 6 months, and it pains me. Maybe Lokiel is numb to the pain now? :mrgreen:

Your point was a valid one so it didn't ruffle any feathers.

As you lamented, the longer your car is not used, the easier it becomes to give it less priority until you get several days to dedicate to it :(

For me, normally I don't get much time during the week to do any work after work so everything needs to be done on the weekend.

RS2000 wrote:...
Wouldn't that front end bar mod make the car unregisterable?


Image

bruce wrote:No one would notice the change as that area is well hidden.


Exactly (and I can always bolt the endplates back on to mount the rubber bumper if needed).
Don't worry about dying, worry about not living!
Garage Thread: http://www.mx5cartalk.com/forum/viewtopic.php?f=57&t=76716

RS2000
Racing Driver
Posts: 680
Joined: Mon Nov 25, 2013 7:38 am
Vehicle: NB8A
Location: Newcastle

Re: Lokiel's "Gina" (2004 Titanium SE)

Postby RS2000 » Wed May 20, 2020 2:43 pm

I realise it is well hidden, I should have asked can it be 'engineered'. I doubt it.

User avatar
bruce
Speed Racer
Posts: 7706
Joined: Fri Apr 25, 2003 11:00 am
Vehicle: NA8 - Turbo
Location: Victoria
Contact:

Re: Lokiel's "Gina" (2004 Titanium SE)

Postby bruce » Wed May 20, 2020 4:18 pm

Let's not go down that rabbit hole as it is really starting to ponder the fundamentals of the universe....

User avatar
Lokiel
Forum legend
Posts: 4126
Joined: Thu May 28, 2009 2:39 pm
Vehicle: NB SE
Location: Brisbania

Re: Lokiel's "Gina" (2004 Titanium SE)

Postby Lokiel » Thu May 21, 2020 11:07 pm

Over the last couple of days I picked up my modified A/C lines and ND condensor + new barbs from Kooler Car Air Conditioning.

I also purchased a new A/C belt since my original one was too short and the new one provided for the ND compressor was too big.
I used a silicone hose to get an approximate size for the A/C belt and took it to Autobarn to find one of the required length.
It worked really well since it could be overlaid and shaped onto the Gates belts they had available (I thought I'd probably need to return to the store a couple of times to get the right size).

I'd also asked Kooler Car to remake my "Franstein" #6 liquid hard line from the condenser to the receiver/drier because it was dodgy as hell so I provided it as a template.
The owner had quite a laugh about it and told me that there's a bloody good reason most mechanics refer A/C work to A/C specialists, especially the #6 lines because they're high pressure lines.

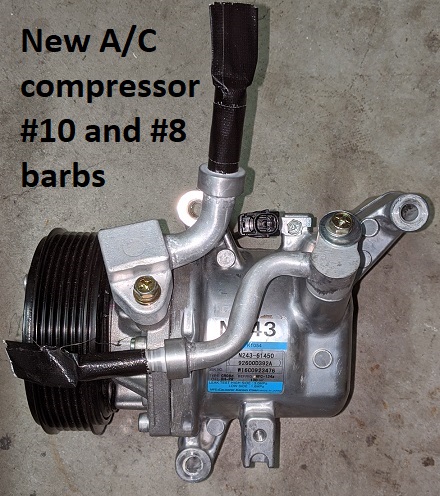
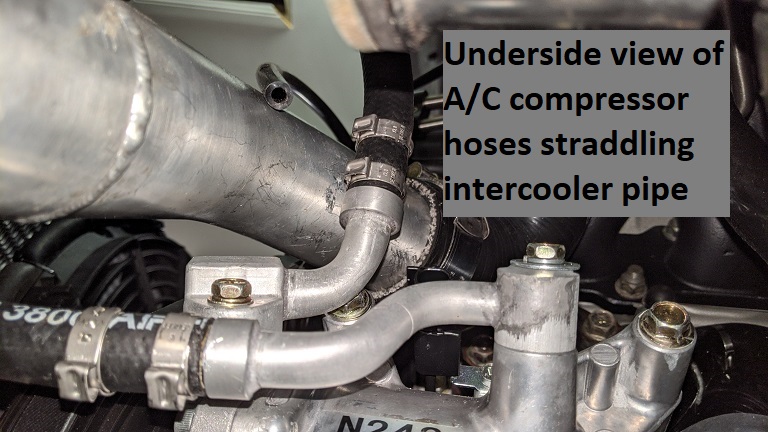
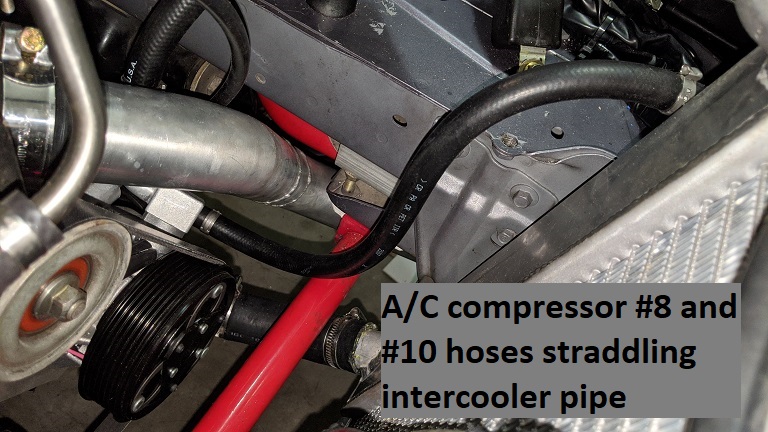
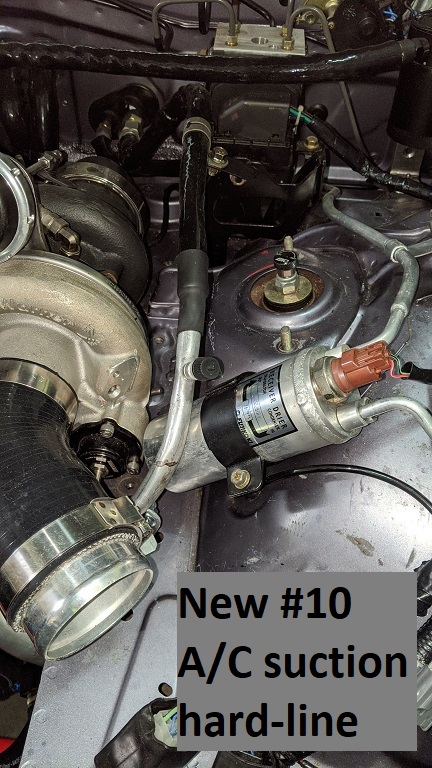
The A/C compressor's #10 suction hose from the evaporator normally routes to the rear firewall by going underneath and up to the rear firewall.
With my new downpipe in the way I needed to up from the compressor instead.
My hotside intercooler pipe gets in the way a bit so the new #10 barb had to exit at 90* and it had to exit to the rear and up because it would be too close to the A/C belt if routed forward.
Image
Image
Image

Kooler Car welded their barbs onto the #10 and #8 hardlines I provided and sold me all the matching clamps required for their barbs.
They also added a valve to the #10 hardline in the position I needed. I'd added a SpeedFlow heat sheath because I wouldn't be able to fit it later with the valve in place.
The existing #8 and #10 hoses I'd bought earlier were fine for the new barbs, as was the existing crimping tool I'd bought.
The Kooler Cars barbs differ from most I've seen, they have a bloated section with two recesses either side where the hose clamps crimp into - the owner claims that these are the only ones he's used that don't leak.
A blue plastic locator came with two crimps for every barb. The two crimps fitted into the plastic locator which was then slid over the hose and the barb inserted into the hose as far as the plastic locator would allow. At this point the crimps are located correctly for the barb and can be crimped into place. The plastic locator can be left in place at that point or cut off so I cut them off since they look out of place (the owner tols me that's what he always does too since he thought they looked daggy).

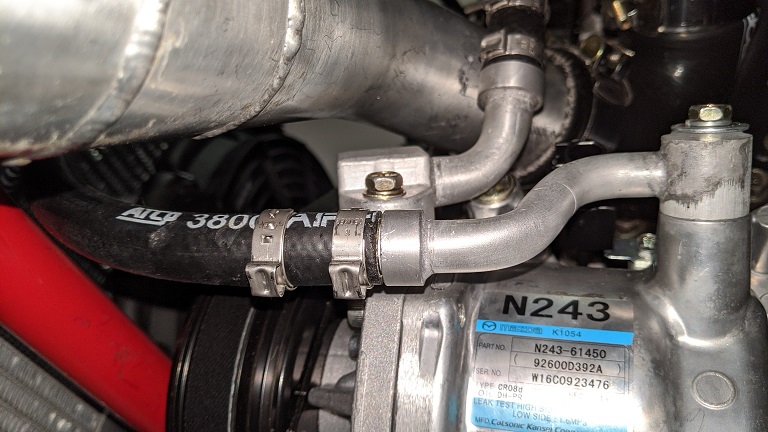
I was really happy with the #8 Discharge hose, a simple S-bend was used and it safely clears the anti-roll bar:
Image
- the #8 hose doesn't flop about at all which surprised me given its length.

The #10 suction line from the evaporator to the A/C condenser was a bit more of a hassle.
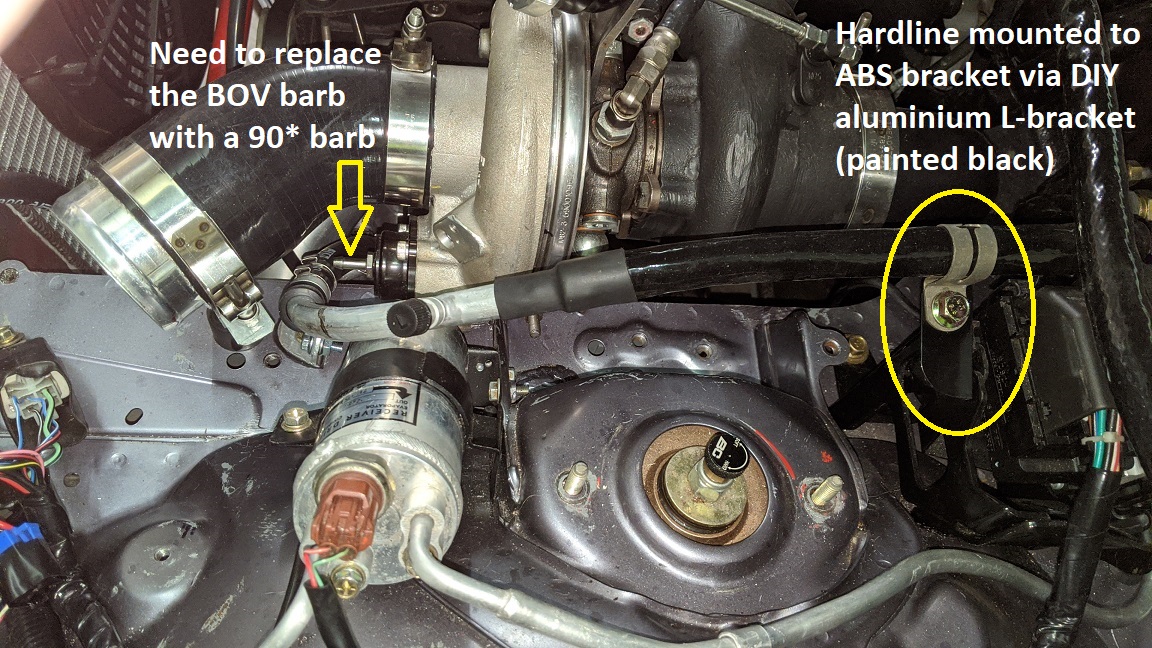
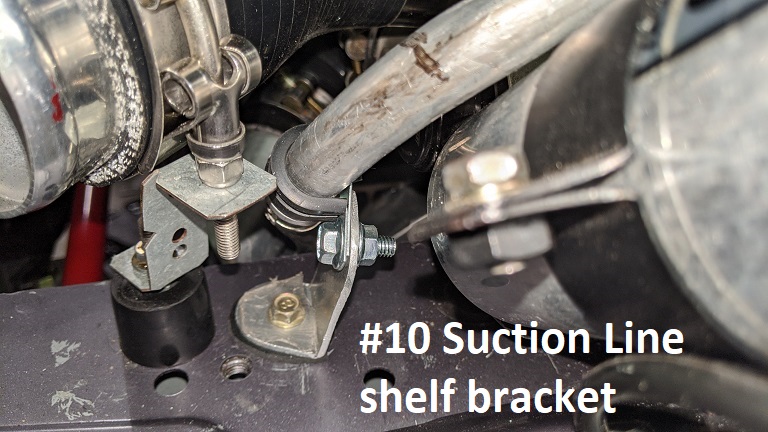
I made 2 brackets for the hardline, one connected to the shelf and one to the ABS bracket to ensure that it wouldn't move.
Getting the shelf bracket's angle correct took several attempts because it "gets quite busy there" (see 2nd and 3rd photos below; the shelf bracket's vertical section angles about 30* towards the passenger side).
The DIY aluminium L-bracket on the ABS bracket stuck out like dogs balls so I reshaped it to look more elegant and painted it black to make it "disappear", which worked really well:
Image
Image
Image
The #10 suction hose is quite short, ~ 200mm, so I really need to drive the car a lot without gassing up the A/C to ensure that it does provide enough flex.
I also need to order a 90* barb for the BOV because it currently exiits straight and is too close to the #10 hose for my liking.
FYI: The #10 hardline is very close to the Receiver/Drier but both are mounted to the chassis (or chassis brackets) so they won't move enough to make contact.

Underside view of A/C compressor barbs:
Image
Image

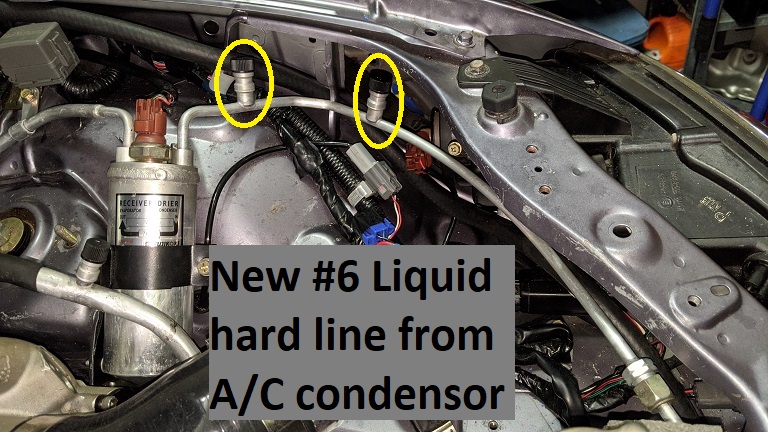
The new #6 liquid hard line from the condensor to the receiver/drier looks a bit better than my Frankenstein version :P
A few days after I dropped it off I thought that the valve may actually be too hard to access since it sat under the fender shelf and could actually be mounted outside my cold air box where it had plenty of access. I gave them a call and they told me it had already been made and they could simply add another barb one where I needed it to save me $$$ so I agreed (see circled barbs below; right one was the original barb):
Image

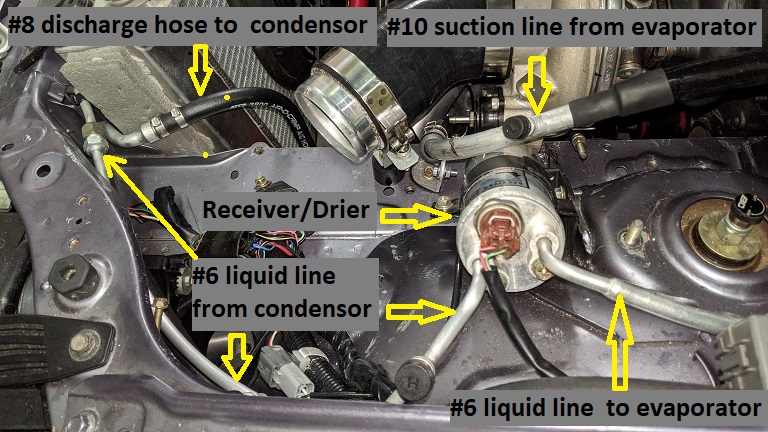
Here's a nice summary shot of all the A/C lines (A/C flow is anti-clockwise):
Image

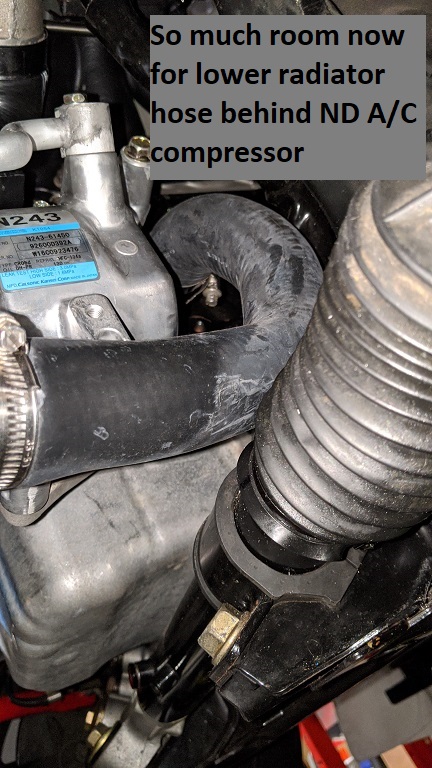
Every time I'm under the car these days I'm amazed at how simple the lower radiator hose routing is now and how much room is available (more so with the smaller ND compressor).
The reason for the OEM convoluted lower hose routing is that on LHD cars, the steering shaft is in the way so the hose needs to be routed around it - they SHOULD have had a separate RHD solution for the lower radiator hose:
Image
I can probably shorten the hose a bit to provide even more clearance from the steering rack.
Don't worry about dying, worry about not living!
Garage Thread: http://www.mx5cartalk.com/forum/viewtopic.php?f=57&t=76716

User avatar
Lokiel
Forum legend
Posts: 4126
Joined: Thu May 28, 2009 2:39 pm
Vehicle: NB SE
Location: Brisbania

Re: Lokiel's "Gina" (2004 Titanium SE)

Postby Lokiel » Sun May 24, 2020 10:20 pm

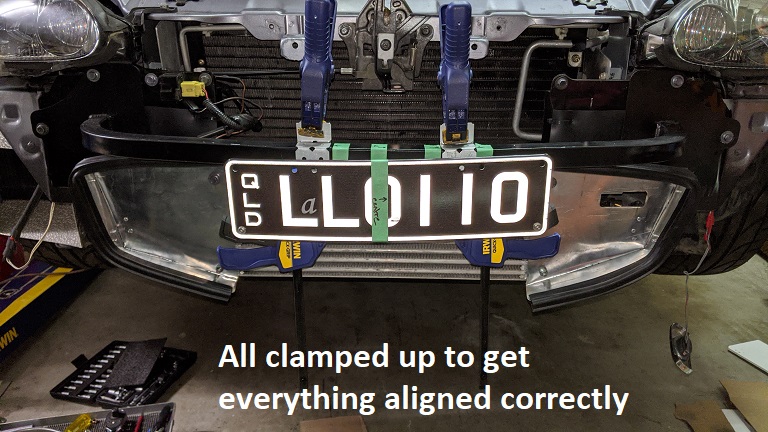
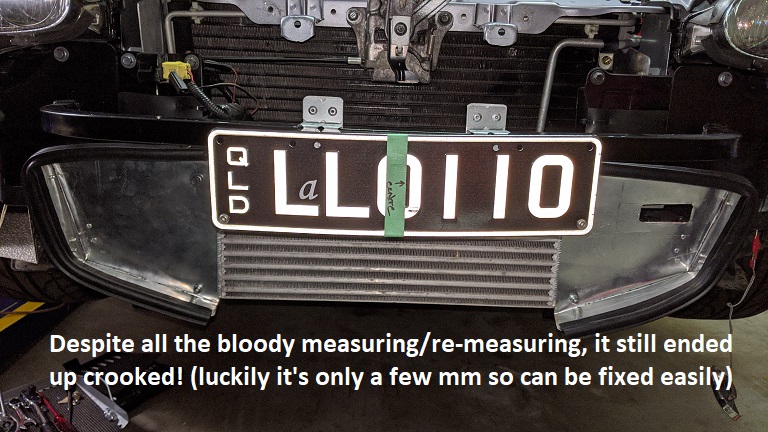
I really hate side-mounted number plates, to me they make the car look crooked so the only place to mount a centred number plate was to the new bar.

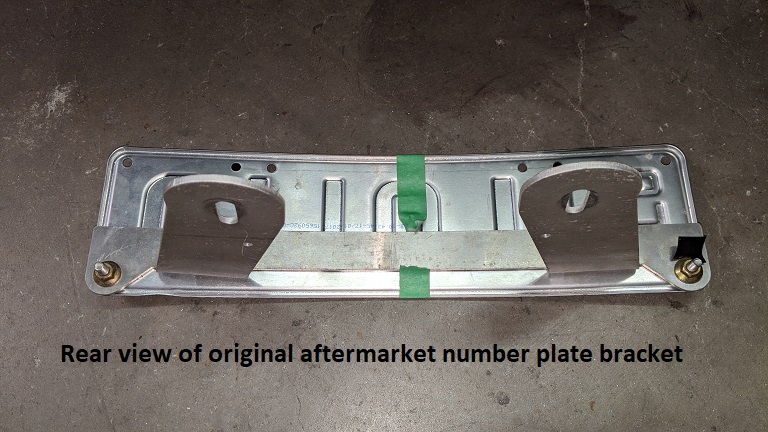
I didn't want to drill holes through the OEM bumper and noted that the rear of the new bar cleared the mounted OEM bumper so I could mount my existing aftermarket MX5-Plus number plate mount there somehow.
Image

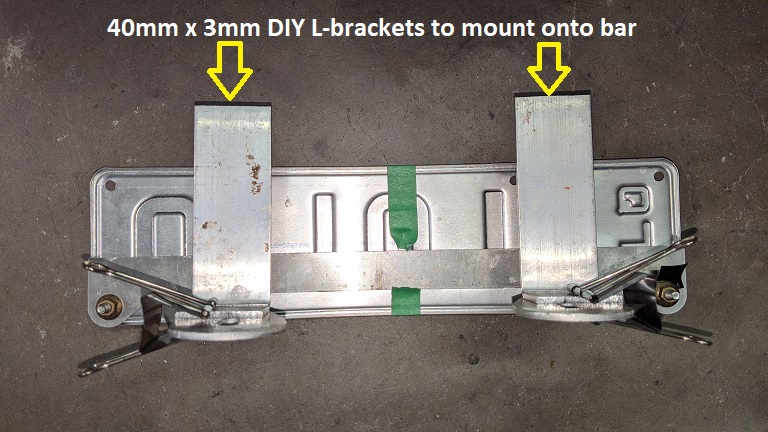
The green tape on the number plate was used as a reference point, the right edge (when viewed from the front) being the centre of the plate.

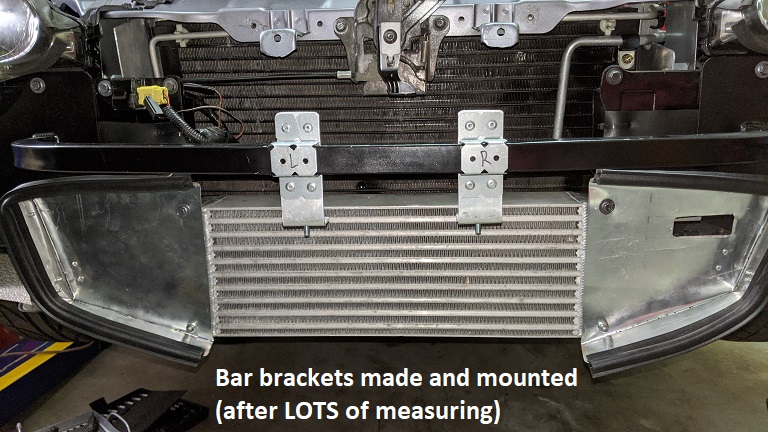
I made a couple of 40mm x 3mm aluminium L-brackets to mount to the existing number plate bracket and a couple of double-width galvanised brackets to wrap around the bar and mount the L-brackets to:

Image

Image

Image

I wrapped the bar with a couple of layers of black tape where the galvanised brackets attach to to give them some grip on the bar. With the aluminium rear brackets pop-riveted to them, they don't move/slide at all.

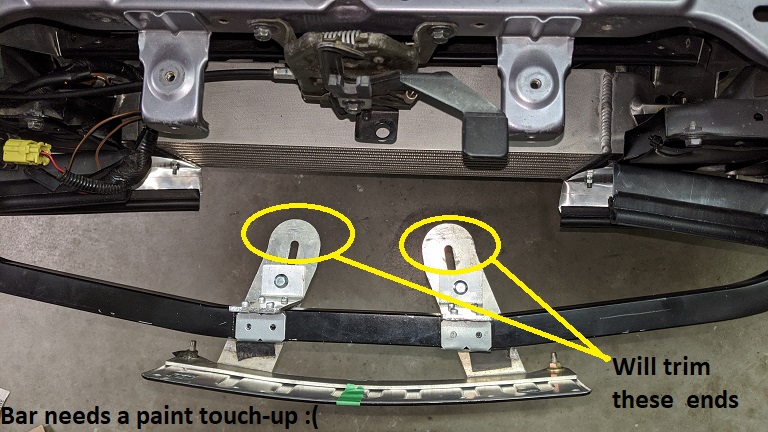
I spent a LOT of time measuring everything up, installing/removing the front bumper multiple times, only to find that it's slightly crooked. Luckily it's only by a few mm so can be easily fixed (hopefully just by bending the original bracket a bit):

Image

Image

I'm currently giving the bar a couple of resprays (painting the front of the galvanised brackets in the process) and will trim off the un-needed end sections of the original bracket.

Regarding the custom number plate for those who may be curious and noted it's no longer "04 MSM":

I didn't like the "04 MSM" number plate any more since there's very little left of the original MSM on my car (LSD, rocker cover, grey instrument cluster dials ... that's it).

I named my car "Gina", after Gina Lollobrigida (see first post).
Gina's nickname was "La Lollo".
The number plate "LLO110" is a "3x letter + 3x number" combination so wasn't insanely expensive.
"Someone" stuck the letter "a" sticker on the front and rear so it reads as "LaLollo".

If anyone wants the "04 MSM" plate in QLD, let me know, it's for sale cheap.
Don't worry about dying, worry about not living!
Garage Thread: http://www.mx5cartalk.com/forum/viewtopic.php?f=57&t=76716

User avatar
plohl
Racing Driver
Posts: 1922
Joined: Wed Oct 14, 2009 12:13 am
Vehicle: NA8
Location: Brisbane

Re: Lokiel's "Gina" (2004 Titanium SE)

Postby plohl » Mon May 25, 2020 10:50 pm

Wait, why does it need number plates? I thought this was a garage only build?
Cheers,
plohl

User avatar
Lokiel
Forum legend
Posts: 4126
Joined: Thu May 28, 2009 2:39 pm
Vehicle: NB SE
Location: Brisbania

Re: Lokiel's "Gina" (2004 Titanium SE)

Postby Lokiel » Tue May 26, 2020 1:32 pm

Image
Don't worry about dying, worry about not living!
Garage Thread: http://www.mx5cartalk.com/forum/viewtopic.php?f=57&t=76716

User avatar
bruce
Speed Racer
Posts: 7706
Joined: Fri Apr 25, 2003 11:00 am
Vehicle: NA8 - Turbo
Location: Victoria
Contact:

Re: Lokiel's "Gina" (2004 Titanium SE)

Postby bruce » Tue May 26, 2020 2:36 pm

H(istoric) plates are next...

User avatar
Lokiel
Forum legend
Posts: 4126
Joined: Thu May 28, 2009 2:39 pm
Vehicle: NB SE
Location: Brisbania

Re: Lokiel's "Gina" (2004 Titanium SE)

Postby Lokiel » Thu Jun 04, 2020 11:14 pm

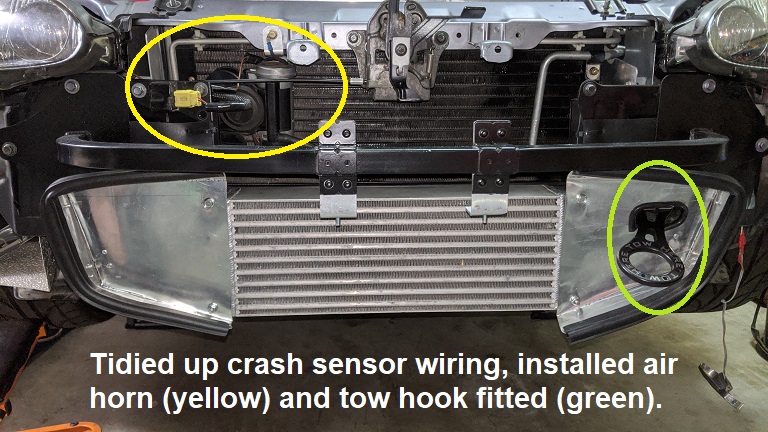
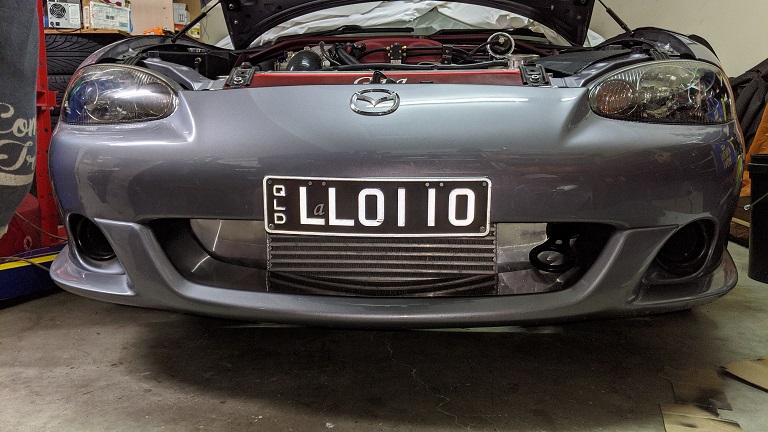
Tidied up the front crash sensor wiring, installed the air horn, tow hook, bumper and number plate:

Image

Image
... looks legit!

I stuffed a half-length Clarke Rubber foam roll under the intercooler to prevent any air escaping under it - not sure how long it'll last but it's cheap and I still have the other half to replace it when needed.

The enclosed cavity above and behind the intercooler is huge (you can stick your arm through the gap above the intercooler) so there'll be plenty of fresh air forced through the A/C condenser and radiator now.

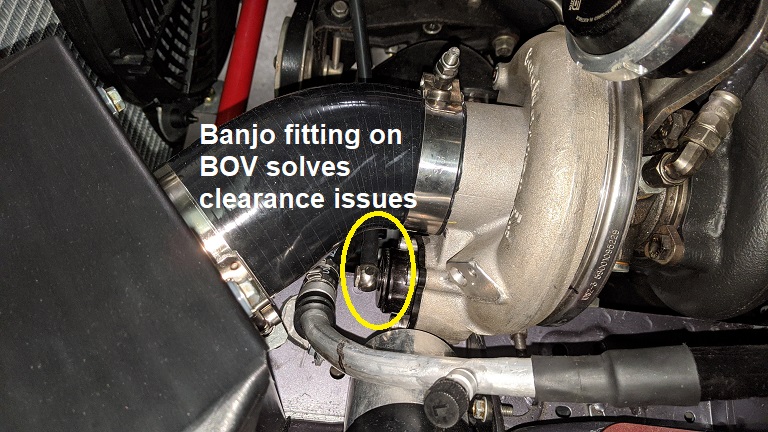
My TurboSmart BOV was using the straight barb and the hose was too close to the new A/C hose for my liking:
Image

The TurboSmart BOV comes with 2 barbs, a straight one and a banjo fitting but I couldn't find the banjo fitting anywhere so ordered a couple of M10 90* 6mm swivel barbs from eBay (I ordered 2 since S&H was more expensive than the cost of a single barb and it's always nice to have a spare).
Unfortunately for me, the swivel barbs use a M10x1 thread but the TurboSmart BOV needs a M10x1.25 thread - I'd just assumed that it needed an M10x1 thread :(
Needless to say I was p****d off and went on a search and destroy mission for the damned TurboSmart banjo fitting.
Eventually I found it (in a small plastic zip-lock bag with the original crappy EFR6258 BOV) and installed it:
Image
- much more clearance now and the hose was shortened too (always a good thing).

I installed the front strut brace to ensure that the #10 A/C hard line was OK (and try and figure out the shape for a heat shield):
Image

It's good to see the engine bay all back together again:
Image
- now I need to stop "dicking about" and tune/drive it!
Don't worry about dying, worry about not living!
Garage Thread: http://www.mx5cartalk.com/forum/viewtopic.php?f=57&t=76716

User avatar
ManiacLachy
Forum Guru
Posts: 3266
Joined: Mon Jan 13, 2014 2:35 pm
Vehicle: NB SE
Location: Brisbane

Re: Lokiel's "Gina" (2004 Titanium SE)

Postby ManiacLachy » Fri Jun 05, 2020 9:41 am

Looking good! The work you put into that engine bay really shows.

To me the silver block off plates around the intercooler really draw the eye and look obvious. Maybe less noticeable when viewed from a normal standing height though. But maybe painting them black would "disappear" them?

Does the wastegate canister sit taller than the strut bar? It's hard to tell from the photos, but if not that might indicate there'll be no clearance issues with the GV hood.

User avatar
Lokiel
Forum legend
Posts: 4126
Joined: Thu May 28, 2009 2:39 pm
Vehicle: NB SE
Location: Brisbania

Re: Lokiel's "Gina" (2004 Titanium SE)

Postby Lokiel » Fri Jun 05, 2020 3:38 pm

I laid a pine plank over the wastegate can and rested in on both fenders and it sits under it by about 2mm.
The top of the can is about 5mm below the top of the front strut brace.
I'm actually running out of space in the garage to make swapping hoods feasible :(

I'm not a fan of painting aluminium since it gets ratty very quickly - wrapping them in black vinyl is a good option though (with a flux-capacitor sticker on each side maybe?)
Don't worry about dying, worry about not living!
Garage Thread: http://www.mx5cartalk.com/forum/viewtopic.php?f=57&t=76716

User avatar
ManiacLachy
Forum Guru
Posts: 3266
Joined: Mon Jan 13, 2014 2:35 pm
Vehicle: NB SE
Location: Brisbane

Re: Lokiel's "Gina" (2004 Titanium SE)

Postby ManiacLachy » Fri Jun 05, 2020 4:13 pm

Sounds like the can will just scrape under. Let's hope your engine mounts are tight enough to prevent the engine movement from pushing the can higher.

Give me a shout, I'll come and help you with the hood swap if you need extra hands. You might need to put Gina nose out into the driveway for extra maneuvering room.

Vinyl wrap would be a good idea for the blocking plates. You could even do it body colour then! Easy to remove if it doesn't look right. They're probably too big to anodize?

The American
Forum Guru
Posts: 1525
Joined: Fri Jun 29, 2012 9:23 pm
Vehicle: NB8B - Turbo
Location: Brisbane, Qld. Previously Perth WA
Contact:

Compressor housing choice

Postby The American » Fri Jun 05, 2020 6:22 pm

If you did this again, would you consider the 90 degree compressor cover/housing? I will have a lot less stuff to navigate around with my pipework, with no AC to consider.

User avatar
Lokiel
Forum legend
Posts: 4126
Joined: Thu May 28, 2009 2:39 pm
Vehicle: NB SE
Location: Brisbania

Re: Lokiel's "Gina" (2004 Titanium SE)

Postby Lokiel » Fri Jun 05, 2020 7:14 pm

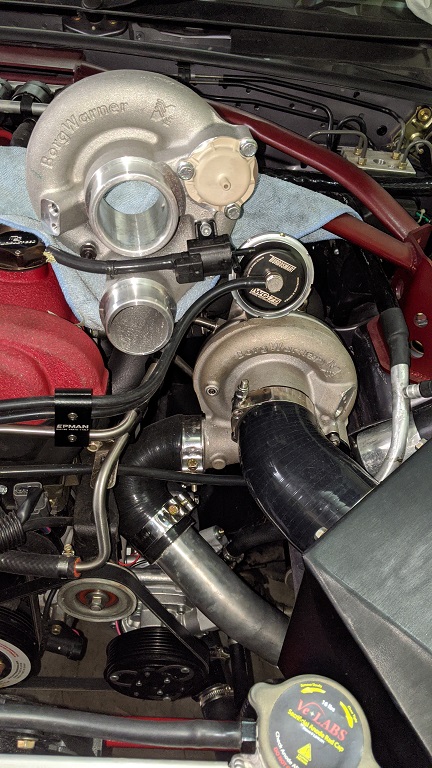
Like this?
Image

I bought the 90* compressor cover a while ago to see if it would help but didn't use it because, at the time I still had the NB A/C compressor fitted and I think that the OEM #8 hose to the front of the car was in the way and I wanted to keep it to save costs.

Thanks for bringing this up because I can now see with the new ND compressor's barb fittings and hose routes that I CAN use the 90* compressor cover (I probably could have used it with the NB compressor too if I got the #8 hose barb modified).
The BOV will sit above the A/C receiver/drier cannister instead of below it, as it does now.
I should be able to shorten the intercooler downpipe and connect it via a 90* coupler to eliminate that horrible 135* coupler.

You can see in the photo that the interior casting of the compressor outlet barb is SHITE (is not this bad on my current housing).
It's smooth inside the snail and intake barb but not the outlet barb so I'll have to do some filing/polishing before installing it.

Would it allow the P/S to be retained?
Don't know! (leaning towards a "maybe")

The 90* outlet is definitely the way to go if you want to route the coldside intercooler plumbing underneath WITH A/C.
WITHOUT A/C, you should just be able to orient the outlet straight down (less bends are better for flow).

Where I mounted the A/C receiver/drier cannister prevents me from mounting the EBC on the housing; without it, you could mount the EBC on the housing as Borg Warner intended.
Don't worry about dying, worry about not living!
Garage Thread: http://www.mx5cartalk.com/forum/viewtopic.php?f=57&t=76716

User avatar
Lokiel
Forum legend
Posts: 4126
Joined: Thu May 28, 2009 2:39 pm
Vehicle: NB SE
Location: Brisbania

Re: Lokiel's "Gina" (2004 Titanium SE)

Postby Lokiel » Sat Jul 10, 2021 11:27 pm

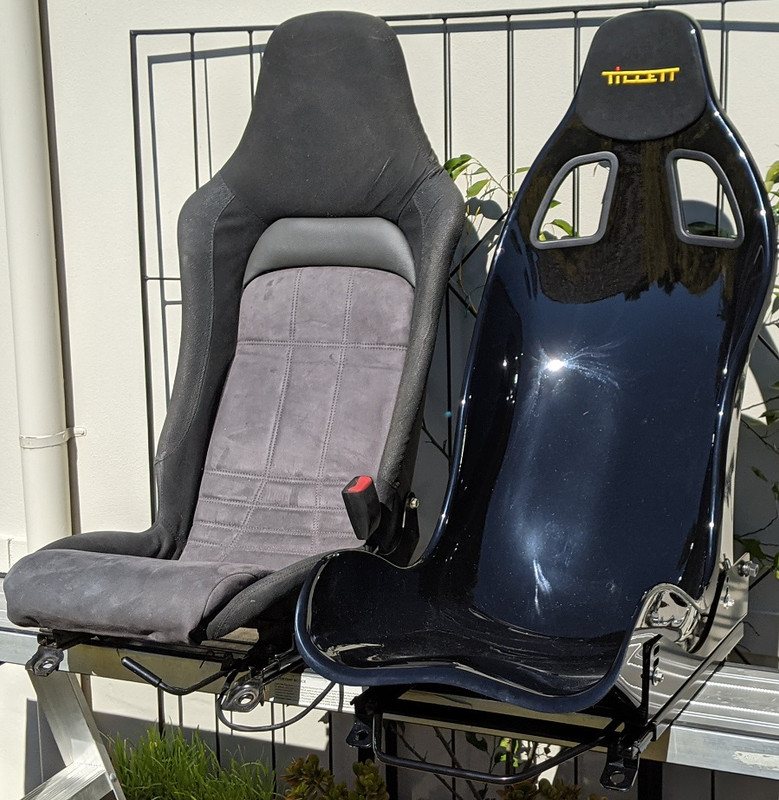
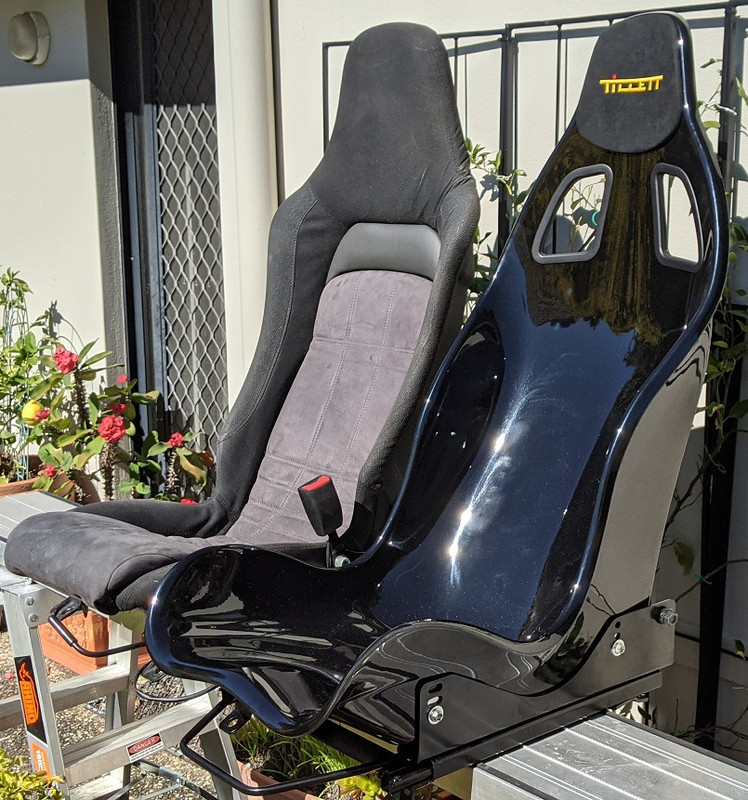
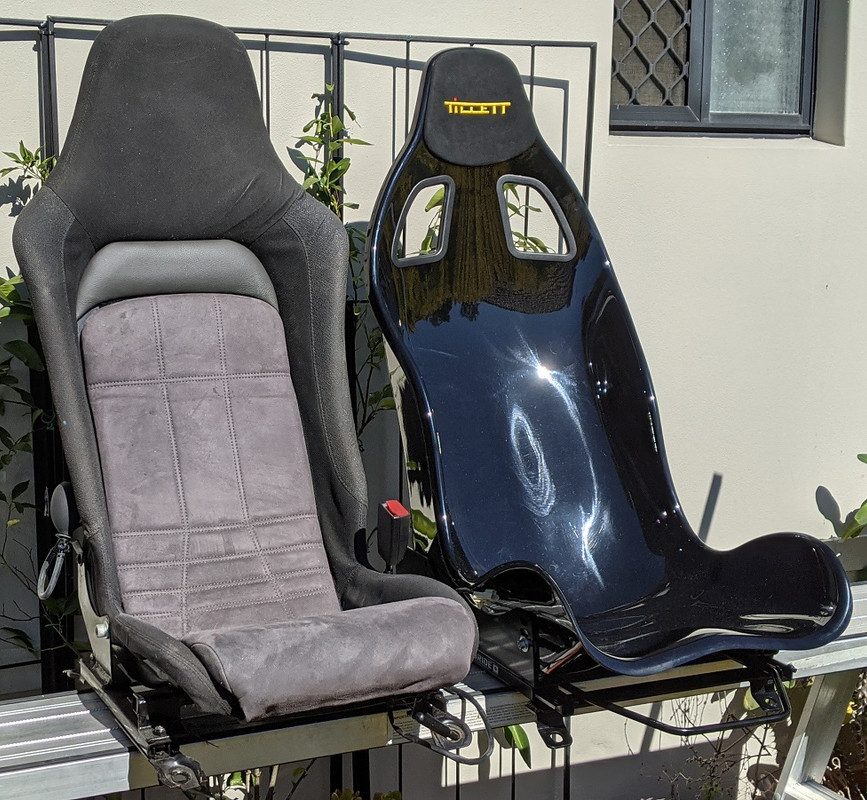
My Lotus seats don't really have any thigh support so I need to brace myself against the car using my knees through "the twisty-stuff".
I found too that the front low thigh ridges of the seat tend to cut diagonally across my hamstrings.
If I drove the car more I'd probably get used to it but after DD my comfy SP23 seats I decided I really wanted better - I'm at the extreme limit of the Lotus seats and not getting any smaller so I needed an alternative.

Lotus owners tend to upgrade to Tillett seats because they have better thigh support so that's what I figured I needed but the Tillett B5 was probably going to be too small.
Tillett recently released the B8 seat which they describe as an XL version of the B5 seat.
I looked at the specs and figured that I would fit into these seats and took a risk by ordering two of them from Demon Tweeks in the UK to save on S&H (I hate the look of mis-matched seats).
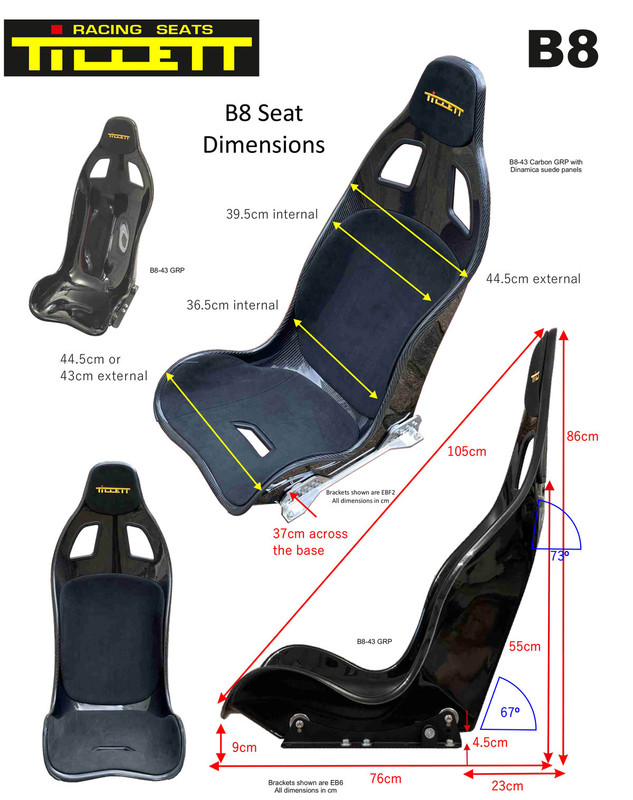
Image

The seats took 8 weeks to manufacture/deliver and arrived this week via UPS.
I had to pay Import Duty which UPS took care of for a ~A$10 fee and both seats arrived well-packed in a single box.
The seats are incredibly light so ordering two at once was definitely the correct decision.

I'd previously bought Mazda NA/NB Bride Lowmax seat mounts from Nengun Performance in Japan because, based on what I'd read on the forums, they accomodate just about any side-mounted seat and they're specific to the car so the seats are guaranteed to be angled correctly.
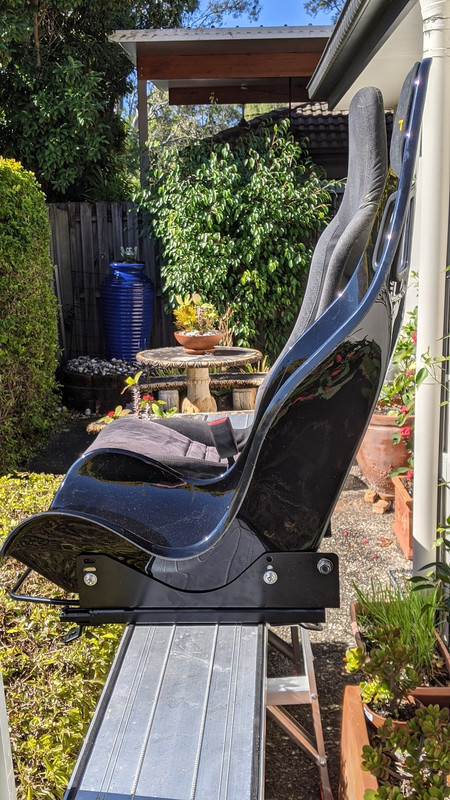
The Bride Lowmax mount has a slider and the side brackets that bolt to it provide 3x front and 3x mount points to angle the seat.
The side mounts also have a mount point for the OEM seatbelt.
Tillett's site doesn't give any advice on brackets for an MX5 so I wasn't going to risk paying for any that may not work and they're bloody expensive.
Getting a mod-plate for these seats+brackets should be trivial.

I don't like the look of carbon fibre so I ordered the slightly cheaper FRP seats which have a slick black finish.
The seats come with a thin headpad embroided with the Tillett logo.
You can also purchase a seat and backpad (see bottom left of picture above) but for ~A$300 per set I figured I can something made locally for that price.

The seats themselves are very comfortable but even Tillet recommend some padding for DD.

Comparison vs Lotus seats:
Image
Image
Image
Image

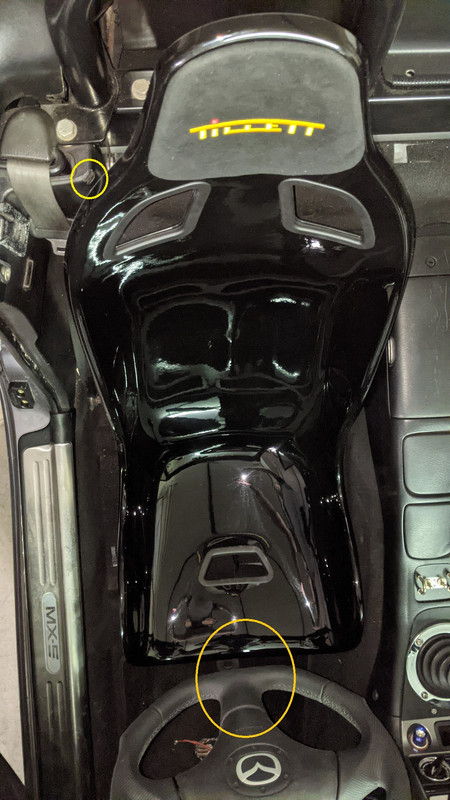
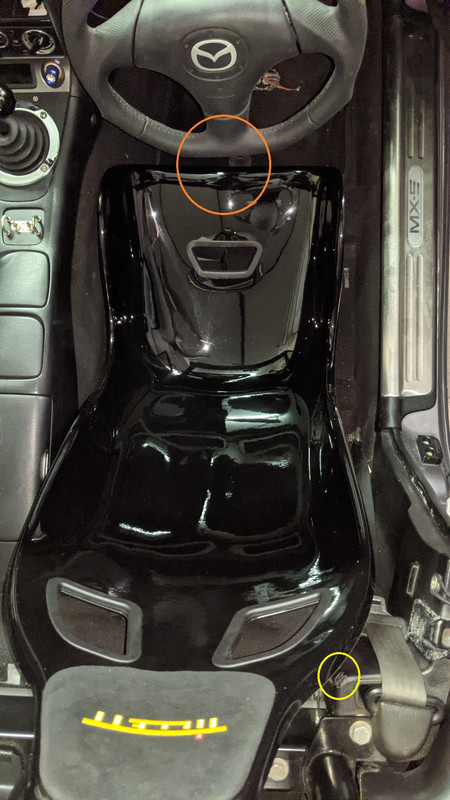
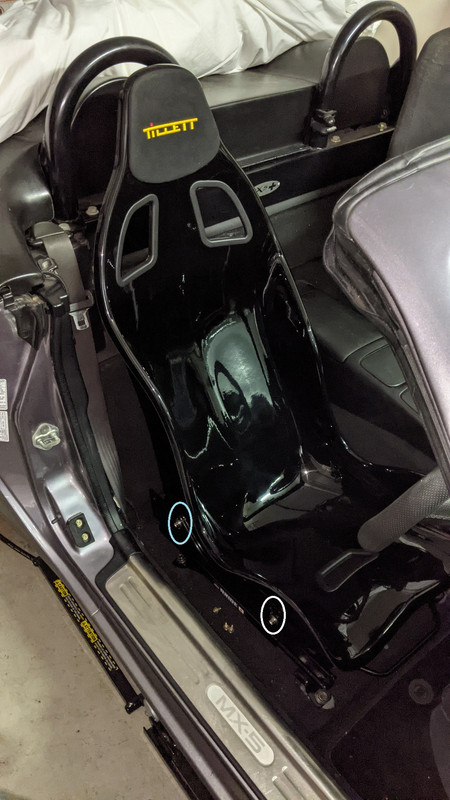
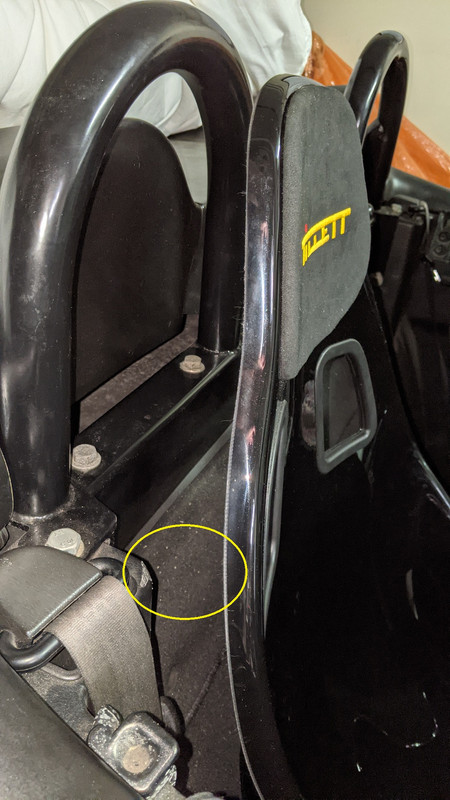
Mounted photos (using the middle of 3x rear side mounts and lowest of the 3x front mounnts - originally used lowest on front and rear but that reclined me too much).
The yellow circles in the photos below show how close the seat gets to the seatbelt mount rail (mine is worn from previos seats).
At its furthest-rear position, the seat sits ~ 10mm in front of it.
The orange circle shows that the seat is centred on the steering wheel (which wasn't quite straight when I took the photos).Image
Image
Image
Image

There's quite a lot of space on the right of the seat and the left side does not touch the transmission tunnel anywhere, even the fromt has ~10mm of clearance.
The OEM seatbelt mounts to the Bride Lowmax side-mount.

There's plenty of thigh support and they hold you well so they'll make a decent track seat but being deep with high thigh support makes getting in and out of them harder so just as well it's NOT a DD!

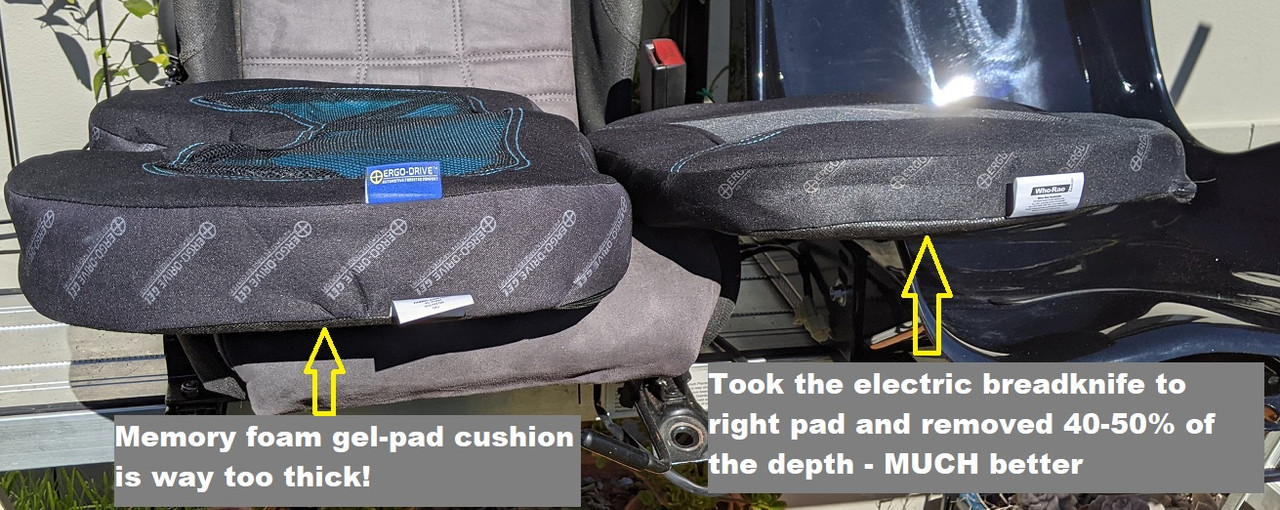
During the week I bought a couple of gel+memory foam seat cushions, lumbar support and a couple of seat pads from Autobarn.
The memory foam lumbar support was too thick.
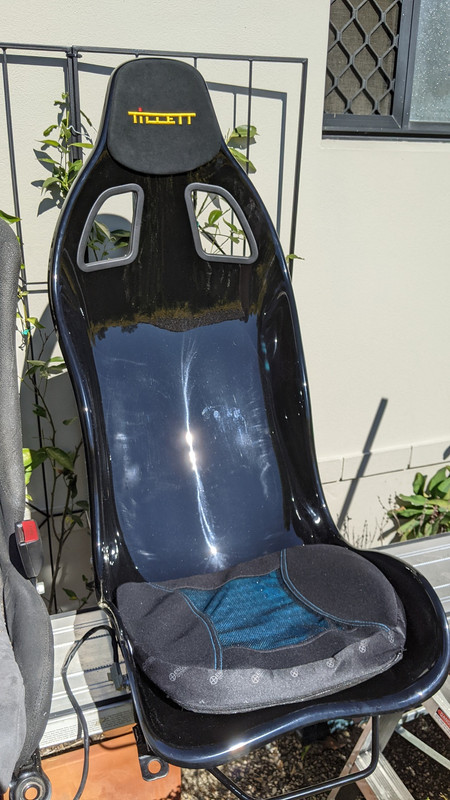
The gel+memory foam seat cushions were too thick so I cut one down to ~50% depth with an electric bread knife and it's MUCH better, I could drive long distances with this comfortably.
Tillet is correct in stating that you don't need much padding to make these seats more comfortable for DD.
Image
Image

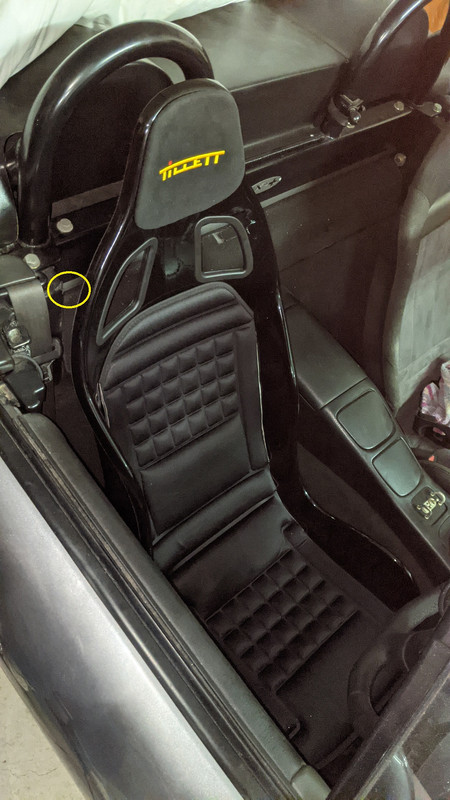
The best one was the one I originally thought wasn't deep enough. It was too wide so I cut the edges off and it's quite comfortable:
Image

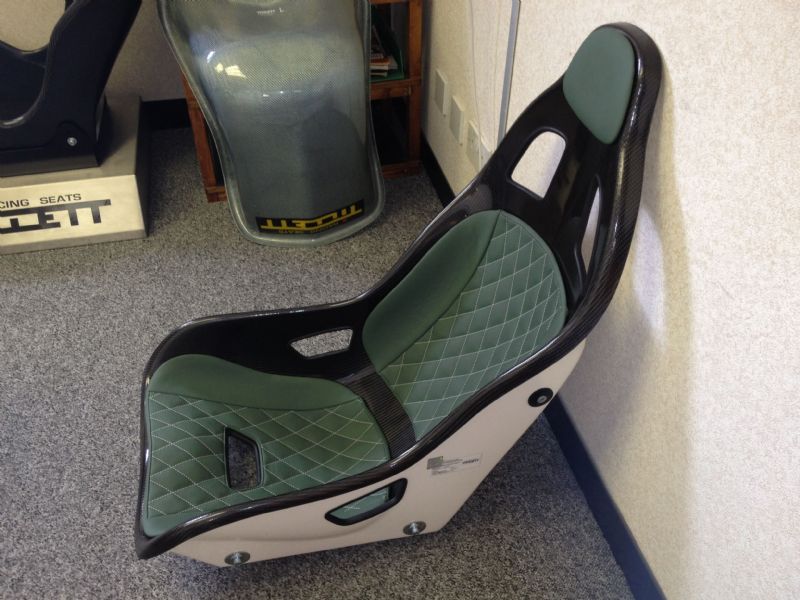
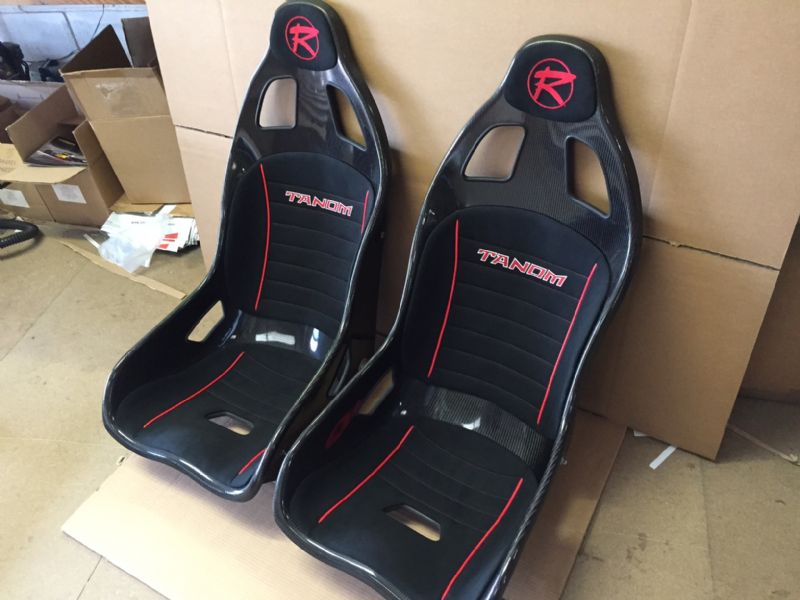
I plan to get some custom+local padding, preferably similar to the following but in titanium grey of course with possibly a "Gina" custom emroided headrest:
Image
Image

Lachlan came over today to collect a few turbo brackets and wastegate actuators and got to check out the seats, which gave me the motivation to fit one, otherwise I'd have waited until I got the padding fitted.

Hopefully will get time tomorrow to post some of the other stuff I've been doing...
Don't worry about dying, worry about not living!
Garage Thread: http://www.mx5cartalk.com/forum/viewtopic.php?f=57&t=76716


Return to “MX5 Garage Chat”

Who is online

Users browsing this forum: No registered users and 190 guests