Lokiel's "Gina" (2004 Titanium SE)
Moderators: timk, Stu, -alex, miata, StanTheMan, greenMachine, ManiacLachy, Daffy, zombie, Andrew, The American, Lokiel
- Lokiel
- Forum legend
- Posts: 4126
- Joined: Thu May 28, 2009 2:39 pm
- Vehicle: NB SE
- Location: Brisbania
Re: Lokiel's "Gina" (2004 Titanium SE)
^
I suspect that originally my fittings kit came with the same 4x male quick-connect fittings and needed the 2x straight barbs to connect to the power unit. Later they realised they could integrate the 2x barb fittings into 2 of the male quick connect fittings to improve reliability and save money. The integrated quick connect fittings fit in the existing fittings packaging so they didn't need to change the packaging, leaving 2 spare spots in the packaging that were originally occupied by the 2x straight fittings.
I suspect that originally my fittings kit came with the same 4x male quick-connect fittings and needed the 2x straight barbs to connect to the power unit. Later they realised they could integrate the 2x barb fittings into 2 of the male quick connect fittings to improve reliability and save money. The integrated quick connect fittings fit in the existing fittings packaging so they didn't need to change the packaging, leaving 2 spare spots in the packaging that were originally occupied by the 2x straight fittings.
Don't worry about dying, worry about not living!
Garage Thread: http://www.mx5cartalk.com/forum/viewtopic.php?f=57&t=76716
Garage Thread: http://www.mx5cartalk.com/forum/viewtopic.php?f=57&t=76716
-
Magpie
- Speed Racer
- Posts: 7468
- Joined: Fri Feb 11, 2011 12:49 pm
- Vehicle: NA6
- Location: Purga, QLD
- KevGoat
- Speed Racer
- Posts: 3976
- Joined: Sun Jun 17, 2012 8:48 pm
- Vehicle: NB SE
- Location: Down South, Adelaide, SA
Re: Lokiel's "Gina" (2004 Titanium SE)
Wouldn't it be nice to be able to actually buy something that works straight off these days ??
Sent from my SM-G930F using Tapatalk
Sent from my SM-G930F using Tapatalk
- Lokiel
- Forum legend
- Posts: 4126
- Joined: Thu May 28, 2009 2:39 pm
- Vehicle: NB SE
- Location: Brisbania
Re: Lokiel's "Gina" (2004 Titanium SE)
After a few phone calls and e-mails containing photos to clarify exactly what QuickJACK fittings I'd received and what I SHOULD have received, my 2 new quick connect male-male fittings between the pump and hose arrived the next day - damn good service.
Fittings kit as it SHOULD have been:
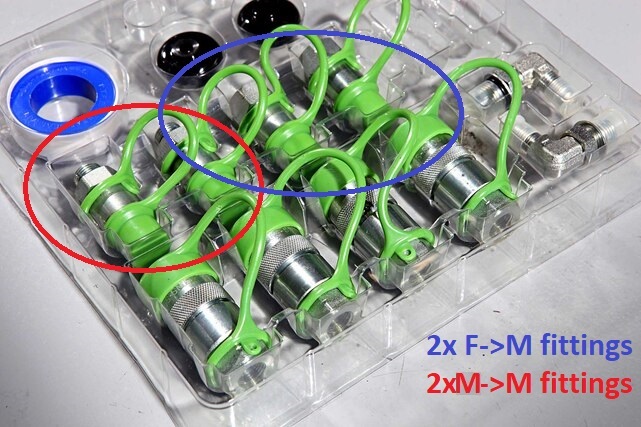
I'd receieved 4x F-M fittings rather than 2x F-M fittings and 2x M-M fittings.
Male hose to male pump quick connector:
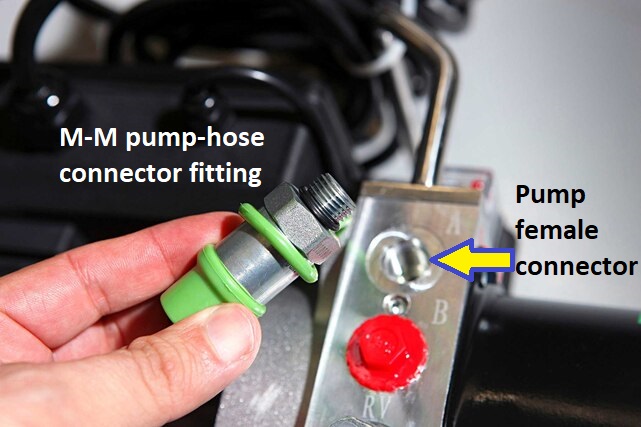
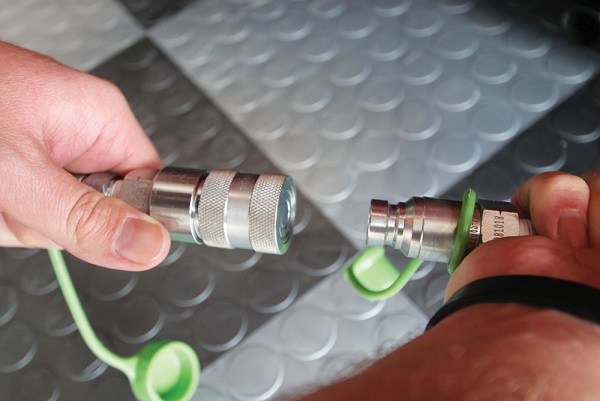
The quick connect fittings require quite a lot of force to connect once full of hydraulic fluid so if you're planning on a LOT of wrenching by hand, or it's just a quick job, you might want to leave them connected while working on the car.
At any rate, connect them first to the pump to relieve some pressure, then to the jacks.
I'd watched several videos about the assembly of the QuickJACK so when raising it initially, I wasn't surprised that it took a LONG time pressing on the UP button before there was any movement at all.
After the initial movement, they move upward in small jerking movements.
Pressing the Down button didn't do anything at all unless I put some weight on the jacks - I just used light pressure using my foot.
The instructions say to fill the air cannisters to 40-50psi but no more so I tried to get as close to 50psi as possible, but only managed 47psi no matter how many attempts I made.
Maybe with the full 50psi the ramps would have gone down on their own but it was a common comment in the reviews too that the jacks need weight on them to go down.
After bleeding the air from the hydraulic pumps, the ramps went up very smoothly and quickly.
At that point I was happy to stand on the ramps and go up and down several times, including all the way to full height.
With my full bodyweight on the jacks, they went down smoothly, evenly if I balanced on both ramps, faster on one if more of my weight was on it.
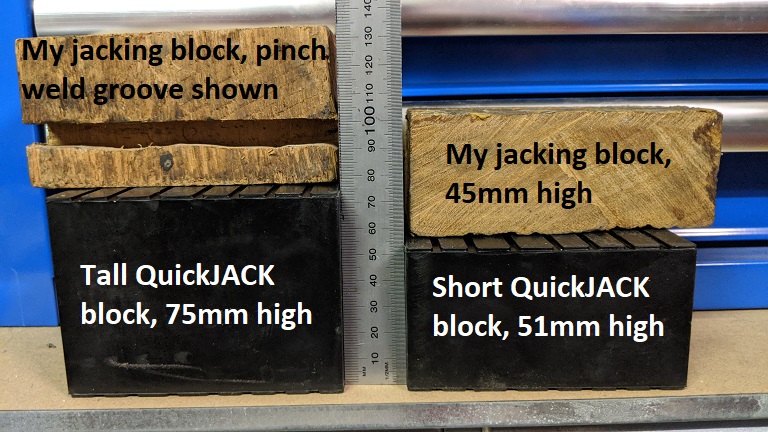
The QuickJACK comes with 2 sets of rubber blocks, 4x tall ones and 4x short ones.
I've ordered a set of pinch weld blocks too since I prefer to use blocks that accomodate them and don't damage the pinch welds.

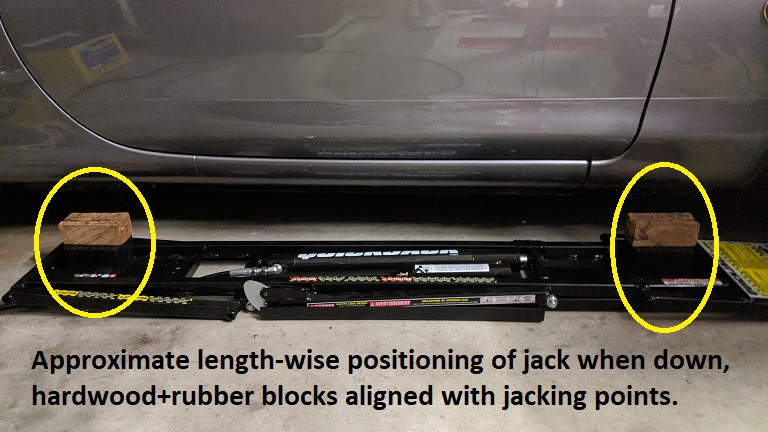
With the jacks under the car, I can fit the shorter rubber blocks and slide my DIY hardwood blocks on top along the pinch weld which makes the alignment with the jacking points very easy:
Jacks raised to half-way locking point (380mm ground to pinch weld):

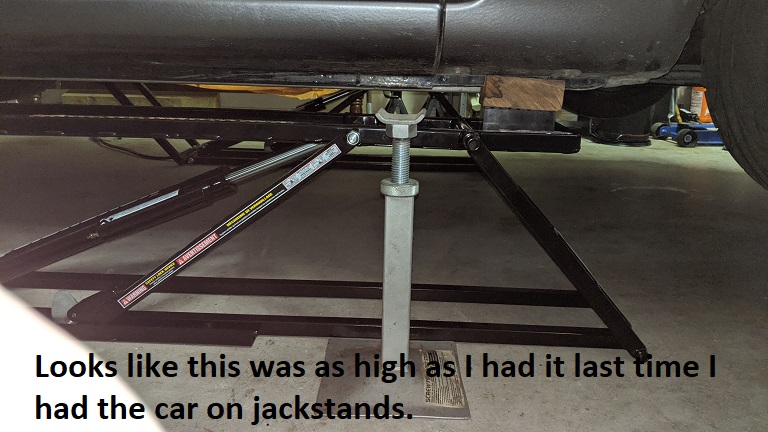
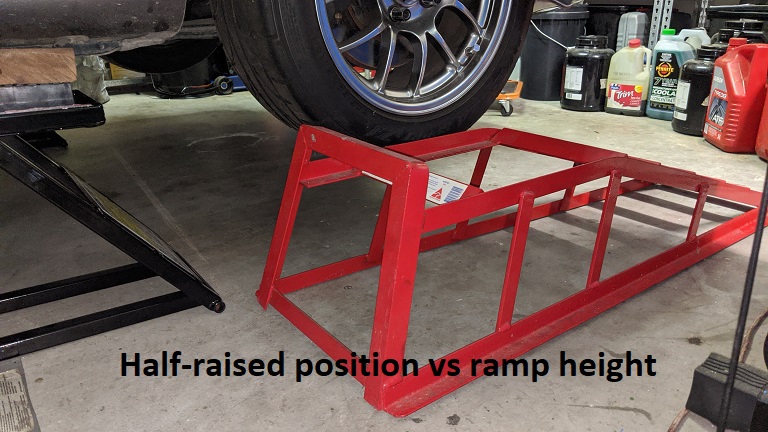
This height is useful to get under the car and still work in the engine bay - it was also about the height I was using last time I worked on the car (I always put a hardwood block on top of the stand).
Jacks raised to full locking point (475mm ground to pinch weld):
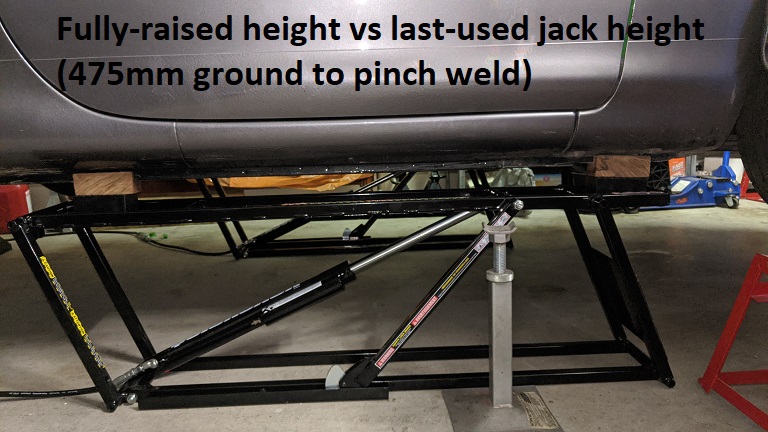

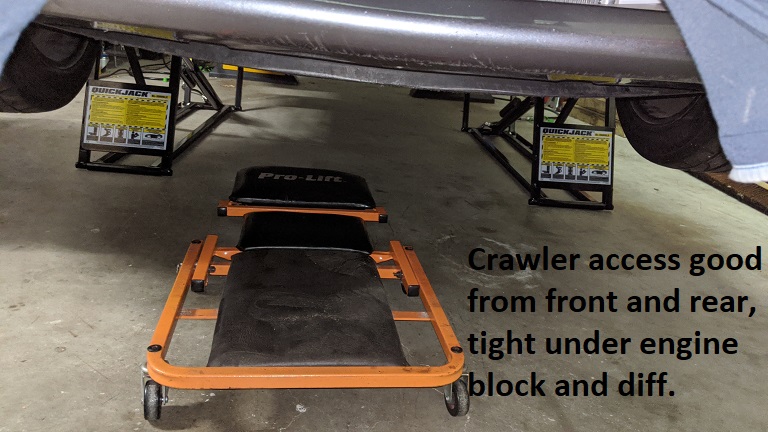
This height is great, I can actually roll over while under the car but it's too high to work in the engine bay for a "short-arse" like me.
I can go from front to back of the car on my crawler but it's too tight to be practical directly under the engine bay or gearbox with all the MSM bracing installed - skinny guys would probably be OK though.
One thing to be aware of with the QuickJACK is that it hinges forwards so when fully raised, you'll lose about 400mm of space in front of the car - park as close to the rear of the garage if you need the space in the front.
Depending on which end of the car I'm working under, I'll probably still place my ramps under the wheels at that end - should never be too confident when working under a car on your own.
The kit also comes with 2x manoeuvreing handles which are really only needed if you intend to leave the jacks together UNDER your car so that you can pull then out - the jacks are easy enough to slide in and jiggle about by hand to line them up.

Now I need to find a place in my garage to mount the jacks away out of use.
One of the best solutions is to stand them upright on their wheels and chain them at the top to a wall fitting so that's on my "ToDo" list.
I think every DIYer would love these jacks but they are expensive
For my MX5, I hate jacking up the rear because I have a Beatrush PPF brace so cannot easily jack up the car from "the pumpkin" without using a specially shaped chunk of hardwood on my jack that falls off easily.
For my SP23, I hate jacking the car up from the front because the jacking point is so far back and difficult to find without pre-jacking the car with a scissor lift quite high.
The QuickJACK makes jacking both cars up easy.
Wish I'd bought this years ago!
Fittings kit as it SHOULD have been:

I'd receieved 4x F-M fittings rather than 2x F-M fittings and 2x M-M fittings.
Male hose to male pump quick connector:

The quick connect fittings require quite a lot of force to connect once full of hydraulic fluid so if you're planning on a LOT of wrenching by hand, or it's just a quick job, you might want to leave them connected while working on the car.
At any rate, connect them first to the pump to relieve some pressure, then to the jacks.

I'd watched several videos about the assembly of the QuickJACK so when raising it initially, I wasn't surprised that it took a LONG time pressing on the UP button before there was any movement at all.
After the initial movement, they move upward in small jerking movements.
Pressing the Down button didn't do anything at all unless I put some weight on the jacks - I just used light pressure using my foot.
The instructions say to fill the air cannisters to 40-50psi but no more so I tried to get as close to 50psi as possible, but only managed 47psi no matter how many attempts I made.
Maybe with the full 50psi the ramps would have gone down on their own but it was a common comment in the reviews too that the jacks need weight on them to go down.
After bleeding the air from the hydraulic pumps, the ramps went up very smoothly and quickly.
At that point I was happy to stand on the ramps and go up and down several times, including all the way to full height.
With my full bodyweight on the jacks, they went down smoothly, evenly if I balanced on both ramps, faster on one if more of my weight was on it.
The QuickJACK comes with 2 sets of rubber blocks, 4x tall ones and 4x short ones.
I've ordered a set of pinch weld blocks too since I prefer to use blocks that accomodate them and don't damage the pinch welds.

With the jacks under the car, I can fit the shorter rubber blocks and slide my DIY hardwood blocks on top along the pinch weld which makes the alignment with the jacking points very easy:


Jacks raised to half-way locking point (380mm ground to pinch weld):


This height is useful to get under the car and still work in the engine bay - it was also about the height I was using last time I worked on the car (I always put a hardwood block on top of the stand).
Jacks raised to full locking point (475mm ground to pinch weld):


This height is great, I can actually roll over while under the car but it's too high to work in the engine bay for a "short-arse" like me.
I can go from front to back of the car on my crawler but it's too tight to be practical directly under the engine bay or gearbox with all the MSM bracing installed - skinny guys would probably be OK though.
One thing to be aware of with the QuickJACK is that it hinges forwards so when fully raised, you'll lose about 400mm of space in front of the car - park as close to the rear of the garage if you need the space in the front.
Depending on which end of the car I'm working under, I'll probably still place my ramps under the wheels at that end - should never be too confident when working under a car on your own.
The kit also comes with 2x manoeuvreing handles which are really only needed if you intend to leave the jacks together UNDER your car so that you can pull then out - the jacks are easy enough to slide in and jiggle about by hand to line them up.

Now I need to find a place in my garage to mount the jacks away out of use.
One of the best solutions is to stand them upright on their wheels and chain them at the top to a wall fitting so that's on my "ToDo" list.
I think every DIYer would love these jacks but they are expensive
For my MX5, I hate jacking up the rear because I have a Beatrush PPF brace so cannot easily jack up the car from "the pumpkin" without using a specially shaped chunk of hardwood on my jack that falls off easily.
For my SP23, I hate jacking the car up from the front because the jacking point is so far back and difficult to find without pre-jacking the car with a scissor lift quite high.
The QuickJACK makes jacking both cars up easy.
Wish I'd bought this years ago!
Don't worry about dying, worry about not living!
Garage Thread: http://www.mx5cartalk.com/forum/viewtopic.php?f=57&t=76716
Garage Thread: http://www.mx5cartalk.com/forum/viewtopic.php?f=57&t=76716
- Lokiel
- Forum legend
- Posts: 4126
- Joined: Thu May 28, 2009 2:39 pm
- Vehicle: NB SE
- Location: Brisbania
Re: Lokiel's "Gina" (2004 Titanium SE)
With the Covid-19 shutdowns I've had some time to do a few jobs on the car again.
This meant completing the A/C since I wasn't happy with the lines mounted to the compressor, I needed separate barbs between the compressor and hoses and it was almost impossible to tighten them.
Kooler Car Air Conditioning in Geebung, QLD, make custom fittings so I contacted them about what I needed and they asked me to bring in my A/C hoses and compressor.
This meant taking off the front bumper to remove the 8-sized hose from the radiator.
With the front bumper off, and time on my hands, I started to think about ducting...
Years ago when I first bought my MSM, I replaced the token OEM intercooler with a real one from eBay.
I was concerned with how much the eBay intercooler blocked airflow to the A/C heat exchanger and radiator so I bought the Begi Air Scoop and installed it:

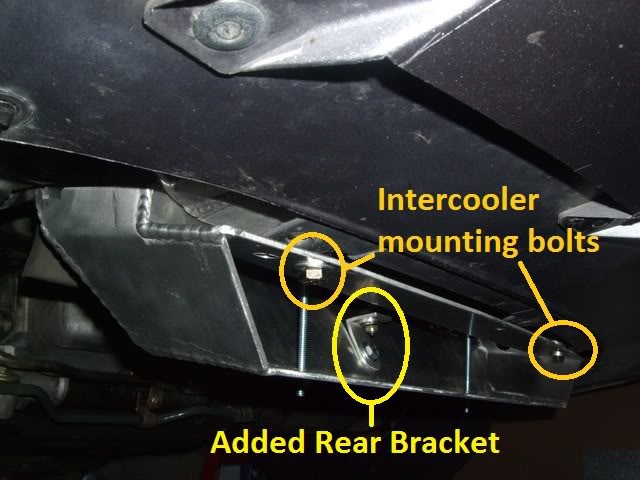
The scoop hangs dangerously low for DD and many people pointed out that while it would help with cooling the A/C heat exchanger and radiator with the extra air, it would also make the intercooler less efficient because there was now additional positive pressure behind the intercooler because of the extra air.
- so out it came!
Years later I installed a 300HP Fab9 Intercooler, TSE radiator, radiator top-sealing panel and SPAL fan and started to think about ducting.
I also bought two of MT.net's matrussell122 Radiator Support Bar (see https://www.miataturbo.net/miata-parts-sale-trade-5/radiator-support-bars-more-airflow-cooling-99508/) in preparation for it (the bar was cheap and I figured I could split the cost of S&H with someone because there was little difference between 1 or 2 since they fit in the same box).
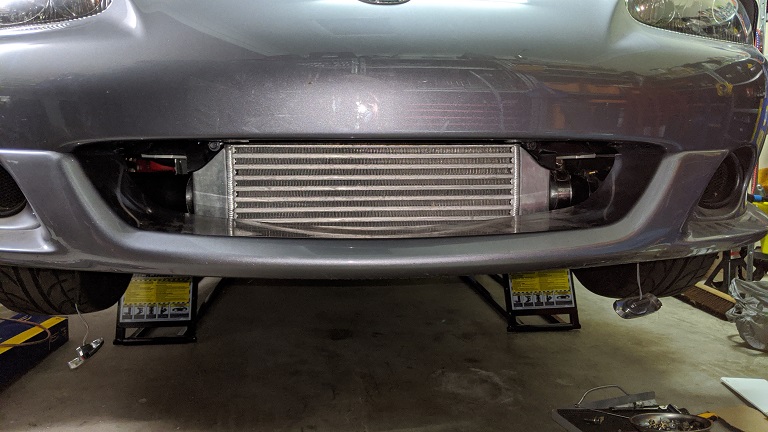
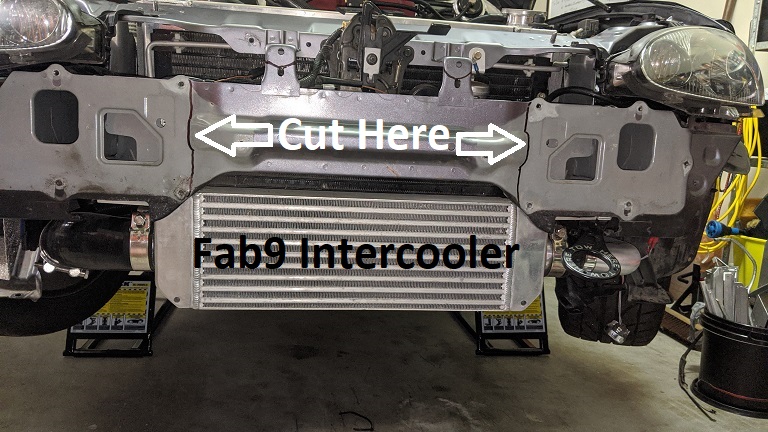
Here's the front view of my MSM with the Fab9 intercooler installed.
Note how the intercooler dominates the intake and there are large gaps on the left and right hand side.
From underneath the car, you can see massive gaps between the intercooler and TSE radiator and between the OEM intercooler mounting bar and the bumper:
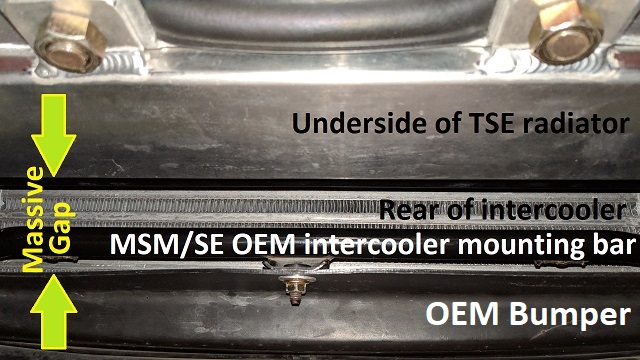
I began thinking about those gaps and thought "Why not create a chamber between the intercooler and A/C heat exchanger and exit the intercooler air under the radiator?".
The advantages of doing this are:
1. There is no pressure behind the intercooler so air can pass easier through the intercooler, making it more efficient
2. Only fresh air will flow into the chamber between the intercooler and A/C heat exchanger (this is air that flows over the intercooler) so will not be pre-heated by the intercooler
3. Air passing through the radiator will only need to pass through the A/C heat exchanger
The OEM front engine bay brace had to go which was accounted for with my Ryobi grinder (with cutting wheel) and Ryobi reciprocating saw (only the 2nd time I've actually used it):

View from above:

The remnants of the OEM front plates were painted black to match the bar and coat the newly cut edges.
I don't weld so I thought "Why not bolt a stainless steel square bar across the top for added stiffening and to mount stuff from?":
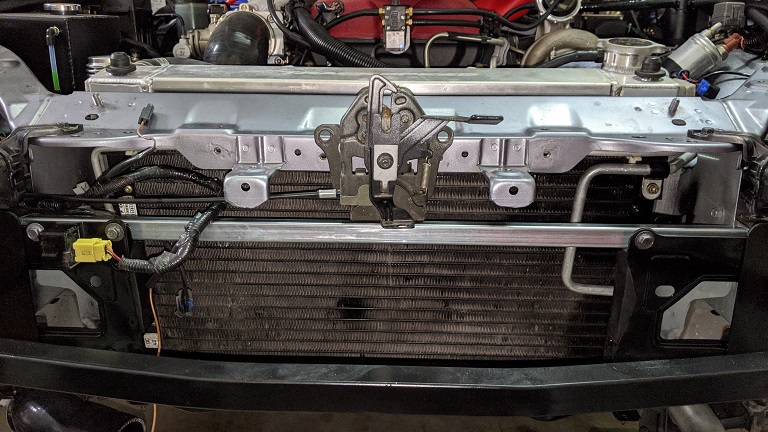
Unfortunately the hood latch hangs too low - in this photo, the bar I was going to add is actualy positioned behind the hood latch.
So that's not an option and the amount of additional rigidity it supplied was questionable anyway.
I want to retain the OEM hood latch because a few years ago at Lakeside I noticed Bitrusty's SP only had Aerocatch hood pins and the leading edge of his bonnet could be seen rippling as it approached.
I started with the two side panels and dividing panel whose top edge leans against the intercooler and the bottom is mounted to the MSM's OEM intercooler mounting bar:
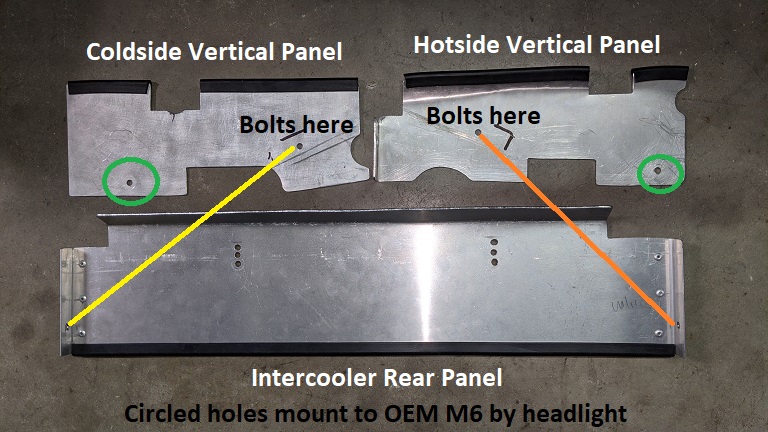
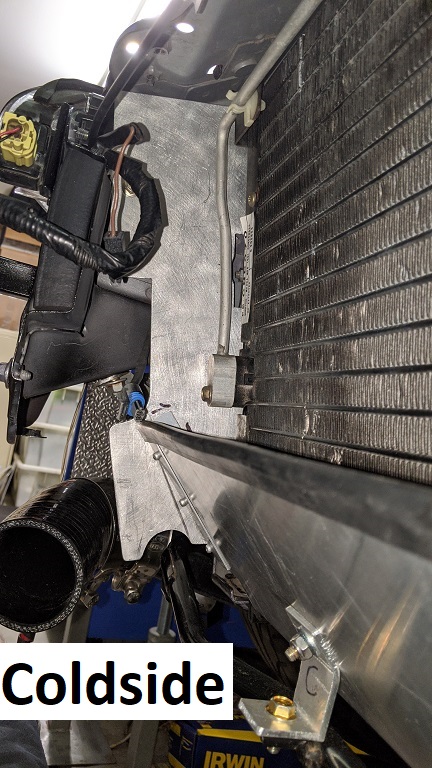

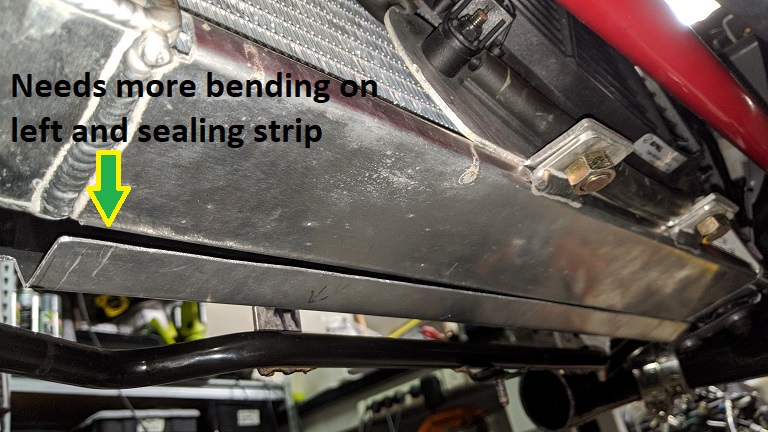

FYI: The large cutout at the front edge of the coldside panel is needed to accommodate the IAT sensor mounted in the intercooler tank.
Getting to this point took FOREVER, it took ages to get all the cutouts and angles right.
The panels are 2.5mm aluminium and the aluminium brackets on the bottom are made from pre-formed 3mm aluminium L-bar.
The top side panels were attached to an OEM M6 bolt near the headlight using galvanised brackets (I was over making custom aluminium brackets by now, these are easy to cut+bend to size and the bend is not as brittle as an aluminium 90* bend):
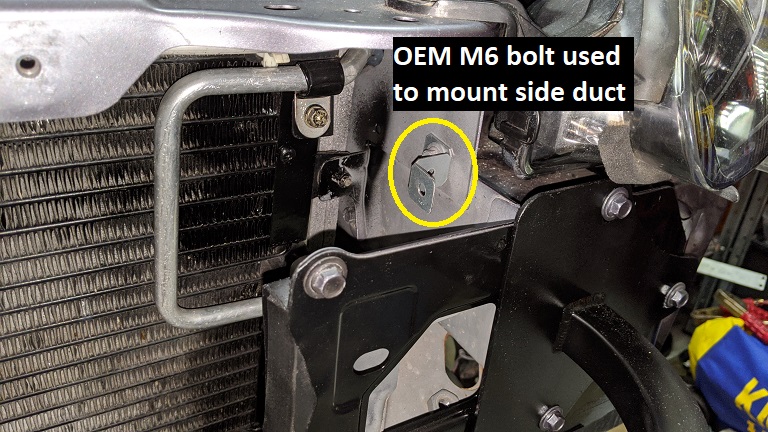
While I was doing this, I cleaned up some rust on my A/C heat exchanger and sprayed it with rustproofing black paint (I didn't mask everything off as well as I should've so there's lots of overspray).
I added a couple of "Elephant Ears" to block off the gaps on the left and right side of the intercooler:

These panels are only 1mm thick and I used the same pre-formed 3mm aluminium L-bar to make brackets for the lower outer mounts so that they don't flex much.
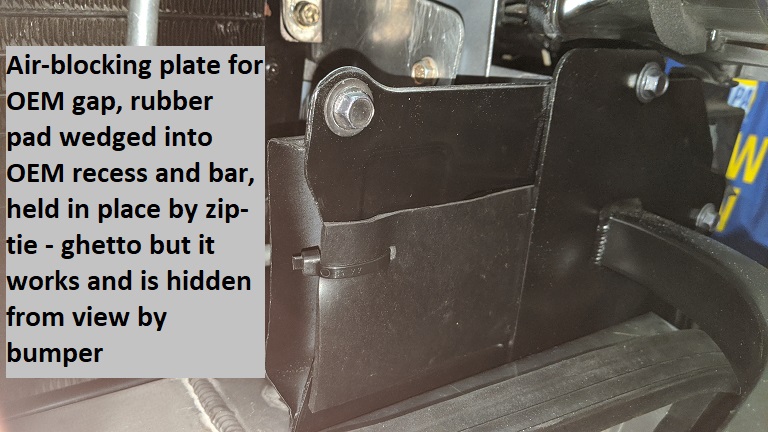
To block the OEM front plate gaps, I went for a simple ghetto mod:
Here's how it looks with the front bumper fitted (not as bad as I feared so I doubt I'll paint or add black vinyl cladding to the panels):
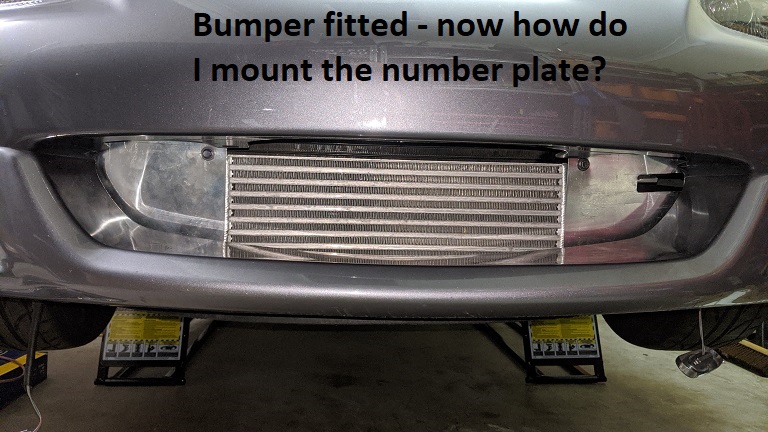
There's a gap below the intercooler and bumper which I'll need to fill with foam but apart from that, all incoming air should be funelled through the intercooler or A/C heat exchanger+radiator.
Mounting my number plate is the next challenge - it'll probably require DIY brackets to the new radiator bar (I plan on clamping it to the bar rather than drilling into the bar).
If anyone has any ideas, please let me know.
I also thought about welding some mount points to the top of the intercooler but it's a long way from the car's bumper so the bracket would bounce a lot.
It's a pity we can't have stick-on front number plates
So is this a reasonable ducting solution?
This meant completing the A/C since I wasn't happy with the lines mounted to the compressor, I needed separate barbs between the compressor and hoses and it was almost impossible to tighten them.
Kooler Car Air Conditioning in Geebung, QLD, make custom fittings so I contacted them about what I needed and they asked me to bring in my A/C hoses and compressor.
This meant taking off the front bumper to remove the 8-sized hose from the radiator.
With the front bumper off, and time on my hands, I started to think about ducting...
Years ago when I first bought my MSM, I replaced the token OEM intercooler with a real one from eBay.
I was concerned with how much the eBay intercooler blocked airflow to the A/C heat exchanger and radiator so I bought the Begi Air Scoop and installed it:


The scoop hangs dangerously low for DD and many people pointed out that while it would help with cooling the A/C heat exchanger and radiator with the extra air, it would also make the intercooler less efficient because there was now additional positive pressure behind the intercooler because of the extra air.
- so out it came!
Years later I installed a 300HP Fab9 Intercooler, TSE radiator, radiator top-sealing panel and SPAL fan and started to think about ducting.
I also bought two of MT.net's matrussell122 Radiator Support Bar (see https://www.miataturbo.net/miata-parts-sale-trade-5/radiator-support-bars-more-airflow-cooling-99508/) in preparation for it (the bar was cheap and I figured I could split the cost of S&H with someone because there was little difference between 1 or 2 since they fit in the same box).
Here's the front view of my MSM with the Fab9 intercooler installed.
Note how the intercooler dominates the intake and there are large gaps on the left and right hand side.

From underneath the car, you can see massive gaps between the intercooler and TSE radiator and between the OEM intercooler mounting bar and the bumper:

I began thinking about those gaps and thought "Why not create a chamber between the intercooler and A/C heat exchanger and exit the intercooler air under the radiator?".
The advantages of doing this are:
1. There is no pressure behind the intercooler so air can pass easier through the intercooler, making it more efficient
2. Only fresh air will flow into the chamber between the intercooler and A/C heat exchanger (this is air that flows over the intercooler) so will not be pre-heated by the intercooler
3. Air passing through the radiator will only need to pass through the A/C heat exchanger
The OEM front engine bay brace had to go which was accounted for with my Ryobi grinder (with cutting wheel) and Ryobi reciprocating saw (only the 2nd time I've actually used it):


View from above:

The remnants of the OEM front plates were painted black to match the bar and coat the newly cut edges.
I don't weld so I thought "Why not bolt a stainless steel square bar across the top for added stiffening and to mount stuff from?":

Unfortunately the hood latch hangs too low - in this photo, the bar I was going to add is actualy positioned behind the hood latch.
So that's not an option and the amount of additional rigidity it supplied was questionable anyway.
I want to retain the OEM hood latch because a few years ago at Lakeside I noticed Bitrusty's SP only had Aerocatch hood pins and the leading edge of his bonnet could be seen rippling as it approached.
I started with the two side panels and dividing panel whose top edge leans against the intercooler and the bottom is mounted to the MSM's OEM intercooler mounting bar:


FYI: The large cutout at the front edge of the coldside panel is needed to accommodate the IAT sensor mounted in the intercooler tank.
Getting to this point took FOREVER, it took ages to get all the cutouts and angles right.
The panels are 2.5mm aluminium and the aluminium brackets on the bottom are made from pre-formed 3mm aluminium L-bar.
The top side panels were attached to an OEM M6 bolt near the headlight using galvanised brackets (I was over making custom aluminium brackets by now, these are easy to cut+bend to size and the bend is not as brittle as an aluminium 90* bend):

While I was doing this, I cleaned up some rust on my A/C heat exchanger and sprayed it with rustproofing black paint (I didn't mask everything off as well as I should've so there's lots of overspray).
I added a couple of "Elephant Ears" to block off the gaps on the left and right side of the intercooler:

These panels are only 1mm thick and I used the same pre-formed 3mm aluminium L-bar to make brackets for the lower outer mounts so that they don't flex much.
To block the OEM front plate gaps, I went for a simple ghetto mod:

Here's how it looks with the front bumper fitted (not as bad as I feared so I doubt I'll paint or add black vinyl cladding to the panels):

There's a gap below the intercooler and bumper which I'll need to fill with foam but apart from that, all incoming air should be funelled through the intercooler or A/C heat exchanger+radiator.
Mounting my number plate is the next challenge - it'll probably require DIY brackets to the new radiator bar (I plan on clamping it to the bar rather than drilling into the bar).
If anyone has any ideas, please let me know.
I also thought about welding some mount points to the top of the intercooler but it's a long way from the car's bumper so the bracket would bounce a lot.
It's a pity we can't have stick-on front number plates
So is this a reasonable ducting solution?
Don't worry about dying, worry about not living!
Garage Thread: http://www.mx5cartalk.com/forum/viewtopic.php?f=57&t=76716
Garage Thread: http://www.mx5cartalk.com/forum/viewtopic.php?f=57&t=76716
- ManiacLachy
- Engaged
- Posts: 3315
- Joined: Mon Jan 13, 2014 2:35 pm
- Vehicle: NB SE
- Location: Brisbane
Re: Lokiel's "Gina" (2004 Titanium SE)
Lokiel wrote:So is this a reasonable ducting solution?
Reasonable as in "reasonably effective", or reasonable as in a "reasonable amount of effort"?
Yes to the first. No to the second (IMHO).
I think it will direct air really well, it will ensure the heat exchangers receive the most efficient air flow, it's very thorough and complete. But for a car that hasn't ever seen overheating it seems like extreme overkill. And you still have the vented Garage Vary hood to install!
I don't mean come off as rude or aim to offend. I am, as always, amazed at your ingenuity and respect your work, I just think its a complex solution to a problem that didn't exist. Where efforts could have been better focused on jobs that need to be completed to see Gina rolling on the streets again - which is what I really really really want to see!
I also question how safe the re-enforcement bar is. I'm not an engineer, for all I know it might be an improvement even. But to my eye it looks dubious.
As for the licence plate, I guess you could use an offset holder, it would attach on the opposite side to your tow hook (requiring another cutout), where the baby teeth were. MX5 Mania sell them, and I think Auto+ used to as well, though those designs would partially obscure your oil cooler duct path through the fog-light hole. You might be able to fab one up that sits a little higher though.
- Lokiel
- Forum legend
- Posts: 4126
- Joined: Thu May 28, 2009 2:39 pm
- Vehicle: NB SE
- Location: Brisbania
Re: Lokiel's "Gina" (2004 Titanium SE)
Don't worry, I know where you're coming from, it's just that while I'm waiting for the A/C hoses, the car up on the jack and the bumper off and all the parts available for the ducting work, it was the perfect time to do the fiddly ducting work. After the A/C hoses have been installed (hopefully tomorrow when I pick up the hoses), my next job will be re-tuning the MS3 (I've just bought a month's subscription to Evan's Performance academy since now's the time to study some of the MS3 features I know nothing about).
I plan on doing track days again in future so effective ducting is important, especially given the size of the Fab9 350hp intercooler.
MT.net's Savington was one of the first to use this type of bar on his track car and he use it on several other builds so I'm comfortable with it in terms of chassis rigidity. In terms of a head-on crash, it will probably cause more damage to the front end since the original rubber pad behind the bumper was intended to absorb more energy.
With regard to the vented Garage Vary hood, I've heard that the EFR6258's wastegate actuator is likely to hit it. In preparation for this, I've ordered the shorter wastegate bracket to see if that helps - been waiting for it now from JEGS in the US for 2 months since it's not in stock despite being available on the website when I ordered (https://www.jegs.com/i/BorgWarner/156/59007119007/10002/-1). That wont be a simple job either because to swap in the bracket I need to remove the turbo and it's easier to remove the turbo with the exhaust manifold still attached
Unfortunately I don't like the look of the side license plate mounts, to me, they make the car look off-centre. I may have to live with that though
Don't worry about dying, worry about not living!
Garage Thread: http://www.mx5cartalk.com/forum/viewtopic.php?f=57&t=76716
Garage Thread: http://www.mx5cartalk.com/forum/viewtopic.php?f=57&t=76716
-
The American
- Forum Guru
- Posts: 1542
- Joined: Fri Jun 29, 2012 9:23 pm
- Vehicle: NB8B - Turbo
- Location: Brisbane, Qld. Previously Perth WA
- Contact:
Re: Lokiel's "Gina" (2004 Titanium SE)
Perhaps what I appreciate the most about Lokiel's thread is the visual description of the solution and the steps taken to implement it. To me, this car will never be about being dríven, but the implementation of thoughtfully executed DIY projects.
- bruce
- Speed Racer
- Posts: 7807
- Joined: Fri Apr 25, 2003 11:00 am
- Vehicle: NA8 - Turbo
- Location: Victoria
- Contact:
Re: Lokiel's "Gina" (2004 Titanium SE)
I used a lot of silicon sealant to stick my licence plate to the nose. Problem was I had to change my plate and the silicon will need to be ground off.
- KevGoat
- Speed Racer
- Posts: 3976
- Joined: Sun Jun 17, 2012 8:48 pm
- Vehicle: NB SE
- Location: Down South, Adelaide, SA
Re: Lokiel's "Gina" (2004 Titanium SE)
The American wrote:To me, this car will never be about being dríven, but the implementation of thoughtfully executed DIY projects.
Agree. Lokiel's thread is a great source of information and how to's with some of the most informative explanations alongside clearly labeled images.
Sent from my SM-G930F using Tapatalk
- KevGoat
- Speed Racer
- Posts: 3976
- Joined: Sun Jun 17, 2012 8:48 pm
- Vehicle: NB SE
- Location: Down South, Adelaide, SA
Re: Lokiel's "Gina" (2004 Titanium SE)
^ that said ... I'm neither brave enough, nor crazy enough, to attempt a fraction of what Lokiel does.
Sent from my SM-G930F using Tapatalk
Sent from my SM-G930F using Tapatalk
- ManiacLachy
- Engaged
- Posts: 3315
- Joined: Mon Jan 13, 2014 2:35 pm
- Vehicle: NB SE
- Location: Brisbane
Re: Lokiel's "Gina" (2004 Titanium SE)
Lokiel wrote:Don't worry, I know where you're coming from
Good to know I didn't ruffle any feathers, certainly not my intent. I'm with the others, I love how you think out your projects, and present them with great information and illustrations. That must add some time to the posts. I plan to "borrow" from many of your developments in time.
My car hasn't dríven properly in over 6 months, and it pains me. Maybe Lokiel is numb to the pain now?
- Roadrunner
- coyotes after you
- Posts: 1115
- Joined: Tue Nov 06, 2012 9:02 pm
- Vehicle: NB SE
- Location: Newcastle
Re: Lokiel's "Gina" (2004 Titanium SE)
Looking back through your build I can't recall seeing, do you have brake ducts installed? I only say because when I did my radiator ducting and tightly sealed off the sides and base of the bumper mouth to the radiator I melted my caliper piston seals at the next track day. May have been a coincidence but I put it down to removing the air flow from the bumper mouth that would normally spill out sideways into the wheel wells.
I then put brake ducts in and happy days since. Just food for thought.
I then put brake ducts in and happy days since. Just food for thought.
MeepMeep
-
RS2000
- Racing Driver
- Posts: 680
- Joined: Mon Nov 25, 2013 7:38 am
- Vehicle: NB8A
- Location: Newcastle
Re: Lokiel's "Gina" (2004 Titanium SE)
Lokiel wrote:MT.net's Savington was one of the first to use this type of bar on his track car and he use it on several other builds so I'm comfortable with it in terms of chassis rigidity. In terms of a head-on crash, it will probably cause more damage to the front end since the original rubber pad behind the bumper was intended to absorb more energy.
Unfortunately I don't like the look of the side license plate mounts, to me, they make the car look off-centre. I may have to live with that though
Wouldn't that front end bar mod make the car unregisterable?
- bruce
- Speed Racer
- Posts: 7807
- Joined: Fri Apr 25, 2003 11:00 am
- Vehicle: NA8 - Turbo
- Location: Victoria
- Contact:
Re: Lokiel's "Gina" (2004 Titanium SE)
No one would notice the change as that area is well hidden.
Who is online
Users browsing this forum: No registered users and 6 guests


