Lokiel's "Gina" (2004 Titanium SE)
Moderators: timk, Stu, -alex, miata, StanTheMan, greenMachine, ManiacLachy, Daffy, zombie, Andrew, The American, Lokiel
-
kiezon
- Fast Driver
- Posts: 134
- Joined: Fri Mar 10, 2017 7:28 pm
- Vehicle: NB8B
Re: Lokiel's "Gina" (2004 Titanium SE)
How are you finding the performance of the AC now as opposed to the factory configuration?
- bruce
- Speed Racer
- Posts: 7807
- Joined: Fri Apr 25, 2003 11:00 am
- Vehicle: NA8 - Turbo
- Location: Victoria
- Contact:
Re: Lokiel's "Gina" (2004 Titanium SE)
It's a bit cold to be turning up the aircon? Plus the car never gets dríven so....
- Lokiel
- Forum legend
- Posts: 4126
- Joined: Thu May 28, 2009 2:39 pm
- Vehicle: NB SE
- Location: Brisbania
Re: Lokiel's "Gina" (2004 Titanium SE)
I've been quiet in my build thread for a while but have been doing some work on Gina.
This weekend I FINALLY completed anodisng my new Cold Air Box which took MUCH longer than I expected (this mod took 3 weekends of work and re-work).
The first thing I needed to do to anodise the Cold Air Box was to find large enough containers to dye and seal the box.
Previously I'd used 2 large crab cooker pots which barely fit on my hot plate but these were too small.
A bit of googling showed me that many DIYers used Eskys - unfortunately many of the large ones have built-in wheels which reduce the inner volume of the Esky and give them odd shapes.
BCF had the best range of Eskys so I picked up 2x 33L Eskys WITHOUT wheels.
The dyeing bath needs to be kept at 60*C for 15 minutes and the sealant bath between 85-95*C for 15 minutes so I bought a few 2200 Watt heating elements and made some aluminium brackets to mount them in the Esky:
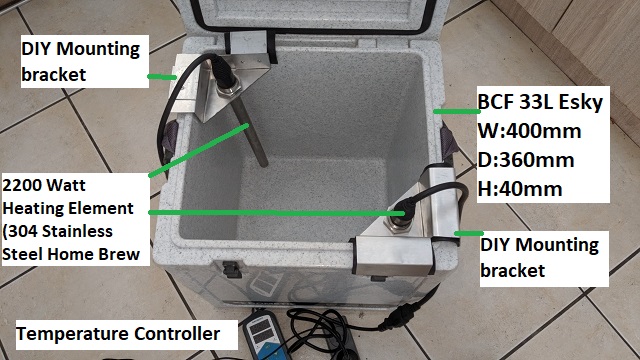
Originally I used rubber strips under the DIY mounts but they're not needed, the heating elements have a silicone sealant ring that prevents heat transfer to the aluminum mounts.
I also bought a couple of temperature controllers for the baths.
Unfortunately the one in the sealant bath burnt out - couldn't cope with 2x 2200W Heating Elements.
LOTS of distilled water was purchased (approximately 140L).
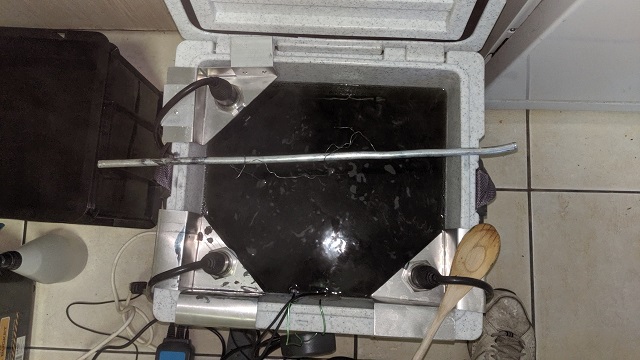
To get a brushed finish, I previously used a harsh scourer on the coolant overflow tank and dragged it slowly+forcefully across in the direction I wanted.
This took ages and didn't really give me the finish I wanted - you had to get very close to notice the brushed finish.
I bought 3 different wheel brushes to speed this up, a scourer, bronze and stainless steel:
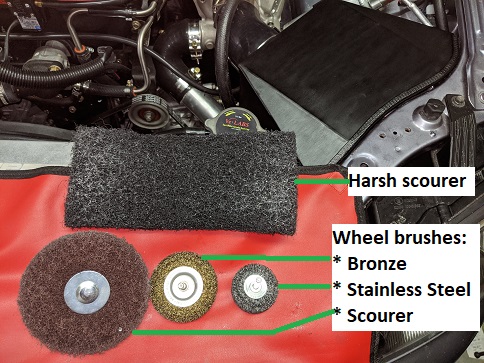
The Stainless steel wheel brush gave me the brushed result I wanted so I used it on the Cold Air Box wall, both inside and out.
The finish actually cut your hand if you dragged it across the surface.
I anodised the Cold Air Box wall but when I took it out of the dye bath, the dye simply ran off the piece so I put it back in the dye for another 15 minutes.
When I pulled it out of the dye bath the second time, some of the dye remained on the piece but it definitely wasn't jet black.
I cleaned it and put it in the sealant bath for 15 minutes and when it came out, it definietly wasn't jet black and some sections still showed bare aluminium:
The original hand-cutting surface had been smoothed out completely.
I decided to do an experiment with the Cold Air Box roof, I used the stainless steel wire brush on the roof only and left the underside unfinished.
Like the wall, the roof top barely held any colour but looked blue.
Unlike the wall, the unfinished underside of the roof was jet black and actually held the colour when I rubbed my hand over it:
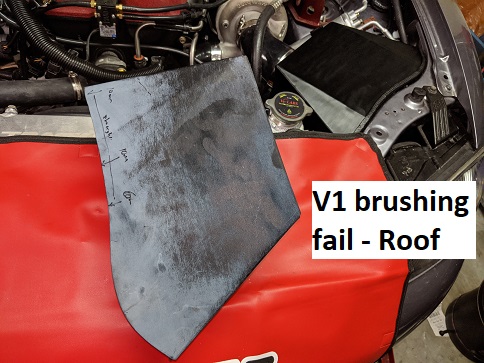
Based on this, I figured that the harsh brushed finish of the stainless steel wheel was causing very deep cuts with sharp edges and valleys.
In the acidic anodising bath, the sharp edges and valleys were smoothed and the valleys were quite wide.
The wide valleys meant that the dye simply ran out of them and prevented the anodising from working as needed (ie. produce a porous surface that the dye seeps into).
This meant re-making the Cold Air Box
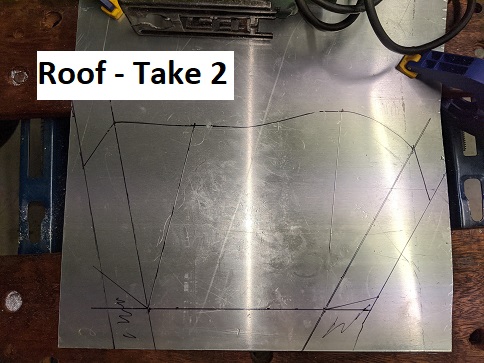
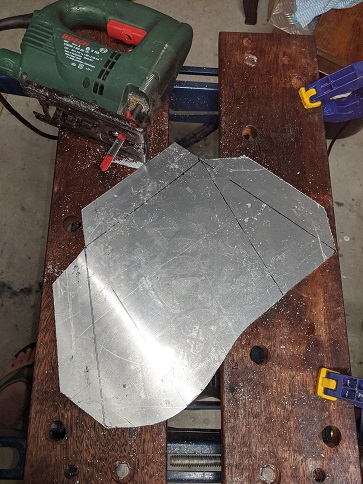
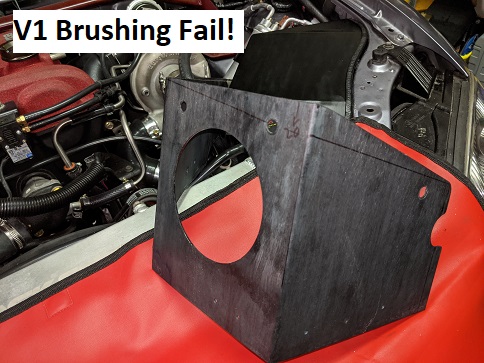
I decided to angle the wall down a little too which is what the line drawn on the "V1 Brushing Fail!" picture above is.
This time I decided to use the bronze wheel brush only which worked great:
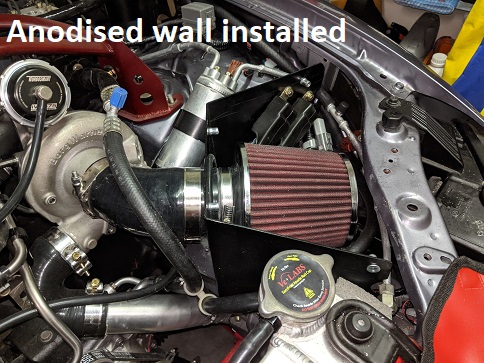
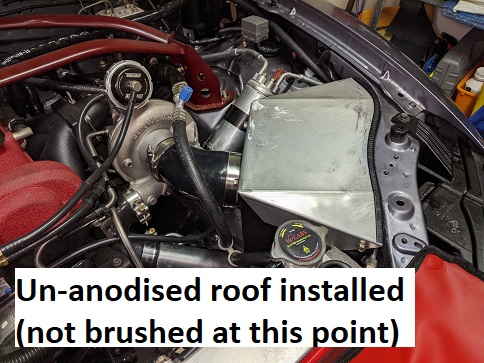
Looks great, even if I do say so myself (I really hated the raw aluminium look):
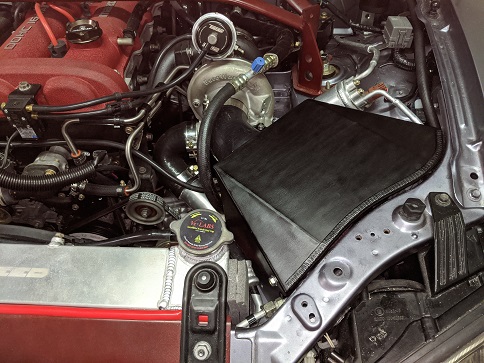
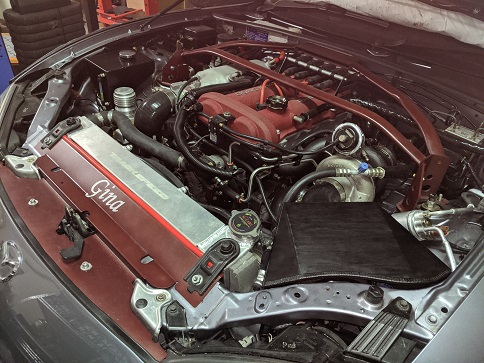
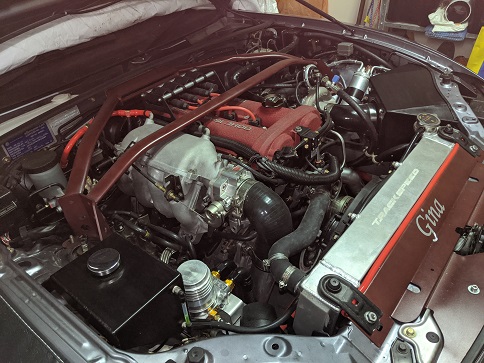
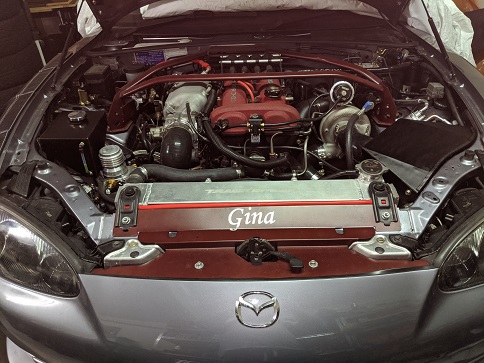
The black brushed finish of the Cold Air Box matches that of the coolant overflow tank, symmetry is restored!
This weekend I FINALLY completed anodisng my new Cold Air Box which took MUCH longer than I expected (this mod took 3 weekends of work and re-work).
The first thing I needed to do to anodise the Cold Air Box was to find large enough containers to dye and seal the box.
Previously I'd used 2 large crab cooker pots which barely fit on my hot plate but these were too small.
A bit of googling showed me that many DIYers used Eskys - unfortunately many of the large ones have built-in wheels which reduce the inner volume of the Esky and give them odd shapes.
BCF had the best range of Eskys so I picked up 2x 33L Eskys WITHOUT wheels.
The dyeing bath needs to be kept at 60*C for 15 minutes and the sealant bath between 85-95*C for 15 minutes so I bought a few 2200 Watt heating elements and made some aluminium brackets to mount them in the Esky:

Originally I used rubber strips under the DIY mounts but they're not needed, the heating elements have a silicone sealant ring that prevents heat transfer to the aluminum mounts.
I also bought a couple of temperature controllers for the baths.
Unfortunately the one in the sealant bath burnt out - couldn't cope with 2x 2200W Heating Elements.
LOTS of distilled water was purchased (approximately 140L).

To get a brushed finish, I previously used a harsh scourer on the coolant overflow tank and dragged it slowly+forcefully across in the direction I wanted.
This took ages and didn't really give me the finish I wanted - you had to get very close to notice the brushed finish.
I bought 3 different wheel brushes to speed this up, a scourer, bronze and stainless steel:

The Stainless steel wheel brush gave me the brushed result I wanted so I used it on the Cold Air Box wall, both inside and out.
The finish actually cut your hand if you dragged it across the surface.
I anodised the Cold Air Box wall but when I took it out of the dye bath, the dye simply ran off the piece so I put it back in the dye for another 15 minutes.
When I pulled it out of the dye bath the second time, some of the dye remained on the piece but it definitely wasn't jet black.
I cleaned it and put it in the sealant bath for 15 minutes and when it came out, it definietly wasn't jet black and some sections still showed bare aluminium:

The original hand-cutting surface had been smoothed out completely.
I decided to do an experiment with the Cold Air Box roof, I used the stainless steel wire brush on the roof only and left the underside unfinished.
Like the wall, the roof top barely held any colour but looked blue.
Unlike the wall, the unfinished underside of the roof was jet black and actually held the colour when I rubbed my hand over it:

Based on this, I figured that the harsh brushed finish of the stainless steel wheel was causing very deep cuts with sharp edges and valleys.
In the acidic anodising bath, the sharp edges and valleys were smoothed and the valleys were quite wide.
The wide valleys meant that the dye simply ran out of them and prevented the anodising from working as needed (ie. produce a porous surface that the dye seeps into).
This meant re-making the Cold Air Box


I decided to angle the wall down a little too which is what the line drawn on the "V1 Brushing Fail!" picture above is.
This time I decided to use the bronze wheel brush only which worked great:


Looks great, even if I do say so myself (I really hated the raw aluminium look):


The black brushed finish of the Cold Air Box matches that of the coolant overflow tank, symmetry is restored!
Don't worry about dying, worry about not living!
Garage Thread: http://www.mx5cartalk.com/forum/viewtopic.php?f=57&t=76716
Garage Thread: http://www.mx5cartalk.com/forum/viewtopic.php?f=57&t=76716
-
Magpie
- Speed Racer
- Posts: 7468
- Joined: Fri Feb 11, 2011 12:49 pm
- Vehicle: NA6
- Location: Purga, QLD
Re: Lokiel's "Gina" (2004 Titanium SE)
Dodgy day anodizing?
- SKYHI
- Racing Driver
- Posts: 1355
- Joined: Sun Apr 01, 2007 8:08 am
- Vehicle: NB SE
- Location: Brisbane
Re: Lokiel's "Gina" (2004 Titanium SE)
Damn. I got to applaud your determination and persistence with your DIY projects. Well done.
- Lokiel
- Forum legend
- Posts: 4126
- Joined: Thu May 28, 2009 2:39 pm
- Vehicle: NB SE
- Location: Brisbania
Re: Lokiel's "Gina" (2004 Titanium SE)
Magpie wrote:Dodgy day anodizing?
This COULD be done but requires me to bring a lot of stuff - would be interesting to demonstrate though if anyone wanted to try it themselves (I'm happy to lend out the equipment and can provide details on where to purchase the needed chemicals).
The black dye and anodising solutions can be re-used - these have been sitting in the eskys now for nearly 3 weeks (in my kitchen) and I haven't transferred them to the empty 5L de-mineralised water containers yet (I plan to use the solutions again).
This means all we need is at least 70-80L of de-mineralised water for the the anodising bath and rinsing bath and about 6kg of Hy-Clor 3kg Dry Acid pH Decreaser (I use this instead of sulfuric acid because it's safer and can be bought at Bunnings). After anodising a large piece, the acidity of the solution drops markedly.
Regarding the time to do this, assuming that the pieces to be anodised have the required finish:
Rinsing Bath: 1 minute
Anodising Bath: 1.5-2.0 hours
Rinsing Bath: 1 minute
Dye Bath: 15 minutes
Rinsing Bath: 1 minute
Sealant Bath: 15 minutes
Rinsing Bath: 1 minute
So we could get at least 2 sets of anodised pieces done.
I've only done black so far but do have a small container of red dye I haven't tried we could try on smaller items.
Here's some other colour options from Caswell: https://www.caswellplating.com.au/store/store.php/categories/anodizing-dyes
I don't mind bringing the stuff if there's enough people interested and we have some suitable pieces to anodise.
It is a bit risky but most bare aluminium pieces can be anodised decently.
FYI: I thought about anodising my intake manifold but I'd need MUCH larger conatainers and I never want to remove the lower part and re-install it again.
Don't worry about dying, worry about not living!
Garage Thread: http://www.mx5cartalk.com/forum/viewtopic.php?f=57&t=76716
Garage Thread: http://www.mx5cartalk.com/forum/viewtopic.php?f=57&t=76716
-
Magpie
- Speed Racer
- Posts: 7468
- Joined: Fri Feb 11, 2011 12:49 pm
- Vehicle: NA6
- Location: Purga, QLD
Re: Lokiel's "Gina" (2004 Titanium SE)
Maybe no if it stops you doing one of your roastsLokiel wrote:This COULD be done but requires me to bring a lot of stuff
- ManiacLachy
- Engaged
- Posts: 3315
- Joined: Mon Jan 13, 2014 2:35 pm
- Vehicle: NB SE
- Location: Brisbane
Re: Lokiel's "Gina" (2004 Titanium SE)
He's a man of many talents, but you much choose wisely 
- Gladiator
- Racing Driver
- Posts: 1963
- Joined: Tue Apr 24, 2012 2:34 pm
- Vehicle: NA6
- Location: Springfield Lakes
Re: Lokiel's "Gina" (2004 Titanium SE)
I’ve just caught up on this thread after a long long while. Love your work Lokiel.
Sent from my iPhone using Tapatalk
Sent from my iPhone using Tapatalk
"I'd rather a bottle in front of me than a frontal lobotomy"
1990 Silver Eunos NA6
1990 Silver Eunos NA6
- Lokiel
- Forum legend
- Posts: 4126
- Joined: Thu May 28, 2009 2:39 pm
- Vehicle: NB SE
- Location: Brisbania
Re: Lokiel's "Gina" (2004 Titanium SE)
Re-doing my AN-10 air conditioning lines has been something that has taken up way too much time but admittedly I haven't been fully committed to getting them done and have been working on them on and off for over a month now.
I'd bought a lot of different fitting types from Speedy Air Spares but none would mount onto the compressor's AN-10 "peanut mount" so I thought, "Why not modify an OEM fitting to make it fit since I've learned to braze aluminium now after doing the AN-6 hard lines?".
I cut the barb off at the peanut fitting and drilled a new hole for it on the top of the fitting - brazing the two together should be easy!
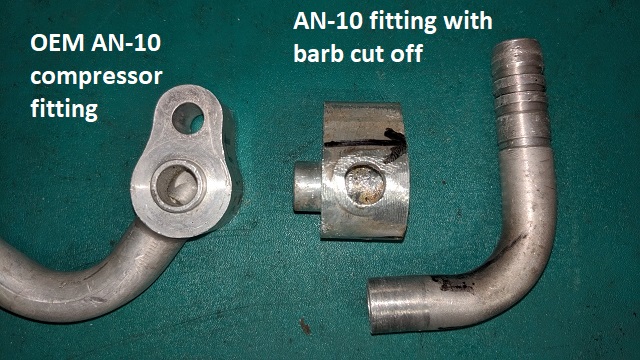
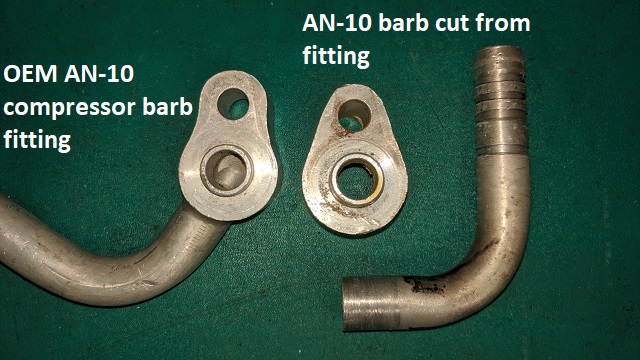
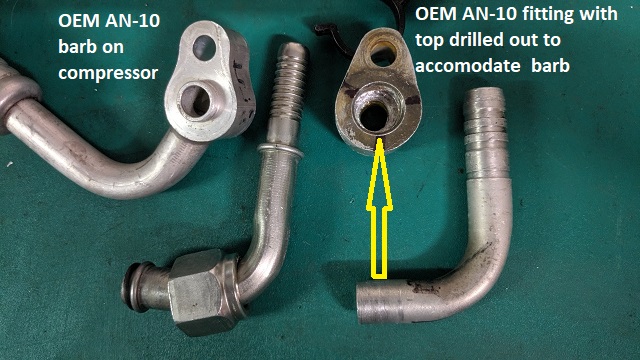
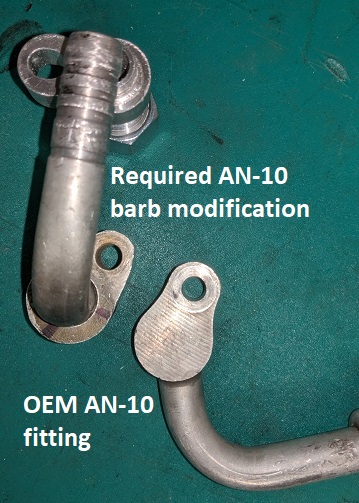
Unfortunately my brazing skills weren't up to the task
Either I put too much heat into the barb and not enough on the fitting, causing the barb to melt away, or put too much heat into the fitting, causing the fitting to melt away:
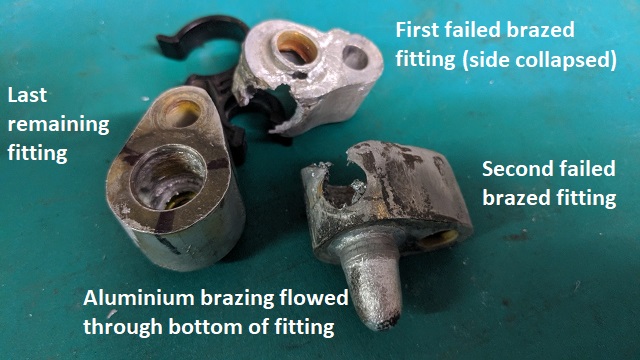
The one on the bottom right was probably close to being successful; I was using a lot of brazing rod which was flowing well and I assumed it was filling the gaps correctly, then the top melted away and when it cooled down I saw that the braze had simply flowed through the gaps and formed a stalactite.
Well that wasn't going to work so I found an AN-10 screw barb on eBay that would fit with a bit of work (I needed to adjust the fitting's bolt hole to make it fit):
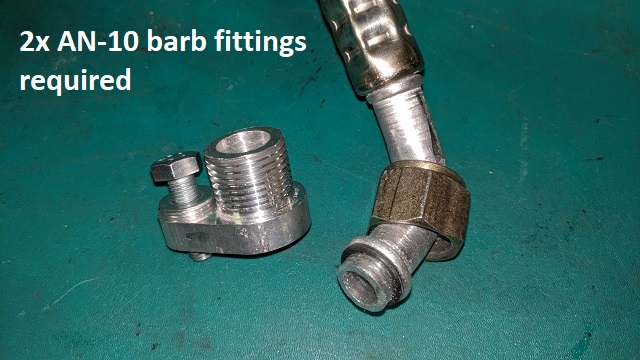
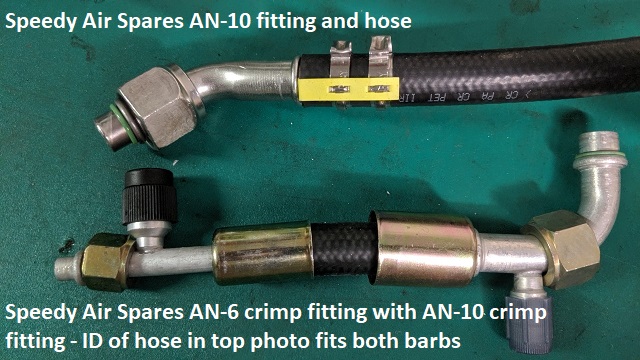
The Speedy Air Spares AN-10 hose diameter is MUCH smaller than other AN-10 hoses which is great because it makes it easier to route.
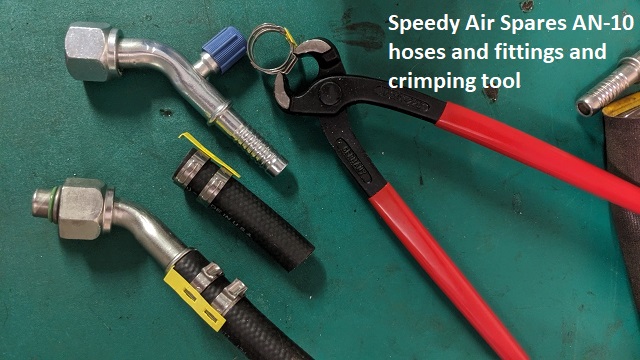
The crimp is a little too bulky and wouldn't let me fit an AN-12 SpeedFlow heat sleeve over it, something that was going to be a real issue at the firewall fitting since it's so close to the turbo's downpipe.
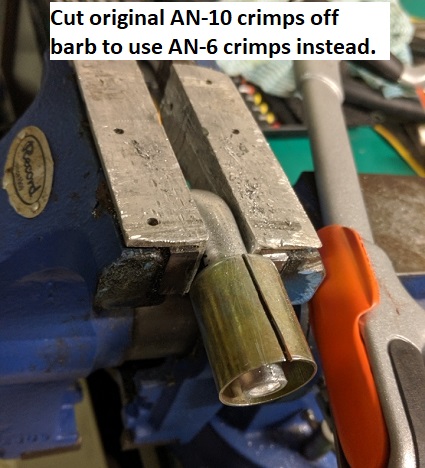
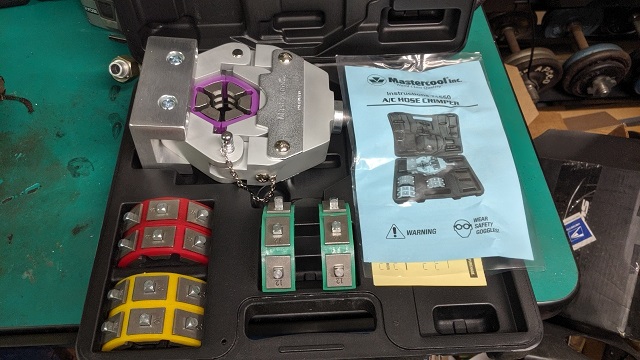
I noticed that the AN-10 hose actually fit inside the Speedy Air Spares AN-6 traditional A/C crimp fitting so I cut off the AN-10 fitting's traditional A/C crimp, bought some AN-6 A/C crimps and the A/C crimping tool (that was bloody expensive):
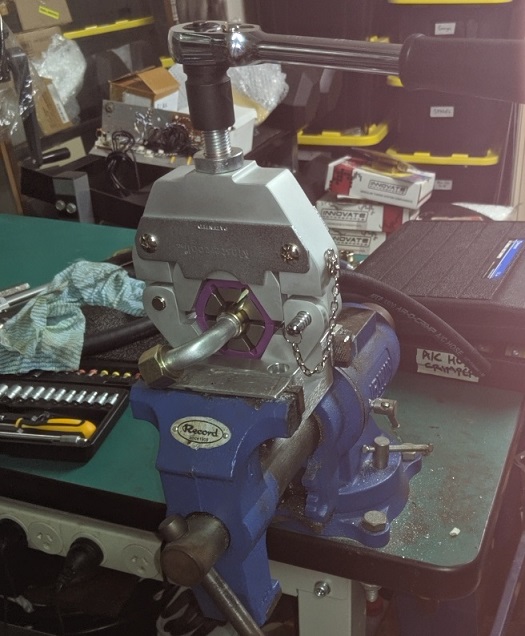
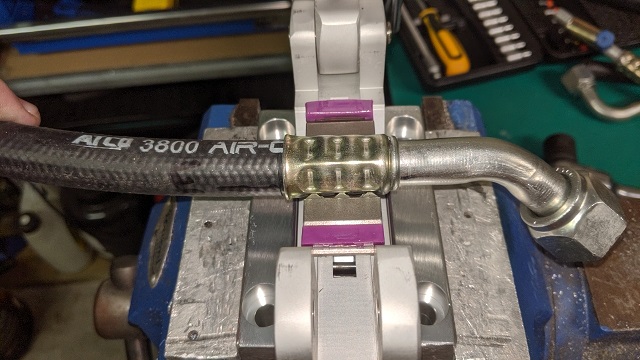
These turned out fantastic, any idiot can use this tool and look like a professional!
I routed the AN-10 hose over the air filter's "neck", added a bracket for it to the front strut brace and routed it to the firewall with a 45* AN-10 fitting (last half has a SpeedFlow heat sleeve over it).
This keeps the hose as far away as possible from the downpipe and allows me to still pull everything off the engine without needing to disconnect the A/C lines.
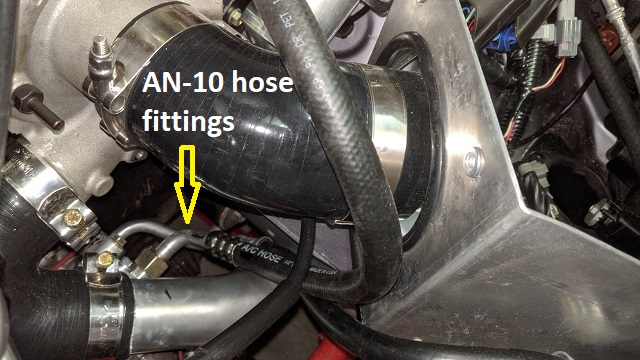
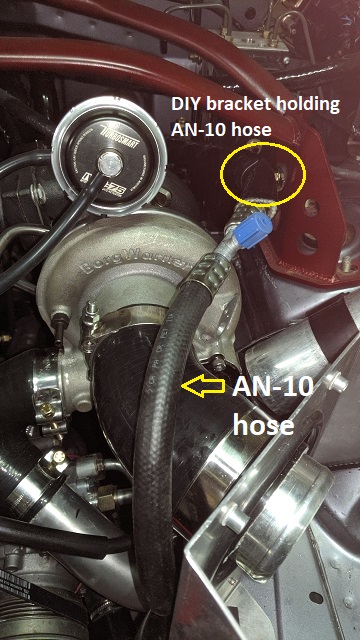
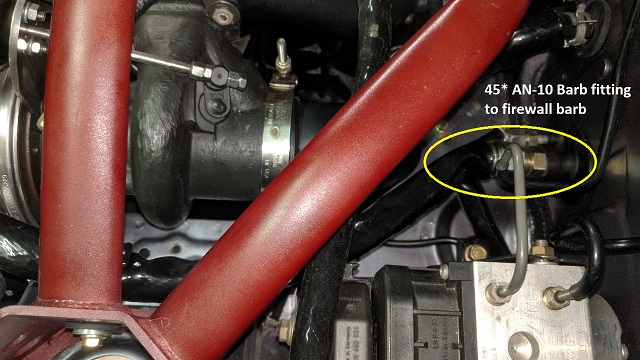
Unfortunately I HATE all the fittings needed on the AN-10 hose's compressor end and it's a pain in the arse to screw in (I had no idea how much torque had been applied).
I'd bought a lot of different fitting types from Speedy Air Spares but none would mount onto the compressor's AN-10 "peanut mount" so I thought, "Why not modify an OEM fitting to make it fit since I've learned to braze aluminium now after doing the AN-6 hard lines?".
I cut the barb off at the peanut fitting and drilled a new hole for it on the top of the fitting - brazing the two together should be easy!


Unfortunately my brazing skills weren't up to the task
Either I put too much heat into the barb and not enough on the fitting, causing the barb to melt away, or put too much heat into the fitting, causing the fitting to melt away:

The one on the bottom right was probably close to being successful; I was using a lot of brazing rod which was flowing well and I assumed it was filling the gaps correctly, then the top melted away and when it cooled down I saw that the braze had simply flowed through the gaps and formed a stalactite.
Well that wasn't going to work so I found an AN-10 screw barb on eBay that would fit with a bit of work (I needed to adjust the fitting's bolt hole to make it fit):

The Speedy Air Spares AN-10 hose diameter is MUCH smaller than other AN-10 hoses which is great because it makes it easier to route.

The crimp is a little too bulky and wouldn't let me fit an AN-12 SpeedFlow heat sleeve over it, something that was going to be a real issue at the firewall fitting since it's so close to the turbo's downpipe.
I noticed that the AN-10 hose actually fit inside the Speedy Air Spares AN-6 traditional A/C crimp fitting so I cut off the AN-10 fitting's traditional A/C crimp, bought some AN-6 A/C crimps and the A/C crimping tool (that was bloody expensive):


These turned out fantastic, any idiot can use this tool and look like a professional!
I routed the AN-10 hose over the air filter's "neck", added a bracket for it to the front strut brace and routed it to the firewall with a 45* AN-10 fitting (last half has a SpeedFlow heat sleeve over it).
This keeps the hose as far away as possible from the downpipe and allows me to still pull everything off the engine without needing to disconnect the A/C lines.


Unfortunately I HATE all the fittings needed on the AN-10 hose's compressor end and it's a pain in the arse to screw in (I had no idea how much torque had been applied).
Don't worry about dying, worry about not living!
Garage Thread: http://www.mx5cartalk.com/forum/viewtopic.php?f=57&t=76716
Garage Thread: http://www.mx5cartalk.com/forum/viewtopic.php?f=57&t=76716
- Lokiel
- Forum legend
- Posts: 4126
- Joined: Thu May 28, 2009 2:39 pm
- Vehicle: NB SE
- Location: Brisbania
Re: Lokiel's "Gina" (2004 Titanium SE)
After a late night on the town a few weeks ago, I decided to do some internet surfing since I couldn't sleep and wound up purchasing the Rev9 "Arrive ND Compressor AC Conversion Kit" since the dodgy AN-10 fittings at the compressor bothered me:
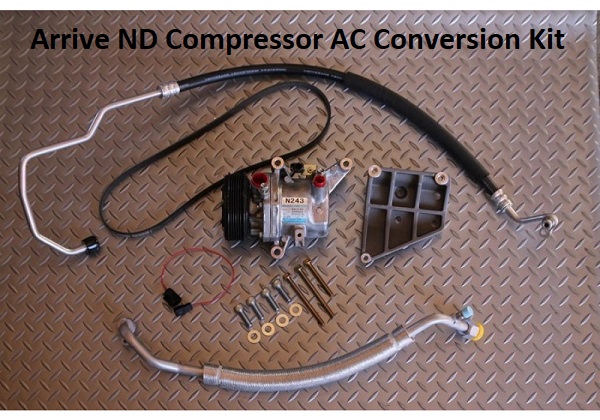
When it arrived, I noticed immediately that the supplied hoses were different to those shown in the advertisement:
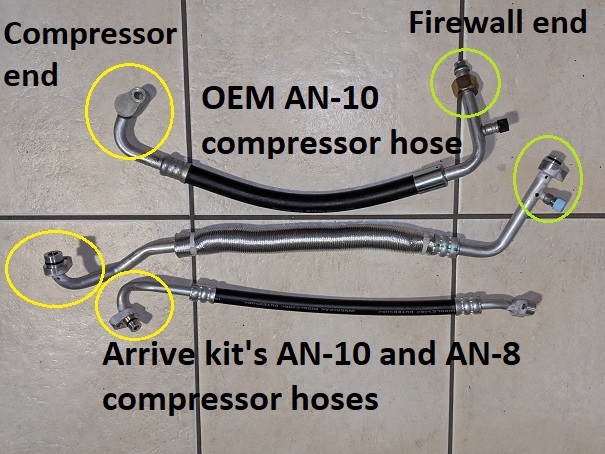
I contacted Rev9 on this and they claimed that the photos shown were for an NA-8 and that the hoses supplied were for an NB.
I assured Rev9 that in Australia, NBs have an AN-10 nut connecting to the firewall, which is exactly what was shown in the "NA-8" photo.
I have no idea what the other AN-8 hose is supposed to connect to.
Haven't heard anything since, even after sending them photos of the hose connectors I need.
I'm modifying these anyway but anyone considering buying this kit should send photos of their required fittings to Rev9 so that they send the correct ones.
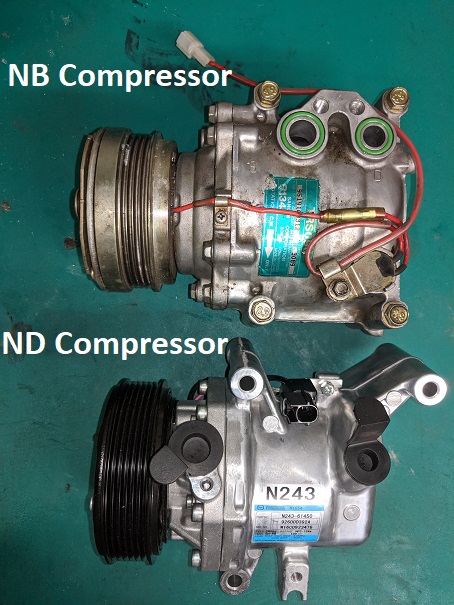
Here are the NB and ND compressors for comparison, 8.6kg and 4.8kg respectively (including the mounting bracket):
Unfortunately for me, the SE/MSM's water inlet barb from the engine block for the hose to the lower radiator barb interferred with the new mounting bracket (on the SE/MSM, the lower radiator hose had to be routed to avoid the turbo so the narb is different to standard NBs)
This interference was before the mod I had to make to the pipe to re-route the lower radiator hose so it may impact all SEs/MSMs.
Here was the chunk that needed to be removed:
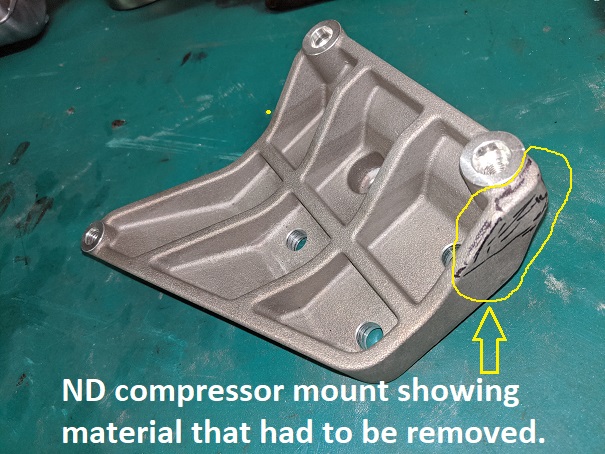
A comparison of the OEM bracket and modified ND bracket:
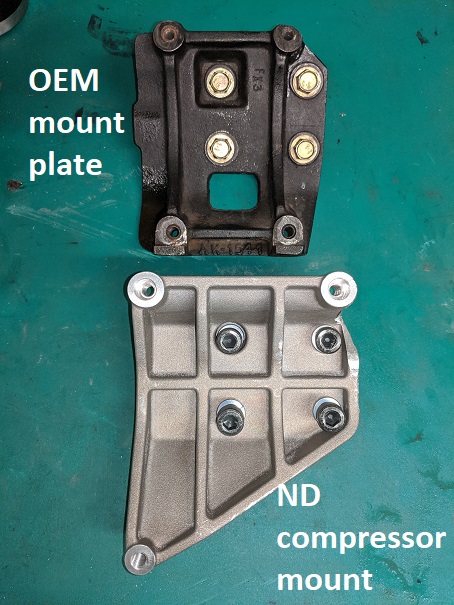
This wasn't fun in Sunday's heat as it took a long time because I wanted to remove as little material as possible (way too many iterations and today feels like someone has just beaten the crap out of me with a bat).
FINALLY I got it fitted and the A/C condenser mounted:
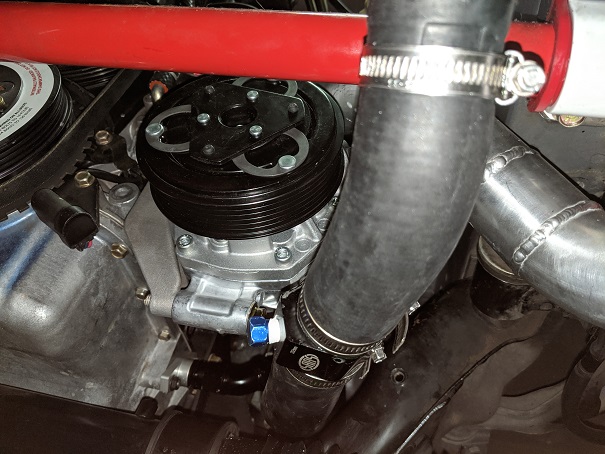

The kit comes with a new A/C belt but it's too big since I no longer have power steering.
Unfortunately the old belt is now too small so I need another new belt
I now have a LOT more room down there and can easily get to the oil drain fitting at the sump - previously the only way to get to it was from the top and I needed to remove the turbo's silicone elbow to get to it. Even then I had to blindly contort my arm down there to loosen/tighten the fitting.
This will make life much easier in future and the weight saving is a bonus.
Now I need to bend the ND barbs into the orientation I need and connect them to the AN-10 and AN-8 hoses (the expensive crimping tool will make fitting then to the hose easy at least).

When it arrived, I noticed immediately that the supplied hoses were different to those shown in the advertisement:

I contacted Rev9 on this and they claimed that the photos shown were for an NA-8 and that the hoses supplied were for an NB.
I assured Rev9 that in Australia, NBs have an AN-10 nut connecting to the firewall, which is exactly what was shown in the "NA-8" photo.
I have no idea what the other AN-8 hose is supposed to connect to.
Haven't heard anything since, even after sending them photos of the hose connectors I need.
I'm modifying these anyway but anyone considering buying this kit should send photos of their required fittings to Rev9 so that they send the correct ones.
Here are the NB and ND compressors for comparison, 8.6kg and 4.8kg respectively (including the mounting bracket):

Unfortunately for me, the SE/MSM's water inlet barb from the engine block for the hose to the lower radiator barb interferred with the new mounting bracket (on the SE/MSM, the lower radiator hose had to be routed to avoid the turbo so the narb is different to standard NBs)
This interference was before the mod I had to make to the pipe to re-route the lower radiator hose so it may impact all SEs/MSMs.
Here was the chunk that needed to be removed:

A comparison of the OEM bracket and modified ND bracket:

This wasn't fun in Sunday's heat as it took a long time because I wanted to remove as little material as possible (way too many iterations and today feels like someone has just beaten the crap out of me with a bat).
FINALLY I got it fitted and the A/C condenser mounted:


The kit comes with a new A/C belt but it's too big since I no longer have power steering.
Unfortunately the old belt is now too small so I need another new belt
I now have a LOT more room down there and can easily get to the oil drain fitting at the sump - previously the only way to get to it was from the top and I needed to remove the turbo's silicone elbow to get to it. Even then I had to blindly contort my arm down there to loosen/tighten the fitting.
This will make life much easier in future and the weight saving is a bonus.
Now I need to bend the ND barbs into the orientation I need and connect them to the AN-10 and AN-8 hoses (the expensive crimping tool will make fitting then to the hose easy at least).
Don't worry about dying, worry about not living!
Garage Thread: http://www.mx5cartalk.com/forum/viewtopic.php?f=57&t=76716
Garage Thread: http://www.mx5cartalk.com/forum/viewtopic.php?f=57&t=76716
- ManiacLachy
- Engaged
- Posts: 3315
- Joined: Mon Jan 13, 2014 2:35 pm
- Vehicle: NB SE
- Location: Brisbane
Re: Lokiel's "Gina" (2004 Titanium SE)
As always, super impressive work!
Why did you need to replace the compressor? Was it just that you wanted new connections at the firewall, and this kit was shiny during a late night internet browse? Also, I had no idea there was such a kit to retro fit the ND compressor into an NA!
Do you not have a tensioner pulley in place of the PS tensioner? How do you tension the AC belt then?

And is there a reason you went inside the strut brace with the AC hose? It looks awful close to the turbo. I'd have thought with a little extra hose length you could run around the outside quite easily.
Seeing all this work you're going through makes me worry about getting my Kracken kit installed. I already plan to drop PS in order for the turbo outlet intercooler piping, but this AC work looks pretty involved. I think I'm going to farm this job out to more experienced hands.
Why did you need to replace the compressor? Was it just that you wanted new connections at the firewall, and this kit was shiny during a late night internet browse? Also, I had no idea there was such a kit to retro fit the ND compressor into an NA!
Do you not have a tensioner pulley in place of the PS tensioner? How do you tension the AC belt then?

And is there a reason you went inside the strut brace with the AC hose? It looks awful close to the turbo. I'd have thought with a little extra hose length you could run around the outside quite easily.
Seeing all this work you're going through makes me worry about getting my Kracken kit installed. I already plan to drop PS in order for the turbo outlet intercooler piping, but this AC work looks pretty involved. I think I'm going to farm this job out to more experienced hands.
- Lokiel
- Forum legend
- Posts: 4126
- Joined: Thu May 28, 2009 2:39 pm
- Vehicle: NB SE
- Location: Brisbania
Re: Lokiel's "Gina" (2004 Titanium SE)
ManiacLachy wrote:As always, super impressive work!
Why did you need to replace the compressor? Was it just that you wanted new connections at the firewall, and this kit was shiny during a late night internet browse? Also, I had no idea there was such a kit to retro fit the ND compressor into an NA!
Do you not have a tensioner pulley in place of the PS tensioner? How do you tension the AC belt then?
And is there a reason you went inside the strut brace with the AC hose? It looks awful close to the turbo. I'd have thought with a little extra hose length you could run around the outside quite easily.
Seeing all this work you're going through makes me worry about getting my Kracken kit installed. I already plan to drop PS in order for the turbo outlet intercooler piping, but this AC work looks pretty involved. I think I'm going to farm this job out to more experienced hands.
I'd seen this kit before and knew that it was both lighter and smaller than the OEM kit and my original A/C was was OK but not great so I figured why not get the newest compressor? Plus, I was drunk when I did order it and had a bit of spare cash burning a hole in my pocket.
I NEED the same connections at the firewall, which is why I was annoyed when I found they'd delivered the wrong hoses - I had blenty of barbs I could use anyway so no biggie for me.
I do have a tensioner pulley in place of the P/S but my original hose is too small to fit it at its lowest setting and the new one is too big at the highest setting so I'll need something in-between (or get a larger pulley on the belt tensioner).
The reason I went inside the front strut brace rather than around it is that there's not much space between the rear of the front strut brace and the ABS to weave the rubber hose through to the firewall barb and the tight bends may kink the hose. The 45* fitting from the firewall angles upward to keep the hose as far as possible from the hot downpipe and the hose and fitting are clad in a SpeedFlow heat sheath which is more protective than the OEM cladding on the SE/MSMs A/C hose near the downpipe. I'm also thinking about making a DIY heat shield over the turbo using the SuperCheap heat-panel to add additional heat shielding so the hose and everything else will be even safer.
Other routings were considered but this was by far the simplest, there's just no way to neatly snake a long AN-10 hardline from the firewall like I did with the AN-6 line that will not obstruct other components (I need to be able to remove/access components without needing to disconnect the A/C).
Dropping the P/S is a good idea for the intercooler plumbing and in hindsight I'd probably get the A/C done by a professional but only AFTER fitting the new turbo kit. You should be there to watch how they route the plumbing to ensure that you can still work on the car without needing to disconnect the A/C, otherwise they'll end up doing what's quickest for them. I may still get the 6-AN hard-lines re-done professionally now that I have the routing for them all sorted out how I want (I don't like the ugly DIY brazing joins in the pipes).
Don't worry about dying, worry about not living!
Garage Thread: http://www.mx5cartalk.com/forum/viewtopic.php?f=57&t=76716
Garage Thread: http://www.mx5cartalk.com/forum/viewtopic.php?f=57&t=76716
- ManiacLachy
- Engaged
- Posts: 3315
- Joined: Mon Jan 13, 2014 2:35 pm
- Vehicle: NB SE
- Location: Brisbane
Re: Lokiel's "Gina" (2004 Titanium SE)
I knew you'd have your reasons, thanks!
To be honest, I'm even considering ditching the AC all together. All the weight savings! All the room for activities! No plumbing issues! I rarely used my AC when I was daily driving it, and now I have the Subaru the need is even less. It never worked too well in the first place, but it's still a big step to take. I plan to talk to Daffy's mechanic, Darren, about it, he'll be my man to perform the work including the turbo install.
To be honest, I'm even considering ditching the AC all together. All the weight savings! All the room for activities! No plumbing issues! I rarely used my AC when I was daily driving it, and now I have the Subaru the need is even less. It never worked too well in the first place, but it's still a big step to take. I plan to talk to Daffy's mechanic, Darren, about it, he'll be my man to perform the work including the turbo install.
- SKYHI
- Racing Driver
- Posts: 1355
- Joined: Sun Apr 01, 2007 8:08 am
- Vehicle: NB SE
- Location: Brisbane
Re: Lokiel's "Gina" (2004 Titanium SE)
ManiacLachy wrote:I knew you'd have your reasons, thanks!
To be honest, I'm even considering ditching the AC all together. All the weight savings! All the room for activities! No plumbing issues! I rarely used my AC when I was daily driving it, and now I have the Subaru the need is even less. It never worked too well in the first place, but it's still a big step to take. I plan to talk to Daffy's mechanic, Darren, about it, he'll be my man to perform the work including the turbo install.
Funny you should say that, as I'm currently considering whether or not to re-install the Ac when I finally do my radiator upgrade. The last couple of times I've dríven the car, it's been bearable, but I'm waiting to see how it copes with summer, especially now that I have a permanent black hardtop installed on the car
Who is online
Users browsing this forum: No registered users and 8 guests


