Lokiel's "Gina" (2004 Titanium SE)
Moderators: timk, Stu, zombie, Andrew, The American, Lokiel, -alex, miata, StanTheMan, greenMachine, ManiacLachy, Daffy
- Lokiel
- Forum legend
- Posts: 4126
- Joined: Thu May 28, 2009 2:39 pm
- Vehicle: NB SE
- Location: Brisbania
Re: Lokiel's "Gina" (2004 Titanium SE)
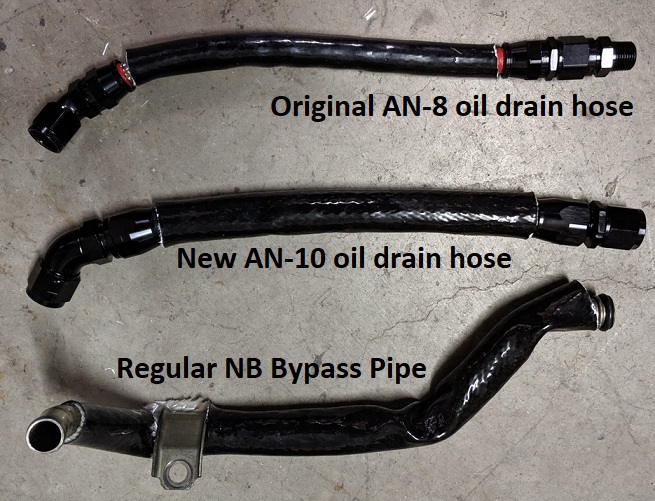
It was a long weekend in Queensland this weekend for Labour Day so I decided to sheath all my hot-side hoses and pipes and replace the AN-8 oil drain line with an AN-10 line.
MT.net (and now Borg-Warner) recommends using an AN-10 oil drain line for better drainage, which is what TSE supplies, along with an AN-10 flange for the turbo. The AN-8 lines can cause frothing of the oil because it can't drain fast enough, making drainage even worse, and the AN-8 barb that screws into the turbo protrudes high enough to allow oil to pool between it and the turbo housing - not an issue with a flange.
I still need to enlarge my oil drain hole in the oil pan but that'll have to wait until I can pull the engine out.
SpeedFlow produce fibreglass heat sleeves with a silicone coating so I bought some SpeedFlow-8, -10 and -12 sleeves.
I didn't like the extra turbo water-barb on the solid Bypass Pipe that runs underneath the exhaust manifold since I needed to plug it with a rubber bung so I bought a regular NB Bypass Pipe to use instead:
After my original fitting of the AN-8 oil drain line, I knew that re-fitting the oil drain line was going to be a pain in the arse since the fittings are all AN aluminium fittings so the alignment angles MUST be correct to prevent cross-threading which is difficult when one end of the hose is already fitted, everything is done by feel and I don't have hands like a small child.
I'd bought an AN-10 push-fitting flange in preparation for this but couldn't find the bloody thing so had to use screw fittings
As expected, it took hours to secure the fitting to the turbo flange's barb (I even tried unscrewing the flange from the turbo, screwed the hose to the flange's barb, then tried screwing the flange back onto the turbo - that was even more impossible!).
The "trick" was NOT to do it by feel from the side of the car where I had best access, but to do it from the front where I could just see the flange's barb so knew what angle to force the hose to when I screwed it in.
Unfortunately the two Bypass Pipes are different so it doesn't fit:
I went back to the original MSM/SE Bypass Pipe and sheathed it in a combination of SpeedFlow-10 and -12 heat sleeves:
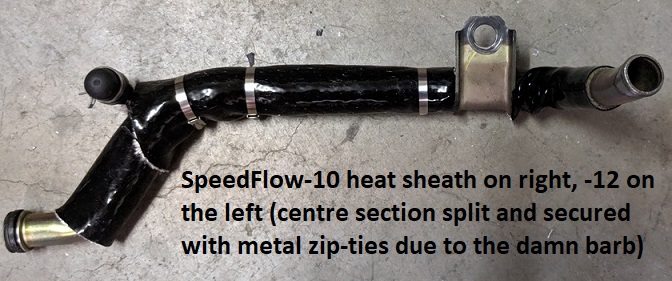
I also sheathed the oil catch can hose that runs over the turbo and the two heater hoses that go into the firewall. The heater hose closest to the engine took forever since it curls and I had to forcefully feed the sleeve on a few mm at a time:
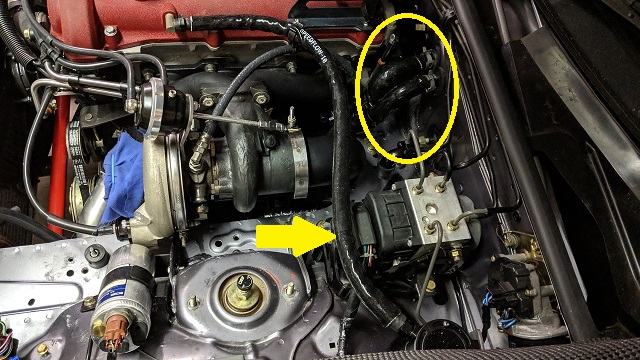
All back together:
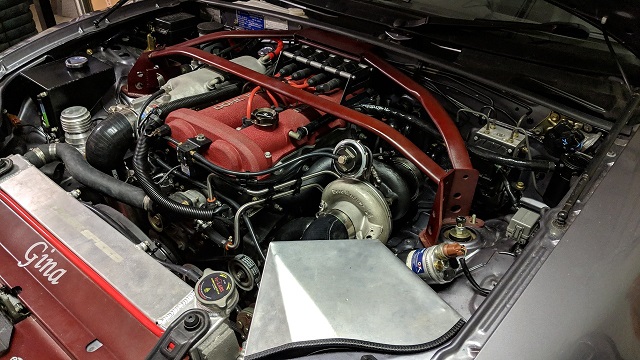
Now I need to get the A/C hard-lines sorted out.
Don't worry about dying, worry about not living!
Garage Thread: http://www.mx5cartalk.com/forum/viewtopic.php?f=57&t=76716
- ManiacLachy
- Forum Guru
- Posts: 3266
- Joined: Mon Jan 13, 2014 2:35 pm
- Vehicle: NB SE
- Location: Brisbane
Re: Lokiel's "Gina" (2004 Titanium SE)
It's all coming together slowly, and looking good. Interested to see the AC lines solution.
So, I might have missed it, for now are you just going to run the -8 oil drain? Or was it the -10 that you fitted with some difficulty to the turbo? In which case it's not connected at the engine end just yet?
-
- Speed Racer
- Posts: 7468
- Joined: Fri Feb 11, 2011 12:49 pm
- Vehicle: NA6
- Location: Purga, QLD
Re: Lokiel's "Gina" (2004 Titanium SE)
Will it be on the road in 2019
Great work and attention to detail!
- Lokiel
- Forum legend
- Posts: 4126
- Joined: Thu May 28, 2009 2:39 pm
- Vehicle: NB SE
- Location: Brisbania
Re: Lokiel's "Gina" (2004 Titanium SE)
ManiacLachy wrote:It's all coming together slowly, and looking good. Interested to see the AC lines solution.
So, I might have missed it, for now are you just going to run the -8 oil drain? Or was it the -10 that you fitted with some difficulty to the turbo? In which case it's not connected at the engine end just yet?
I replaced the AN-8 oil drain hose with an AN-10 oil drain hose - this was always going to be a bugger to fit so I wanted to do it when I had a spare afternoon. I really need to make the hole in the sump bigger too but at least now I no longer have issues with oil pooling inside the turbo between the previously used AN-8 barb and the turbo housing (with the flange fitting, oil runs out completely).
Annoyingly I only read about oil drain issues on MT.net (see https://www.miataturbo.net/diy-turbo-discussion-14/psa-efr-turbo-oil-drain-information-read-before-designing-your-oil-drain-93944/) a few days AFTER I installed the AN-8 hose.
I used the AN-8 hose rather than the TSE AN-10 hose because the TSE hose needed to be shortened anyway and the Borg-Warner installation manual recommended an AN-8 hose and the turbo was designed with an AN-8 barb fitting OR a flange fitting
Don't worry about dying, worry about not living!
Garage Thread: http://www.mx5cartalk.com/forum/viewtopic.php?f=57&t=76716
- ManiacLachy
- Forum Guru
- Posts: 3266
- Joined: Mon Jan 13, 2014 2:35 pm
- Vehicle: NB SE
- Location: Brisbane
Re: Lokiel's "Gina" (2004 Titanium SE)
Ok, so the -10 is on the turbo, nice. But it can't fit to the engine yet, right? It's still got a -8 sized hole that you need to enlarge with the engine out, right? Or are you able to still connect the -10 hose to that port, while not quite optimal?
Sorry, just trying to get it right in my head. Knowing that -10 is needed makes the install a little more complicated for an engine in situ, it's good information to have.
- Lokiel
- Forum legend
- Posts: 4126
- Joined: Thu May 28, 2009 2:39 pm
- Vehicle: NB SE
- Location: Brisbania
Re: Lokiel's "Gina" (2004 Titanium SE)
ManiacLachy wrote:Ok, so the -10 is on the turbo, nice. But it can't fit to the engine yet, right? It's still got a -8 sized hole that you need to enlarge with the engine out, right? Or are you able to still connect the -10 hose to that port, while not quite optimal?
Sorry, just trying to get it right in my head. Knowing that -10 is needed makes the install a little more complicated for an engine in situ, it's good information to have.
I have a flange fitting on the pan with an AN-10 barb - the flange is mounted using two OEM bolts on the pan.
The hole in the pan is still the OEM MSM/SE size so needs to be enlarged to match the size of the AN-10 hose - currently it's "about" AN-8 size.
Trying to get a drill in there with the engine in place is damn near impossible, even if I remove the turbo and exhaust manifold.
I've got a Boundary Engineering oil pump and SuperMiata clutch that I want to fit one day so it'll have to wait until then.
Don't worry about dying, worry about not living!
Garage Thread: http://www.mx5cartalk.com/forum/viewtopic.php?f=57&t=76716
-
- Fast Driver
- Posts: 229
- Joined: Wed Dec 12, 2012 9:26 pm
- Vehicle: NB SE
- Location: Sunshine Coast QLD
Re: Lokiel's "Gina" (2004 Titanium SE)
hey! probs wouldnt remember me as i have not been around for like 5 years. i purchased ur old exhaust off you and you spend tons of time helping me install it with all of your tools. wanted to get back into it all, just popped on to see if you were still going with the beast and dam you definetly are! nice work man, good to see ur still perfecting the SE i always looked up to haha.
- Lokiel
- Forum legend
- Posts: 4126
- Joined: Thu May 28, 2009 2:39 pm
- Vehicle: NB SE
- Location: Brisbania
Re: Lokiel's "Gina" (2004 Titanium SE)
james_p93 wrote:hey! probs wouldnt remember me as i have not been around for like 5 years. i purchased ur old exhaust off you and you spend tons of time helping me install it with all of your tools. wanted to get back into it all, just popped on to see if you were still going with the beast and dam you definetly are! nice work man, good to see ur still perfecting the SE i always looked up to haha.
I still have your OEM MSM/SE exhaust in my garage
Don't worry about dying, worry about not living!
Garage Thread: http://www.mx5cartalk.com/forum/viewtopic.php?f=57&t=76716
- MX5NBpsi
- Driver
- Posts: 48
- Joined: Wed Jan 03, 2018 12:38 am
- Vehicle: NB8B - Turbo
- Lokiel
- Forum legend
- Posts: 4126
- Joined: Thu May 28, 2009 2:39 pm
- Vehicle: NB SE
- Location: Brisbania
Re: Lokiel's "Gina" (2004 Titanium SE)
The following has been done over the last few weekends (lots of "show stoppers"):
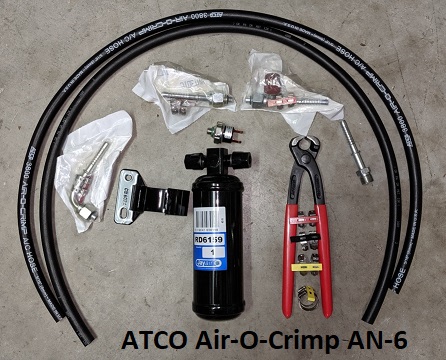
I did some web-surfing to find A/C hoses/fittings that I could use to hook up my relocated A/C Receiver/Drier and found what looked to be the ideal solution, ATCO Air-O-Crimp fittings: https://speedyairspares.com.au/catalog/NEW_Air_O_Crimp_Fittings_Easy_to_use_DYI_Crimping-269-1.html
These fittings come with their own crimp-locks and a cheap crimping tool (vs the US$300+ beadlock crimping tool) so I purchased a bunch of 6-AN and 10-AN fittings, matching hoses and the crimping tool. I also purchased a universal A/C Receiver/Drier cannister to match them that had two pressure switch ports and a pressure switch that was known to fit (this turned out to be unnecessary since the OEM one is the same thread as the one I bought).
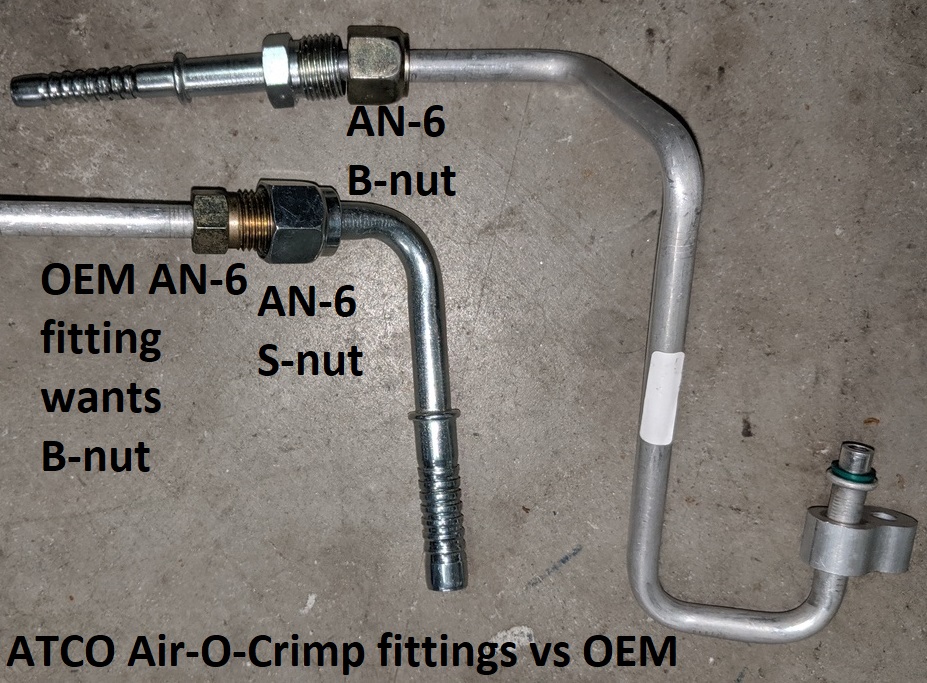
The 10-AN fittings fitted the bulkhead fine but the 6-AN fittings didn't fit the bulkhead OR the front of the car.
What the hell was that about?
Surely 6-AN fittings are all the same?
My 6-AN oil fittings all fit the OEM connections!
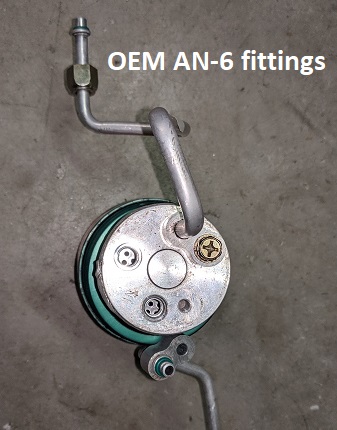
It turns out that 6-AN fittings can use a B-nut or an S-nut; the B-nut is the most common and is slightly smaller than the S-nut.
Most aftermarket 6-AN A/C fittings use S-nuts and some more web-surfing led to another option I hadn't thought of - make your own hardlines using your original fittings.
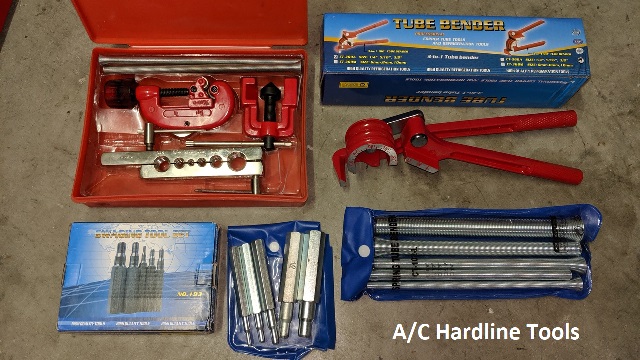
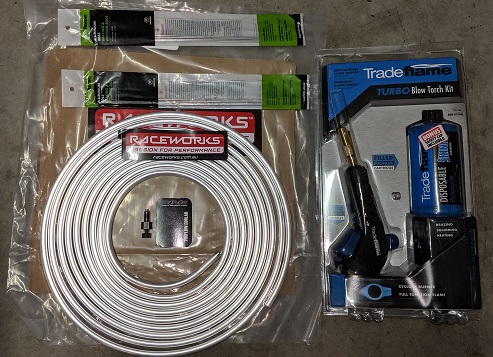
I did some research into brazing aluminium, watched some videos and figured "That looks easy enough!", so I bought some brazing stuff, swaging tools, a hardline bending kit and borrowed a friend's pipe-cutter and flaring toolset.
That "thing" in the middle of the bottom photo's aluminium roll is a pipe beading tool - cool little tool!
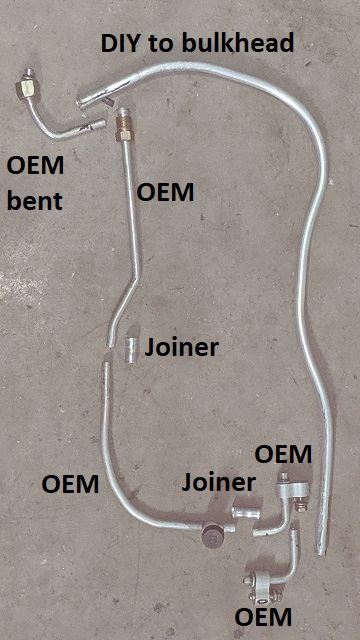
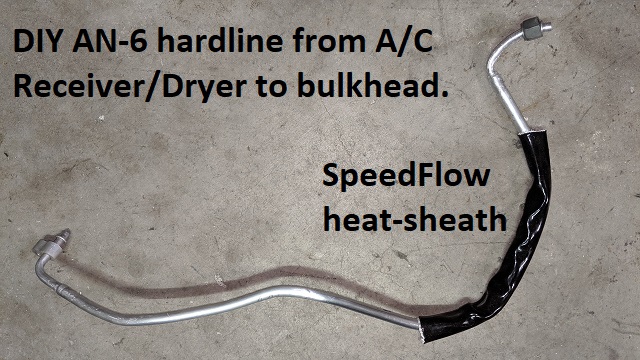
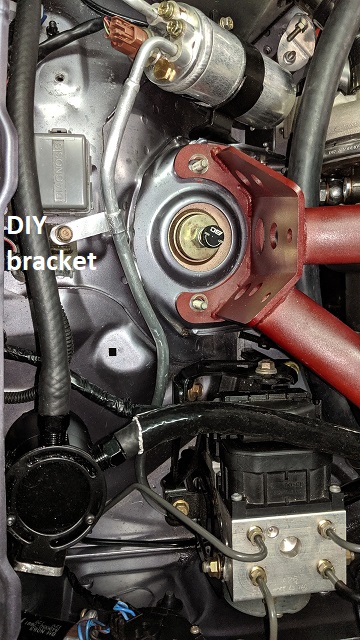
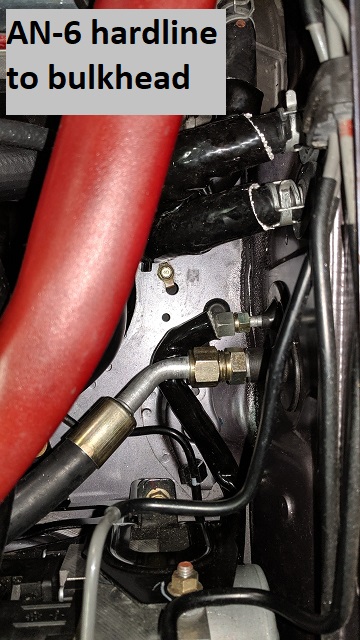
I cut up my existing hardlines, made the joiners and long hard-line to the bulkhead (it passes down and behind the ABS):
The joiners and DIY long hard-lines were swaged so that the OEM hardlines could be inserted into them and brazed.
Watching the online videos made brazing look really easy and they produced lovely results.
In practice it's MUCH harder, too much heat and your aluminium pipes will decompose, too little heat and the brazing rod will simply "gob-up" into slag where you're trying to apply it.
My technique was basically heat up the inner tube at the base mostly, keeping the torch moving constantly, push the brazing rod into the join and when it starts to melt drag the rod around the join slowly until it's sealed. After that, use a file to clean it up.
When the brazing rod starts melting it runs into the join and the rod melts easily in the existing molten braze - that's "the sweet spot".
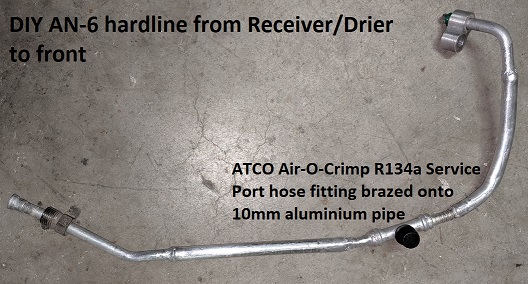
After making the front hardline with the R134a valve I did a leak test and found that the valve was leaking
It seems that the heat of the blowtorch burned it out since it was so close to the joiner - BUGGER!
Swaging the aluminium pipe I bought was hassle since the pipe is very thin so it crushed easily and straightening it out was annoying so I went to Bunnings and bought some straight 10mm rod.
The 10mm rod is slightly larger and thicker than the imperial aluminium roll I bought so was easier to swage but MUCH harder to bend.
I used the Air-O-Crimp 6-AN R134a straight fitting in the front hard-line, it fitted well once the 10mm pipe was swaged and made another long hard-line to the rear from the 10mm pipe (after fitting a SpeedFlow heat sheath to it):
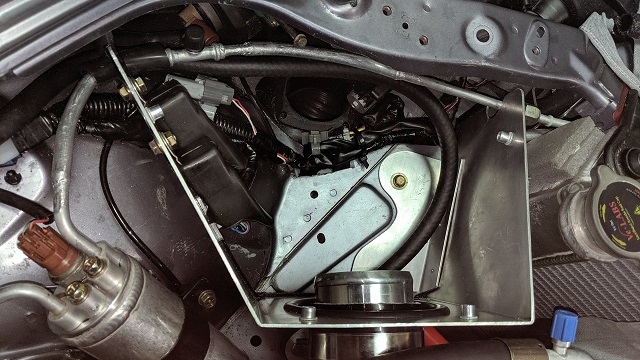
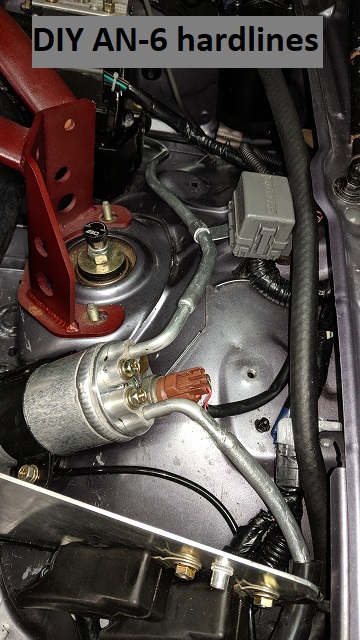
All fitted:
- love the way the rear hardline "flows"
The 10-AN line still needs some thought to make it look tidy.
I'll need to modify the peanut fitting at the condenser and make a custom hard-pipe from it that allows me to connect a R134a fitting - there's no room at the rear for it since the downpipe is too close.
Much as I'd like to avoid it, the 10-AN hose will need to run between the exhaust manifold and tower brace, there's no other tidy options or room - a SpeedFlow heat sheath will help though.
Don't worry about dying, worry about not living!
Garage Thread: http://www.mx5cartalk.com/forum/viewtopic.php?f=57&t=76716
-
- Speed Racer
- Posts: 7468
- Joined: Fri Feb 11, 2011 12:49 pm
- Vehicle: NA6
- Location: Purga, QLD
Re: Lokiel's "Gina" (2004 Titanium SE)
Any excuse to buy tools. I have tried aluminium brazing and like you struggled initially, it helps if you have a heat sink near where you are heating up to stop the heat 'traveling'.
When on the road?
When on the road?
- ManiacLachy
- Forum Guru
- Posts: 3266
- Joined: Mon Jan 13, 2014 2:35 pm
- Vehicle: NB SE
- Location: Brisbane
Re: Lokiel's "Gina" (2004 Titanium SE)
All the DIY! That's some good work. Could you take a shot of the engine bay a little further out so we can see the whole routing?
Road? Gina isn't meant for such things! She'll need new tyres by then and Lokiel will research vulcanising his own rubber compound.
Magpie wrote:When on the road?
Road? Gina isn't meant for such things! She'll need new tyres by then and Lokiel will research vulcanising his own rubber compound.
- Lokiel
- Forum legend
- Posts: 4126
- Joined: Thu May 28, 2009 2:39 pm
- Vehicle: NB SE
- Location: Brisbania
Re: Lokiel's "Gina" (2004 Titanium SE)
Magpie wrote:Any excuse to buy tools. I have tried aluminium brazing and like you struggled initially, it helps if you have a heat sink near where you are heating up to stop the heat 'traveling'.
When on the road?
I was initially holding the pipe directly in my vice while brazing.
When the join was quite a distance above the vice it worked OK but when close to the vice, as you said, the heat just passed directly into the vice.
For the AN-10 peanut fitting, I'm going to try sandwiching some broken tiles between the fitting and the vice to minimise heat loss.
After the A/C has been completed, hopefully next weekend, I plan to tune the MS3 and just enjoy driving it for a while.
Don't worry about dying, worry about not living!
Garage Thread: http://www.mx5cartalk.com/forum/viewtopic.php?f=57&t=76716
-
- Speed Racer
- Posts: 7468
- Joined: Fri Feb 11, 2011 12:49 pm
- Vehicle: NA6
- Location: Purga, QLD
Re: Lokiel's "Gina" (2004 Titanium SE)
ManiacLachy wrote:Vulcanising his own rubber compound.
Just think of the tools that will be required for this
-
- Speed Racer
- Posts: 2189
- Joined: Fri Nov 29, 2013 8:51 am
- Vehicle: ND - RF
- Location: Sydney
Re: Lokiel's "Gina" (2004 Titanium SE)
Magpie wrote:Just think of the tools that will be required for this
Hey, you shouldn't call Lokiel that!
"A Convertible has a top you can put down when the weather's nice...... A Roadster has a top you can put up when the weather's bad."
Who is online
Users browsing this forum: No registered users and 249 guests