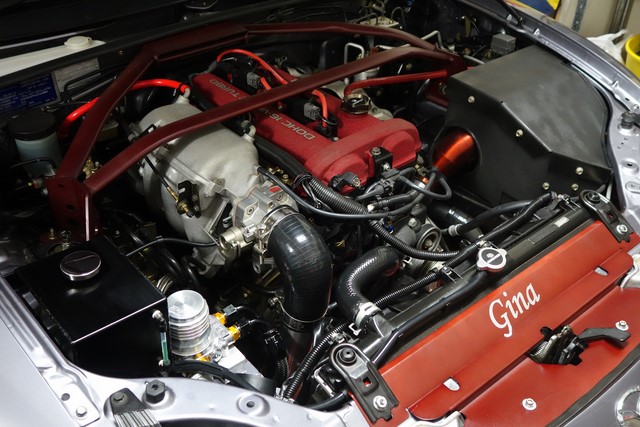
Lokiel's "Gina" (2004 Titanium SE)

Chat to do with your MX5/Miata/Eunos Garage Ride(s).

Moderators: timk, Stu, zombie, Andrew, The American, Lokiel, -alex, miata, StanTheMan, greenMachine, ManiacLachy, Daffy

User avatar
Lokiel
Forum legend
Posts: 4126
Joined: Thu May 28, 2009 2:39 pm
Vehicle: NB SE
Location: Brisbania

Re: Lokiel's "Gina" (once a 2004 Titanium SE) Recreated AGAIN

Postby Lokiel » Tue Jun 05, 2018 8:22 pm

Originally posted by Lokiel, Sun Sep 24, 2017 5:05 pm

Originally posted by ManiacLachy, Mon Jul 13, 2015 9:51 am[

Lokiel wrote:* For the short drive I had today, the seats are comfy.

Woah. WOAH! :!: Did you just say your drove it?!

I kid :mrgreen: Great write up as always, you always come up with inventive ways to get the job done and the new seats look great. Shame the Mazdaspeeds are so bulky because they do look fantastic, but in our cars where space is a premium these Lotus seats appear to be a winner.


Originally posted by timk, Wed Jul 15, 2015 1:30 pm[

Significant events in history:

Sun Jul 12, 2015 - Gina leaves the garage.


Originally posted by slug_dub, Wed Jul 15, 2015 6:34 pm[

Mind blown :D


Originally posted by Magpie, Wed Jul 15, 2015 6:42 pm[

So how much fuel did the car use on its drive? When will it be allowed on the road again so we can see it being dr ven :)


Originally posted by MINX, Wed Jul 15, 2015 6:46 pm[

Magpie wrote:So how much fuel did the car use on its drive? When will it be allowed on the road again so we can see it being dr ven :)

Jeez, you can't expect it to just get dr ven about like some sort of useful vehicle .
It sounds like it will now be due for a full tear down and rebuild ready for its end of year cruise to Supercheap.


Stuart


Originally posted by timk, Wed Jul 15, 2015 8:35 pm[

None of you guys are much better, myself included. Well maybe MINX if he still drives his daily?


Originally posted by Magpie, Wed Jul 15, 2015 8:40 pm[

Ouch timk, you almost hurt my limited feelings :) My excuse is I'm not home enough to use it as a daily ...


Originally posted by MINX, Wed Jul 15, 2015 9:22 pm[

I haven't been using it much this last two weeks, haven't been able to snaffle the keys off Lisa, beanied up topless to work. My SE is up to about 155k. Don't have to commute anywhere but still dr ven pretty much everyday, booked for Lakeside on Monday and 4th Natmeet Tassie in Feb.
Been lucky I guess with balance of power modding and reliability and ease of use with no peculiar traits so Easy for anyone to drive.
Simons car is any exercise in hobby modding not driving.
Image


Stuart


Originally posted by KevGoat, Wed Jul 15, 2015 9:37 pm[

I'm saying nothing ... I might manage to clock up around 5-6K for the year by the time my SE reaches it's first birthday with me ... thanks only to the 3K we did on the Canberra road trip :P


Originally posted by timk, Wed Jul 15, 2015 10:56 pm[

I manage 5 or 6 drives a year! :oops:


Originally posted by Lokiel, Wed Jul 15, 2015 11:11 pm[

Keep the wise-cracks coming, some of them do crack me up and most of them are close enough to the truth.
Don't worry about dying, worry about not living!
Garage Thread: http://www.mx5cartalk.com/forum/viewtopic.php?f=57&t=76716

User avatar
Lokiel
Forum legend
Posts: 4126
Joined: Thu May 28, 2009 2:39 pm
Vehicle: NB SE
Location: Brisbania

Re: Lokiel's "Gina" (once a 2004 Titanium SE) Recreated AGAIN

Postby Lokiel » Tue Jun 05, 2018 8:22 pm

Originally posted by Lokiel, Sun Sep 24, 2017 5:06 pm

MINX wrote::
Been lucky I guess with balance of power modding and reliability and ease of use with no peculiar traits so Easy for anyone to drive.
Simons car is any exercise in hobby modding not driving.
:
Stuart

Stuart's just got more self control and sense than some of us and hasn't succumbed to the "MOAR POWA!" bug - 150rwkw in an NA/NB is probably enough.
And yes, I'm a habitual tinkerer but have one more big mod I'm still waiting on before I'll get Gina back to the track.


Originally posted by ManiacLachy, Thu Jul 16, 2015 8:26 am[

timk wrote:None of you guys are much better, myself included. Well maybe MINX if he still drives his daily?

I drive mine every day :D Granted, I'm currently throwing a CEL ... and I'm not nearly as modded as the others :oops: (yet)

Lokiel, we just want to see more of Gina about the traps. Come to BP Coffee one Sunday morning, maybe a Mt Mee run?


Originally posted by The American, Thu Jul 16, 2015 8:39 am[

I think I've managed 3000 km in mine since I picked it up in early '14, but in defence of fun over distance, I've nearly worn out a set of semi slicks since about September!


Originally posted by Magpie, Thu Jul 16, 2015 9:48 am[

ManiacLachy wrote:Lokiel, we just want to see more of Gina about the traps. Come to BP Coffee one Sunday morning, maybe a Mt Mee run?

Would it help if I called around with the trailer and towed it up to Burpengary, this way its KM's will be kept low and it will not use any fuel :)


Originally posted by Lokiel, Thu Jul 16, 2015 12:15 pm[

Magpie wrote:
ManiacLachy wrote:Lokiel, we just want to see more of Gina about the traps. Come to BP Coffee one Sunday morning, maybe a Mt Mee run?

Would it help if I called around with the trailer and towed it up to Burpengary, this way its KM's will be kept low and it will not use any fuel :)


Does it come with a cover too, don't want any bug splatter?


Originally posted by Magpie, Thu Jul 16, 2015 1:05 pm[

You can provide your own cover if I'm towing it :)


Originally posted by speed, Thu Jul 16, 2015 6:54 pm[

I don't have a SE but am glad to see there are other forumites that do little kms. Suspect that I've done less kms than pretty much everyone on here due to being time poor when at home :(
We are talking less than 1,000 kms since purchased in no member 2013!!!
Don't worry about dying, worry about not living!
Garage Thread: http://www.mx5cartalk.com/forum/viewtopic.php?f=57&t=76716

User avatar
Lokiel
Forum legend
Posts: 4126
Joined: Thu May 28, 2009 2:39 pm
Vehicle: NB SE
Location: Brisbania

Re: Lokiel's "Gina" (once a 2004 Titanium SE) Recreated AGAIN

Postby Lokiel » Tue Jun 05, 2018 8:22 pm

Originally posted by Lokiel, Sun Sep 24, 2017 5:06 pm

Originally posted by Lokiel, Sun Aug 09, 2015 7:59 pm[

SHOCK, HORROR, DISBELIEF!

Gina actually left the garage!

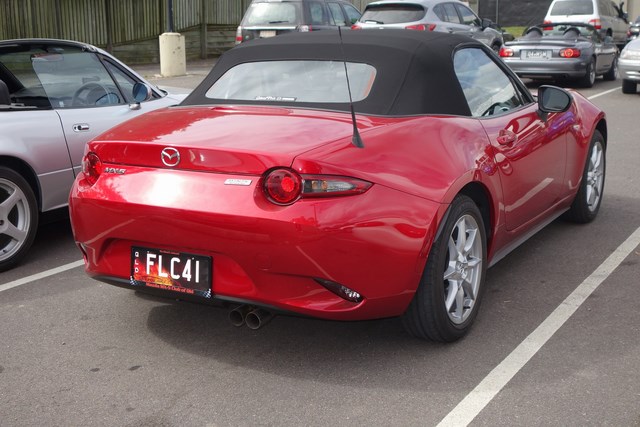
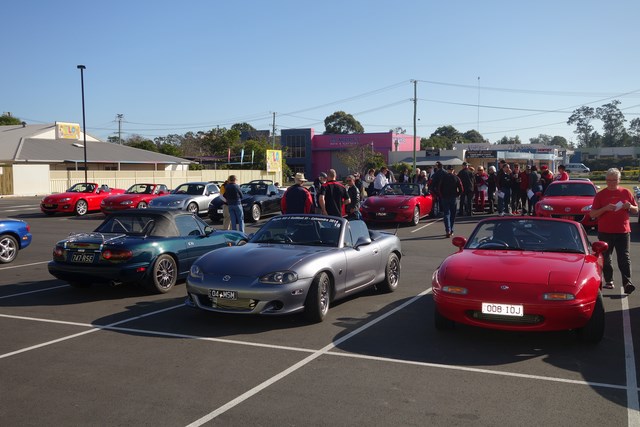
I went along to the QLD MX5 Car Club Brisbane run today from Meadowbank to Waterford to take Gina for a much-needed spin but mostly to check out the new NDs in the flesh.

... see (Gina's in the top right corner - NO, that's NOT MINX):
Image


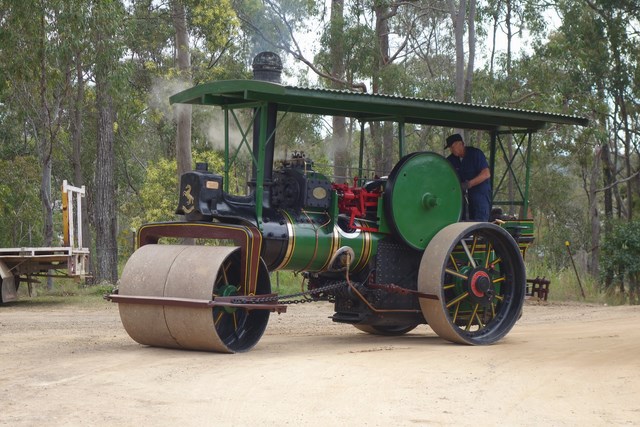
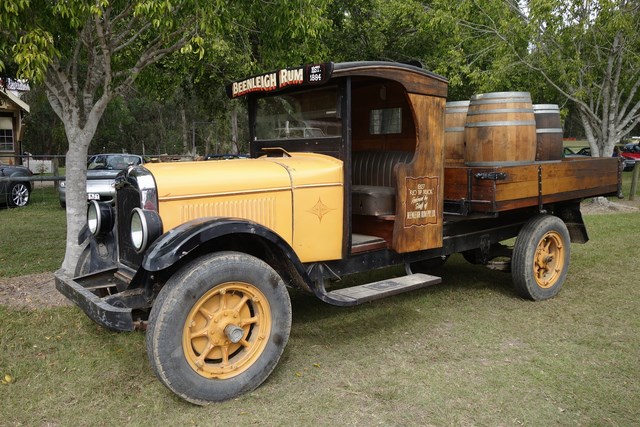
We had morning tea at Heritage Park Pimpama where they have quite a few working steam engines and heritage vehicles; here's a couple of them:
Image


Image


... also found a set of lightweight rims, they do need a bit of work but there's no gutter rash:
Image

- then I found out that they were 17" rims so I lost interest.

... see, it really IS Gina and NOT MINX:
Image


Originally posted by The American, Sun Aug 09, 2015 8:12 pm[

I once spotted 04MSM in pouring rain in Maleny. Would never have thought it would be accused if being a garage queen!


Originally posted by slug_dub, Mon Sep 28, 2015 5:32 pm[

Why couldn't I see this car at the Automotive Plus garage Sale?? :P


Originally posted by Magpie, Mon Sep 28, 2015 5:43 pm[

Because there was a very slim chance of rain forecast :)

Mine was so happy it went back on Sunday for more attention!
Don't worry about dying, worry about not living!
Garage Thread: http://www.mx5cartalk.com/forum/viewtopic.php?f=57&t=76716

User avatar
Lokiel
Forum legend
Posts: 4126
Joined: Thu May 28, 2009 2:39 pm
Vehicle: NB SE
Location: Brisbania

Re: Lokiel's "Gina" (once a 2004 Titanium SE) Recreated AGAIN

Postby Lokiel » Tue Jun 05, 2018 8:23 pm

Originally posted by Lokiel, Sun Sep 24, 2017 5:07 pm

Originally posted by Lokiel, Sun Oct 25, 2015 10:01 pm[

I've been quiet in this thread for a while since I've been spending most of my free time working on my Android AdapTrackit App, an Adaptronic Select ECU gauge display and data logger:

Image

For details, see http://lokiel.weebly.com/android-adaptrackit-app.html, it includes a complete User's Guide.

SUMMARY:

The Android AdapTrackIt App can be used to display live Adaptronic Select ECU values and log data for subsequent analysis.

The design goal of the AdapTrackIt App was to replace the instrument cluster and present as much information as possible to the driver whilst still being readable at a glance while driving.

LIMITATION: Currently only supports 1920x1080 screen resolutions (will address this soon).

For details, see http://lokiel.weebly.com/android-adaptrackit-app.html

I plan to have this available on the Android Play Store when all the bugs are sorted but it's available for use now if you want to try it out; you can find the .apk at http://www.adaptronic.com.au/forum/index.php?topic=6235.0

It's not malicious, I promise, and there's also a "Demo mode" that allows you to play with the App without needing connection to the ECU (so you can even try it out if you don't even have an Adaptronic Select ECU).

It still has some minor bugs (eg. the default boost gauge min and max values need to be set manually for the gauge to work and I need to handle the case when GPS is stopped) which I will fix in the next week or so (just need the time to do it).

Hope you like the Vehicle icons :P


Originally posted by joshuam, Sun Oct 25, 2015 10:14 pm[

Very cool!

Have you been working on that by yourself? There is a massive amount of work in that, and great documentation too which many people often forget about.


Originally posted by KevGoat, Sun Oct 25, 2015 10:43 pm[

That is all very cool!!


Originally posted by Lokiel, Sun Oct 25, 2015 11:43 pm[

joshuam wrote:Very cool!

Have you been working on that by yourself? There is a massive amount of work in that, and great documentation too which many people often forget about.

Thanks, and yes, it was a LOT of work by myself (I even created icons for the App, hence the MX5 vehicle icon) and I'm NOT a fan of Java. I started working on the App about 18 months ago and have been working at it on and off when I had the time. About a month ago I decided to really focus on it to finish it off and spent the last 4 weekends on it so it's really close to finished now.


Originally posted by ManiacLachy, Mon Oct 26, 2015 7:45 am[

That is awesome, Lokiel, very awesome!


Originally posted by Magpie, Mon Oct 26, 2015 8:01 am[

:BROADY:

When is it going to get exposed to UV rays?


Originally posted by Lokiel, Mon Oct 26, 2015 11:02 am[

Magpie wrote::BROADY:

When is it going to get exposed to UV rays?

Believe it or not, there has been some road-testing of the AdapTrackIt App!


Originally posted by Magpie, Mon Oct 26, 2015 11:14 am[

So we need to be on the look out for something that is camouflaged:
Image

By the way I'm back to using mine as a daily, drove it into Milton today in the rain :)


Originally posted by joshuam, Mon Oct 26, 2015 11:33 am[

Lokiel wrote:Thanks, and yes, it was a LOT of work by myself (I even created icons for the App, hence the MX5 vehicle icon) and I'm NOT a fan of Java. I started working on the App about 18 months ago and have been working at it on and off when I had the time. About a month ago I decided to really focus on it to finish it off and spent the last 4 weekends on it so it's really close to finished now.


Yes we all noticed the awesome NB icons :P

Yeah I have really wanted to do apps for stuff, but almost all my coding is in C or similar languages (Matlab, VB.Net, C++ etc) and I can't stand the sight of Java :P I find bugs in the code to just be impossible to find in Java.... It just stops working for fun!


Originally posted by ManiacLachy, Mon Oct 26, 2015 11:37 am[

Magpie wrote:By the way I'm back to using mine as a daily, drove it into Milton today in the rain :)


No rain on the East side (right around where Gina takes refuge) ;)
Don't worry about dying, worry about not living!
Garage Thread: http://www.mx5cartalk.com/forum/viewtopic.php?f=57&t=76716

User avatar
Lokiel
Forum legend
Posts: 4126
Joined: Thu May 28, 2009 2:39 pm
Vehicle: NB SE
Location: Brisbania

Re: Lokiel's "Gina" (once a 2004 Titanium SE) Recreated AGAIN

Postby Lokiel » Tue Jun 05, 2018 8:23 pm

Originally posted by Lokiel, Sun Sep 24, 2017 5:12 pm

Originally posted by Lokiel, Sat Oct 31, 2015 11:13 am[

I had the shocks replaced on my SP23 last week and used my Eibach Pro-Kit springs instead of the OEM springs. I got Fulcrum to do it since getting the front shocks off is a bitch of a job and I'd done it twice before (once to put them on my original Mazda 3 and once to take them off after it got hail-damaged). I'd need a wheel alignment anyway so the cost of their labour vs. mine was worth every penny.

Fulcrum informed me that my driver-side motor mount needed replacing, a notorious problem with Mazda 3s, Ford Focuses and the Volvo using the same platform (always forget the model) - these tend to fail on regular Mazda 3s and Mazda used the same mounts for the SP23 and MPS which have even more power and torque. I'd suspected this since I could hear some metallic knocking on the right hand side if I listened for it when I started the engine. With the Eibach springs in place, the knocking is obvious when I start the engine and every bump in the road I could feel/hear it so those factory springs were doing one hell of a job to cushion the ride. I've ordered a complete set of engine mounts and will be installing them next weekend (if you don't hear from me after that, please send someone around, I may be pinned under the engine block). It's not a hard job and the mounts are easy enough to get at so it should only take a few hours, and this lovely lady has been a big help:
[youtu]https://youtu.be/[/youtu]
[youtu]https://youtu.be/[/youtu]
There's another mount under the battery tray but unfortunately she hasn't done a video for that :( There are other youtube videos on it.

With the firmer springs, I suspect the driver-side engine mount may have an even shorter life-span than normal so will look at some more hardy solutions for when that occurs (unfortunately most are race-oriented which means greater NVH, something I don't really want in a DD but could live with).

Ideally I'd just risk driving Gina to work in the meantime but the clutch has been slipping, even under mild acceleration. This was something I'd been waiting to fix all in one go with the TSE cast manifold I'm waiting for and the water inlet mod I want done (to allow the hose run diagonally down behind the A/C and straight to the radiator - I hate the convoluted route the OEM hose takes and it's too close to my intercooler plumbing).

So now I have 2 cars that I'm not driving to work :evil:


Originally posted by ManiacLachy, Sat Oct 31, 2015 1:01 pm[

Gina's clutch is slipping? The OS Gliken? I thought that thing would be over kill and last ages?


Originally posted by bruce, Sat Oct 31, 2015 3:14 pm[

Lokiel drives like a girl and slips the.clutch cconstantly!


Originally posted by Lokiel, Sat Oct 31, 2015 4:26 pm[

bruce wrote:Lokiel drives like a girl and slips the.clutch cconstantly!

Image
-LOL


Originally posted by bruce, Sat Oct 31, 2015 4:31 pm[

Lokiel writes with crayons! <-- Lokiel's edit: This taunt cracked me up!


Originally posted by Lokiel, Sat Oct 31, 2015 8:09 pm[

bruce wrote:Lokiel writes with crayons!

Them's pretty spiteful words coming from a guy who's on "The List"!
Don't worry about dying, worry about not living!
Garage Thread: http://www.mx5cartalk.com/forum/viewtopic.php?f=57&t=76716

User avatar
Lokiel
Forum legend
Posts: 4126
Joined: Thu May 28, 2009 2:39 pm
Vehicle: NB SE
Location: Brisbania

Re: Lokiel's "Gina" (once a 2004 Titanium SE) Recreated AGAIN

Postby Lokiel » Tue Jun 05, 2018 8:24 pm

Originally posted by Lokiel, Sun Sep 24, 2017 5:12 pm

Originally posted by The American, Mon Nov 02, 2015 7:11 pm[

Lokiel,
I've been thinking about the TSE manifold you've mentioned somewhere. How will it help your boost creep issue? Wouldn't that require provision for an EWG?


Originally posted by Lokiel, Mon Nov 02, 2015 8:53 pm[

The American wrote:Lokiel,
I've been thinking about the TSE manifold you've mentioned somewhere. How will it help your boost creep issue? Wouldn't that require provision for an EWG?

The EFR6258 turbo can easily be "clocked", you can rotate it so that the outlet points where you want (it's not infinite, there are a fixed number of clocking positions).
The wastegate actuator's bracket is mounted to the inlet housing and it can be mounted in several places (there are mount points around the entire circumference, once again, there are a limited number of options).
The shaft of the wastegate actuator connects to a wastegate hinge on the exhaust housing that opens and closes the wastegate valve.
To activate the hinge cleanly, the shaft MUST move back and forth along the same plane as the hinge with NO twisting.
With my clocking orientation, the shaft needs to twist to activate the wastegate valve cleanly.

I now think this is a design flaw in the wastegate actuator's bracket, instead of bolt holes to bolt onto the turbo's inlet housing, they should be "elongated bolt holes" that allow it to to be rotated around a bit to allow the shaft to move correctly.
eg. Like the adjustable Garret one in the top left corner of this photo:
Image
The risk with this is that the wastegate bracket may slide so maybe it would have been better to provide a temporary one to identify where the bolt holes need to be drilled and making the installer drill their required mount holes into the actual bracket.
All the work that was done to try and address the wastegate binding was on modifying the shaft, I don't think that adjusting the bracket was ever considered.

If you don't change the clocking of the turbo from the factory, the wastegate shaft moves correctly. I don't think enough effort was put into assuring that the wastegate shaft moves correctly if oriented differently.

I've harranged Savington from TSE about ensuring that the wastgate will NOT bind or generate boost creep if I want the turbo outlet clocked down and he's assured me that it wont.

Jason from MX5 Plus suggested re-making the manifold with an EWG - one less issue to deal with.


Originally posted by Lokiel, Mon Nov 02, 2015 9:58 pm[

One thing I really need to explicitly point out in this thread, and I tell this to everyone who's asked me about it, is "What went wrong with my build?"

Several things:

1. The EFR6258 turbo had only just come out and few people actually had one so issues regarding boost creep and wastegate valve binding weren't widely known. Using a "Bleeding Edge" turbo isn't the smartest thing to do, no matter how good it appears on paper - it's better to wait for it to be proven and issues discovered/solved.

2. I wanted to route the turbo outlet plumbing underneath rather than over the top in the same manner as the SE does so that I could make an airbox without a hot pipe running through the middle of it - this also allowed me to duct air from the passenger-side foglight into the airbox using the hole that the original intercooler pipe used. This required the turbo to be re-clocked. Dann's original suggestion was a top-mount manifold which may have allowed me to use the factory orientation.

3. My engine wasn't built when I had the turbo fitted and I was paranoid about bending a rod on the way home (it's a long drive from Newcastle to Brisbane, temptation to see just what the new turbo could do would have seen me bury the pedal a few times) so I asked Dann to simply wire the wastegate open. Testing the wastegate operation wasn't something either of us even considered - it should "just work" shouldn't it?

These decisions were all mine and Dann built what I wanted - the manifold and exhaust really do look great and I'm still amazed he managed to build a low-mount manifold, there's not much space down there. Dann actually re-made the manifold after not being happy with the first attempt and I'm sure he would have made a 3rd one if my engine was built and he was tuning it since he would have identified the massive boost creep and wastegate binding then.

I've put all this down to "Lessons hard-Learned" :(


Originally posted by ManiacLachy, Tue Nov 03, 2015 7:53 am[

You love it on the bleeding edge though, and we appreciate you for it!

Why the TSE manifold and not the Fab9? Isn't the Fab9 already setup for an EWG? Maybe you've just had enough of them after your COPs issues, and having to build your own fittment kit for the FMIC?


Originally posted by Lokiel, Tue Nov 03, 2015 10:06 am[

ManiacLachy wrote::
Why the TSE manifold and not the Fab9? Isn't the Fab9 already setup for an EWG? Maybe you've just had enough of them after your COPs issues, and having to build your own fittment kit for the FMIC?


I'm NOT a fan of how far "slung-out" the Fab9 turbo sits, that's a lot of weight hanging at a distance from the engine block - it's going to bounce rather than vibrate. charlie_91's thread shows that his manifold, which was similar, cracked in a couple of places on his drive home from Sydney because the manifold couldn't bear the weight.

I mentioned this to Dann and he's not a fan either for similar reasons.

The EWG is nice though.

As for Fab9's other stuff, I can't complain about that and service has always been good/prompt.

I sold the COPs to davekmoore and his guy got them running. I had similar issues with my LSx CNPs too so it's definitely some other issue that I need to chase down (possibly ECU related).

The Fab9 intercooler requires more work for MSM/SE owners than fitting the commonly used CoolingPro intercooler since its cold-side outlet does not line up with the MSM/SE's plumbing for it. I believe that there's now a fix for this (ie. you can buy the cold-side plumbing).


Originally posted by Lokiel, Sat Mar 19, 2016 3:10 pm[
Don't worry about dying, worry about not living!
Garage Thread: http://www.mx5cartalk.com/forum/viewtopic.php?f=57&t=76716

User avatar
Lokiel
Forum legend
Posts: 4126
Joined: Thu May 28, 2009 2:39 pm
Vehicle: NB SE
Location: Brisbania

Re: Lokiel's "Gina" (once a 2004 Titanium SE) Recreated AGAIN

Postby Lokiel » Tue Jun 05, 2018 8:24 pm

Originally posted by Lokiel, Sun Sep 24, 2017 5:13 pm

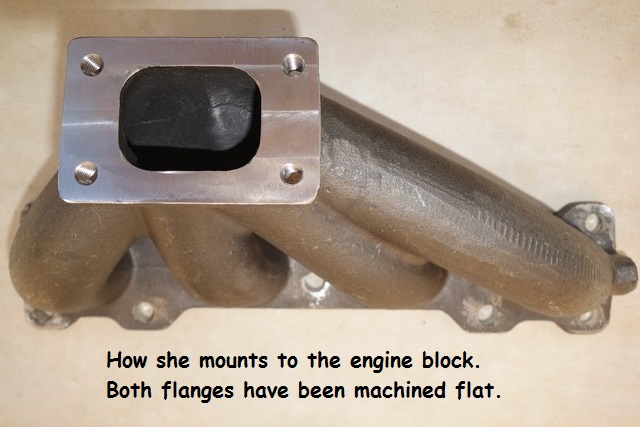
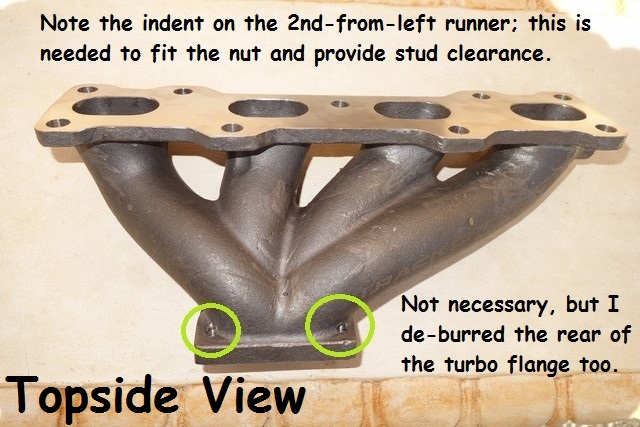
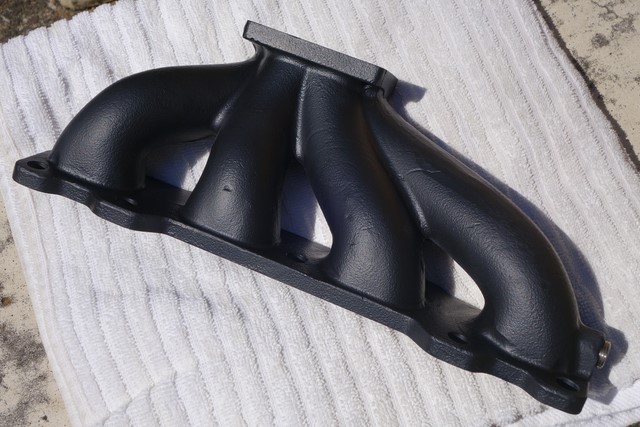
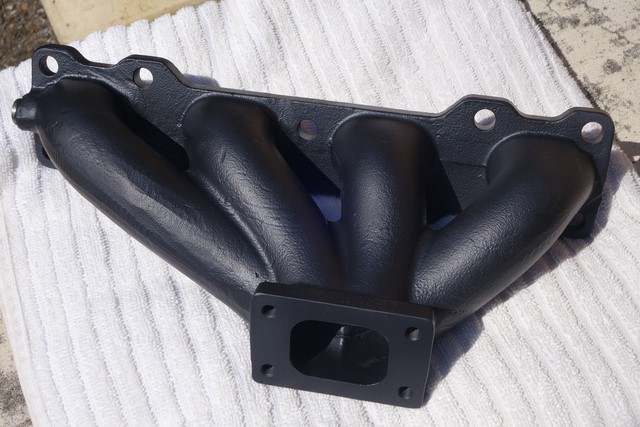
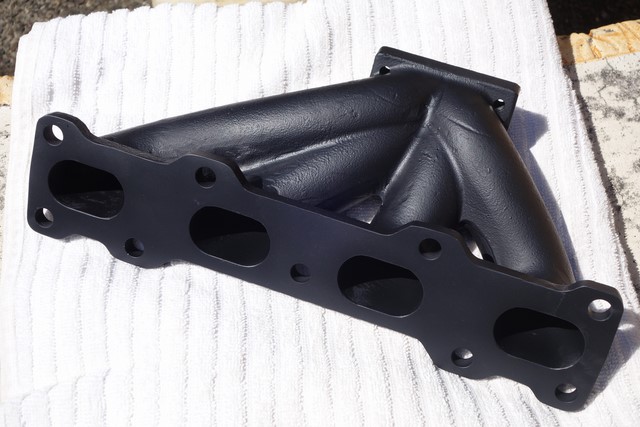
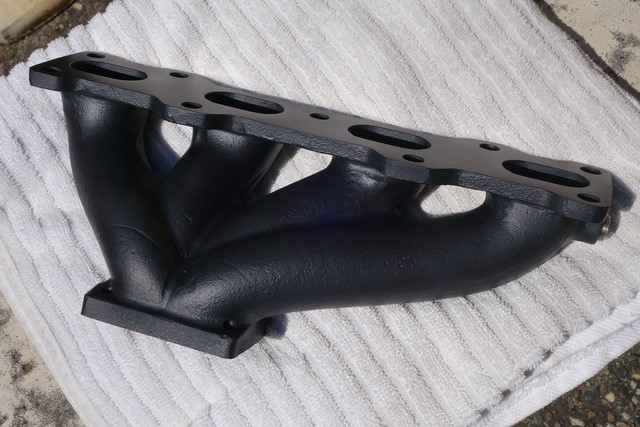
WooHoo!!! TSE EFR turbo exhaust manifold arrived yesterday!

First impression was that "It''s heavy!" - 5.9kgs which is a good thing, I know it can handle the weight of the EFR6258 hanging off it.

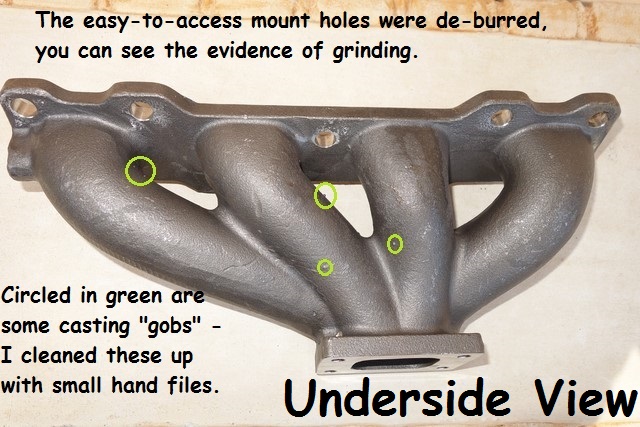
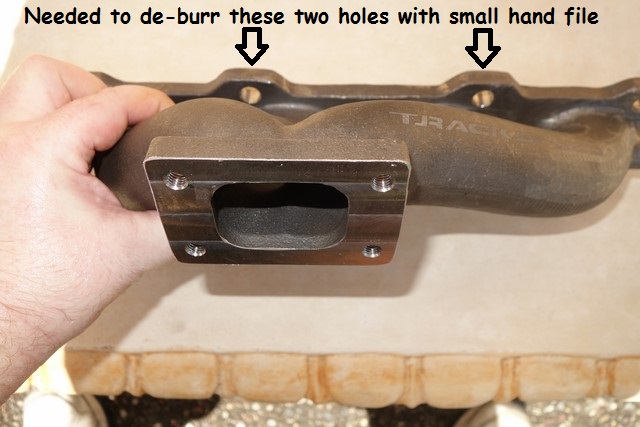
The only real work I needed to do on it was clean up a few burrs (the easy-to-access mount holes were already deburred) and eliminate some casting "globs" and ridges since I plan on getting it ceramic coated while I wait for the matching TSE downpipe to arrive.

It's well casted - I have a lot of cast iron weight plates and the cheaper ones have hundreds of these small "globs" (even the good ones have them); I suspect that the cheap plates have been sand-casted. There's a few creases and ridges on the outside but that's typical of castings.

The faces have all been machined flat.

Image


Image


Image


Image


I plan to get it ceramic coated black at http://www.competitioncoatings.com.au since I reckon black looks better than rusty-orange and anything to reduce under-bonnet temperatures is a good thing.
They also have a silver option but timk thought that looked like "too blingy" when he did his and re-did it black (I thought it made the manifold look like something you'd buy off eBay).

At this rate I'm hoping to have the car up and running by July (unfortunately I've learned patience through this build :( )


Originally posted by ManiacLachy, Sat Mar 19, 2016 3:31 pm[

My birthday is in July, you can take me for a ride as a present :mrgreen:

So, what's the plan once the DP arrives? Drive down to Newcastle for the magic touch?


Originally posted by Lokiel, Sat Mar 19, 2016 8:01 pm[

ManiacLachy wrote::
So, what's the plan once the DP arrives? Drive down to Newcastle for the magic touch?

My clutch is slipping at the moment and I plan to get it looked at by MX5 Plus so figured I'd get them to fit the turbo at the same time. I want the clutch tested when the car's generating around 270rwhp, I'd hate to get it looked at now only to find it may need additional work once the new manifold and downpipe have been fitted because the car's generating a LOT more power.


Originally posted by taminga16, Sat Mar 19, 2016 9:08 pm[

Bruce would be on a lot of peoples "LISTS".
Greg.


Originally posted by Lokiel, Sat Mar 19, 2016 9:42 pm[

taminga16 wrote:Bruce would be on a lot of peoples "LISTS".
Greg.

All in good fun, I got a chuckle out of his "Lokiel writes with crayons!" response.


Originally posted by bruce, Sun Mar 20, 2016 3:39 pm[

I am on so many LISTS, I have to tell people to 'join the queue'.

On a serious note, any idea of the cost to coat the manifold and the dump? These are things I too need doing. I know black is recommended for turbos, but I wonder how the silver coat is lasting (I enjoy bling).


Originally posted by speed, Mon Mar 21, 2016 8:41 am[

taminga16 wrote:Bruce would be on a lot of peoples "LISTS".
Greg.

Haha but I do respect his bluntness and honesty in other posts.

Lokiel, the manifold looks great. You guys are making me want to turbo my car faster than I had planned :)


Originally posted by Lokiel, Mon Mar 21, 2016 10:17 am[

bruce wrote::
On a serious note, any idea of the cost to coat the manifold and the dump? These are things I too need doing. I know black is recommended for turbos, but I wonder how the silver coat is lasting (I enjoy bling).


e-mail response from competitioncoatings.com.au:

"To ceramic coat your manifold in Black would cost $247.5 inc gst.
At this stage we would say allow up to 2 3 weeks from the time we receive it, as we have the easter long weekend coming up"

Their warranty is for 2 years.
Don't worry about dying, worry about not living!
Garage Thread: http://www.mx5cartalk.com/forum/viewtopic.php?f=57&t=76716

User avatar
Lokiel
Forum legend
Posts: 4126
Joined: Thu May 28, 2009 2:39 pm
Vehicle: NB SE
Location: Brisbania

Re: Lokiel's "Gina" (once a 2004 Titanium SE) Recreated AGAIN

Postby Lokiel » Tue Jun 05, 2018 8:25 pm

Originally posted by Lokiel, Sun Sep 24, 2017 5:14 pm

Originally posted by Lokiel, Mon Mar 28, 2016 3:08 pm[

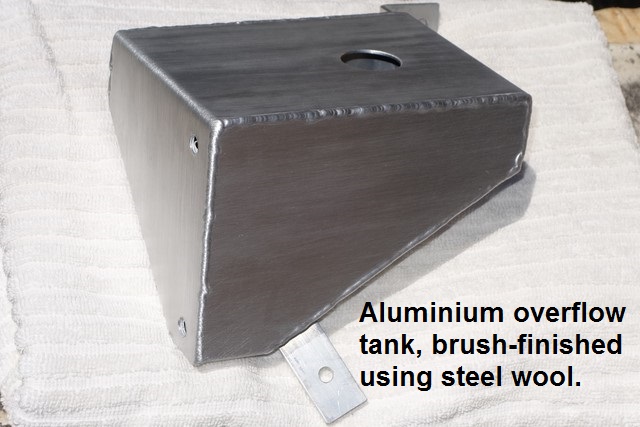
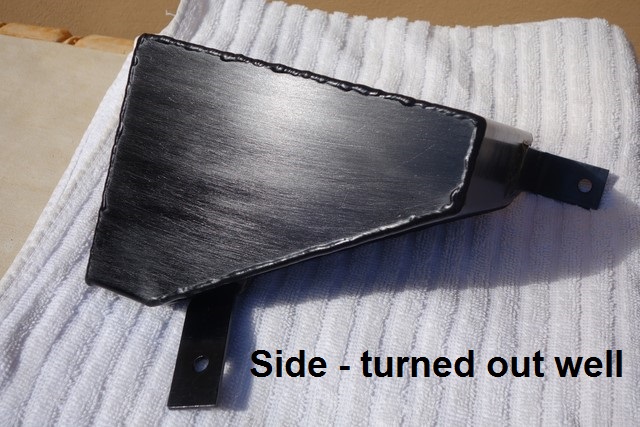
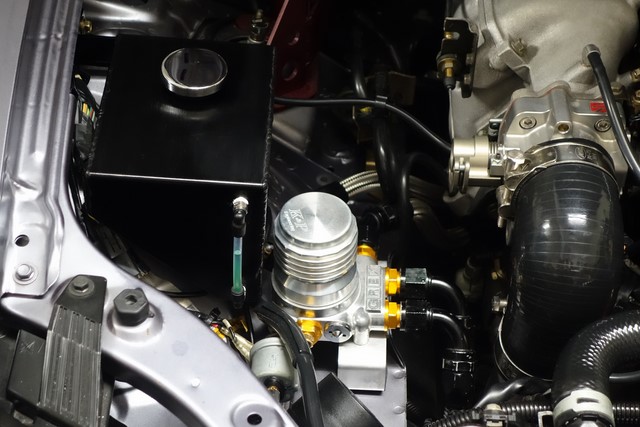
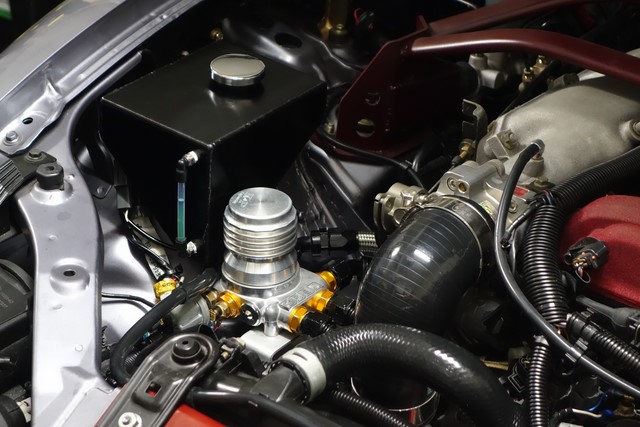
Last year I organised a Group Buy for some NB Aluminimum coolant reservoir tanks from FrankB at MiataTurbo.net (see http://mx5cartalk.com/forum/viewtopic.php?f=28&t=68679)).

Image


I wanted a brushed aluminium finish so I hit it with various abrasive pads and finally settled on steel wool since that produces the most abrasion - I would've liked even deeper abrasion but couldn't find anything better that wouldn't gouge the crap out of the tank.

The problem with raw aluminium is that is scratches and stains easily and it's bound to stain being a water tank when you fill it and spill a bit.

Painting is an option but anodising is even better since it creates a hard surface that's resistant to scratches and you don't have to worry about the paint flaking off or scratching.

I did a lot of research on home DIY anodising and figured I could do it over a long weekend and still get my chores done so this Easter was a good time to do it.

Caswell produces a DIY anodising kit and has a great DIY guide: http://www.caswellplating.com.au/LCD.pdf
It's a copyrighted document so I can't quote it but page 3 contains why/how anodising works and page 7 contains the steps involved.
I had to convert all the values to metric and calculate how much time was needed to anodise the tank (it's based on the surface area of the part and amperage).

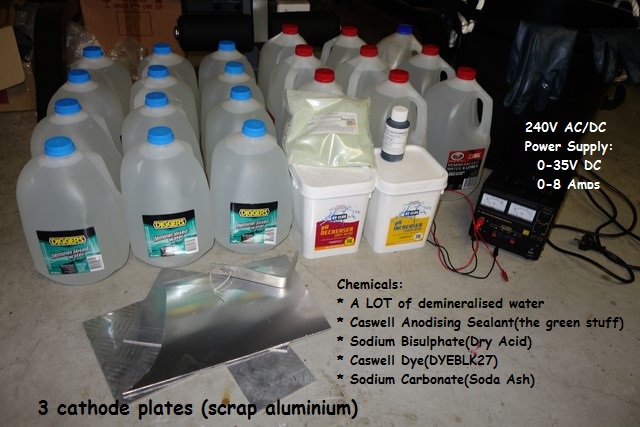
I wasn't keen on dealing with sulphuric acid so visited Bunnings to use Pool acid (Sodium Bisulphate, pH increaser) instead after reading that it's a good alternative.
While there, I picked up some massive tubs, Pool soda ash (Sodium Carbonate, pH decreaser - to neutralise acid before disposing of it), heavy-duty cleaning gloves and bought out all their de-mineralised water, as well as SuperCheap's too.

Earlier in the year I purchased Caswell's Black and Red dyes, some Titanium wire and their Anodising Sealant.
You can use other dyes commonly available from the chemist but their effectiveness cannot be guaranteed.
Some say that the sealant is not necessary, you can just boil the part when finished.
For anodising Aluminiumm, the anode must be either Aluminium or Titanium.

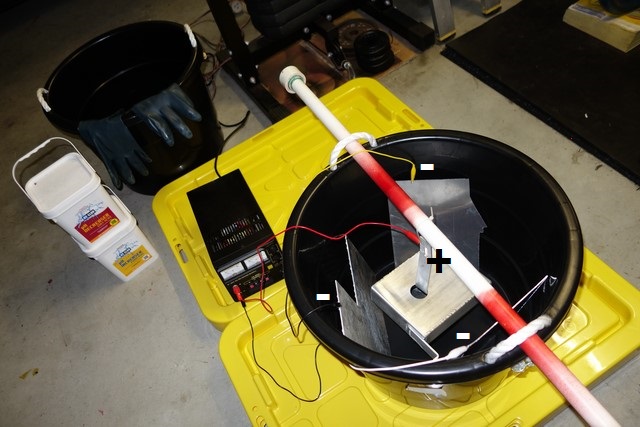
Here's the array of supplies, minus buckets and pots:
Image

- I suspect some of my neighbors think I'm setting up a meth-lab and fully expected a visit from the boys in blue over the weekend:
Image

First thing to do is "prep" the crap out of the tank, get the brushed finish correct, clean it in detergent, degrease it, wash it, degrease it again, then wash it again in de-mineralised water, all using rubber gloves - one oily fingerprint and you have to start all over again.
Anyone who's ever done any painting knows how important preparation it but anodising is another level on top of that.

The tank after brush-finishing:
Image


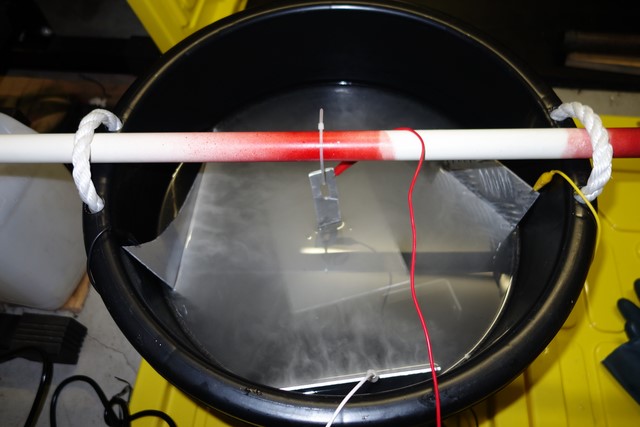
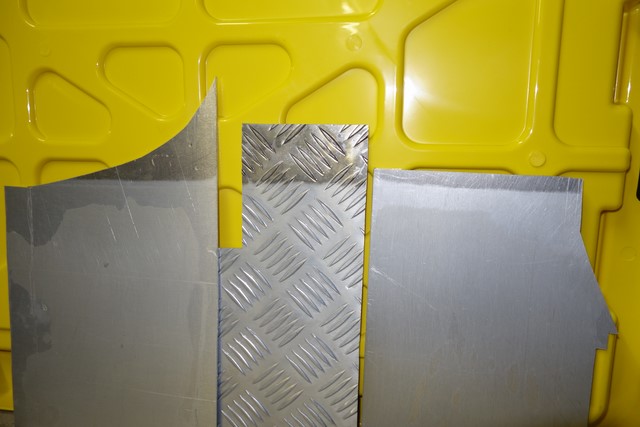
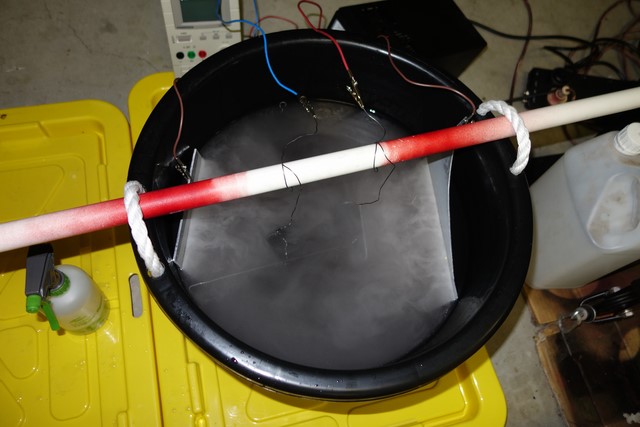
I used a whole 3kg tub of the acid and 3 aluminium cathodes (offcuts) - for best results, the surface area of the cathodes should be the same as the surface area of the part being anodised.
Image


Image

- fizzing nicely
- interestingly, the checker-plate offcut was less effective than the other two aluminium plates, possibly because it had been anodised

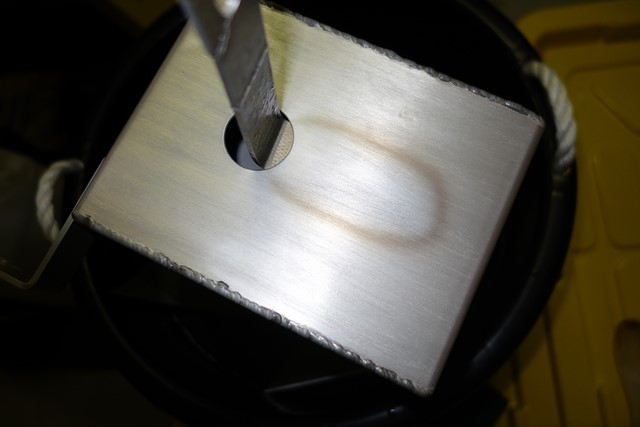
When finished anodising, 2 hours 40 minutes at 4 amps, it looked like this:
Image


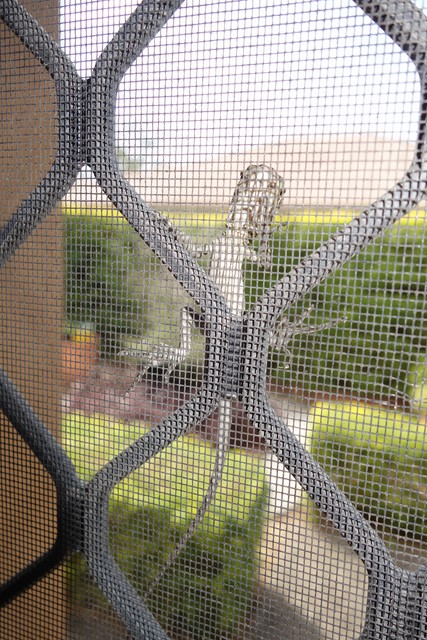
I hoped that the black dye would mask the oblong mark, corresponding to the contact patch of the 90* aluminium anode underneath, so mist-spray washed it and put it in the dyeing tank, watched by this curious fellow:

Image

- we get a LOT of geckos here in Brisbane but this is a "Tommy Roundhead" (according to Google); he used to run away but now is quite tame and hangs out near my back door.

After 5 minutes I took it out to see how it was looking and noted that all sides looked OK EXCEPT the top, the dye just ran off.
I re-read the instructions again which state that any part in contact will NOT anodise correctly, no wonder it wasn't absorbing colour!
DOH! - I used that 90* aluminium bracket as an anode because I figured it wouldn't leave a mark since the contact point was inside the tank :(

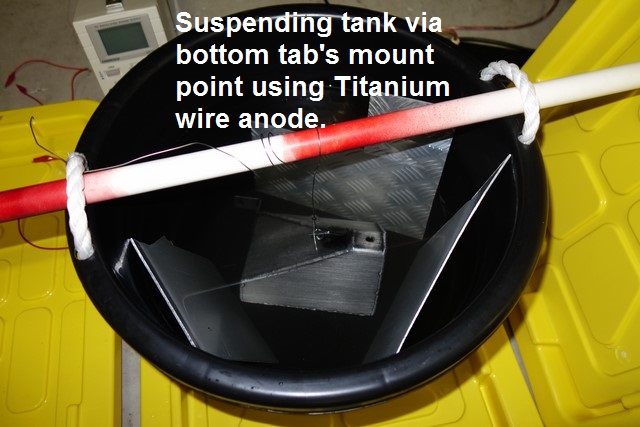
After rinsing the dye off, I repeated the stainless steel finish (to remove the dye that wouldn't rinse off) and cleaning process, then started anodising again using the Titanium wire connected to the base tab's mount hole:
Image


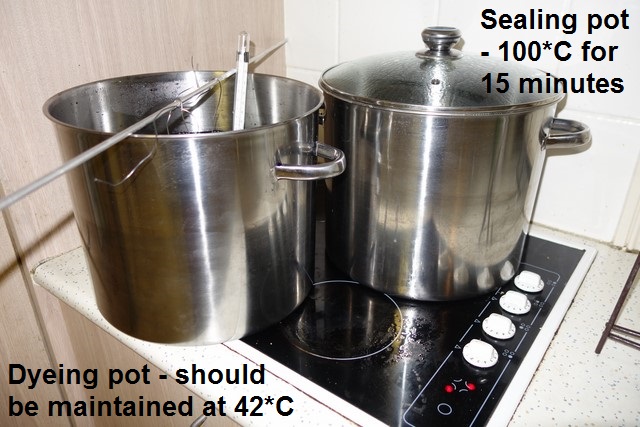
Much better this time, so after a mist-spray wash, into the dyeing tank at 42*C for 15 minutes:
Image


This time the colour was absorbed everywhere, even on the tab where the anode connected to, so into the sealant pot for 15 minutes.

I mist-sprayed the tank again to wash off the sealant, rinsed the crap out of it, then put it in the oven at 200*C for 15 minutes to dry it out.
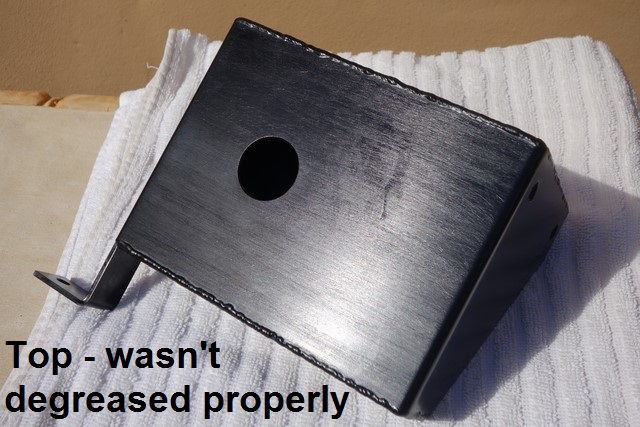
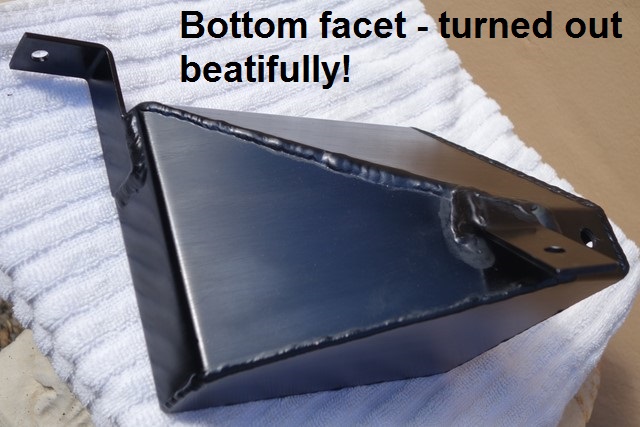
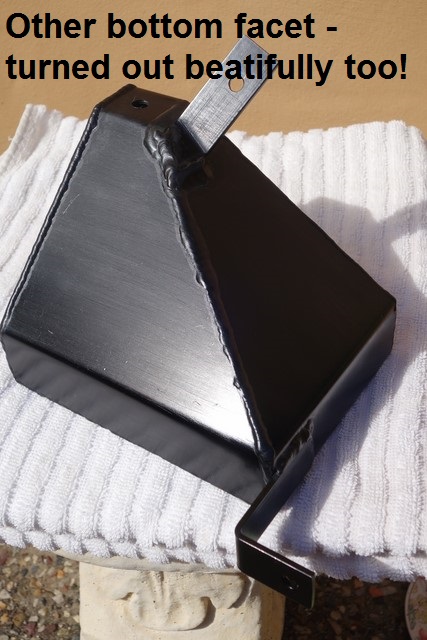
It turned out pretty good, except for a few grease marks (illustrating why preparation is SO important) on the top which can be seen in the right light:
Image

Image

Image

Image


Q: Why Black and not Red?
A: My airbox in the opposit corner is black, it's "a symmetry thing".


Originally posted by Lokiel, Mon Mar 28, 2016 3:11 pm[

Here's the cathode plates after anodising:
Image


Originally posted by Magpie, Mon Mar 28, 2016 3:55 pm[

Impressive.
Don't worry about dying, worry about not living!
Garage Thread: http://www.mx5cartalk.com/forum/viewtopic.php?f=57&t=76716

User avatar
Lokiel
Forum legend
Posts: 4126
Joined: Thu May 28, 2009 2:39 pm
Vehicle: NB SE
Location: Brisbania

Re: Lokiel's "Gina" (once a 2004 Titanium SE) Recreated AGAIN

Postby Lokiel » Tue Jun 05, 2018 8:25 pm

Originally posted by Lokiel, Sun Sep 24, 2017 5:15 pm

Originally posted by Lokiel, Mon Mar 28, 2016 4:08 pm[

Thanks Mark, I've wanted to do this for so long but knew I needed a few days to do it the first time.

Damn, just noticed that I spelled "beautifully" wrong in an image above AND cut&pasted it into the next image :(

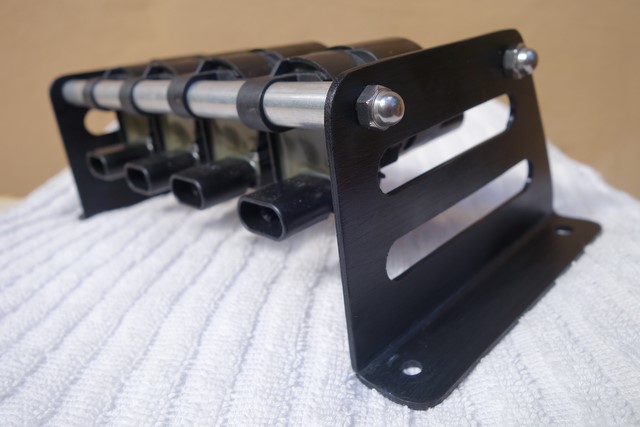
While I had the anodising stuff all set up, I decided to anodise my D514A coil brackets too.
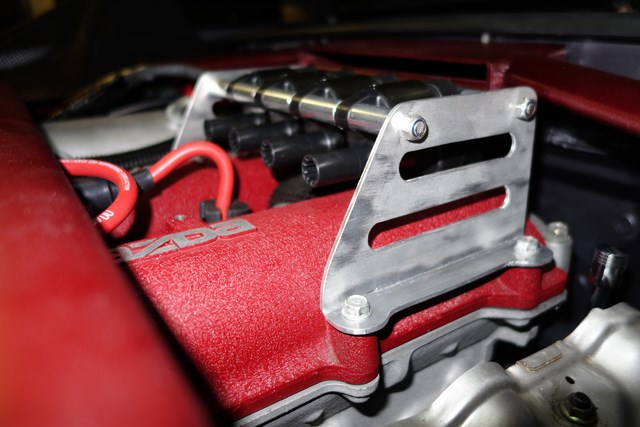
Image


The surface area is much less than the coolant overflow tank so only 2 cathodes were needed:
Image


No blemishes on these but not quite as black as the coolant tank. Maybe it was due to the aluminium composition being different or the electrolyte was too weak after anodising the coolant tank twice (I cranked the amperage up to 4.5amps to "maintain the fizz"):
Image


Image


Image


Originally posted by The American, Mon Mar 28, 2016 4:39 pm[

Very cool!


Originally posted by Roadrunner, Mon Mar 28, 2016 8:19 pm[

That's come up great and should be much easier to keep clean compared to black spray paint.
Great stuff!

Are you going to anodise the airbox now? :P


Originally posted by Lokiel, Mon Mar 28, 2016 9:20 pm[

Roadrunner wrote::
Are you going to anodise the airbox now? :P


Yeah, I really like the look of the black anodised aluminium and the fact that it's harder to scratch than regular aluminum - or paint :(

The airbox is about 4-5x the size of the coolant tank.

I'm going to need a 50L rectangular tub for anodising since it must also house the cathodes.
I can probably use a plastic tub with aquarium heaters for the dyeing phase to keep it at 42-43*C.
Finding a pot/tub large enough for the Sealing phase (you need to boil the crap out of the part for ~15 minutes) will be harder.

I suspect I'll need to re-make the airbox wall when I install the TSE manifold since the turbo will sit much higher so the intake hole will be in the wrong position.


Originally posted by Roadrunner, Mon Mar 28, 2016 10:22 pm[

Mix it in a 40gal drum. Then your neighbours will really start to get worried lol


Originally posted by ManiacLachy, Tue Mar 29, 2016 7:28 am[

That is very cool, and the finish is beautiful. :beer:


Originally posted by Magpie, Tue Mar 29, 2016 7:35 am[

I was looking at the bike on the weekend after reading your post, it is in trouble. I will tell my partner it was all your fault :)


Originally posted by Lokiel, Tue Mar 29, 2016 2:39 pm[

I've just been informed that "my mate" above is NOT a "Tommy Roundhead" but is actually a young "Intellagama lesueurii (AGAMIDAE) Water Dragon".

http://www.saveourwaterwaysnow.com.au/01_cms/details.asp?ID=913#2417 points out "Can be mistakenly indentified as Tommy Roundhead when juvenile, when the crest is not so obvious.".

I live near a creek and have seen the adult versions which can grow as long and thick as your arm and look quite formidable so I'll be keeping "on the good side" of "my mate".


Originally posted by bruce, Tue Mar 29, 2016 4:03 pm[

Are you going to end up gassing yourself?
Do you end up with toxic waste?


Originally posted by Magpie, Tue Mar 29, 2016 4:25 pm[

Remember Lokiel said he had a creek down the back :)


Originally posted by Lokiel, Tue Mar 29, 2016 4:54 pm[

bruce wrote:Are you going to end up gassing yourself?
Do you end up with toxic waste?


Good question regarding toxic waste. I know that nickel plating generates toxic waste due to the chemicals needed but hadn't read anything about aluminium anodizing producing toxic waste other than the acid bath.

I had the garage door up and a fan blowing across the tank to blow the air that way - you could still smell it so it couldn't be good for you in a closed environment.
The sealant pot stunk the house up a bit though so all doors and windows were open.

The dye can be re-used so I stored that for re-use later (~13L) .

I bought swimming pool pH decreaser (acid) AND pH increaser (base) since I knew that there was going to be a lot of strong acid to dispose of.
Once I'd finished, I slowly added the pH increaser into the anodizing tank until it no longer tasted acidic (it had some real "kick" prior to adding the pH increaser, citric acid X 5 - not sure I'd care to try the taste test prior to all that anodising which weakened the electrolyte).
I should've bought some pH paper too but I figured the taste test was good enough - still wasn't keen on emptying the contents onto my garden so it went down the drain.


Originally posted by Lokiel, Wed Mar 30, 2016 1:15 pm[

Magpie wrote:Remember Lokiel said he had a creek down the back :)

Too far "down the back" to lug all those chemicals.

In hindsight, the acid bath would've made a wonderful swimming pool for cane toads!


Originally posted by Magpie, Wed Mar 30, 2016 1:28 pm[

Not only do can toads enjoy acid baths, but they react well to a pitching wedge :)


Originally posted by MattR, Sat Apr 02, 2016 9:43 pm[

Lokiel wrote:I bought swimming pool pH decreaser (acid) AND pH increaser (base) since I knew that there was going to be a lot of strong acid to dispose of.
Once I'd finished, I slowly added the pH increaser into the anodizing tank until it no longer tasted acidic (it had some real "kick" prior to adding the pH increaser, citric acid X 5 - not sure I'd care to try the taste test prior to all that anodising which weakened the electrolyte).
I should've bought some pH paper too but I figured the taste test was good enough - still wasn't keen on emptying the contents onto my garden so it went down the drain.


So you put it in the creek then? As that is where the storm water will flow to.

Or even worse if it went in the sewer.

Best bet next time ring council, they will tell you best and safest method of disposal of waste.

Even small amounts of chemicals can have pretty bad effects on receiving waters.


Originally posted by Lokiel, Sat Apr 02, 2016 10:26 pm[

MattR wrote:
Lokiel wrote:I bought swimming pool pH decreaser (acid) AND pH increaser (base) since I knew that there was going to be a lot of strong acid to dispose of.
Once I'd finished, I slowly added the pH increaser into the anodizing tank until it no longer tasted acidic (it had some real "kick" prior to adding the pH increaser, citric acid X 5 - not sure I'd care to try the taste test prior to all that anodising which weakened the electrolyte).
I should've bought some pH paper too but I figured the taste test was good enough - still wasn't keen on emptying the contents onto my garden so it went down the drain.


So you put it in the creek then? As that is where the storm water will flow to.

Or even worse if it went in the sewer.

Best bet next time ring council, they will tell you best and safest method of disposal of waste.

Even small amounts of chemicals can have pretty bad effects on receiving waters.


I think I was quite responsible in my disposal practice, neutralising the acid first and I wasn't using any toxic chemicals like those that are needed for nickel plating.
I doubt many pool owners go to this effort when emptying their swimming pools.
And, if it ended up in the sewer, it was certainly far less toxic than than the sewerage which has an extremely high ammonia content.


Originally posted by MattR, Mon Apr 04, 2016 7:01 pm[

But the problem is the chemicals used to alter the pH of the original citric acid, the alkalines used to up the pH can be pretty nasty in themselves and the the natives don't like the nitogens, phosphates, ammonias and so on used in most trade waste stuff.

I have seen some serious environmental damage done by what was though to be innocuous disposal of chemicals down drains in relative small amounts when i worked in the Blue Mountains for Sydney Water.

What we think is alright for the environment can actually be pretty bad for native flora and fauna.

The best bet would have been the garden over the drain, particularly if you have weeds you want to get rid of.
Don't worry about dying, worry about not living!
Garage Thread: http://www.mx5cartalk.com/forum/viewtopic.php?f=57&t=76716

User avatar
Lokiel
Forum legend
Posts: 4126
Joined: Thu May 28, 2009 2:39 pm
Vehicle: NB SE
Location: Brisbania

Re: Lokiel's "Gina" (once a 2004 Titanium SE) Recreated AGAIN

Postby Lokiel » Tue Jun 05, 2018 8:25 pm

Originally posted by Lokiel, Sun Sep 24, 2017 5:16 pm

Originally posted by Lokiel, Sat Apr 09, 2016 1:28 pm[

Received the TSE manifold back from Competition Coatings, http://www.competitioncoatings.com.au/, during the week:

BEFORE:
Image

Image


AFTER:
Image

Image

Image

Image


FYI: Cost = A$275


Originally posted by Lokiel, Sat Apr 09, 2016 2:58 pm[

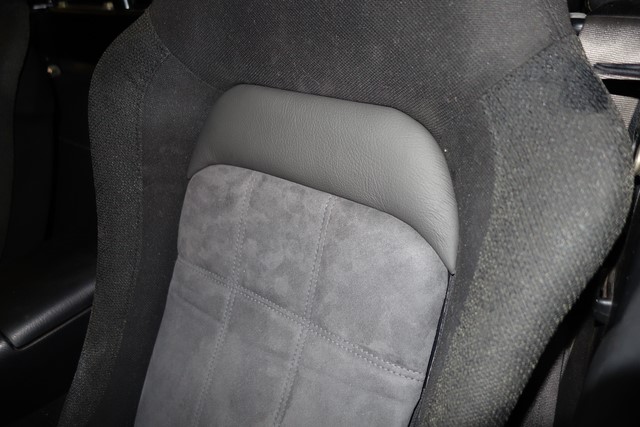
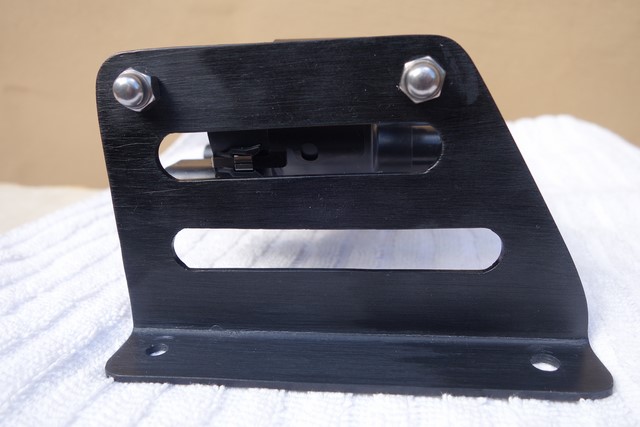
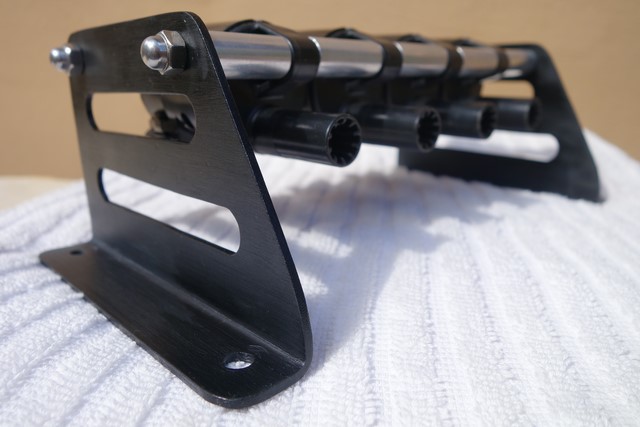
A few months ago I received the "missing chunks" for my Lotus Seat Probax inserts from Allon White Sports Cars Ltd. in the UK.
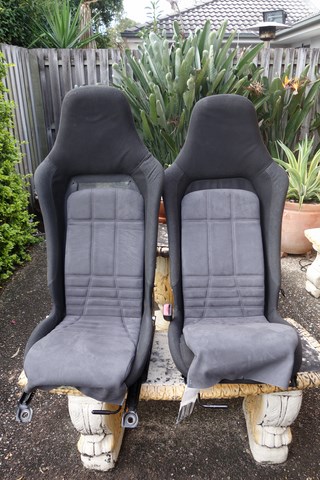
Some history on this:

I purchased MINX's Lotus Elise seats but found them too firm, they were the original Lotus Elise seats.

In 2005, Lotus upgraded the seats, which had virtually no padding at all, to use a new padding called Probax that really transforms the seat into being comfortable.

You can't buy this stuff yourself but I found Allon White Sports Cars Ltd. in the UK that customises Lotuses and other sports cars and has access to Probax.
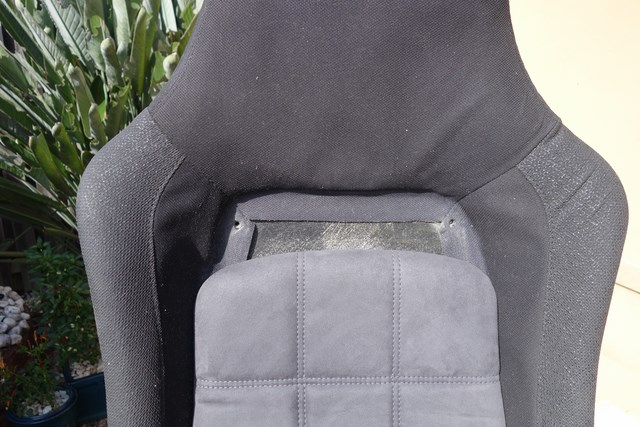
I specified the inserts I needed but when they arrived, they were too short:
Image

Image


I wasn't happy with this and was REALLY annoyed when they suggested that I hadn't fitted them correctly.
The seat base is scalloped so it's pretty obvious how it's supposed to be positioned and the bend from the seat base to seat back is bloody obvious, you CAN'T fit it incorrectly!
They suggested I just needed to pull the top tauter but the gap is 100mm, NOT 5mm!

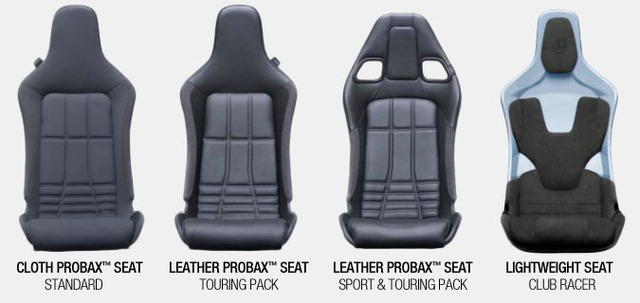
I found a picture of the various Lotus seats and sent that to them:
Image

You can clearly see from this picture that the STANDARD and TOURING PACK seat inserts are taller and have a different shaped top (more square) to the SPORT & TOURING PACK seat insert, which looks suspiciously like the seat inserts I received.
I'd sent them photos of my seats prior to manufacture and pointed out that they'd clearly screwed up based on the photo above.
The mounting pins in the seat inserts are also wider than the mounting holes in my seat (250mm apart vs. 225mm).
After a few back and forth e-mails, they agreed to either redo the inserts or just send me the "missing chunks". I chose the latter since I'd already glued-in the seat inserts.

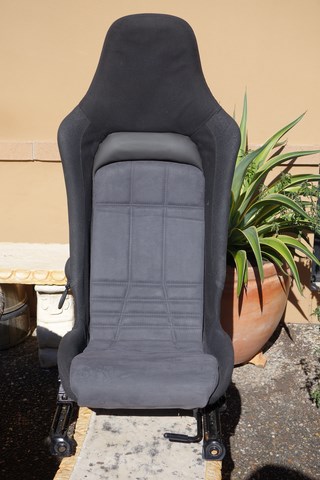
The seat inserts are Alcantara and when the "missing chunks" arrived, were clearly a much lighter grey than than my seat inserts - I preferred my DIY inserts that I'd clad in leather matching my grey door, steering wheel, gear gaiter and handbrake gaiter, at least they matched something and didn't introduce another shade of grey:
Image


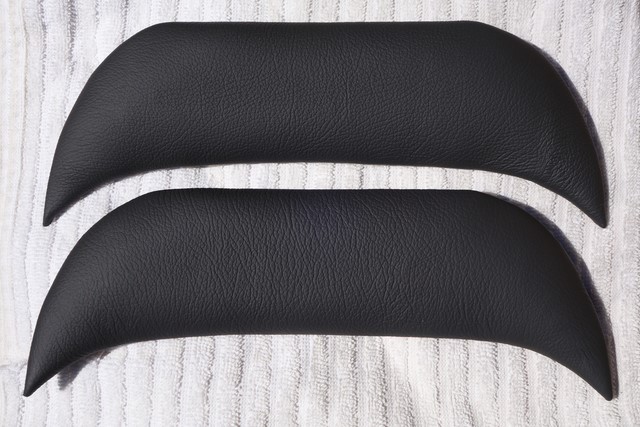
I still had just enough of the grey leather left to re-clad the "missing chunks" and decided to use a professional motor trimmer, Jobson's Pty Ltd in Annerley Brisbane, since my DIY efforts had some visible creases on some edges.
Here's the "missing chunks" that I had re-clad this week:
Image

Image

- they look a bit better than my first DIY job :P


Originally posted by billybunter, Sat Apr 09, 2016 3:06 pm[

I think you did a pretty good job on the seat project. I know how I would have felt if it happened my way so you took it pretty calmly. :wink:


Originally posted by Lokiel, Sat Apr 09, 2016 3:16 pm[

billybunter wrote:I think you did a pretty good job on the seat project. I know how I would have felt if it happened my way so you took it pretty calmly. :wink:

ManiacLachy reckons that these may be the most expensive seats ever put into an MX5 given their purchase price, what MINX paid for the seat bracket manufacture and what I paid for the Probax seat inserts.
They're definitely one of a kind (two if you count the seats separately) and wont be up for sale.


Originally posted by bruce, Sat Apr 09, 2016 4:52 pm[

That bit looks good. It's like a highlight piece, if u had a red car that bit would be the red.
Don't worry about dying, worry about not living!
Garage Thread: http://www.mx5cartalk.com/forum/viewtopic.php?f=57&t=76716

User avatar
Lokiel
Forum legend
Posts: 4126
Joined: Thu May 28, 2009 2:39 pm
Vehicle: NB SE
Location: Brisbania

Re: Lokiel's "Gina" (once a 2004 Titanium SE) Recreated AGAIN

Postby Lokiel » Tue Jun 05, 2018 8:26 pm

Originally posted by Lokiel, Sun Sep 24, 2017 5:17 pm

Originally posted by Lokiel, Sun Apr 10, 2016 5:16 pm[

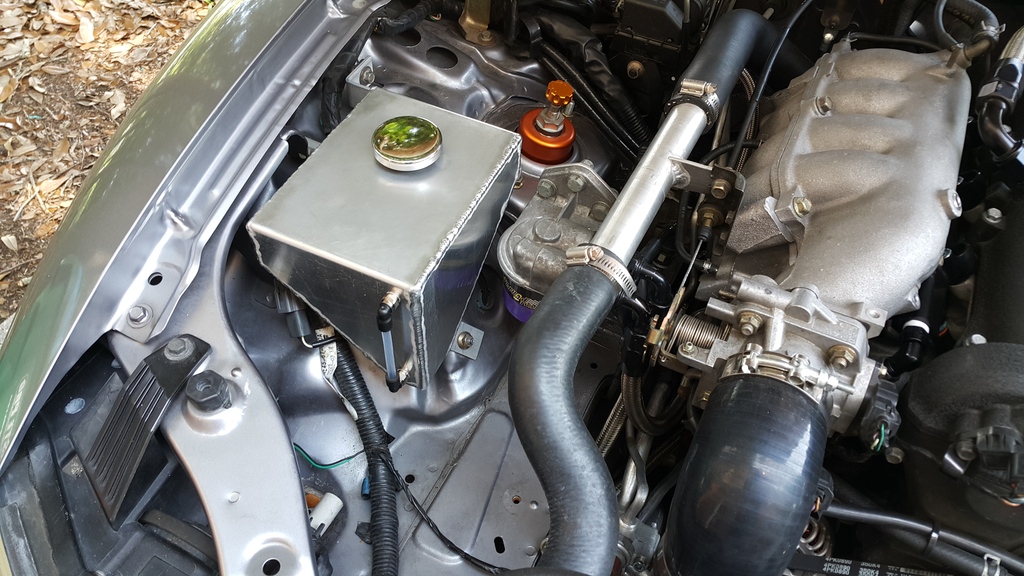
After re-assembling Frank's Tank, filling it and leak-testing it for a week, I installed it today.

Wasn't too keen on doing this job since it looked like I may need to move the oil filter first, the filter is in the way to prevent the tank being removed and installed.

The aluminium box bracket I made to mount the filter relocation block is easy enough to access all mounting bolts IF the oil lines aren't connected, but require the use of stubby spanners and "a bazillion" small turns of the bolts when the lines are connected. I figured that I just needed to remove one of the block bolts and loosen the other to swivel it out of the way - surely that would be easier than draining the oil and removing the filter? Still undecided on that one.

So here it is installed:

Image

Image

I put a silicon sleeve around the silicon hose where it touches the relocation block and oil pressure sensor.

Image

- as Roadrunner alluded to earlier, I think I'll anodise the airbox when I re-make it, it looks pretty ordinary compared to the annodised tank.


Originally posted by ManiacLachy, Sun Apr 10, 2016 8:34 pm[

Yeah.. You probably should have just drained the oil ;) The end result is great though, love that anodised black. The air box is going to be awesome


Originally posted by TCR, Thu May 19, 2016 3:22 pm[

As someone who recently purchased an SE, this is an awesome thread. Just need a spare week to read it all :)

I've been skipping through it trying to find out how you did the CAI because I want to something similar. Looks pretty straight forward, but I must have missed what you did with the intercooler piping that runs through that corner. Assume you re-routed in somewhere?


Originally posted by Lokiel, Thu May 19, 2016 4:25 pm[

I have a low-mount aftermarket manifold+turbo and the intercooler plumbing that goes underneath rather than over the top.
The advantages of doing this is that I can duct cold air from the passenger-side foglight (now removed) up through that OEM intercooler pipe hole into my air box AND NOT have a hot intercooler pipe running through my cold air box.

See http://www.mazda-speed.com/forum2/index.php/topic,22049.0.html for how to re-clock the OEM turbo.

When my TSE downpipe arrives I'm moving to a high-mount setup but the intercooler plumbing will still go underneath.


Originally posted by TCR, Thu May 19, 2016 4:48 pm[

Ah right, makes sense. Will look at my options when I get the chance.


Originally posted by Lokiel, Fri Jul 29, 2016 10:55 pm[

I'm expecting my EFR6258 Trackspeed Engineering downpipe any month now :P so have been motivated to get a few things done.

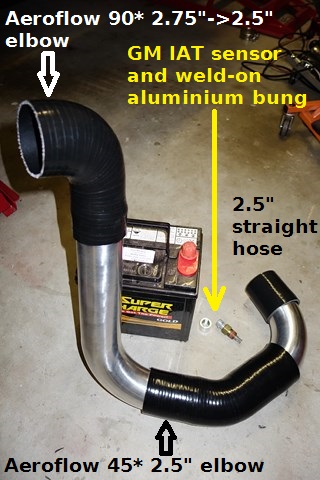
One such project was to simplify "The Cobra", my cold-side plumbing:
Image


That lower section needed to be simplified, I hated the short 90* bend and short coupler, too many hose clamps needed in such a short span.
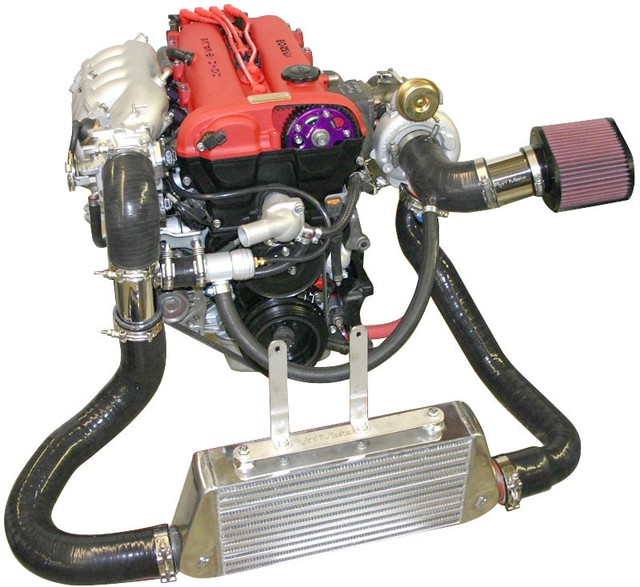
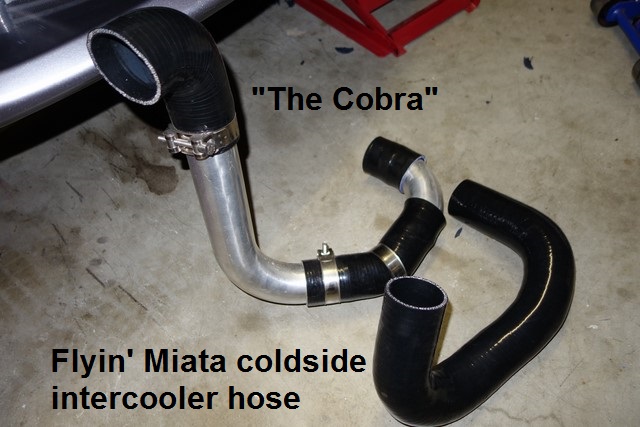
Flyin' Miata have custom silicone hoses they use in their turbo kits and the coldside one looked like it would do the trick:
Image


Unfortunately for me, FM have updated their coldside plumbing from the above setup but they suggested the new hose could still be of use based on the photo of "The Cobra" I sent them.

As usual with FM, the S&H was expensive but it arrived within 4 days of payment so I was impressed and decided to fit it during the week.

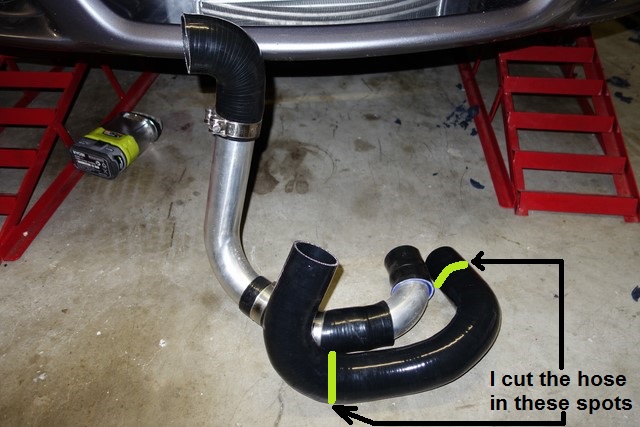
The FM intercooler sits lower than my Fab9 350hp intercooler and it's not as long so I knew that some trimming would be required to the hose.
Image

Image


The FM silcone hose is thicker than my original silicone hose so I needed to buy 2 worm clamps the next size up because there was no way I could fit my original ones over the hose and barb - a real show stopper when doing these jobs after work and everything is shut :(
I stubbornly persisted with trying to fit the original worm clamps but gave up after the 20th (or so) attempt because I had to disassemble the worm clamp to fit it over the barb and hose and the cylindrical bolt retainer kept falling out before I could get the bolt screwed into it. Being cylindrical, the damn thing would roll away to various crevices when it fell out and I'd waste time trying to find it.

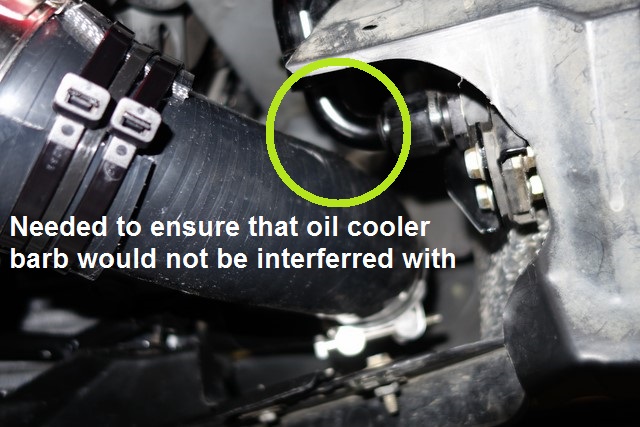
My oil cooler is mounted behind the starboard foglight so I had to ensure that the intercooler hose would not contact the lower barb on the oil cooler.
Image


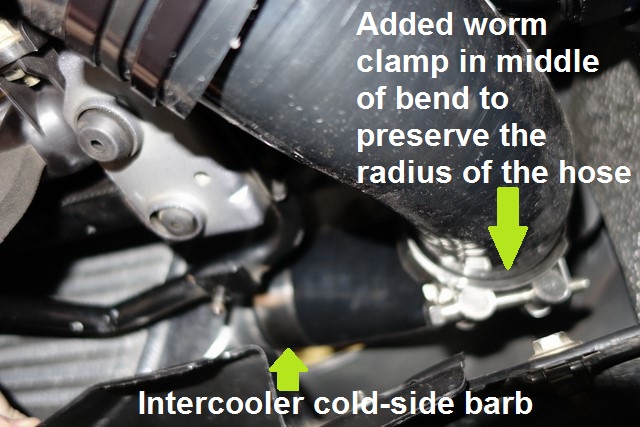
The FM hose was being squashed into an oval shape in the middle of the bend so I used one of the original worm clamps at the bend to maintain the circular radius at that point (the original worm clamp could be fitted around the silicone hose alone).
Image


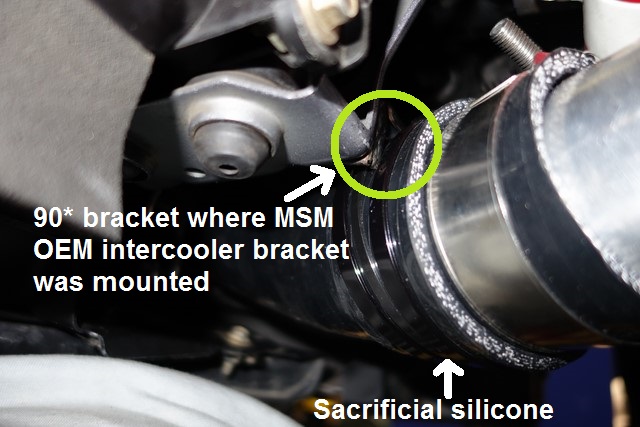
The FM silicone hose has about 5mm of clearance between it and the 90* MSM/SE bracket on the bottom radiator mount that the original intercooler pipe was mounted to. The cold-side intercooler plumbing is quite solid but I don't doubt that it would occasionally bump this bracket so I used an FM hose off-cut as a sacrificial shield for the hose. That gap is about as thick as the FM silicone hose so it actually serves to hold the cold-side plumbing against the bracket.
Image


I'm now happy with the cold-side plumbing, it now consists of 2 silicone couplers (2.5" FM hose and 2.5->2.75" 90* bend) and a 2.5" aluminium J-pipe.

I do wonder if I took "The Cobra" to a turbo-shop whether I could find a 2.5" custom hose that could be modified in the same way - there's some very interesting turbo/intercooler hoses out there.

In hindsight I should've taken the front bumper off to do this right from the start but I didn't want to go through the hassle. Squeezing your hands into such a confined environment to fit/refit the hose to cut it down to the right size was painfully slow and trying to get the clamps on was annoying because the bloody clamp retainers kept falling out and rolling everywhere.


Originally posted by speed, Sat Jul 30, 2016 9:33 am[

Nice one. I had no idea that silicon IC hose kits were even available. Oh well, guess I have the alloy piping now, may as well continue as planned and cut/shape and have welded.


Originally posted by ManiacLachy, Sat Jul 30, 2016 3:07 pm[

Nicely done. I'm always a fan of your pictures with captions in them, they come up often when I search various MX-5 issues :mrgreen:
Don't worry about dying, worry about not living!
Garage Thread: http://www.mx5cartalk.com/forum/viewtopic.php?f=57&t=76716

User avatar
Lokiel
Forum legend
Posts: 4126
Joined: Thu May 28, 2009 2:39 pm
Vehicle: NB SE
Location: Brisbania

Re: Lokiel's "Gina" (once a 2004 Titanium SE) Recreated AGAIN

Postby Lokiel » Tue Jun 05, 2018 8:26 pm

Originally posted by Lokiel, Sun Sep 24, 2017 5:17 pm

Originally posted by Lokiel, Sat Aug 20, 2016 9:49 pm[

I've been slack updating this thread so will attempt to get it up to date now.

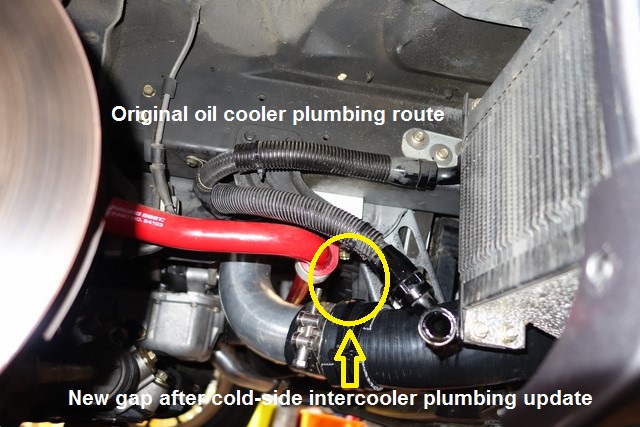
After re-doing the intercooler coldside plumbing, I noticed that now there was a decent sized gap above it and the brace that supports the radiator.
Image

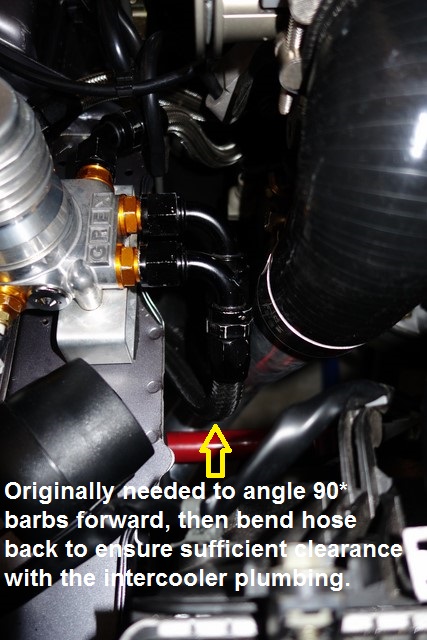
I never liked the way I had to route the AN-10 lines behind the sway bar brace, it adds extra bends+length to the lines but was necessary due to space availability and the Aeroflow hose flexibility (stiffness).

The 90* fittings on the relocation block originally to the oil cooler had to be angled forward and the hose bent backwards to ensure that they didn't contact the intercooler plumbing - another thing I didn't like:
Image


I was told that SpeedFlow hoses are more flexible so purchased 2m of it and SpeedFlow fittings since I wasn't sure if the Aeroflow fittings would match the SpeedFlow hose.

The SpeedFlow hose is definitely more flexible than the AeroFlow hose and the SpeedFlow hose ends are MUCH easier to fit than the AeroFlow hose ends. The AeroFlow hose ends have longer barbs and fit the hose much tighter so require more effort to fit.

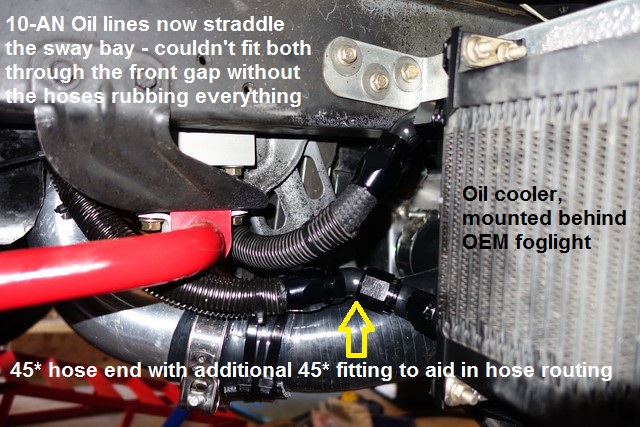
Well though that gap looked big enough, it's not big enough to comfortably fit 2x AN-10 hoses through because they also need to bend 90* up to the oil relocation block - too much hose rubbing (against the other hose and chassis/braces).

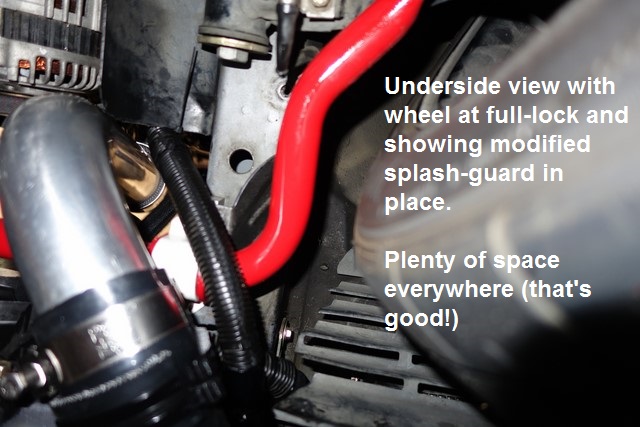
The simple solution was to straddle the sway bay which left plenty of room around the hoses. I used a 45* hose end for the cooler's lower barb and an additional 45* fitting to allow me to route the lower hose easier (effectively made it a hard-line fitting that directed the barb away from the intercooler intercooler hose). I used a 90* hose end on the top barb but have ordered a 45* barb to replace it to reduce the bend in the hose and move it even further away from the other hose:
Image

Image


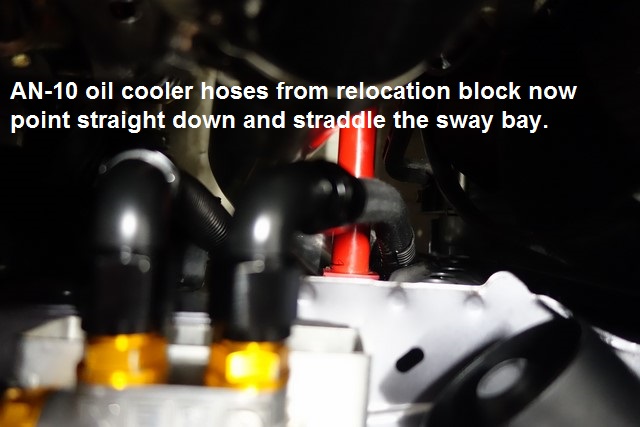
The 90* barbs on the oil relocation block can now go straight down since they straddle the sway bar:
Image


Much happier with this re-routing - reduced the length of the hoses and eliminated 2x180* bends (behind the swaybar brace).


Originally posted by NitroDann, Sat Aug 20, 2016 11:14 pm[

While its true that the vast majority of low tier brands will do the job and wont fail if carefully assembled, the difference between low end and something like earls or speedflow is night and day.

Dann
Don't worry about dying, worry about not living!
Garage Thread: http://www.mx5cartalk.com/forum/viewtopic.php?f=57&t=76716

User avatar
Lokiel
Forum legend
Posts: 4126
Joined: Thu May 28, 2009 2:39 pm
Vehicle: NB SE
Location: Brisbania

Re: Lokiel's "Gina" (once a 2004 Titanium SE) Recreated AGAIN

Postby Lokiel » Tue Jun 05, 2018 8:27 pm

Originally posted by Lokiel, Sun Sep 24, 2017 5:18 pm

Originally posted by Lokiel, Sat Aug 20, 2016 11:37 pm[

I've decided to switch to a MS3-Pro ECU. I phoned NitroDann one evening for a quick question about MS vs Adaptronic vs Haltech ECUs since he's used all 3 and he raved about the MS, in particular just how much better the tuning software was - that was enough to convince me to do the switch (and that there's much more online help available which is good for me since I'm a tinkerer by nature).

When I installed my VDO Oil Pressure and Oil Temperature sensors for my PLX Devices gauges, I routed the wiring along the top of the radiator, down the passenger side, and through a hole in the passenger firewall (that's the extra split loom in the photo below). The GM Air Intake Sensor in the cold-side intercooler tank also followed this route. I'd also installed a VDO water temperature sensor in a Maruha sandwich plate behind the coolant housing which I routed along this new harness and also re-wired the AIT sensor and A/C power wire to use the split loom to hide the wiring:
Image


The Megasquirt ECU doesn't use the IAT sensor (on the SE/MSM, it uses the IAT2 sensor in the TB) and I've never really cared about the new water temperature values so I decided to get rid of them and re-wire the oil temperature/pressure and GM Air Intake sensor wiring along the driver side instead to hide the wiring as much as possible.

To make my life easier, I decided to switch to sensors readily supported by the Megasquirt.
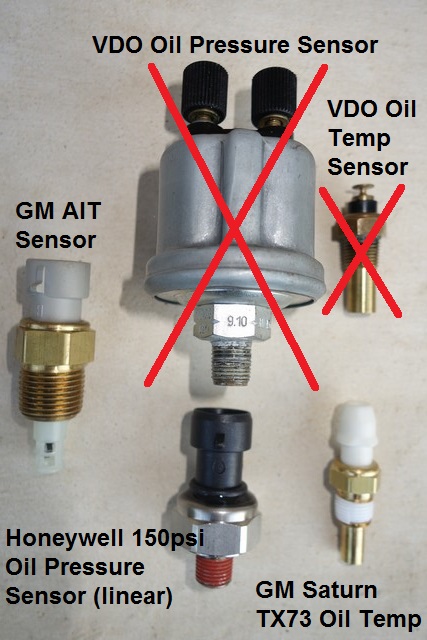
The Megasquirt has default values for GM temperature sensors so I kept the GM Air Intake Temperature sensor in the intercooler and found a GM Saturn TX73 sensor to replace the VDO oil temperature sensor (had the same fitting size, 1/8- 27NPT).
I also replaced the VDO Oil Pressure sender with a Honeywell 150PSI sender; this is a 0.5-4.5V linear sender which can be configured in the MS ECU.

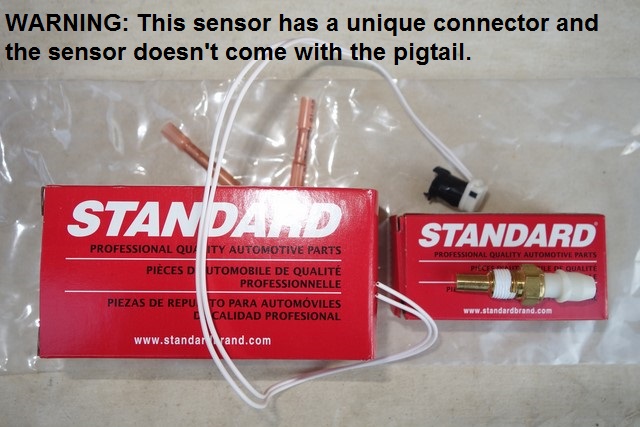
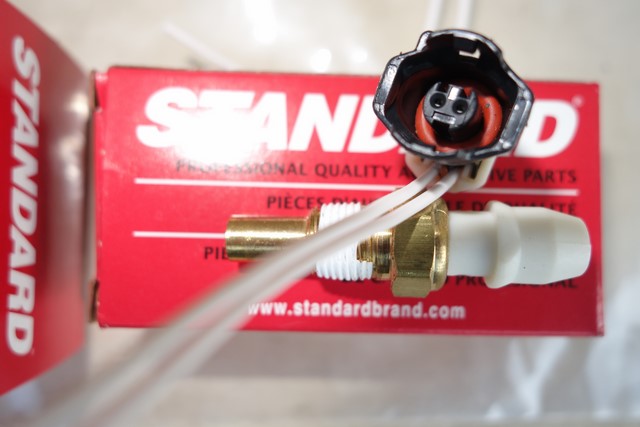
GM Saturn TX73 Temperature sensor:
Image

Image

I made the mistake of ordering the TX73 sensors only, figuring they'd include the pigtail so had to wait another week after ordering the pigtails.
S&H was expensive so I ordered 4, figuring I should have a spare and could sell the other 2 and get half the S&H cost back.

Here's what's out and what's in:
Image


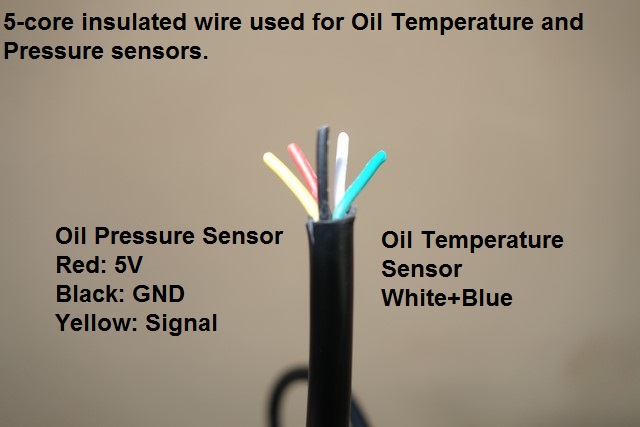
When I originally did my wiring, I used separate wires which were messy and a pain to fit through the firewall.
The oil pressure sensor has three pins (5V, GND, Signal) and the the oil temperature sensor has 2 wires (polarity doesn't matter so I haven't paid attention to it) so I bought 5 metres of 5-core insulated wire to make wiring easier:
Image


The Air Intake Temperature sensor in the intercooler has it's own 2-core wire that shares the oil loom route, they're spiral-wrapped together and run along the driver side. through the driver firewall and to the passenger footwell. It's cleaned up the engine a lot, always a good thing.

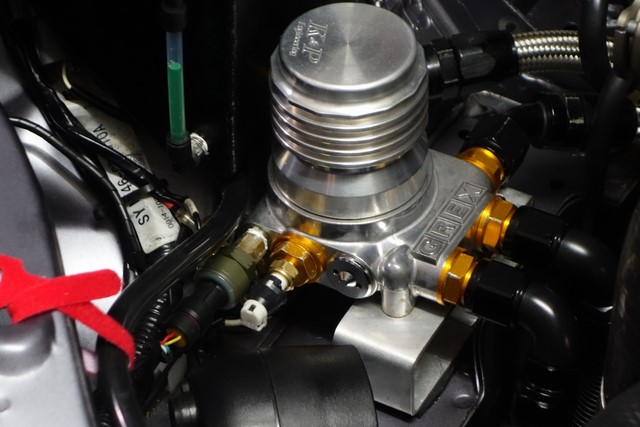
Here's the oil sensors fitted:
Image

That red velcro tie-back is holding the overflow hose out of the way for the photo, otherwise it hides the oil pressure sender.
The new spiral-wrapped wiring is hidden under the OEM harness with the white label.

More to come tomorrow: Megasquirt hardware modz + TinyIOX


Originally posted by Lokiel, Sat Aug 20, 2016 11:55 pm[

NitroDann wrote:While its true that the vast majority of low tier brands will do the job and wont fail if carefully assembled, the difference between low end and something like earls or speedflow is night and day.

Dann

I'd have no problems recommending AeroFlow fittings over SpeedFlow fittings when it comes to price, there's no way those Aeroflow hoses were going to leak (took a LOT of effort to remove the hose end when I tried a 45* instead of the 90* end, I needed to use the aluminium vice jaws and spanner) and I was very impressed by them.

The quality of the AeroFlow fittings is exceptional too for a Chinese product, it's just that the additional flexibility of the SpeedFlow hose allowed me to route my oil lines better. Side by side, the two fittings seem very similar in terms of quality.

I can't say this for other Chinese fittings though (I've seen some nice oil filter relocation blocks which had crappy/cheap/light fittings).
Don't worry about dying, worry about not living!
Garage Thread: http://www.mx5cartalk.com/forum/viewtopic.php?f=57&t=76716

User avatar
Lokiel
Forum legend
Posts: 4126
Joined: Thu May 28, 2009 2:39 pm
Vehicle: NB SE
Location: Brisbania

Re: Lokiel's "Gina" (once a 2004 Titanium SE) Recreated AGAIN

Postby Lokiel » Tue Jun 05, 2018 8:27 pm

Originally posted by Lokiel, Sun Sep 24, 2017 5:19 pm

Originally posted by sailaholic, Sun Aug 21, 2016 9:58 am[

Intersting on the ecu swap, did you see adaptronic had a new software platform out to replace wari?


Originally posted by smy0003, Sun Aug 21, 2016 10:22 am[

sailaholic wrote:Intersting on the ecu swap, did you see adaptronic had a new software platform out to replace wari?


Is Andy recommending Eugene yet?
Last time I checked he was saying it was only for Beta purposes and WARI was still recommended to actually tune a car.
I downloaded the Eugene log viewer and it had so many bugs I had to force shut-down my computer, I'm back to using WARI and log viewing in Matlab.


Originally posted by Lokiel, Sun Aug 21, 2016 11:30 am[

I played with the new Adaptronic "Eugene" S/W when the beta was first announced and Andy was merely asking people to try the new interface and provide feedback on it - he didn't recommend switching to it immediately because it was still in the beta-test phase. The latest release is 1.1.3 so it looks like it's ready for use now (typically software whose major release number is > 1 is ready for release).

The original WARI software was getting "long in the tooth" so needed a revamp and Eugene is the latest interface. If you're starting with an Adaptronic ECU now you should use it, or learn to use it.

The MS S/W has a couple of really nice features:
1. Almost every setting has a Help icon you can click on to see what it does
2. All settings have a Note icon you can click to write a note about the setting (useful when you've changed a setting for a particular reason and want to keep it documented for yourself and anyone else who tunes your car)

The original WARI software didn't have these features and you really needed to read the reference guide multiple times to figure out how everything gelled together, documentation was scarce and the reference guide, like most reference guides, was accurate but not really user-friendly. Andy's added some REALLY good "Idiot Guides" (simple guides on different topics that anybody can follow) to his site now that I wished existed when I started.

Eugene was in the beta phase when I decided to switch ECUs but the main reason for the switch was that the MS software is much better and established and that there is much more online information/help available. Andy from Adaptronic does an excellent job with regard to customer support but as "a constant tinkerer", I can't simply ring him up when I'm trying to figure out how to do something on the weekend to get immediate help. With the MS, it's often a case of simply Googling for the information because it has a larger user-base and MS users tend to be similar to "Unix-nerds/geeks", post the question and you'll get feedback within a few hours because someone has already done it or knows how to do it.

The design of the Adaptronic ECU is better though, it's the size of a pack of cigarettes, harness connects to the back, all other I/O is on the front and you can easily mount it in the glovebox.
The Adaptronic ECU also supports serial Wideband O2 input - you need a separate box for that with the MS.

smy003, why can't you use MegaLogViewer to analyse the log files instead of Matlab?
I just used my Android AdapTrackIt App to log the data, it's just a .csv file, and read those into MegaLogViewer (I had to change the column headings to match those used by MLV).


Originally posted by bruce, Sun Aug 21, 2016 1:30 pm[

I sorta yearn for a big v8 with a carby after reading all that.
Don't worry about dying, worry about not living!
Garage Thread: http://www.mx5cartalk.com/forum/viewtopic.php?f=57&t=76716

User avatar
Lokiel
Forum legend
Posts: 4126
Joined: Thu May 28, 2009 2:39 pm
Vehicle: NB SE
Location: Brisbania

Re: Lokiel's "Gina" (once a 2004 Titanium SE) Recreated AGAIN

Postby Lokiel » Tue Jun 05, 2018 8:28 pm

Originally posted by Lokiel, Sun Sep 24, 2017 5:19 pm

Originally posted by Lokiel, Sun Aug 21, 2016 3:35 pm[

Megasquirt Modz

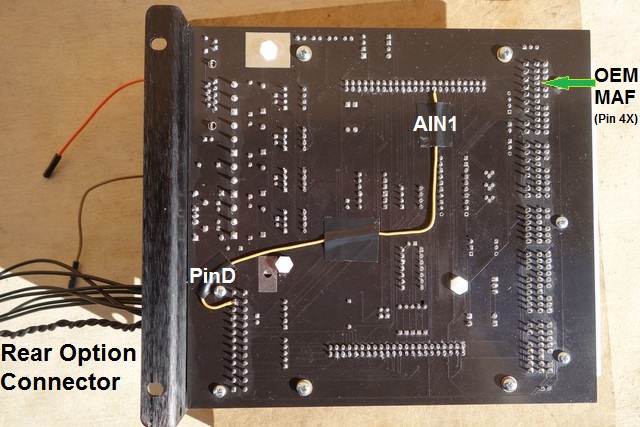
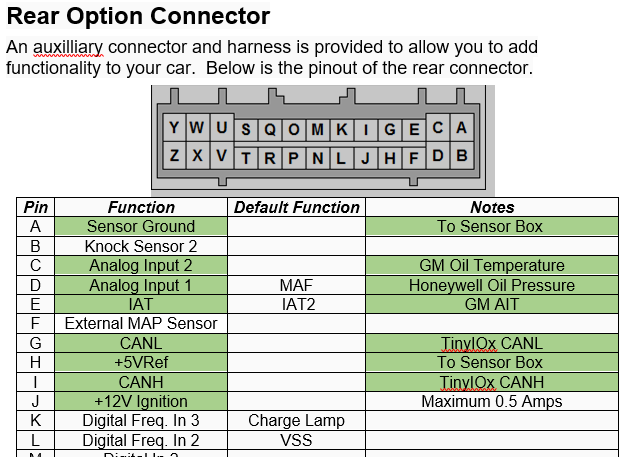
The DIY AutoTune MegaSquirtPNP Pro #MSM0405 Rear Option Connector has two spare Analog Inputs on its rear connector but for some reason, Analog Input 1 is electrically connected to the OEM MAF input which I thought was odd because if you purchase an aftermarket ECU, the first thing you do is switch from the MAF sensor to a MAP sensor for airflow input - maybe it was so that it was easy to connect another engine bay sensor to the MAF sensor wire in the engine bay harness?

I wanted to use Analog Inputs 1 and 2 for my Oil Pressure and Oil Temperature sensors respectively so since I've eliminated the MAF sensor years ago and it's unused, I connected the board's Analog Input 1 pin to the rear connector's Analog Input 1 pin:
Image


The green-highlighted cells below show how I've wired up the Rear Option Connector:
Image

- I'm not using the 12V Ignition at the moment.


Originally posted by KevGoat, Sun Aug 21, 2016 4:08 pm[

bruce wrote:I sorta yearn for a big v8 with a carby after reading all that.


Yeah all this is way over my head.

'Ol days just used Stanley HW with the Flatblade UI ... turn screw...tuned ....

:mrgreen:


Originally posted by Magpie, Sun Aug 21, 2016 4:44 pm[

So when will you be tuning it on the road?
Don't worry about dying, worry about not living!
Garage Thread: http://www.mx5cartalk.com/forum/viewtopic.php?f=57&t=76716


Return to “MX5 Garage Chat”

Who is online

Users browsing this forum: No registered users and 18 guests