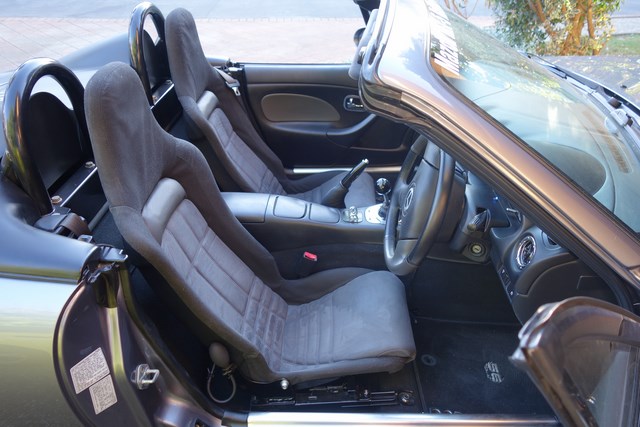
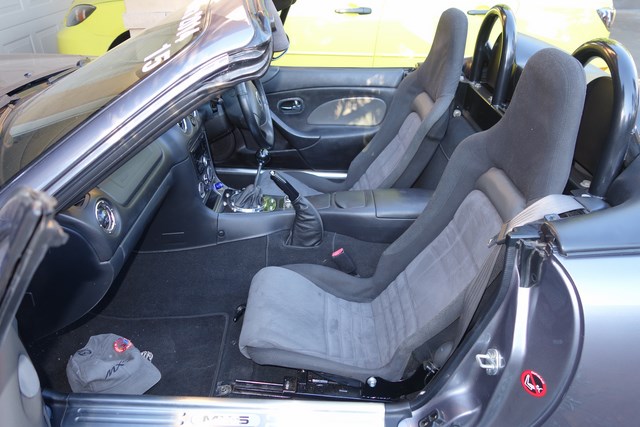
Lokiel's "Gina" (2004 Titanium SE)

Chat to do with your MX5/Miata/Eunos Garage Ride(s).

Moderators: timk, Stu, zombie, Andrew, The American, Lokiel, -alex, miata, StanTheMan, greenMachine, ManiacLachy, Daffy

User avatar
Lokiel
Forum legend
Posts: 4126
Joined: Thu May 28, 2009 2:39 pm
Vehicle: NB SE
Location: Brisbania

Re: Lokiel's "Gina" (once a 2004 Titanium SE) Recreated AGAIN

Postby Lokiel » Tue Jun 05, 2018 8:15 pm

Originally posted by Lokiel, Sun Sep 24, 2017 4:52 pm

Originally posted by Nevyn72, Fri Jun 13, 2014 11:27 am[

So how many kilometres have you actually done in your car this year mate? :?

I bet you'll be really itching to actually drive the bloody thing for a change sometime soon! :mrgreen:


Originally posted by Lokiel, Fri Jun 13, 2014 11:55 am[

Nevyn72 wrote:So how many kilometres have you actually done in your car this year mate? :?

I bet you'll be really itching to actually drive the bloody thing for a change sometime soon! :mrgreen:


I've done the 1,00km run-in "Ks" - at least that's something.

I'd hoped to be driving it again this weekend but at this point another week delay isn't going to upset me, I'm used to it by now :(

This is the big problem with DIY, figuring out what parts you need, waiting for parts, realising that you bought the wrong parts or that you need a non-standard part, waiting some more for the right parts to arrive.

You learn a lot more this way though (that's what I'm telling myself right now, and that the satisfaction of doing it myself will be worth it).


Originally posted by bruce, Fri Jun 13, 2014 2:38 pm[

You know a bit of lube will make the silicon joiners slide more easily (dishwashing liquid).


Originally posted by Lokiel, Fri Jun 13, 2014 8:36 pm[

bruce wrote:You know a bit of lube will make the silicon joiners slide more easily (dishwashing liquid).

I've done that trick before but this time had started the job and was too stubborn/lazy to go and get the dishwashing liquid once I'd started.
Surely it couldn't be that hard to slide the hose "just a little bit further" along the pipe could it?
YES IT COULD!


While waiting for the bus home from the city, I realised that this weekend I was going to be car-less, again, and had nothing other than my hedges to do this weekend. Nevyn72's comment:
Nevyn72 wrote::
I bet you'll be really itching to actually drive the bloody thing for a change sometime soon! :mrgreen:

was playing on my mind so I decided to do the next best thing:

[url=https://s19.postimg.cc/nryarxlc3/Xbox_ONE_EBgames_Bundle_zps8d7b003b.jpg[/img]https://s19.postimg.cc/nryarxlc3/Xbox_ONE_EBgames_Bundle_zps8d7b003b.jpg[/img[/url]

... EB Games Xbox ONE TITANFALL bundle, with Battlefield 4, Watch Dogs and [b][b]FORZA 5![/b][/b]

Forza 5 was the only game I really wanted, it has the Bathurst track - the other games were just a bonus though I do enjoy FPS.
The JB Hi-Fi, Target and DSE Xbox ONE Bundles all include Forza 5 with FIFA soccer (not interested), and either Watch Dogs or Titanfall so for me, EB Games had the best games (and one extra game).

I'm going to blame you Nevyn72 for this impulse buy, especially when I end up with the steering wheel, pedals, and simulation rig.


Originally posted by ManiacLachy, Fri Jun 13, 2014 8:44 pm[

What's the bet you spend all your time customizing your in game car and not racing it :P


Originally posted by Nevyn72, Fri Jun 13, 2014 9:19 pm[

ManiacLachy wrote:What's the bet you spend all your time customizing your in game car and not racing it :P

Hahahahaha!! :mrgreen:

I'll pay that! :wink:


Originally posted by Apu, Sat Jun 14, 2014 5:44 am[

Lokiel wrote: so I decided to do the next best thing:

[url=https://s19.postimg.cc/nryarxlc3/Xbox_ONE_EBgames_Bundle_zps8d7b003b.jpg[/img]https://s19.postimg.cc/nryarxlc3/Xbox_ONE_EBgames_Bundle_zps8d7b003b.jpg[/img[/url]

... EB Games Xbox ONE TITANFALL bundle, with Battlefield 4, Watch Dogs and [b][b]FORZA 5![/b][/b]

Forza 5 was the only game I really wanted, it has the Bathurst track - the other games were just a bonus though I do enjoy FPS.
The JB Hi-Fi, Target and DSE Xbox ONE Bundles all include Forza 5 with FIFA soccer (not interested), and either Watch Dogs or Titanfall so for me, EB Games had the best games (and one extra game).

I'm going to blame you Nevyn72 for this impulse buy, especially when I end up with the steering wheel, pedals, and simulation rig.


So I'm going to ask this very personal question...wife and kids? If yes, how did you manage that because I've been trying to get around the "we have enough consoles in the house!".

...and "just buy it" is not a solution as the fallout from that is just not worth it.
Don't worry about dying, worry about not living!
Garage Thread: http://www.mx5cartalk.com/forum/viewtopic.php?f=57&t=76716

User avatar
Lokiel
Forum legend
Posts: 4126
Joined: Thu May 28, 2009 2:39 pm
Vehicle: NB SE
Location: Brisbania

Re: Lokiel's "Gina" (once a 2004 Titanium SE) Recreated AGAIN

Postby Lokiel » Tue Jun 05, 2018 8:16 pm

Originally posted by Lokiel, Sun Sep 24, 2017 4:53 pm

Originally posted by Nevyn72, Sat Jun 14, 2014 8:47 am[

This might sound a bit sad but despite spending the last 4 months on 'cripple leave', and having the perfect room for one, I still don't own a console of any description! :|


Originally posted by ManiacLachy, Sat Jun 14, 2014 9:10 am[

I've resigned myself to no new consoles for a while :( been replaying old games. Saving all my begging points for the car


Originally posted by greenltd, Sat Jun 14, 2014 7:09 pm[

Nevyn you're not the only one without a conso. You are part of a proud group


Originally posted by Lokiel, Sat Jun 14, 2014 11:29 pm[

ManiacLachy wrote:What's the bet you spend all your time customizing your in game car and not racing it :P

Even I got a chuckle out of that (you bastard)!

Apu wrote:
Lokiel wrote::
So I'm going to ask this very personal question...wife and kids? If yes, how did you manage that because I've been trying to get around the "we have enough consoles in the house!".

Given the the modz I've done to the car so far, I would have thought the answer is obvious, single no kids - no woman would would let me spend that much money on a car instead of her.
I really don't know how magpie gets away with it with his modz with his better half, he's either a sweet talker or Australia's answer to:
Image


Originally posted by Magpie, Sun Jun 15, 2014 6:44 am[

I get away with because I HAD a secret fund for the car. Now there is no secret fund so I have to be a tad careful, purchases are just now small. Plus for the next 6 weeks she is away so I can have deliveries done to home!

Questions are asked, I just answer them saves any issues. Price may be compromised when I respond :)


Originally posted by Juicy HiC, Sun Jun 15, 2014 9:31 am[

I know the feeling Magpie!


Originally posted by Juicy HiC, Sun Jun 15, 2014 5:34 pm[

I know exactly how you feel Magpie


Originally posted by Juicy HiC, Sun Jun 15, 2014 5:35 pm[

I know exactly how you feel Magpie


Originally posted by NitroDann, Sun Jun 15, 2014 5:40 pm[

Tldr.

More boost.

Dann


Originally posted by Exocet Australia, Sun Jun 15, 2014 7:19 pm[

NitroDann wrote:More boost.

Dann


pfft, more boost.....

how bout' a 300kg weight reduction diet??


Originally posted by timk, Sun Jun 15, 2014 7:21 pm[

Man you guys are all whipped! :lol:


Welcome to the club! :oops:


Originally posted by MattR, Sun Jun 15, 2014 8:18 pm[

Not me, the better half knows exactly how much I am spending on the race car and when. In fact I have been encouraged to spend money, just ask Tbro, he was there when I was told to buy a set of tyres for the 300.

The thing I found is that everything all comes back to safety. $5k on a cage and seam welding, no problems, a new seat with wings spend the $700, it's all for safety. The dollars for the motec, well I will say it's for safety, the big engine, safety, if you're in front of the other cars then it's safer.... :lol:

So you just have to say you are spending the money to ensure you are around in the future......


Originally posted by Magpie, Sun Jun 15, 2014 8:22 pm[

Yep I play the safety card as well as 'it will protect the engine and all the money I have spent on it".

Should start a thread an excuses you can use to tell the truth and get away with it.


Originally posted by gslender, Mon Jun 16, 2014 2:04 pm[

...isn't there a natural limit that can expose you to the "well if it all costs this much, and it requires this much 'safety' equipment, then maybe you should take up cooking or some other hobby? - needle craft with me perhaps?"
Don't worry about dying, worry about not living!
Garage Thread: http://www.mx5cartalk.com/forum/viewtopic.php?f=57&t=76716

User avatar
Lokiel
Forum legend
Posts: 4126
Joined: Thu May 28, 2009 2:39 pm
Vehicle: NB SE
Location: Brisbania

Re: Lokiel's "Gina" (once a 2004 Titanium SE) Recreated AGAIN

Postby Lokiel » Tue Jun 05, 2018 8:17 pm

Originally posted by Lokiel, Sun Sep 24, 2017 4:54 pm

Originally posted by Magpie, Mon Jun 16, 2014 2:17 pm[

I can cook, as well as knit, sew and design clothes from scratch (or to request) wasting money on a car seemed like something different to do :) However this is not my thread so back on topic.

17" wheels


Originally posted by Lokiel, Mon Jun 16, 2014 10:47 pm[

Magpie wrote:"
However this is not my thread so back on topic.
17" wheels

Whoah, whoah, whoah, there's no place in this thread for that sort of talk...

Image


Originally posted by Lokiel, Sat Jun 21, 2014 3:13 pm[

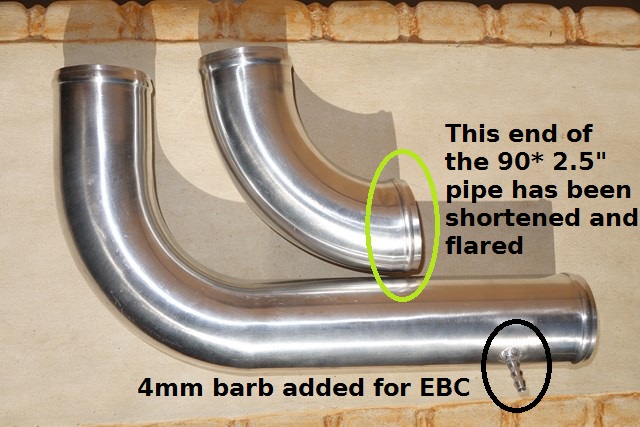
The 4mm intercooler pipe aluminium barb for my EBC finally turned up on Thursday; it was meant to be delivered to 288 Edward Street but got delivered, and signed for, to 266 George Street instead??? It took 2 weeks for the courier to resolve that!

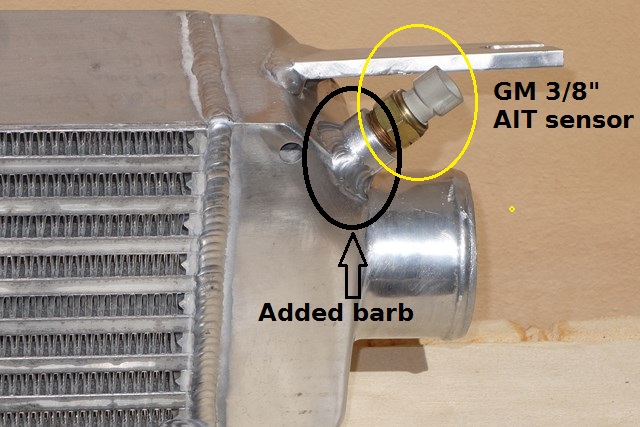
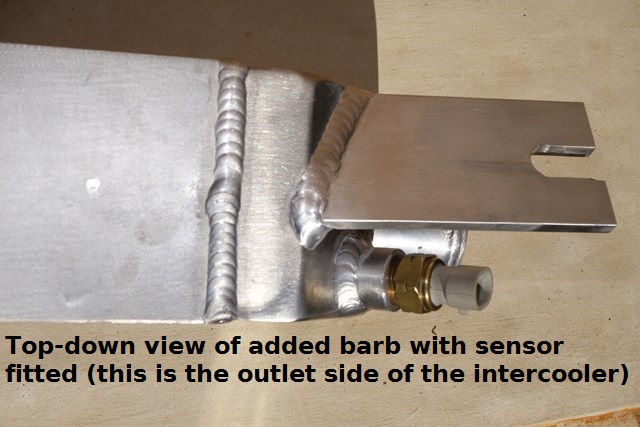
On Friday I dropped the intercooler, AIT 3/8" aluminium barb, intercooler pipe and aluminium barb for the EBC off at Gilrow Engineering to be welded so no more progress until next weekend unfortunately.

I'm attaching the AIT sensor to the intercooler coldside rather than the intercooler pipe leading to the throttle body to minimise heatsoak of the sensor that occurs after hot-starts. The intercooler is effectively a huge heatsink so cools much quicker than the intercooler pipe which is housed in the engine bay so the sensor won't be reporting hotter than actual temperatures after a hot-start.

I also dropped off the 2.5" elbow that I cut to size and they're going to weld a bead on the cut end to prevent the hose from slipping off.


Originally posted by Nevyn72, Sat Jun 21, 2014 3:17 pm[

So another weekend of giving the X-box a hammering then? :mrgreen:


Originally posted by Okibi, Sat Jun 21, 2014 4:22 pm[

Looking forward to seeing the finished pipework.


Originally posted by Lokiel, Sat Jul 05, 2014 9:08 pm[

I got the intercooler and pipes back this week:

Image


Image


Image


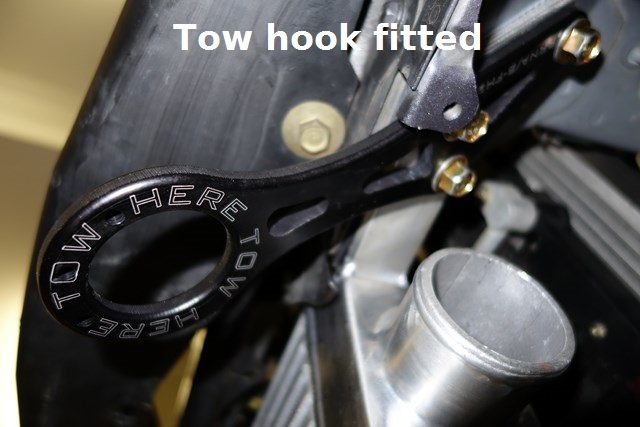
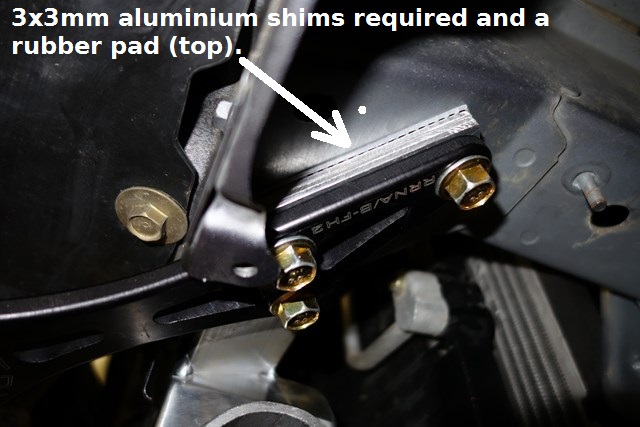
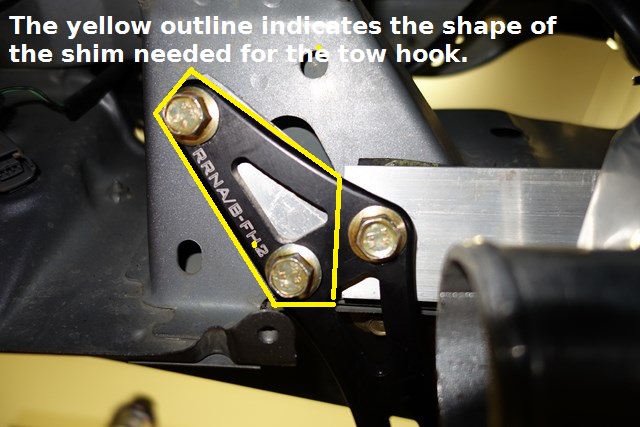
I started fitting it today and needed to make a few shims to re-fit my Ryokurob front tow hook since the Fab9 intercooler bolts onto one of the baby-teeth boltpoints and this is shared by my tow hook.

Image


Image


Image


Those bolts are longer to accommodate the width of the shims and still have enough hold onto the chassis.

Next up I extended the AIT2 sensor harness (SEs/MSMs have two AIT sensors, one in the filter and one between the intercooler and throttle body - referred to as the AIT2 sensor) to the new location on the intercooler and tidied up the wiring.

Tomorrow I plan on calibrating the AIT2 sensor with the Adaptronic ECU "Mighty Car Mods" style and hopefully get her running again.


Originally posted by Nevyn72, Sat Jul 05, 2014 9:53 pm[

Lokiel wrote:.......and hopefully get her running again.

All those poor spiders who are about to become homeless....... :(


Originally posted by ManiacLachy, Sun Jul 06, 2014 12:19 pm[

You'll have to come to Sunday coffee one she's back up and running ;) I've seen Minx, Maniac (crapweasle's), and even caught a glimpse of Tico, but Gina still eludes me :(


Originally posted by Lokiel, Sun Jul 06, 2014 2:49 pm[

ManiacLachy wrote:You'll have to come to Sunday coffee one she's back up and running ;) I've seen Minx, Maniac (crapweasle's), and even caught a glimpse of Tico, but Gina still eludes me :(

Once Gina's back up and running I'm going to be driving her every chance I get - driving the MX5 in Forza on the Xbox ONE just doesn't cut it.

This morning I calibrated the AIT2 sensor (a GM Open-Air sensor) for the Adaptronic ECU, which the Adaptronic ECU refers to as the AuxT sensor, in a similar manner to how Mighty Car Mods tested the raw aluminium vs painted-black intercooler.

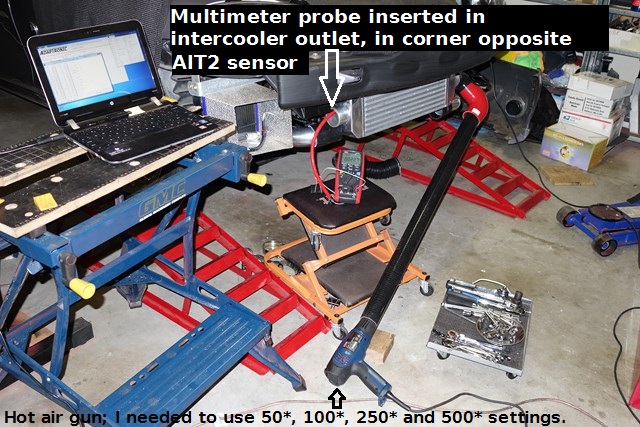
Here's the AIT2/AuxT sensor calibration setup:

Image


Image


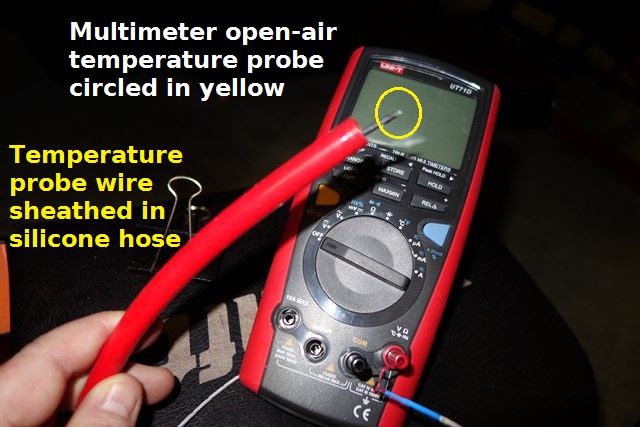
It was probably unnecessary, but I sheathed the multimeter's temperature probe in a silicone hose since I had no idea how hot the intercooler would get (more on this below).

The temperature probe was positioned in the intercooler's top corner, opposite where the AIT2 sensor is located to ensure that that the temperature readings would be similar.

I used a combination of silicone hoses between the intercooler inlet and hot air gun rather than aluminium pipes since the silicone hoses don't lose as much heat. That long black hose should have been much shorter but I didn't want to cut it down and it worked well enough.

To calibrate the sensor on the Adaptronic ECU, you "learn" the temperature readings at 5 degree intervals by clicking on the corresponding temperature value when the temperature probe reports that value. I managed to calibrate it from 20* to 110* using this set-up (my garage doesn't get below about 17*C, even in winter).

Previously I've calibrated sensors by boiling them in water which is what most people recommend but I don't like this method, especially for air temperature sensors:
a. Water temperature inside a container is not uniform when it's in the process of heating up or cooling down to ambient temperature (except at 0*C and 100*C) so all sensors being used in the calibration must be as close together as possible to ensure that they are in the same thermal "zone".
b. The actual open-air sensor is very small and reacts very quickly to temperature changes; in the past my calibration sensors have used long metal probes which retain heat longer and take longer to heat up than the open-air sensor so the calibration sensor was always lagging the temperature reported by the open-air sensor. The multi-meter temperature probe is tiny so should be more in-line with the Open-Air sensor.
c. Open-Air sensors rust easily, even when you think you've dried them off completely (might have something to do with Brisbane's humidity too)
d. This calibration set-up reflects the actual operating environment for the AIT2 sensor so SHOULD be more accurate.

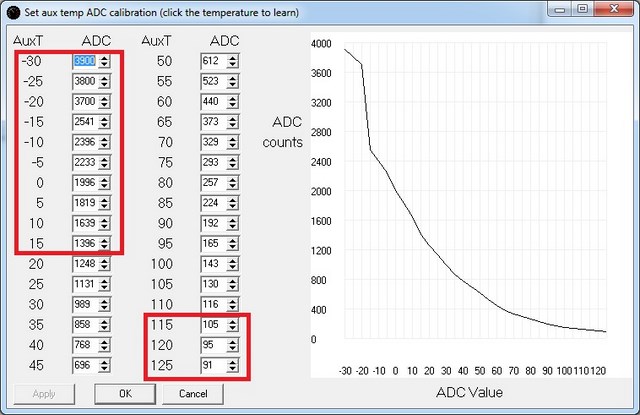
Mighty Car Mods, from memory (I may be wrong), used a hairdryer to heat-soak the intercooler for comedic value. I needed to use my hot air gun's 50*, 100*, 350* and 500*C settings to calibrate the AIT2 sensor from 20*C to 110*C. Here's the results for anyone interested; the values highlighted in red above 110*C were extrapolated and the ones below 20*C weren't updated:

Image

Note: These values are for the GM 3/8" Open-Air Temperature sensor only, you should NOT use them with any other sensor.

Shortly after the 110*C calibration, I'd turned off the heat gun, I touched the multimeter's temperature probe to the intercooler's inlet tank and outlet tank to see what the difference was; the inlet reported ~97*C and the outlet ~77*C (ie. 20*C difference when stationary; not bad!).

Now I'm waiting for the intercooler to cool down, and lunch, before I put the car back together again.
Don't worry about dying, worry about not living!
Garage Thread: http://www.mx5cartalk.com/forum/viewtopic.php?f=57&t=76716

User avatar
Lokiel
Forum legend
Posts: 4126
Joined: Thu May 28, 2009 2:39 pm
Vehicle: NB SE
Location: Brisbania

Re: Lokiel's "Gina" (once a 2004 Titanium SE) Recreated AGAIN

Postby Lokiel » Tue Jun 05, 2018 8:17 pm

Originally posted by Lokiel, Sun Sep 24, 2017 4:55 pm

Originally posted by Lokiel, Sun Jul 06, 2014 9:29 pm[

Putting the car back together took longer than I expected, mostly just tweaking the rotation of the intercooler pipes and hoses to ensure that nothing would bang/touch against anything. It's surprising how much difference a slight twist of a hose/pipe makes.

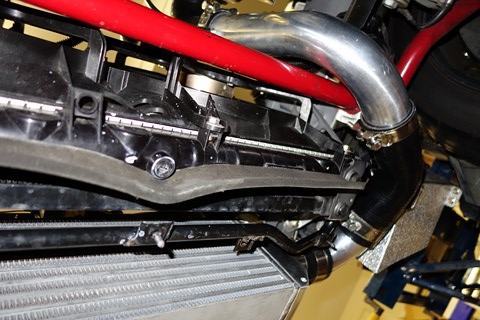
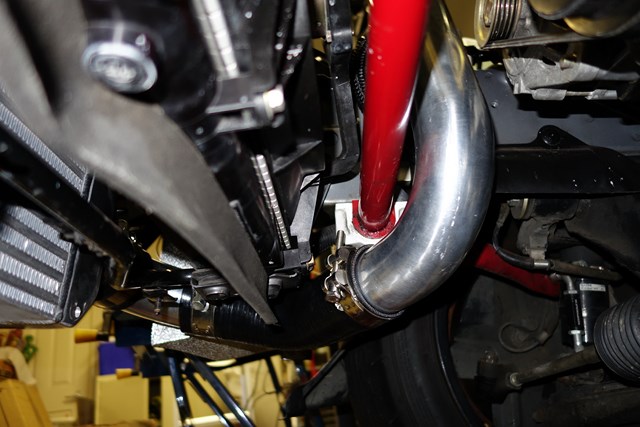
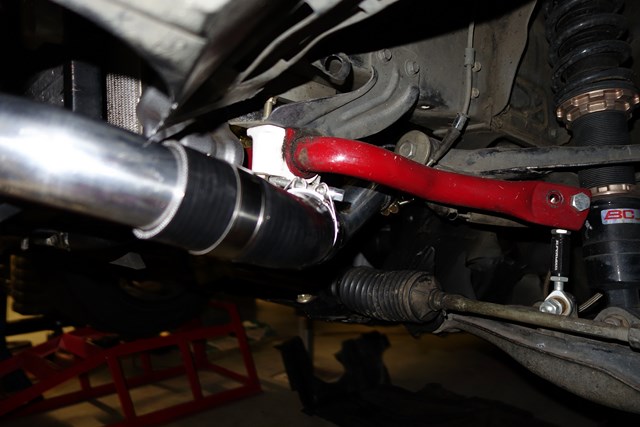
Here's the coldside plumbing; plenty of clearance of the sway bar:

Image


Image


I couldn't really get a good shot of the hotside plumbing, here's the best one; the aluminium pipe on the left is the 90* pipe connected to the intercooler:

Image


Here's the engine bay with the TB's 90* 2.75" -> 2.5" silicone hose reducer fitted - just looks wrong without a red metal TB elbow :( - might need to see what Dann can do again!

Image


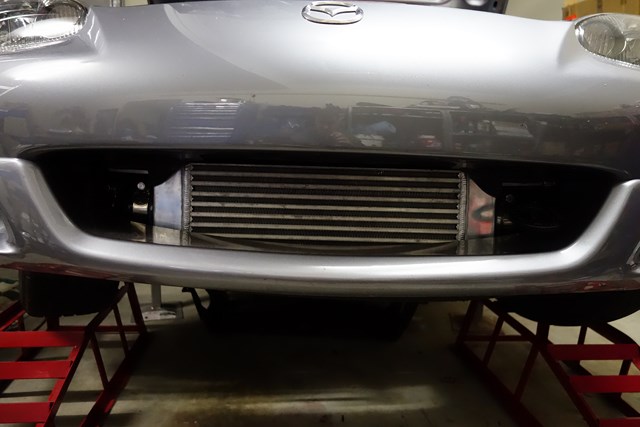
And finally, here's the intercooler and bumper fitted:

Image

Nevyn72 suggested heating the bumper to reform it so that it exposes the complete intercooler - the bottom corners are clipped with the OEM bumper. I'd want to try it out on a test-bumper first though, I'd rather not screw up an MSM/SE bumper since they're hard to find.

Tuning will have to wait until next weekend :(


Originally posted by MattR, Mon Jul 07, 2014 2:04 am[

I wouldn't bother mucking around with the bumper, the extra air flow would make 3/5 of bugger all in the scheme of things once you are moving and air is pushed through the cooler.


Originally posted by ManiacLachy, Mon Jul 07, 2014 8:24 am[

Nice work! Getting close to being back on the road! Better get ready to say farewell to Forza ;)


Originally posted by Nevyn72, Mon Jul 07, 2014 9:19 am[

Looking good, it will be great to finally get Gina back on the road!

So basic tune first off then how long until you get proper dyno tune done?
I know you're going to cap peak power, I'm more interested to see the 'area under the graph' which = low down grunt and drivability. :twisted:

Lokiel wrote:I'd want to try it out on a test-bumper first though, I'd rather not screw up an MSM/SE bumper since they're hard to find.

Too right, they're using the last new one from Mazda in the country on my car's repairs right now! :mrgreen:

Note: the only difference between a stock bumper and a SE bumper is about 10 holes drilled for the front spoiler. :wink:
Don't worry about dying, worry about not living!
Garage Thread: http://www.mx5cartalk.com/forum/viewtopic.php?f=57&t=76716

User avatar
Lokiel
Forum legend
Posts: 4126
Joined: Thu May 28, 2009 2:39 pm
Vehicle: NB SE
Location: Brisbania

Re: Lokiel's "Gina" (once a 2004 Titanium SE) Recreated AGAIN

Postby Lokiel » Tue Jun 05, 2018 8:17 pm

Originally posted by Lokiel, Sun Sep 24, 2017 4:56 pm

Originally posted by Lokiel, Sun Jul 27, 2014 8:17 pm[

Time for an update, now that I've got something positive to report.

Last weekend's plan was to get Gina running again after I'd finally got all the intercooler plumbing sorted and the AIT sensor bung welded into the intercooler.

I'd PM'ed Nevyn72 that the only thing I was really worried about was the Fab9 COPs since I was confident that I'd modified my injector harness to fit the ID725 plugs correctly, I've installed injectors several times before and the squaretop intake manifold and Skunk2 throttle body are "simple" bolt-ons (apart from the bottom 4 bolts on the lower manifold). From my reading about Fab9 COPs, I knew that the dwell time must be 2,500us rather than the OEM 2,100us so I updated that but I also knew that some guys with MS ECUs were having issues.

The car cranked but refused to start so I went through the typical "crank, no start" checklist.

This is where having your own software for your aftermarket ECU is a HUGE help since I could immediately confirm that all sensors and injectors were working correctly. This was a big relief since I started second guessing myself and feared that I may have soldered the injector harness plugs around the wrong way - the Adaptronic WARI software showed that all 4 injectors were hovering just over +12V so I knew that I hadn't screwed that up.

I pulled each spark plug and confirmed that they were all firing - this would have been much easier with 2 people since I spent more time trying to manoever and hold the spark plugs into a position that I could see while cranking the engine. The spark plugs all had a trace of fuel on their tips when I pulled them out so this should have told me it was a spark issue.

After checking the sensors and injectors, the next culprit is usually the fuel system so I needed some fuel-spray which I didn't have so had to pick it up during the week ( no car :( ).

I told the guy at Autobarn what I needed and he said he knew exactly what I needed:

Image


- it actually looked more like this but I said if he had any of those as well I'd take a brunette one:

Image


On Saturday I was busy buying a Daily-Driver car.
Previously I worked in the city so took the bus to work each day.
My new job is in Dutton Park and requires a bus+train to get to and from work and I spend more time waiting than I do in transit which really pisses me off, especially in the evening since the wait for the bus home after getting off the train has been over 20 minutes on three occasions now since it was late - I can walk home from there in 15 minutes!
I'm not keen to leave Gina in an open-air carpark since QLD gets bloody hot, Gina's no longer suitable to drive in stop/start traffic (typical problem when you heavily modify a car) and I believe that having an accident while daily-driving an MX5 in rush hour traffic is inevitable these days with the prevalence of 4WDs on the road - they just don't see you.
As a 2nd car, I wanted something that had reasonable carrying capacity (since Gina has none), light colour (since it will spend most of its life outside and won't look as dirty, requiring less washing hopefully), economical, reliable and "common as mud" so that spare parts are easy to find.
I settled on a 2.0L Mazda 3 Maxx Sport since the "price was right" for one I looked at, same colour as this:
Image
After driving Gina, this "small car" feels like I'm driving a 4WD and the interior is HUGE! It needs slightly stiffer suspension though since there's a tad too much body roll.


Today I got back to figuring out the crank, no start issue.

I sprayed the "Start Ya Bastard" into the intake manifold via the brake booster barb since that was easier than removing the Skunk2 throttle body - same result, crank, no start!

At this point I figured it HAD to be the Fab9 COPs so I removed the Carbing 3-point strut brace to get to the COPs and replaced them and the sparkplugs with my original KV85 leads and plugs - BINGO, she fired up right away! My original prophecy regarding the Fab9 COPs turned out to be true :( I'm going to do more research into this issue.

I Idle-tuned the car and took her for a spin in Rapid Learning mode. This mode never fails to impress me, it didn't take long for the car to feel almost normal and it never stalled on the test-drive. I've now switched to "Slow Coverge" mode and will try and drive each night to smooth it out even more.

Now I need to coordinate a professional tuning session with Brad Smith once I figure out when I've accrued enough time off.


Originally posted by Magpie, Sun Jul 27, 2014 8:36 pm[

http://www.efi.com.au/waekon/index.html#cop
I have purchased this tool to help diagnose a COP issue. I can bring it to Brisbane on 15/08 if you have not solved it. I also have an oscilloscope if needed as well as the Universal EFI Quick Probe.

Let me know if you want me to bring them down.

Good to see you are getting closer to driving it in anger!


Originally posted by ManiacLachy, Mon Jul 28, 2014 11:47 am[

So you've pulled the Fab9 COPs? I was initially impressed with their offerings, but based on your experiences lately I'm thinking they aren't as plug and play with their parts as they make it seem :?

Nice pick up on the 3, I think it'll serve you well, and make hoping in to Gina that much more of an experience!


Originally posted by Lokiel, Mon Jul 28, 2014 12:13 pm[

ManiacLachy wrote:So you've pulled the Fab9 COPs? I was initially impressed with their offerings, but based on your experiences lately I'm thinking they aren't as plug and play with their parts as they make it seem :?

Nice pick up on the 3, I think it'll serve you well, and make hoping in to Gina that much more of an experience!


I still want to figure out what's up with the Fab9 COPs so haven't given up on them yet. I don't know that anyone's run them with an Adaptronic ECU yet so hopefully it's the same voltage-related issue as the MS guys have found since they have a few ideas/solutions.

Going from the 2007 Mazda 3 to my heavily-modified 2005 SE made me realise just how much NVH Gina has and the extra effort/concentration that's required to move from a standing start. The OS Giken clutch doesn't require much travel to engage compared to the stock MX5 clutch which is very forgiving and has greater travel. The Mazda 3 clutch is extremely forgiving and after driving Gina almost feels like driving an automatic since it's so easy.

Gina's no longer suited to rush hour's stop/start traffic so a DD car is a necessity unfortunately. The Mazda 3 is definitely the better commuter car but I think I'll look at stiffening the suspension to make it handle better (it's not bad, or anywhere near as wallowy as some of the Hyundai hire cars I've dr ven, but once you've dr ven an MX5, you become a "handling snob" and recognise this as one of the car's most important requirements).


Originally posted by Magpie, Mon Jul 28, 2014 12:18 pm[

Off topic slightly but I have just replaced my COPS with a brand new set after one of the second hand ones showed signs of failing. The bracket I used was from one of the group buys on here.

Have you taken into account the dwell setting into account? A bit of a Cptain Obvious question....


Originally posted by ManiacLachy, Mon Jul 28, 2014 12:30 pm[

I can't wait 'til the day I finally see Gina in the flesh. Now that she's almost back on her feet it shouldn't be too long I hope.

I'm sure you'll get to the bottom of the COPs issue, and in several years time when I even begin thinking about seriously picking them up you'll have all the answers I need to complete the job :wink:

And it will be a years before I get there. I got in trouble over the exhaust purchase :oops: I think my bulid will proceed slowly for a while.


Originally posted by Lokiel, Mon Jul 28, 2014 12:59 pm[

Magpie wrote:Off topic slightly but I have just replaced my COPS with a brand new set after one of the second hand ones showed signs of failing. The bracket I used was from one of the group buys on here.

Have you taken into account the dwell setting into account? A bit of a Cptain Obvious question....


The Fab9 COPs specified a Dwell Time of 2,500uS instead of the OEM 2,100uS which I did set (I even tried 2,100uS) so I'm happy that's not the issue.

Also, when someone's having issues, I don't believe it's ever a problem referring to "Captain Obvious" oversights, I've made a few of them in my time (eg. leaving the handbrake on while trying to do rear brake work and wondering why I can't get the bloody things off).

I may yet take you up on your COP tool offer although I'm half tempted to let Brad Smith figure it out since I'm almost over trying to DIY everything myself and just want to drive the car again (giving up isn't really in my nature though).


Originally posted by Magpie, Mon Jul 28, 2014 1:03 pm[

Let me know on the tool. I'm attending Round 4 of the Time Attack at QR on 14/08 and returning back to Blackwater possibly on the 16/08.
Don't worry about dying, worry about not living!
Garage Thread: http://www.mx5cartalk.com/forum/viewtopic.php?f=57&t=76716

User avatar
Lokiel
Forum legend
Posts: 4126
Joined: Thu May 28, 2009 2:39 pm
Vehicle: NB SE
Location: Brisbania

Re: Lokiel's "Gina" (once a 2004 Titanium SE) Recreated AGAIN

Postby Lokiel » Tue Jun 05, 2018 8:18 pm

Originally posted by Lokiel, Sun Sep 24, 2017 4:58 pm

Originally posted by Lokiel, Sat Aug 30, 2014 10:46 pm[

This is for Nevyn72's benefit (see http://mx5cartalk.com/forum/viewtopic.php?f=57&t=64088&start=45) :P

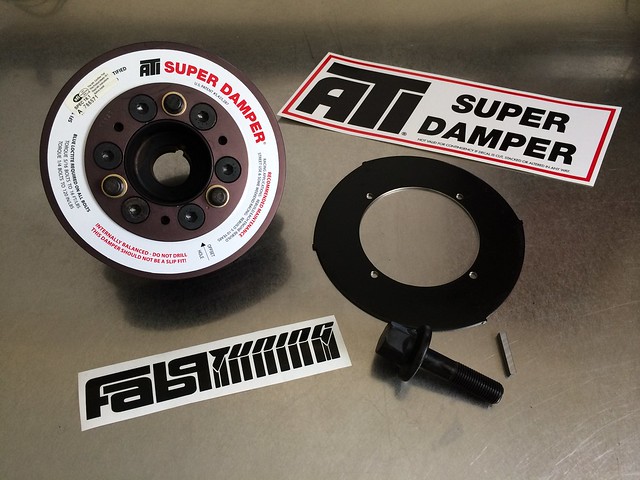
I gave up waiting for Fab9 to supply me with a modified COP harness to allow the Fab9 COPs to work with my Adaptronic ECU, re-installed my original plugs and dropped Gina off today at MX5 Plus to have the ATI Harmonic Damper and FM 36-2 tooth timing wheel installed; they arrived a few weeks after MX5 Plus finished building my engine unfortunately:
Image
Image

I'm also getting GT Auto Garage, located next door to MX5 Plus, to FINALLY tune the car; Jason wanted me to get a dyno run there anyway so that they can compare it to their other built engines that they've tuned on the GT Auto Dyno. For now I've asked for around 270-280rwhp, any more than that I suspect will just result in wasted tyre spinning. The EFR6258 can produce 400hp but 300hp seems to be the "danger zone" for the MSM/SE's 6-speed gearbox on the track so I want to sit comfortably below that threshold; at 270-280rwhp the EFR6258 won't even be breaking a sweat so reliability wont be an issue.

Big thanks to ManiacLachy for the lift home, it takes ages to get home by public transport since it's all routed via the city. I helped him install a couple of brackets for his CAI and relays when I got home. It probably took about the same time to make and install the brackets as it would have to come home by public transport so it worked out well for both of us.


Originally posted by Magpie, Sat Aug 30, 2014 10:51 pm[

Good news! Hope you get to use your spare set of tyres :)


Originally posted by Crapweasel, Sat Aug 30, 2014 11:41 pm[

I'd like to book a passenger seat run (sans ECBs on the floor!) with 270WHP please... :mrgreen:

I'm considering reaching for 250 so would like to see what it's like at that level!


Originally posted by Okibi, Sun Aug 31, 2014 12:28 am[

Been eyeing off one of those crank wheels at FM, keen to see if you think it's worth it.


Originally posted by Nevyn72, Sun Aug 31, 2014 8:36 am[

Crapweasel wrote:I'd like to book a passenger seat run with 270WHP please... :mrgreen:

I'm sure you're not the only one! :wink:
I think he's going to have to book a track for the day just to give people rides....... :lol:

So Lokiel, what are you going to do on the COPS front, stay factory, wait for a fix from Fab9 or look for another solution?
Will the car require a 're-tune' if you replace the factory coils/leads?


Originally posted by ManiacLachy, Sun Aug 31, 2014 8:40 am[

Lokiel wrote:Big thanks to ManiacLachy for the lift home, it takes ages to get home by public transport since it's all routed via the city. I helped him install a couple of brackets for his CAI and relays when I got home. It probably took about the same time to make and install the brackets as it would have to come home by public transport so it worked out well for both of us.


Pretty sure I came out ahead on that deal! I think I owe you those Canadian Clubs after all :wink: Thanks again. It was great to see you workshop, it's extremely well kitted out :shock:

I'm also looking forward to seeing how Gina performs once she's had the tuning done. Amazing car, and very much a test bed of technology and mods for the rest of us SE owners.


Originally posted by Magpie, Sun Aug 31, 2014 8:57 am[

I can't wait to see it stretch its legs on the track :). QR 30/10/14 would be a good day....
Don't worry about dying, worry about not living!
Garage Thread: http://www.mx5cartalk.com/forum/viewtopic.php?f=57&t=76716

User avatar
Lokiel
Forum legend
Posts: 4126
Joined: Thu May 28, 2009 2:39 pm
Vehicle: NB SE
Location: Brisbania

Re: Lokiel's "Gina" (once a 2004 Titanium SE) Recreated AGAIN

Postby Lokiel » Tue Jun 05, 2018 8:18 pm

Originally posted by Lokiel, Sun Sep 24, 2017 4:58 pm

Originally posted by Lokiel, Sun Aug 31, 2014 10:14 am[

Okibi wrote:Been eyeing off one of those crank wheels at FM, keen to see if you think it's worth it.

timk has a Mazda Protege 36-1 wheel in his car so you might want to ask him about it (please get him to post his thoughts in his garage thread for others to read too).

Nevyn72 wrote::
So Lokiel, what are you going to do on the COPS front, stay factory, wait for a fix from Fab9 or look for another solution?
Will the car require a 're-tune' if you replace the factory coils/leads?

I'm a bit fed up with the Fab9 COPs at the moment, I've wasted a lot of time on them and Bryan hasn't responded to any of my e-mails after his initial correspondence that he'd send me one of the modified harnesses so I may just "pony-up" the big bucks for the FM Big Spark kit (see http://www.flyinmiata.com/index.php?deptid=4529&parentid=0&stocknumber=04-59100%20%201994-00). I know that I could DIY my own Toyota COPs but I've just read too many threads where people have had issues with them (mostly because the Toyota COPs have come from 2nd hand sources) and I now just want something that bloody works. The FM kit is expensive because they use new coils and despite their cost, you know that FM products are reliable.

The car won't need a re-tune, aftermarket COPs are used to generate a stronger spark so are less likely to misfire, something that's more prone on modified turbocharged engines or high compression engines
Magpie wrote:I can't wait to see it stretch its legs on the track :). QR 30/10/14 would be a good day....
.

Magpie wrote:I can't wait to see it stretch its legs on the track :). QR 30/10/14 would be a good day....

Sigh! The only thing that sucks about starting a new job is waiting to accumulate leave and being able to get it when you need it.


Originally posted by Nevyn72, Sun Aug 31, 2014 10:21 am[

Lokiel wrote:The FM kit is expensive.......

Yikes! You're not kidding about the price...... :shock:


Originally posted by Magpie, Sun Aug 31, 2014 11:20 am[

New job, know the feeling! I have possibly arranged my R&R to suit 30/10. I'm yet to tell my other half that the plane lands at 0530 and I'm heading straight out to QR for the day so can you please have all my gear ready... Plus we would still be unpacking, but I have made sure I know where my essential car stuff is :) I'll have to come over and visit when I'm in Brisbane next or meet up at Plus.

In respect to COPS the second hand ones used on mine did fail, but I bit the bullet and had MX5 Plus purchase new ones. The reason for the failure could have been because when somebody detailed the engine bay before the Ausgarage show in Feb 14 water went down the plug hole of the rear cylinder and kept shorting out the plug hence the intermittent miss fire and damage to the COP. As mentioned I now have tools to test COP's as well as injectors.

I do have a 2 channel oscilliscope (Hantek DSO5062B) if you would like to borrow it to show what is going on. This is using 3 channels http://www.picoscope.tv/automotive/testing-coil-on-plug.html but the theroy is the same.

Plus did have a problem with the 36 tooth wheel however once they went back to the stock not a problem. The toothed wheel is still on the agenda to be resolved, more than likley when the E85 is done.

Since the new COPs have gone in not an issue, the plugs are a beautiful brown colou and I'm the only one who will detail my engine bay! Only fault I have had is a stuffed cam angle sensor, so I carry a spare.


Originally posted by Novice1, Mon Sep 01, 2014 6:59 pm[

Speaking from experience 270-280 hp things go by very quickly.

My car was still very daily driveable with dual boost controller.

Clutch was built up but performed like a normal clutch.

Looking forward to a passenger drive, LOL.

Novice1


Originally posted by Lokiel, Mon Sep 01, 2014 8:50 pm[

Novice1 wrote:Speaking from experience 270-280 hp things go by very quickly.
:/quote]
My 270-280rwhp limit is very much based on your comments from when I asked you about your car a few years ago where you said it could be a handful - this is why I'm not aiming closer to 300rwhp which is probably still just-safe-enough gearbox-wise but probably wasted in the real world (ie. when NOT on a dyno).

I'd like your driving comparison comments too.


Originally posted by Aussie Stig, Mon Sep 01, 2014 11:04 pm[

Holy mother of God!!!! That harmonic balancer was close to $500.

She ain't a cheap mistress...


Originally posted by gslender, Tue Sep 02, 2014 9:37 am[

I guess that much power or more is like putting 10 inch wide wheels on a stock NA6 - significantly more rubber than you can ever use or need with the power/handling available - but in the opposite way


Originally posted by Lokiel, Tue Sep 02, 2014 11:48 am[

Aussie Stig wrote:Holy mother of God!!!! That harmonic balancer was close to $500.

She ain't a cheap mistress...


I found it for half that price on MT.net so jumped on it. It was unused so I couldn't pass it up since it was on my "one-day" bucket list and I know I wont find it that cheap again.


Originally posted by corners, Tue Sep 02, 2014 1:34 pm[

Lokiel wrote:
Magpie wrote:I can't wait to see it stretch its legs on the track :). QR 30/10/14 would be a good day....

Sigh! The only thing that sucks about starting a new job is waiting to accumulate leave and being able to get it when you need it.


Yep I hear you on that!

I've also had my experience with the gearbox issues as Nissan shares the the 6 speed box.


Originally posted by The American, Sun Sep 07, 2014 8:17 pm[

I saw your car for the second time last week, in the Automotive Plus garage (first time was in Maleny during Natmeet). Are you expecting to see it tuned this week?

Your build thread is a good read!
Don't worry about dying, worry about not living!
Garage Thread: http://www.mx5cartalk.com/forum/viewtopic.php?f=57&t=76716

User avatar
Lokiel
Forum legend
Posts: 4126
Joined: Thu May 28, 2009 2:39 pm
Vehicle: NB SE
Location: Brisbania

Re: Lokiel's "Gina" (once a 2004 Titanium SE) Recreated AGAIN

Postby Lokiel » Tue Jun 05, 2018 8:19 pm

Originally posted by Lokiel, Sun Sep 24, 2017 4:59 pm

Originally posted by Lokiel, Sun Oct 26, 2014 11:10 pm[

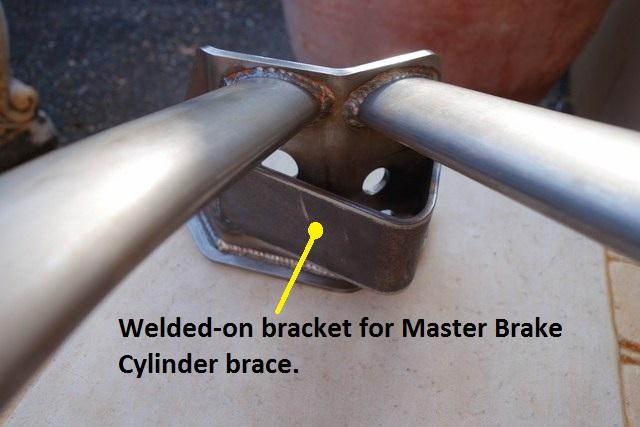
My Carbing 3-point front strut brace didn't have a Master Brake Cylinder brace fitted which annoyed me since I assumed they all had them and I had one previously on another after-market 2-point brace which I liked. Prior to dropping my car off for a tune, I removed the front strut brace, stripped it back to bare metal and got a bracket welded onto the brace:
Image


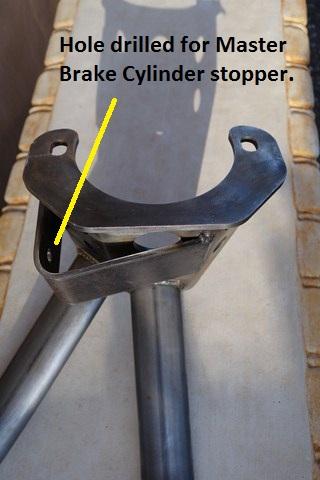
I picked up the car on Saturday from MX5-Plus and determined where I needed to drill a hole for the brace:
Image


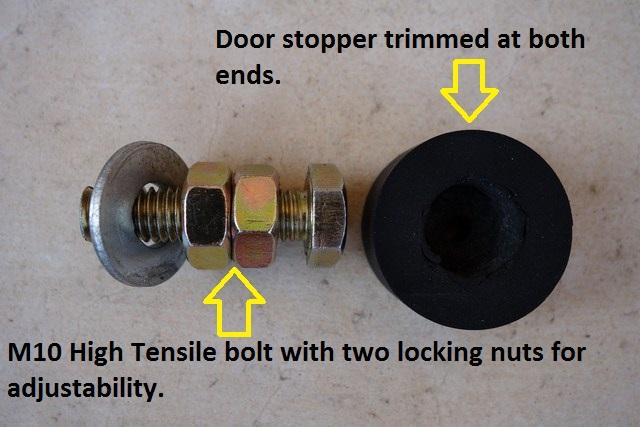
An M10 High Tensile bolt, washer and two locking nuts for adjustability, along with a door stopper trimmed at both ends makes an effective brace:
Image


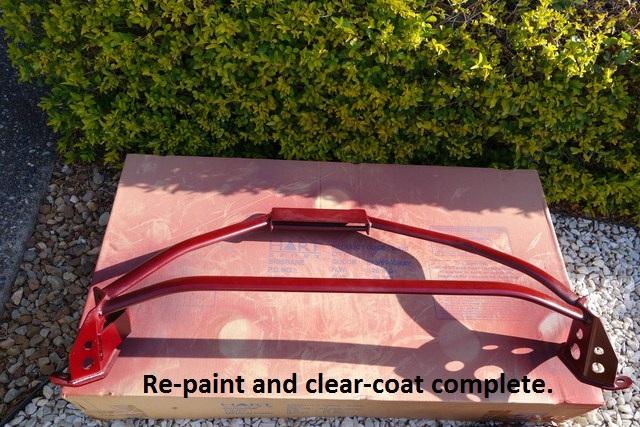
I spent most of today re-painting the 3-point brace, undercoats+paint+clear-coat take a while - luckily today was stinking hot which helped the paint dry faster:
Image


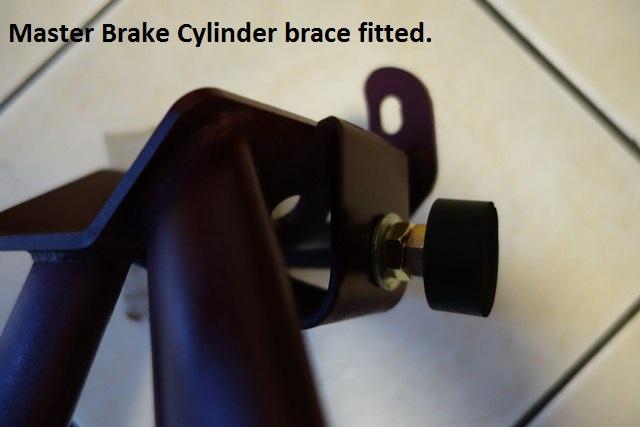
Here's the brace mounted (not planning on putting a nut behind the bracket - saves weight :P ):
Image


Brian from Fab9 has sent me a new Ignition Control Module for the Fab9 COPs which I plan to test before re-fitting the brace so I won't have any pictures of the brace fitted until I deem it works (or not) - the brace needs to be removed to get at all the sparkplugs.

Unfortunately when my car was being tuned, something fried my Adaptronic ECU so it was sent back to Adaptronic and I now have a temporary replacement Adaptronic ECU. My Innovate MTX-L Wideband O2 gauge is dead too, probably got fried at the same time, so I need to replace it :(


Originally posted by gslender, Mon Oct 27, 2014 7:05 am[

Fried your ECU? WTF! How does that happen?


Originally posted by sailaholic, Mon Oct 27, 2014 8:17 am[

Wow that is impressive.


Originally posted by ManiacLachy, Mon Oct 27, 2014 8:23 am[

Can someone explain to me what the brace does exactly? All I know is it's good, and people desire it.

That sucks about frying your ECU and gauges. Is the temporary ECU tuned with a map that you can transfer over to the new unit, or will it need to go in again?


Originally posted by sailaholic, Mon Oct 27, 2014 8:43 am[

If your talking about the complete brace it's a can of worms.

If you just mean the add on bit, it's to reduce the flex in the firewall when you stand on the brakes hard and gives a firmer pedal feel.


Originally posted by Magpie, Mon Oct 27, 2014 9:36 am[

Yes can of worms on the strut brace! However it makes a great arm/tool rest as well as a place to cable tie to.

Brake brace is a proven benefit.


Originally posted by Lokiel, Mon Oct 27, 2014 9:47 am[

gslender wrote:Fried your ECU? WTF! How does that happen?

It happened while it was on the dyno during one of the runs. No idea what caused it so it's been sent back to Adaptronic for Andy to look into/fix/replace and I have a "loaner" installed.

sailaholic wrote:Wow that is impressive.

The bracket or frying my ECU and Innovate MTX-L?

Interestingly the PLX sensors and gauge survived - either because they weren't connected to the ECU (ECU and Innovate gauge are connected via the Serial-In port) or their circuit protection is better if it was due to a power spike.

ManiacLachy wrote:Can someone explain to me what the brace does exactly? All I know is it's good, and people desire it.

That sucks about frying your ECU and gauges. Is the temporary ECU tuned with a map that you can transfer over to the new unit, or will it need to go in again?

The Master Brake Cylinder is mounted on the firewall which will flex forward when you brake. Adding a brace against it prevents the firewall pushing forward so the brakes feel firmer.
The MAP can be transferred straight across to the new ECU. Luckily the ECU swap-back will be easy since it's mounted in the glovebox - I can do it in the MX5 Plus parking lot.


Originally posted by Lokiel, Mon Oct 27, 2014 11:07 am[

gslender wrote:Fried your ECU? WTF! How does that happen?


They suspect it may have been their Snap On jump starter which has now been taken out of service until Snap On can provide some feedback.

I think this is the universe's way of telling me that the EFR6258 isn't meant for MX5s after all the delays I've had and the hassles with wastegates and boost creep resolution (which I still have and will always have with the current configuration).


Originally posted by Okibi, Mon Oct 27, 2014 7:18 pm[

If you want to go back to stock i'll take it! :evil:


Originally posted by sailaholic, Mon Oct 27, 2014 9:58 pm[

whats the issues with the waste gate and boost creep?


Originally posted by fastfreddygassit, Mon Oct 27, 2014 11:27 pm[

^^^^^ditto about boost creep/waste gate issue.

aaah, the trials and tribulations of being a pioneer......


Originally posted by ManiacLachy, Tue Oct 28, 2014 8:36 am[

Just to add to the Q&A session :mrgreen: ...

What's your assessment of GT Auto as Adaptronic tuners? Assuming the electrical issues were a freak accident, how does the final tune shape up? Did you get dyno numbers?


Originally posted by Nevyn72, Tue Oct 28, 2014 9:13 am[

No wonder you've been so quiet about Gina lately........

Sack the tuners and take Gina to the Dodgy Day, the boys will sort her out! :mrgreen:


Originally posted by gslender, Tue Oct 28, 2014 9:53 am[

LOL I'd love to go wild over an adaptronic ECU!!!!
Don't worry about dying, worry about not living!
Garage Thread: http://www.mx5cartalk.com/forum/viewtopic.php?f=57&t=76716

User avatar
Lokiel
Forum legend
Posts: 4126
Joined: Thu May 28, 2009 2:39 pm
Vehicle: NB SE
Location: Brisbania

Re: Lokiel's "Gina" (once a 2004 Titanium SE) Recreated AGAIN

Postby Lokiel » Tue Jun 05, 2018 8:19 pm

Originally posted by Lokiel, Sun Sep 24, 2017 5:00 pm

Originally posted by Lokiel, Tue Oct 28, 2014 11:07 pm[

I was planning on posting up a summary once I had the dyno chart and some more pictures but I'll give a verbal summary now - sorry for you little kiddies, not many pictures just yet, just lots of words.

When MX5 Plus built my engine, Jason mentioned that it had noticeable boost creep.
I was paranoid about not going over 4,000rpm during the break-in period so backed off very quickly when it got close - "The Borg" spools incredibly fast so I backed off a LOT.

The turbo came with a medium Borg-Warner wastegate actuator (12-18psi) and I also bought a Forge wastegate actuator with several springs after I read that 99mx5 on MT.net switched to it after having issues with his OEM actuator. TurboSmart then released their version so I got that too with multiple springs - this was my preferred option since it matched the TurboSmart BOV I had (the BOV that comes with the turbo is dinky in comparison to the TurboSmart BOV).

Most guys using the turbo have a high-mount log manifold with the wastegate actuator between the engine and manifold, like 99mx5's (99mx5's manifold is not a log manifold though):
Image
- note that the actuator shaft is straight.

I wanted a low-mount manifold so that I could route the intercooler hose underneath the car - the lower COG and ability to maintain an OEM look by using the OEM heatshield were added bonuses. Soviet on MT.net has this setup but has no P/S or A/C:
Image
- note that the actuator shaft is straight and is on the passenger-side of the manifold.

The EFR turbos are designed to be easily clockable and multiple configurations should be possible.

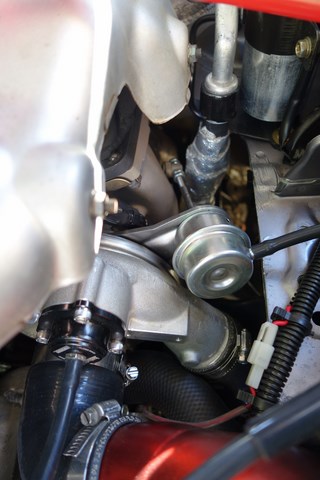
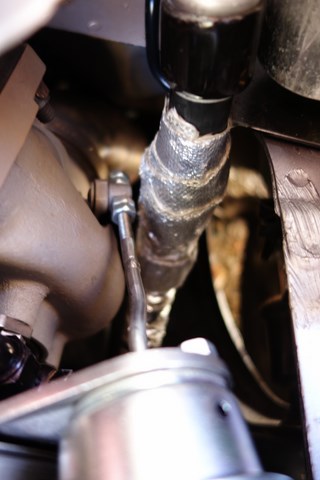
When I had my engine built, MX5 Plus had to bend the shaft of the TurboSmart wastegate actuator to permit it to activate the wastegate valve. This isn't uncommon and if you look at the TurboSmart site you'll see that many model-specific wastegate actuators have bends in them to allow the valve to be opened and closed smoothly.

I dropped my car off at MX5 Plus to have the Super ATi damper and FM 36-2 timing wheel fitted, as well as a dyno tune. It took a few days of communication back and forth between MX5 Plus and Andy from Adaptronic to figure it out, even with FM's information which is specific to their Hydra ECU and not relevent to the Adaptronic. I thought it would be simple and based on timk's work with the Mazda Protege 36-1 timing wheel but that wasn't the case. I haven't looked into this at all but will post the details when I get a chance to look at it.

MX5 Plus also noted that the wastegate actuator was binding so the wastegae valve was never fully opening or closing and that the shaft really needed to twist as well to allow the valve to be opened and closed correctly. When the TurboSmart wastegate actuator was disassembled, the diaphragm had a pinch hole in it, either due to the bending of the shaft or the fact that the diaphragm has a flat shape and needs to move in a very linear fashion to function properly. The Forge wastegate actuator's diaphragm is more like a ball-and socket so allows for some pivoting of the shaft but that too was still binding.

We agreed to send the turbo off to MTQ to see what they could come up with since they have access to every wastegate actuator available and MX5 Plus were out of ideas and buying-and-trying different wastegate actuators would have gotten extremely expensive and time consuming. In the end, MTQ came up with a modified Ford XR6 wastegate actuator that minimised the actuator binding and allows 12psi of boost. The other option was a custom bracket for the actuator and rotating it further clockwise to allow a straighter throw of the wastegate actuator shaft but would have required cutting the shelf, something that's illegal and MX5 Plus would not do.

MX5 Plus and MTQ believe that the EFR turbos are more suited to high boost/power applications and that I will always have boost creep - at least now its minimised.

The Adaptronic ECU was confirmed as being fried by Andy so it's suspected that the Snap On jump-starter was the villain here - now decommissioned until the issue has been resolved. A "loaner" version was installed for the tune.

These issues all added to the time it took to complete the work and GT Auto, the tuners, were flat-out and also helping with Danny's WTAC car. The tuner also had an O/S trip sheduled too so MX5 Plus made sure that I got priority after the WTAC to tune the car before he left.

There's been a tonne of headaches along the way which is to be expected when using any new hardware but at least now MX5 Plus has some hands-on experience of an EFR6258 and it's good to get their professional opionion versus what some of us DIY-backyarders "reckon".

So if you're planning on an EFR6258 build in future, I'd recommend a high-mount log manifold with the wastegate actuator located between the engine and manifold. Even with this setup, I'm not convinced that you wont suffer boost creep.


Tonight I tried the new Fab9 COP Injector Control Module that Brian sent me - same result, "crank, no start" so I'm giving up on them.
They do work with the SE's OEM ECU though so if anyone wants them I'm happy to sell them for $100 (the harness is model-specific and the package includes injectors) - anyone with a Chiptorque modded ECU want them?


Originally posted by Magpie, Wed Oct 29, 2014 7:45 am[

Good to hear/read that it is getting resolved. 12 months ago my engine tune was on hold due to WTAC. Note to all GT auto is very busy prior to WTAC, whilst it shows how good they are it has impacts on us normal drivers :)

Your build is showing his much lack of information there is for RHD cars. Just goes to show for natural aspirated cars ITB's are limited by the booster whereas for forced there are other issues. What works in LHD cars does not always work for us.

So are you going to take it to Morgan Park for a run? It is a great day and not hard on cars.

I agree that Automotive Plus is getting experience doing different things, I also hear that the exposure at WTAC is going to see them get more work, Jason will be happy!


Originally posted by ManiacLachy, Wed Oct 29, 2014 8:23 am[

I always learn so much reading your threads, Simon! Even if I don't completely understand all of it, my eyes are opened to so many things I hadn't even been aware of before :wink:

So, the worst of the hurdles are out of the way now? How does she drive? Looking forward to having a bit of a gawk at the Dodgy Day!


Originally posted by Lokiel, Wed Oct 29, 2014 11:30 am[

ManiacLachy wrote:I always learn so much reading your threads, Simon! Even if I don't completely understand all of it, my eyes are opened to so many things I hadn't even been aware of before :wink:
So, the worst of the hurdles are out of the way now? How does she drive? Looking forward to having a bit of a gawk at the Dodgy Day!

Most of what I know I've learned from other threads and DIYing so I try and "give back" to the community by posting my own experiences, both good and bad - I have no shame in admitting I flocked up or chose the wrong path since others can learn from my mistakes. Posting your own experiences is really useful too because occasionally someone can tell you what you need to do or should have done to rectify an issue.

Once I get the dyno chart and the wideband O2 issue sorted out, I'm going to do a build thread on MT.net - that's going to be "interesting" to say the least but I don't doubt that there will be some excellent feedback.

I still have to reserve judgement on the GT Auto tune until the new wideband O2 sensor is installed. I can say however that the rpm dip when the fans activated was markedly reduced from my DIY tune - not sure if it was due to tuning or the updated Adaptronic WARI software.

Magpie wrote::
So are you going to take it to Morgan Park for a run? It is a great day and not hard on cars.
:

Probably not, I actually want Brad Smith (Adaptronic guru) to tune the car before a track session - yes, I'm overly paranoid.


Originally posted by corners, Wed Oct 29, 2014 11:56 am[

What influenced your decision to go with that turbo?

Why not a Garret? 2560 or 2871?


Originally posted by A.Chen89, Wed Oct 29, 2014 1:01 pm[

Pretty keen to see the dyno graph when its done.

How bad is your boost creep? I haven't really noticed it on my one with the low mount manifold, but I've only tracked it once since the conversion.

The compressor curve for the EFR6258 is a nice fit for small motors. You end up getting the spool of a 2560 but the power of a 2871. The EFR's are super responsive.
An equivalent GTX series turbo would probably do the same job; regular 2560's and 2871's are old tech.

I've seen a Toyota AW11 with a 4AGE fitted with an EFR6258; that thing was hitting 20 psi (which is in the efficiency range of the EFR) pretty easily and making a big amount of power to boot.


Originally posted by corners, Wed Oct 29, 2014 2:17 pm[

A.Chen89 wrote:Pretty keen to see the dyno graph when its done.

How bad is your boost creep? I haven't really noticed it on my one with the low mount manifold, but I've only tracked it once since the conversion.

The compressor curve for the EFR6258 is a nice fit for small motors. You end up getting the spool of a 2560 but the power of a 2871. The EFR's are super responsive.
An equivalent GTX series turbo would probably do the same job; regular 2560's and 2871's are old tech.

I've seen a Toyota AW11 with a 4AGE fitted with an EFR6258; that thing was hitting 20 psi (which is in the efficiency range of the EFR) pretty easily and making a big amount of power to boot.


Good to know, thanks for explaining :beer:


Originally posted by Lokiel, Wed Oct 29, 2014 2:31 pm[

corners wrote:What influenced your decision to go with that turbo?

Why not a Garret? 2560 or 2871?


The new Borg-Warner EFR turbo series are a completely new line, not simply a slow-and-steady evolution of an existing unit; they also pack a LOT of in-built features and are pretty much "the ducks nuts" as far as turbos go, you get all the benefits of a small turbo (low spool) with all the benefits of a large turbo (MOAR POWA).

ie. all the benefits of a Garrett 2550 and 2871 combined.

One of the bigs whines you hear time and time again from guys who've installed a turbo is that they either want MOAR POWA or don't like their slow spooling large turbo - the EFR6258 covers both of these cases.
Don't worry about dying, worry about not living!
Garage Thread: http://www.mx5cartalk.com/forum/viewtopic.php?f=57&t=76716

User avatar
Lokiel
Forum legend
Posts: 4126
Joined: Thu May 28, 2009 2:39 pm
Vehicle: NB SE
Location: Brisbania

Re: Lokiel's "Gina" (once a 2004 Titanium SE) Recreated AGAIN

Postby Lokiel » Tue Jun 05, 2018 8:19 pm

Originally posted by Lokiel, Sun Sep 24, 2017 5:01 pm

Originally posted by Lokiel, Sun Nov 09, 2014 12:10 am[

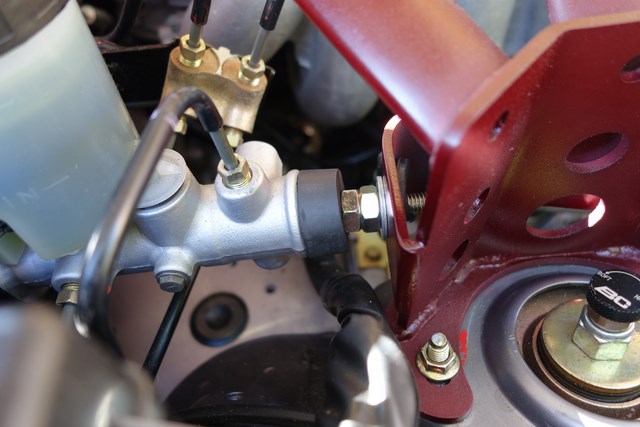
Here's a shot of the Carbing 3-point front strut brace's Brake Master Cylinder brace now that it's installed:
Image

- I even impressed myself with how well it lined up since it's easy to screw alignments up.

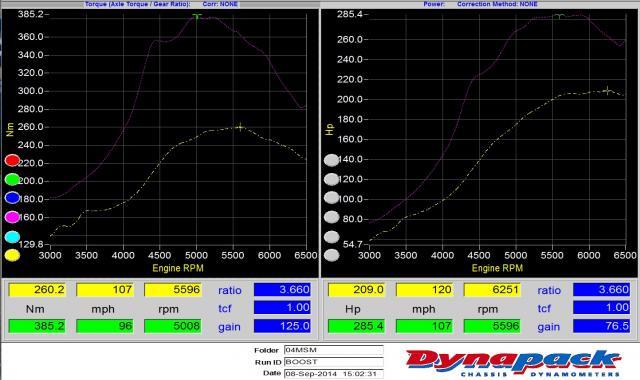
Jason sent me the dyno charts during the week so here they are.

Here's the initial dyno graphs using the Turbosmart IWG with a 10psi spring:
Image

Image

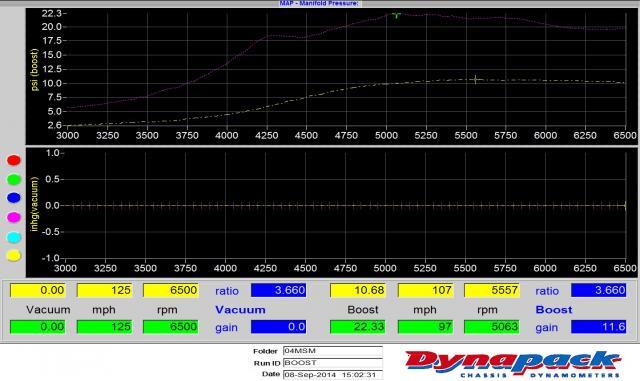
The colour-key on the left corresponds to the dyno run numbers; two runs are plotted with the plots in the run number colour.

The yellow run maxed at 209hp (155kw) and 10.68psi ; this was with wastegate never fully closed.

Once they managed to get the wastegate fully closed by adjusting the wastegate actuator, it managed 285.4hp (212.8kw) and 22.33psi (pink run).
Jason said this run was performed with no timing and no fuel adjustments once enough fuel was added to keep it safe; continuing would've produced a fair bit bore power (ie. 300+hp is possible).

This was when they discovered misalignment issues with the wastegate actuator which opened up a can of worms.

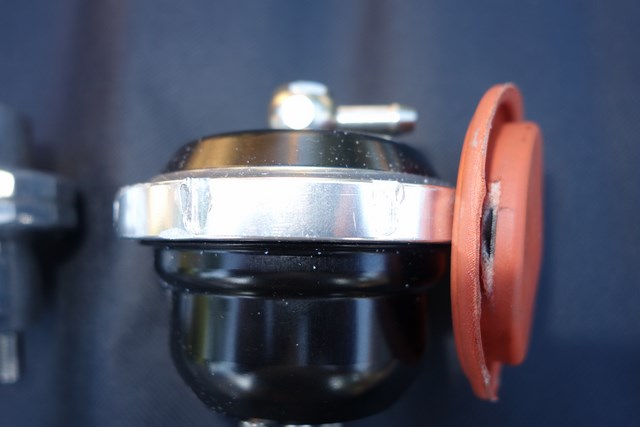
Here's the TurboSmart IWG diaphragm (on the right of the wastegate actuator - looks like a hat), you can see where it has been pinched/worn due the fact that the actuator shaft needed to twist somewhat when opening and closing the wastegate valve:
Image

- the TurboSmart diaphragm is flat and shallow so the shaft needs to move along a very linear path to prevent this type of pinching/wearing.

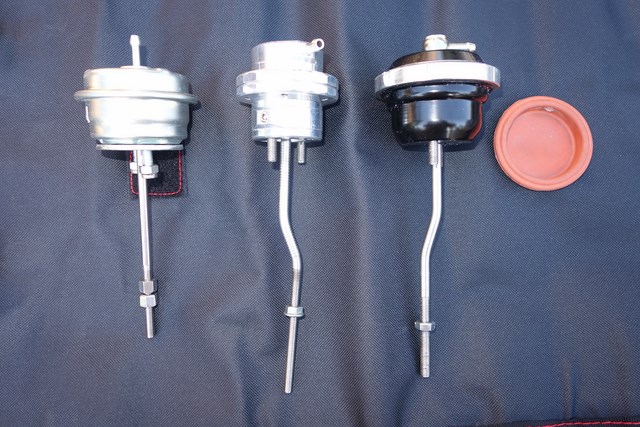
I have a Forge wastegate actuator too which has more of a socket-type diaphragm so it allows the actuator shaft to move around a bit more. That too was modified to fit (shaft modified) but still had binding issues:
Image

- the original EFR6258 wastegate actuator on the left wont fit with my wastegate orientation since the shaft isn't long enough.

The turbo was then sent off to MTQ to see if they could come up with an IWG that would work with my turbo orientation. They ended up using a Ford XR6 wastegate actuator which needed the shaft modified (bent and the end modified to suit the valve actuator):
Image

Image


The Ford XR6 wastegate actuator only has a 6psi spring :(

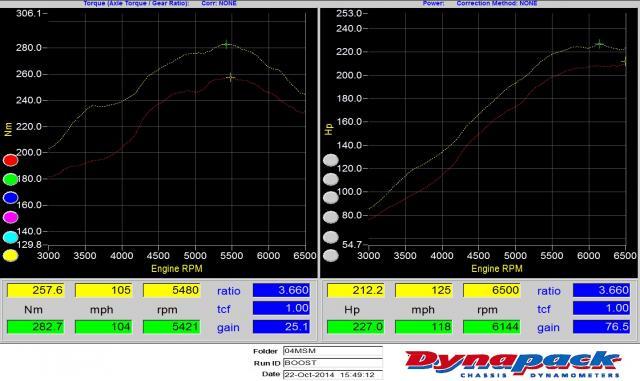
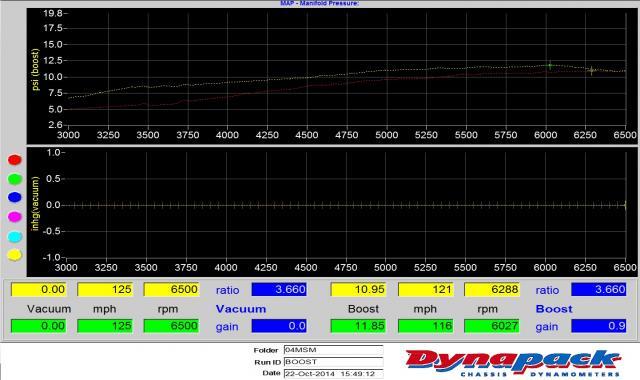
Here's the final dyno runs with the XR6 wastegate actuator:

Image

Image


227hp (169kw) with a maximum boost of 11.85psi.

That's actually pretty wimpy for an EFR6258 but still ~20kw above what's possible on a fully modified SE/MSM using the stock IHI turbo without modifying the turbo.

For now I think I'm going to just enjoy the car for a while (and save for an EFR6258 log-style manifold set-up with an EWG - I can't settle for 169kw when I know that there's so much more power available).

So in summation, if you're planning on using an EFR6258, DON'T use a low-mount solution without provision for an EWG (even if you end up doing a "traditional EFR high-mount" which locates the wastegate actuator between the engine and manifold, allowing for an EWG will give you another option to eliminate any boost creep).


Originally posted by gslender, Sun Nov 09, 2014 8:05 am[

Well that sux - seems odd that the entire custom solution is marked as useless because of a wastegate actuator! So absolutely no possible position where it would work? It's not like it has to even be mount on the turbo?!


Originally posted by Magpie, Sun Nov 09, 2014 8:34 am[

That journey is now finished, time to set off on another one!

Despite the outcome I think that the forum has learnt and will continue to learn from your journey.

So track time now on the cards? You should come out to dodgy day and let others see the work that has gone into your build.


Originally posted by Lokiel, Sun Nov 09, 2014 9:30 am[

gslender wrote:Well that sux - seems odd that the entire custom solution is marked as useless because of a wastegate actuator! So absolutely no possible position where it would work? It's not like it has to even be mount on the turbo?!

That first sentence sums up my feelings precisely.

I was hoping that a custom wastegate actuator bracket could be made to activate the wastegate valve properly but the wastegate actuator really needs to be rotated clockwise more which requires the shelf to be cut - and even that may not work.

IWG actuators need to be mounted to the turbo to ensure that they can activate the wastegate properly (ie. can achieve 100% mechanical closure) - mounting to the turbo ensures that they move/vibrate at the same rate.


Originally posted by Roadrunner, Sun Nov 09, 2014 1:16 pm[

That's disappointing :(
At least you can drive around and enjoy the car for the mean time.
Plus you know there's a lot more on tap once you get the WG sorted


Originally posted by gslender, Sun Nov 09, 2014 1:58 pm[

Lokiel wrote:I was hoping that a custom wastegate actuator bracket could be made to activate the wastegate valve properly but the wastegate actuator really needs to be rotated clockwise more which requires the shelf to be cut - and even that may not work.

IWG actuators need to be mounted to the turbo to ensure that they can activate the wastegate properly (ie. can achieve 100% mechanical closure) - mounting to the turbo ensures that they move/vibrate at the same rate.


All that would do is encourage me to figure out a solution - it would be like Barney on How I Met Your Mother....."Challenge Accepted!"

After all, it only needs to mechanically open/close the wastegate - how bloody hard could it be? Would not be surprised that people "paid by the hour" would look at it and go, umm, it would be cheaper to pay me to swap the entire manifold and use something that fits than to pay me to try a dozen different brackets and fab something up. So often when paying someone to sort it, the simpler/cheaper solution isn't always the best overall - depends on the goal I guess.

G


Originally posted by ED_MX5, Sun Nov 09, 2014 3:20 pm[

Is the only problem with the original wg that the shaft is too short??
If so, could a threaded tube be used with another threaded rod in the other end to use to attach?

ED


Originally posted by Magpie, Sun Nov 09, 2014 3:42 pm[

Looking at the effort that has already gone into this issue it would appear that all avenues have been considered, with the exception of a custom fabrication. From my understanding it appears to be an issue with the orientation of the turbo and another issue with RHD turbo MX5's.


Originally posted by gslender, Sun Nov 09, 2014 3:52 pm[

I won't debate any further, but if the issue is that mechanically there is difficulty in pushing a lever, then I'm doubting that "everything that possibly can be done has been done". Purely because it just doesn't look like the type of engineer/mechanical problem that can't be solved - unless you are limited by the use of standard actuators and standard lever arms etc.

Sad to see this project end this way, but it isn't mine to fund or direct - so hopefully the right outcome can be achieved.

G


Originally posted by pezchops, Sun Nov 09, 2014 7:21 pm[

with the WGA maybe something like modifying the mounting position and use mini universal joints as used on RC cars .
there must be a way ,and if it is going to make such a difference wouldn't it be worth fixing.


Originally posted by Okibi, Sun Nov 09, 2014 10:41 pm[

ED_MX5 wrote:Is the only problem with the original wg that the shaft is too short??
If so, could a threaded tube be used with another threaded rod in the other end to use to attach?

ED


That was my initial thought too.
Don't worry about dying, worry about not living!
Garage Thread: http://www.mx5cartalk.com/forum/viewtopic.php?f=57&t=76716

User avatar
Lokiel
Forum legend
Posts: 4126
Joined: Thu May 28, 2009 2:39 pm
Vehicle: NB SE
Location: Brisbania

Re: Lokiel's "Gina" (once a 2004 Titanium SE) Recreated AGAIN

Postby Lokiel » Tue Jun 05, 2018 8:20 pm

Originally posted by Lokiel, Sun Sep 24, 2017 5:01 pm

Originally posted by Lokiel, Mon Nov 10, 2014 10:17 am[

^
After stuffing around with the TurboSmart and Forge wastegate actuators, which can be pulled apart to make shaping the shaft easier (must be careful not to damage the diaphragm), and concluding that there were still binding issues, the turbo was sent off to MTQ to see what they could come up with since they have more experience and resources in this area. I assume they used an XR6 wastegate actuator since they have plenty of them on hand to play around with (ie. they can afford to stuff a few up and throw them away).

Now that the shaft shape has been determined, it still creeps a bit so that's still an issue - just not as extreme as before, it would be interesting to modify the Borg Warner OEM wastegate actuator shaft in the same manner. I'll definitely chase this up. The low spring rate (6psi) of the Ford XR6 wastegate actuator is what's preventing massive boost creep so a stronger spring will allow more creep. I have the Borg Warner medium-boost cannister (9psi - 20psi) so the Borg Warner low-boost cannister (4psi - 14.7psi) might be just the ticket since 12-14psi would likely give me the 270hp max that I'd like to run.

I'll look into the mini-universal joints suggestion too now that I have the car back. Please keep suggestions coming, brainstorming is good.


Originally posted by NitroDann, Mon Nov 10, 2014 10:39 pm[

Metal ball joint and a wastegate canister bracket that actually aims the rod from the canister correctly. But the truth is that the alignment of the canister and the actuator arm only change rotationally so the ball joint isnt needed. The canister just needs to aim at the centre of the path it will take to swing the wastegate actuator arm, and the rod needs to pass through the hole parallel.

Also, there is no need to stress about creep. Unless you hate the additional top end power.

Dann


Originally posted by ManiacLachy, Fri Jan 30, 2015 12:37 pm[

Nothing posted since November! Are you sick?

Could the new Fab9 EFR manifold solve your problems? http://www.mazda-speed.com/forum2/index.php/topic,30799.0.html

It's a high mount versus your original plan to go low, but might be worth the change to get at that potential power. Or am I missunderstanding everything like the n00b I am?


Originally posted by Lokiel, Fri Jan 30, 2015 3:07 pm[

^
I've been following this on MT.net and have posted a question there (see http://www.miataturbo.net/fab9-tuning-miata-performance-parts-99/new-fab9-side-mount-efr-manifold-82879/#post1201388)

User EO2K PM'ed me a suggestion after this on how to address my wastegate actuator issue:
Image

ie. weld a wastegate actuator mount to the exhaust manifold that allows a "straight shot" to the valve actuator (the wastegate actuator needs to move/vibrate in unison with the wastegate valve actuator to ensure that it opens/closes correctly).

Nobody thought of doing this before, probably because I normally have the OEM MSM heatshield mounted to the manifold - or because it's going to get so hot that it will melt the wastegate actuator's diaphragm?

This requires me messing up my manifold's ceramic coating :(


I'm actually waiting to see what timk comes up with in his build before doing anything further and have given him my thoughts on what I'd do if I had to do it again (high mount to allow the "normal EFR" IWG position between the engine and turbo AND have provision for an EWG if that fails).


Originally posted by toppertee, Fri Jan 30, 2015 7:07 pm[

I would think that would work....
Turbo gets bloody hot, any way and the wastegate rod is connected to the wastegate. Can't see it been a problem. Man up and weld up :D


Originally posted by Magpie, Fri Jan 30, 2015 7:39 pm[

Use Titanium for the legs as it has half the Thermal Conductivity of steel. Or look at using ceramic rods as standoffs and some heat reflecting material under the wastegate or sit the wastegate on some insulation so that the heat soak is reduced.
Don't worry about dying, worry about not living!
Garage Thread: http://www.mx5cartalk.com/forum/viewtopic.php?f=57&t=76716

User avatar
Lokiel
Forum legend
Posts: 4126
Joined: Thu May 28, 2009 2:39 pm
Vehicle: NB SE
Location: Brisbania

Re: Lokiel's "Gina" (once a 2004 Titanium SE) Recreated AGAIN

Postby Lokiel » Tue Jun 05, 2018 8:20 pm

Originally posted by Lokiel, Sun Sep 24, 2017 5:02 pm

Originally posted by Lokiel, Sun Mar 08, 2015 6:01 pm[

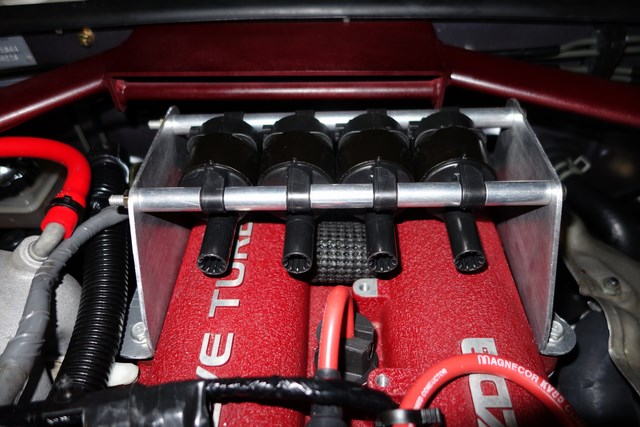
My current project is GM CNPs (Coil Near Plugs) after I've given up on the Fab9 COPs and so far it's been a long slog.

I wasn't keen on paying the US$700+ for the FM Big SPark Kit so decided to make it myself:

Image

I've been discussing these with timk who's started a thread about them on MT.net (see http://www.miataturbo.net/diy-turbo-discussion-14/lsx-coil-thread-82744/) and was thinking about the D585 LS2 truck coils since these produce the biggest spark - they're also the most expensive.
timk convinced me that they're overkill for my needs but after a late night "on the turps" I found a set on eBay when I got home that offered free shipping so bought them (I don't sleep well after drinking so usually surf the internet for a few hours). I expected the US seller would want to charge more for international shipping but he never did - WooHoo!!!

The GM LS2 D585 "truck" coils:

Image

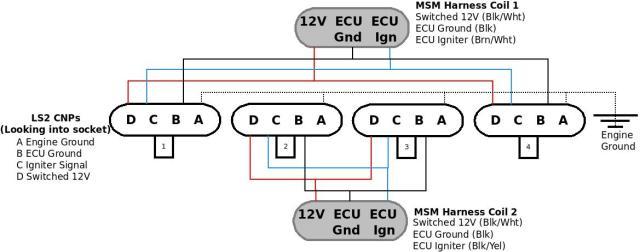
I bought GM pigtails and SE harness plugs from Ballenger Motorsports to make the wasted-spark harness.

My 3-point strut brace and the "height" (due to the mounting tabs) of the D585 coils meant I couldn't mount them in the same manner as the FM kit and I couldn't even mount them on top of the rocker cover unless I mounted them along its length in some manner and laid them flat. If mounted vertically at the rear of the engine, they were uncomfortably close to touching the bonnet.

After wasting a weekend trying to come up with something, I jumped on eBay and found some D514As that came with matching pigtails so bought them and sold the CNPs and pigtails to Patrick Bramston since I heard through the grapevine that he was looking for a set - at least I know they've gone to a good home.

The D514As have their mounting tabs along the length of the CNP so aren't as tall:

Image

These are similar to the D585s but don't have the heatsink on the rear.

Unfortunately USPS "lost" these, which is the 2nd time USPS has done this to me so I'm never using them again. USPS' tracking showed that they had received the package but nothing more after collecting it.
Luckily for me, the eBay seller agreed to send me another set after no trace of them appeared after a month of waiting - gotta love "eBay Reps" (ie. the seller was concerned about protecting his seller reputation so promptly sent me another set).

The D514As turned up on Friday so I decided to make the bracket yesterday.

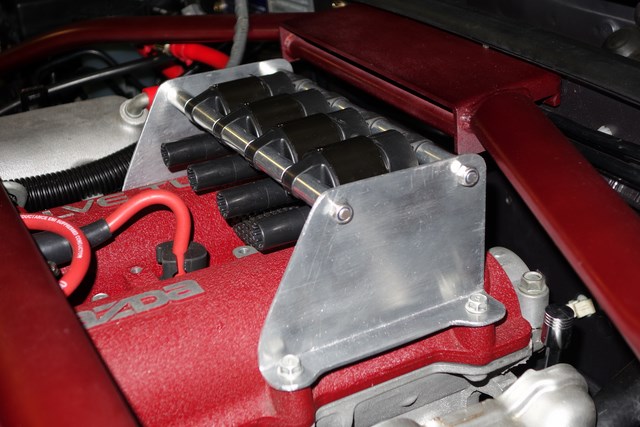
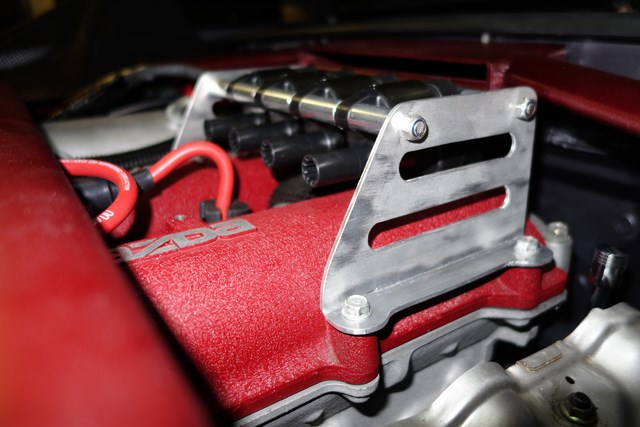
Image


Image


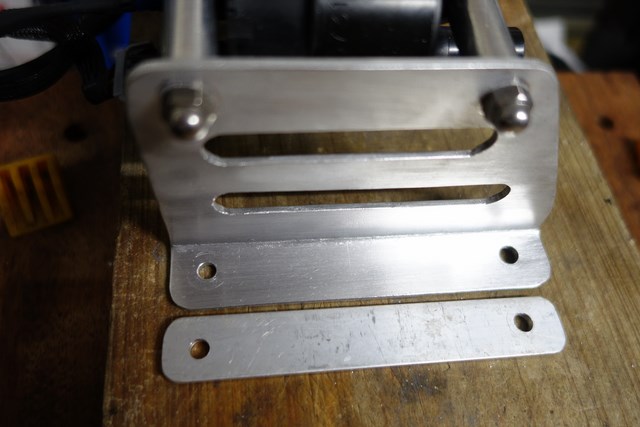
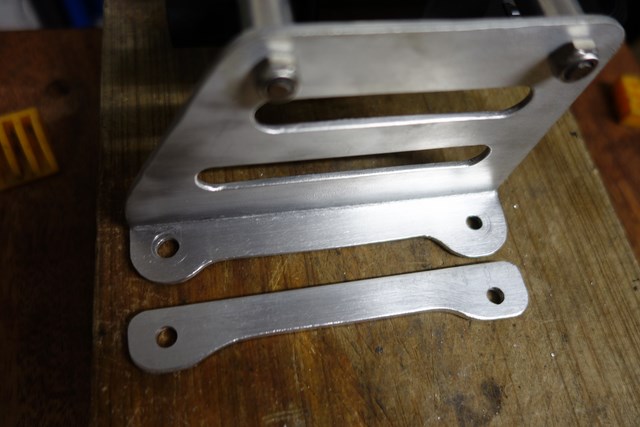
The brackets are made from 3mm aluminium, the threaded rod is 6mm diameter and the spacers are from an eBay LS2 D514A mounting kit. The kit came with 2 brackets (fitting 4 CNPs per bracket and 6 spacers per bracket). 5 spacers per rod fit perfectly with no trimming required.

I allowed an 8mm gap between the lowest point of the CNPs so that I could attach the harness but forgot that the harness' locking tab angles outward so the tips touch the rocker cover :(

I was planning on buying some longer rocker cover bolts since the brackets are 3mm thick so I'll probably add some washers under the brackets to prevent the harness' locking tab ends touching the rocker cover.

The setup is very solid and hopefully the 3mm aluminium bends wont stress fracture at the bends due to vibration.


Today I planned to make the wiring harness and gave each of the D514A pigtail wires a light yank to test them. Two of them pulled right out so I threw them in the bin and ordered another set from Ballenger Motorsport like I'd just sold since those were pretty good - must remember NOT to sell stuff until I KNOW that I wont need it! This really pissed me off since I bought theses D514As because they came with matching pigtails - I could have gotten them cheaper without the pigtails from someone else and may not have had to wait because the original ones were lost.

Having a few hours to kill I figured I may as well "sex up" the CNP brackets a bit since they looked a little bland and chunky:

Image


I was hoping to achieve a brushed finish on the brackets using a wire brush drill bit but it ended up much finer than I wanted - looks better than the unfinished version though.
The colour should even out more as the surface of the aluminium oxidises.


Originally posted by pezchops, Sun Mar 08, 2015 7:21 pm[

`scotch brite' pads are very good for finishing aluminum with an even matt surface.
they look like large green scouring pads but are made with much harder fibers.
we use them all the time at work to hide/blend machining mis-matches and breaking sharp edges.
well worth your trying them as you seem to do a lot of nice fabrications and brackets.


Originally posted by Magpie, Sun Mar 08, 2015 8:03 pm[

When are you going to drive it :)


Originally posted by NitroDann, Sun Mar 08, 2015 8:18 pm[

^


That


Originally posted by Lokiel, Mon Mar 09, 2015 12:29 pm[

Magpie wrote:When are you going to drive it :)

One of the other things I've done is replace the ID725cc injectors with ID1000cc injectors that I bought here on the forum.
I'm yet to see any consistancy with the dead times for the ID725 injectors from various people's Adaptronic ECU tunes, everyone has different values for them.
Andy (THE Adaptronic guru) spent a LOT of time playing with the ID1000 injectors and the WARI software even supports default values for them so I figured that's one less variable to dick about with and switched to them.
I did hope that my MAP wouldn't need to change since I figured that the software would now see that I had larger injectors and make all the necessary fueling calculation adjustments based on the fuel map automatically - I figured WRONG, the new injectors caused the engine to Idle very lean so I had to retune it. So the previous professional tune was just a waste of money :(
This meant Idle tuning the car again which gets easier everytime I do it but also requires me to drive the car in Rapid Learning mode to get a rough tune and then Slow Converge mode to smooth it out. It's not as good as a professional tune since there are some MAP cells you never hit but for DD it works pretty good.
So I have actually been driving the car, just not in anger (well not too much anger :twisted: ).


Originally posted by sailaholic, Mon Mar 09, 2015 1:10 pm[

The tune would should have started ok if the dead times were properly configured.

I had a similar problem going from late 90s probe injectors to the 440 rx8 ones. Of course I also had different spray patters etc to deal with.


Originally posted by NitroDann, Mon Mar 09, 2015 1:37 pm[

Everything he said ^

If the dead times were infact correctly set BOTH NOW AND ON THE PREIOUS SET OF INJUECTORS the tune should have worked fine.

Dann
Don't worry about dying, worry about not living!
Garage Thread: http://www.mx5cartalk.com/forum/viewtopic.php?f=57&t=76716

User avatar
Lokiel
Forum legend
Posts: 4126
Joined: Thu May 28, 2009 2:39 pm
Vehicle: NB SE
Location: Brisbania

Re: Lokiel's "Gina" (once a 2004 Titanium SE) Recreated AGAIN

Postby Lokiel » Tue Jun 05, 2018 8:21 pm

Originally posted by Lokiel, Sun Sep 24, 2017 5:03 pm

Originally posted by Lokiel, Mon Mar 09, 2015 2:38 pm[

Based on sailaholic and NitroDann's comments, and assuming that the ID1000cc injector deadtimes are correct (since Andy provides default values when they're selected - the option to reconfigure/modify them when they're selected disappears from WARI), my ID725cc injector deadtimes were wrong so I'm happy to take that tuning variable out of the equation.

For anyone with an Adaptronic ECU, I'd definitely recommend the ID1000cc injectors over the ID725s, especially when you can get them at the same price from Adaptronic (and if you ever go E85 you'll want the larger injectors).


Originally posted by Magpie, Mon Mar 09, 2015 4:32 pm[

Whilst not really relevant, my ID725's are running at about 7% duty cycle in 6th gear at 3,500 RPM. The IQ3 dash can display a lot of info.


Originally posted by Nevyn72, Mon Mar 09, 2015 4:46 pm[

Lokiel wrote:So the previous professional tune was just a waste of money :(

So I have actually been driving the car, just not in anger (well not too much anger :twisted: ).

So have you resolved the issues with the turbo setup yet?

If not, won't this require yet another tune when you do?
Maybe hold off on another professional tune until the turbo's sorted as well......


Originally posted by Lokiel, Mon Mar 09, 2015 6:38 pm[

Nevyn72 wrote:
Lokiel wrote:So the previous professional tune was just a waste of money :(

So I have actually been driving the car, just not in anger (well not too much anger :twisted: ).

So have you resolved the issues with the turbo setup yet?

If not, won't this require yet another tune when you do?
Maybe hold off on another professional tune until the turbo's sorted as well......


I'm holding off all issues with my turbo setup to see what timk comes up with. If his setup works with the internal wastegate I'll use the same configuration, otherwise I'm going to switch to an external wastegate as Jason from MX5 Plus recommended - that'll mean a new manifold and downpipe but boost creep will NOT be an issue. An external wastegate takes up much more space due to the need for the additional wastegate and its associated plumbing so the internal wastegate is preferred.

No more professional tunes until I've changed manifolds; while I can now tune it well enough for spirited drives, I certainly won't track it without a professional tune.


Originally posted by Lokiel, Mon Apr 06, 2015 8:15 pm[

I made an MSM/SE CNPS harness the previous weekend (with no capacitors):
Image

I installed new Iridium BKR7EIX-11 sparkplugs and tried firing up the car with the D514A CNPS but it wouldn't turn over, just coughing and farting - very similar to the Fab9 COPS. I figured it was probably because capacitors are really needed from 12V to GND and ordered some new bits to make another harness.


This weekend's plan was to finish up the GM CNPS installation since I finally had everything I needed.

My CNPS brackets were slightly too short since there wasn't any clearance between the rocker cover and the harness socket's locking tab - the socket's locking tab angles downward and touches the rocker cover.

Two small washers underneath each of the 4 bolt-points were enough to provide the required clearance but after dropping a few into the engine bay, I knew that was NOT a long-term solution. Luckily I didn't have the splash tray fitted and being small and round, they bounced around the engine bay and rolled out underneath.

Two 3mm aluminium shims solved this issue:
Image

Image

They've been shaped so that they're not visible.

Next issue was the FM Big Spark Kit Magnecore wires:
Image

They've been made specifically for the FM bracket so are too long for me.

I ordered some 180* boots and connectors from Summit racing so that I could shorten the FM wires. Unfortunately the Summit boots are way too tight - you can force them onto the coils but getting them off again is a wrestling match. I then bought a set of Commodore Procomp 10.5mm wires from eBay, figuring I could re-use their boots and connectors.

Here's what the Procomp leads look like with the ends removed (left) vs the Summit kit (on right):
Image

I'm using 3 180* connectors and will use the shortest FM 90* lead for cylinder 4.
The Procomp boots fit nice and snug and their connectors are much longer than the Summit connector - they're also sheathed.

Here's the Magnecore 8.5mm lead (top) vs the Procomp 10.5mm lead with the connectors removed:
Image


... installed:
Image

- much tidier!

The previous wiring harness I made used a common ground wire for all CNPS and the wiring was as short as possible but it made the harness very chunky and inflexible so this time I made the leads longer and made them as two separate harnesses, one for cylinder 1&4 and one for cylinder 2&3, each with their own 4700uF capacitor from 12V to engine GND.

Here's a great DIY soldering tool you should make if you don't have it already (shown holding some scrap wire for demonstration purposes):
Image

- much better than "helping hands" and really made my job of in-engine-bay soldering the ID1000 plugs into the factory harness "a doddle".

The GM factory harness wiring uses the crimps shown on the left below:
Image

These crimps are great since they make it easier to join 4 wires together - trying to solder 4 wires together when their other ends are already connected to plugs is an exercise in chronic frustration. Unfortunately I couldn't find any so I hacked up some of my blade connectors (shown on the right), cutting the two end sections off for use as wire crimps. These DIY crimps plus soldering "for good measure" produced nice compact joins which passed the "tug test".

Here's the new harness (the other one looks the same, only the numbers have changed):
Image

The capacitor is sheathed in some clear heatshrink and zip-tied to the harness.

Everything all in place, battery fully charged, dwell time set to a conservative 3200us, turn the key and...

CRANK, NO START!

Image

I played around with the dwell time, going up in increments of 200us, all the way up to 5000us; the best I got was some coughing and farting again.
All this tweaking really took a toll on the battery - at the end I noted that it was dropping to 9V during cranking and was at about 11.7V when I stopped.

I then spent a couple of days reading everything I could about this and suspect it has something to do with my Ignition MAP which looks like it hasn't really been touched.

I put the original NGK HKS M35i sparkplugs and OEM wiring back in, dropped the dwell time back to stock 2100uS, and everything fired up as normal.

More investigation required!


Originally posted by Nevyn72, Tue Apr 07, 2015 11:55 am[

I swear at this rate you're going to have one of the lowest mileage SE's in Australia mate! :roll: :mrgreen:


Originally posted by Lokiel, Tue Apr 07, 2015 1:52 pm[

Nevyn72 wrote:I swear at this rate you're going to have one of the lowest mileage SE's in Australia mate! :roll: :mrgreen:

She's definitely a "Garage Queen"! :(


Originally posted by MattR, Tue Apr 07, 2015 5:06 pm[

For future reference on ignition leads for Simon, or any one else, this is the go to guy, especially if you are in Brisbane.....

http://gregmartin.webs.com/

He is ex Queensland Ignition Leads who closed their doors in Kallangur a few years ago now, but they supplied an awful lot of leads to racers from club level up to professional outfits inclusing many V8 supercar teams. Prices are great and Greg will come to you to custom fit the leads.

I have used his leads on a number of cars and will be using him for the Charger and S14 when I am ready.

The website might not be that flash, but the quality of his work speaks for itself, and the price is exceptional for what you get.


Originally posted by Lokiel, Tue Apr 07, 2015 6:29 pm[

^
Good to know - with the benefit of hindsight and this information, I would recommend this path, saves $$$ and time waiting around for parts to arrive that may or may not be suitable.


Originally posted by Okibi, Tue Apr 07, 2015 7:13 pm[

Lokiel wrote:.. I would recommend this path..


I was just going to let you do all the hard work then beg for instructions :oops:
Don't worry about dying, worry about not living!
Garage Thread: http://www.mx5cartalk.com/forum/viewtopic.php?f=57&t=76716

User avatar
Lokiel
Forum legend
Posts: 4126
Joined: Thu May 28, 2009 2:39 pm
Vehicle: NB SE
Location: Brisbania

Re: Lokiel's "Gina" (once a 2004 Titanium SE) Recreated AGAIN

Postby Lokiel » Tue Jun 05, 2018 8:21 pm

Originally posted by Lokiel, Sun Sep 24, 2017 5:05 pm

Originally posted by Lokiel, Sun Jul 12, 2015 10:23 pm[

I bought MINX's 2005 Lotus Elise seats many moons ago and decided they were far too hard for DD so looked into improving them before installation.

The Lotus forums have a few threads on how to DIY re-pad them but I also read that in 2006, Lotus introduced Probax inserts for these seats which transformed them into comfortable seats. For more details on this miracle transformation, see http://www.telegraph.co.uk/motoring/2737588/The-Lotus-position.html.

Probax inserts seemed to be the way to go so I was on the hunt for someone who made them which wasn't easy. I finally found Allon White Sports Cars in the UK who agreed to make them for me (see https://allonwhite.co.uk/lotus-car-interiors-trimming/lotus-seats/lotus-elise-seat). I wanted grey inserts to match my existing grey leather trim and they recommended Alcantara since they have more greys available to them in Alcantara than leather and I sent them a swatch of my leather trim for them to colour match.

Allon White is extremely busy so it took a while for them to be made and I received them on Monday.

Unfortunately the seat inserts were a little short :(

Image


Image

- the one on the right wasn't inserted as firmly and moved upward a bit for the photo; the gap is actually the same for both seats.

I'm going to contact them about this to see if I can get the "missing" section made - it's simple enough to attach to the existing backplate.

I decided to see if I could address this shortcoming myself with some DIY trimming since I still had plenty of my original leather trim available.

I bought a bread knife to cut the foam since that's often recommended for cutting foam but one of the guys at work suggested a DIY hotwire foam cutter instead. That sounded like a good little project so I popped into Jaycar for some Nichrome wire (recommended for hotwire cutting foam). Everything else I already had so here's my foam hotwire cutter:

Image

- the vice clamps helped prevent the cutter from rocking during cutting

Image

- basically you just feed a 12-30V current through the cutting wire which heats up and cuts the foam.

First thing to do was make make a template, trace it onto the high density foam and cut it.

Image

- here you can see the plastic trim studs that fix the plastic backplate for the top of the seat inserts to the seat

Image


This was the first one I did.

Image


I realised that I needed the wire to be hotter (ie. bump the voltage from 15V to 20V) and the wire to be tenser.
Here's how clean these cuts are when the wire is hot and tense enough:

Image


I had to further shape the foam to curve/round the edges and reduce its depth. The hotwire cutter was great for reducing depth but I found that scissors were better for fine-trimming to round/curve the edges.

I stuck the foam onto the plastic backplate that clips into the seat using double-sided tape (the strongest I could find). Cladding the foam in leather took ages, curves are REALLY hard to avoid creating creases! As is the case with this type of work, your technique gets better as you go - if I had enough leather available, I would have redone the first one.

Cleaning the original glue from the seats took a while, whatever they used was bloody good. Orange dust ended up everywhere, it was the remnants of the original thin padding in the vertical seat insert. This was different to the seat's base blue foam which was still quite good and decently thick.

Image

The lumbar bladder was actually eliminated in the 2006 Probax seats so it may not be necessary/noticeable.
Many 2005 seat owners preferred to flip this bladder over which allowed it to be mounted lower (and closer to the lumbar region).

Image


I used a combination of SikaBond SPRAY FIX and double-sided tap to fix the inserts to the base of the seat:

Image


The driver-side lumbar pump had a kink in the hard hose which prevented it inflating the lumbar bladder properly so I replaced it with a longer silicon hose and barb (only had a 3-way barb so just plugged the 3rd unused barb).

Image


While the seats were out, I took some close-ups of the brackets since every thread about seats has at least one request for these (MINX had these made):

Image


Image


Image


And here they are installed:

Image


Image

The leather section I added is the same leather that was used to trim the door inserts, tweeter covers, two-tone handbrake gaitor, gear shift gaitor and steering wheel (I reckon there's "too much black" in the standard NB).

For some reason the rear driver's side mount-points aren't aligned properly so I've only got one bolt in the rear - the passenger side was perfect. Hopefully I can figure out if the frame rails can be adjusted/pivoted next weekend, otherwise I'll need to get the driver-side modified. I suspect that it's due to the fact that this is the seat I, and others who've tested the seat for size, mostly sat in while it was out of the car so the rear has splayed apart a bit (approx. 10mm),

So how do these seats compare to the Mazdaspeed seats?

* You sit quite a bit lower (Mazdaspeed seats are slightly higher than OEM)
* There's much more seat travel (really noticeable on the passenger side, there's decent legroom now)
* The cabin feels MUCH roomier (Mazdaspeed seats are quite bulky)
* Lateral support is about the same (non-existent in the OEM seat by comparison)
* Sitting lower means it's still difficult to get out of - there's NO getting out with the door partially opened now so I'll need to take that into account when parking.
* For the short drive I had today, the seats are comfy.

The Mazdaspeed seats really shine as GT seats, they're comfy and supportive for long distance driving and have decent lateral support for "the twisty bits". I'll need a long distance drive to evaluate the Probax inserts properly.

This little mod cost me quite a bit more than I expected/wanted so I finally decided to sell my original SE seats and steering wheel to Don Horton to help cover the costs. Don's got a beautiful red SP with a "recent" Chiptorque mod and LSD but the original seats were getting pretty daggy. I reckon Don now has one of the finest SPs in the country (and the world :P).

Now, what to do with that electric bread knife?


Originally posted by Magpie, Mon Jul 13, 2015 7:47 am[

Nice write up!


Originally posted by Lokiel, Mon Jul 13, 2015 9:48 am[

Forgot to mention one other BIG difference in the seats (wrote it up late last night so missed it):

The Lotus seats give a LOT more feedback into what the rear of the car is doing because the seat is much firmer than the cushier Mazdaspeed seats - really glad I don't still have the 17" OEM wagon wheels now :P
Don't worry about dying, worry about not living!
Garage Thread: http://www.mx5cartalk.com/forum/viewtopic.php?f=57&t=76716


Return to “MX5 Garage Chat”

Who is online

Users browsing this forum: No registered users and 58 guests