Lokiel's "Gina" (2004 Titanium SE)
Moderators: timk, Stu, zombie, Andrew, The American, Lokiel, -alex, miata, StanTheMan, greenMachine, ManiacLachy, Daffy
- Lokiel
- Forum legend
- Posts: 4126
- Joined: Thu May 28, 2009 2:39 pm
- Vehicle: NB SE
- Location: Brisbania
Lokiel's "Gina" (2004 Titanium SE)
Starting mid 2017, PhotoBucket introduced a new extortion policy, users MUST pay US$399 per year to 3rd-party host their images, otherwise all hosted images will be displayed as an image indicating that the account needs to be updated to enable 3rd-party image hosting.
This annual US$399 extortion has rendered millions of images and forum threads useless, "gone dark" is my favourite term I've heard for this, since few personal users, including myself, are willing to pay this massive extortion annual fee.
As a personal user, I'm happy to pay a small annual fee for my image hosting but US$399 is WAY too much.
Due to the frustration with actually using PhotoBucket, their site had become infuriating to actually use because of the volume of pop-up advertising and constant lock-ups in browsers, I wouldn't have actually continued to use it anyway!
To save my Garage thread from "going dark", I've extracted all the posts, translated the PhotoBucket images to their new host site, and re-created it here, along with links to the original posts. Much of this has been automated with Python scripts "scraping" the thread for the posts and doing the translations but by far the biggest effort was creating a file that mapped the PhotoBucket images to their new host location (about 1,000 images).
I've had my 2004 Titanium SE since March 2009 so it's about time I got around to creating an MX5 Garage Chat entry since I often check out what other guys are doing to their cars in there and should contribute something in return. I've been making constant modifications to my car ever since I bought it so will update this in chronological order when I get the time.
Since the MX-5 is a classic styled roadster and the NB has "hips" and cleavage (the middle front two air vents always remind me of that), I decided to name her after a timeless beauty with classic curves. I'm madly in lust with Salma Hayek but "Salma" just doesn't sound like a good name for a car so I've decided to call her "Gina", after the Italian actress Gina Lollobrigida from the 50's and 60's. For those who don't know who Gina Lollobrigida is, here is my inspiration:

Those my friends are truly "dangerous curves".
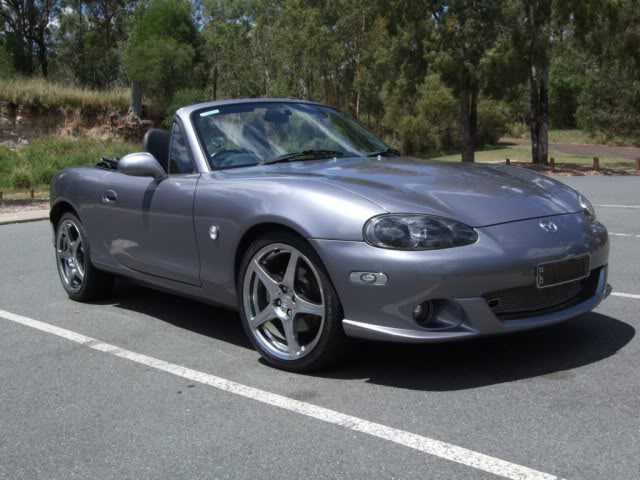
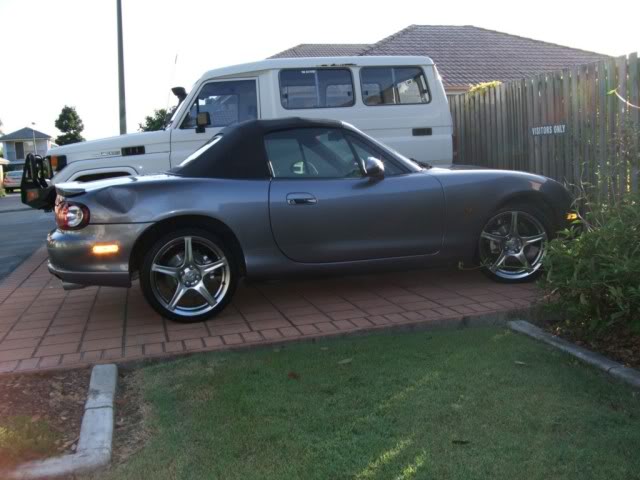
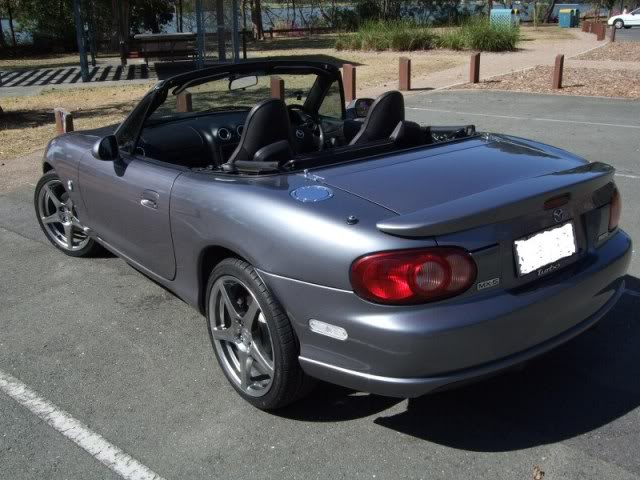
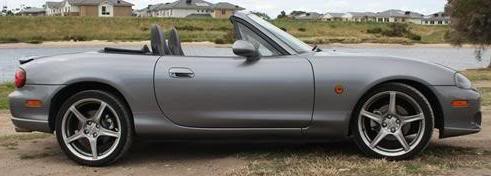
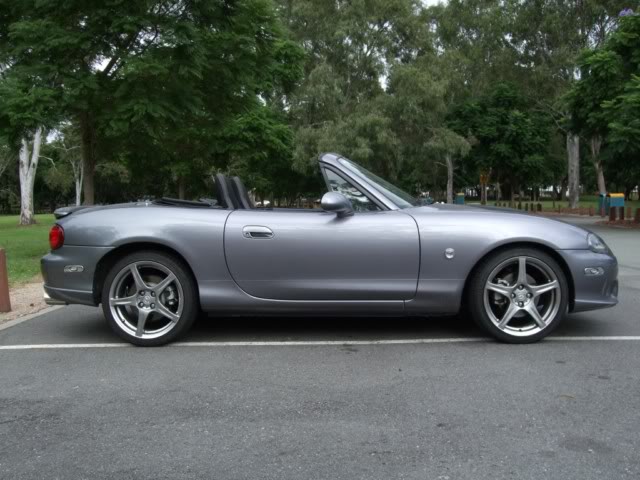
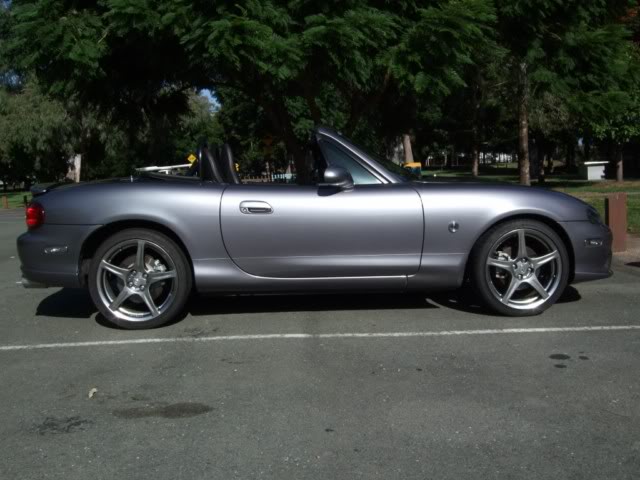
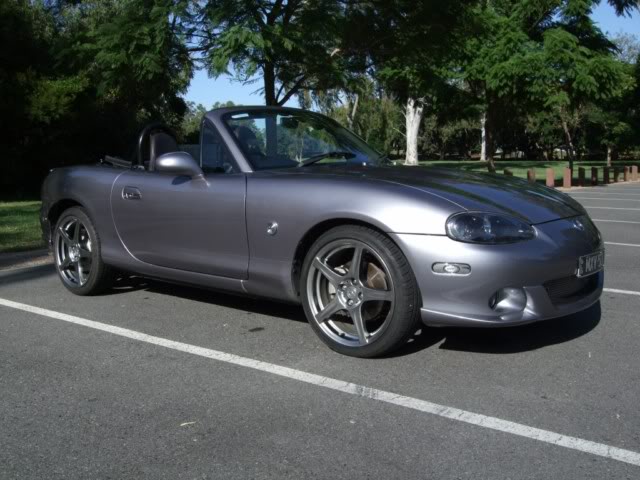
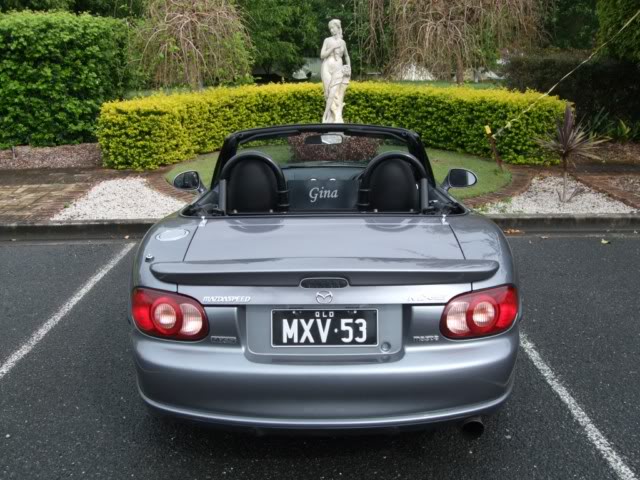
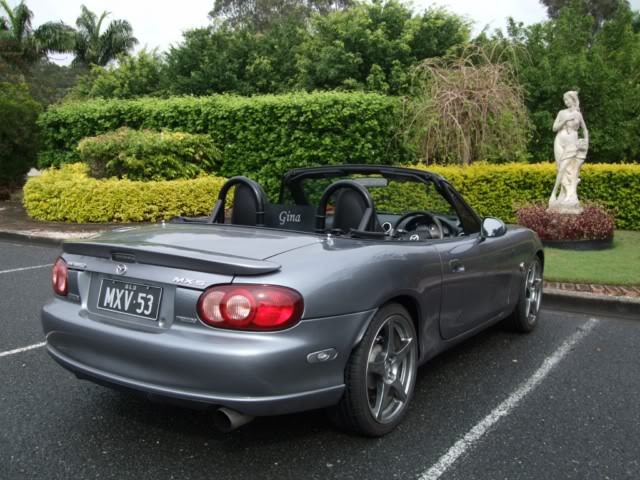
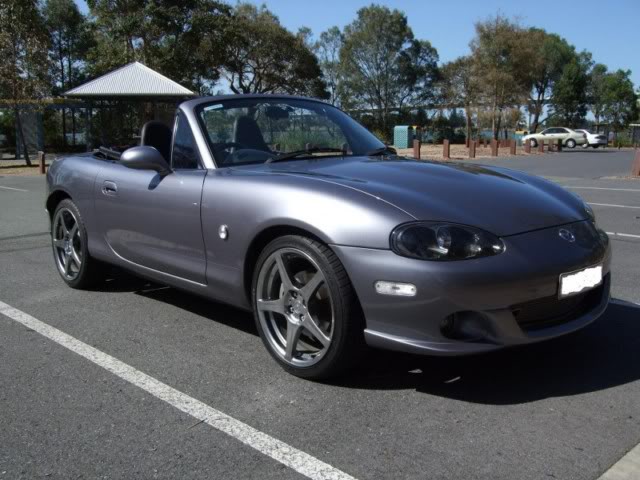
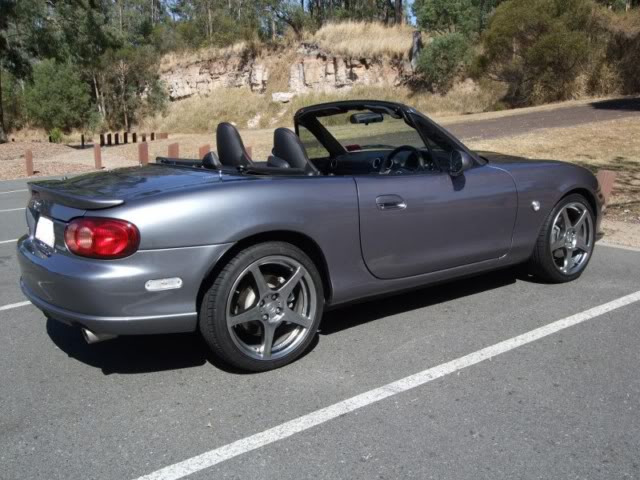
Here's my "Gina" in her current form:
My trusty 1982 Mitsubishi JA Starion that I'd owned and loved for over 20 years had started to develop serious cancer (aka "rust") after moving to Queensland so it was finally time to purchase a new car. I'd put this off many times before because whatever I purchased after the Starion had to be MUCH better to justify the cost of upgrading. My Starion had a larger turbo and an intercooler, it had awesome handling and acceleration and was a fantastic GT. I could drive from Melbourne to Adelaide in 8 hours and have no back problems whatsoever thanks to those fantastic 7-way adjustable seats.
The next car had to be timeless since I planned to keep it at least 10 years. This ruled out cars such as the Nissan 350/370Z, GTR, Suburau WRX, Lancer EVO and Audi TT which really don't look "right" to me now so definitely won't in 10 years time either. The MX-5 is based on the look of a Lotus Elan which is over 20 years old - it looked great then, looks great now and will continue to look good in future (IMHO).
I'd always liked the look of the NA and NB MX-5s (hate the NC though, it looks too bloated and the interior doesn't appeal to me at all) and knew that they handled fantastically but lacked power. After owning a turbocharged car already I knew that any factory-turboed car could easily be improved by aftermarket mods so the SE or SP were the obvious choices.
In the 3 months I spent looking for a car, SPs were almost impossible to find so the SE was pretty much my only option. I finally found one in Victoria with 26,000km on the odometer that looked pretty good and already had the FM downpipe installed on it (which I forgot about since I'd been looking at so many SEs). I bought a one-way ticket to Melbourne to check out Gina. The owner picked me up at the airport, I drove Gina a bit and decided that it was the best I'd seen so far so paid for it then and there and drove it back to Brisbane over a 3 day period. I took the direct route up the "way too straight" Newell Highway, stopping at the Parkes telescope and Dubbo Zoo along the way.
The trip was pretty uneventful until I got into the Darling Downs where I finally hit some serious "twisty bits", leaving Commodores and Falcons in my wake. I knew that the MX-5 handled well but those "twisty-bits" really impressed me once I realised that I was being far too conservative in my initial handling of them. After my Starion, Gina really did need more grunt though.
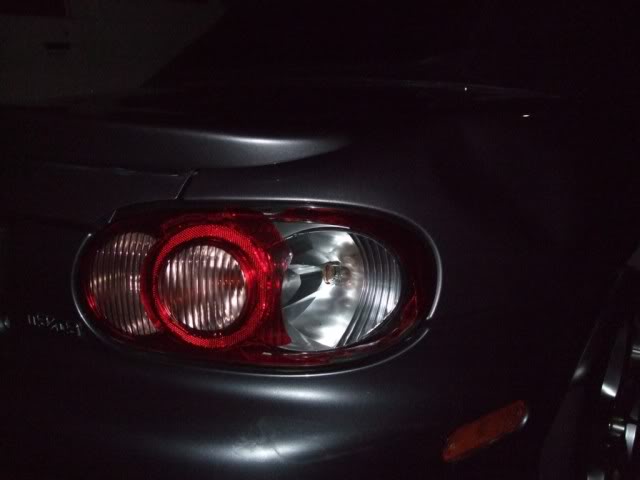
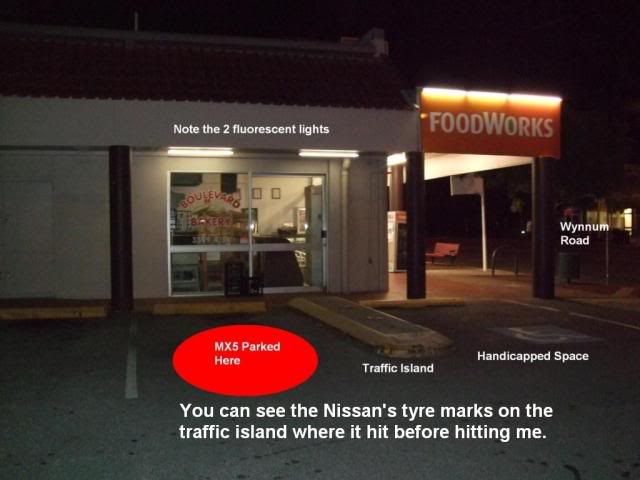
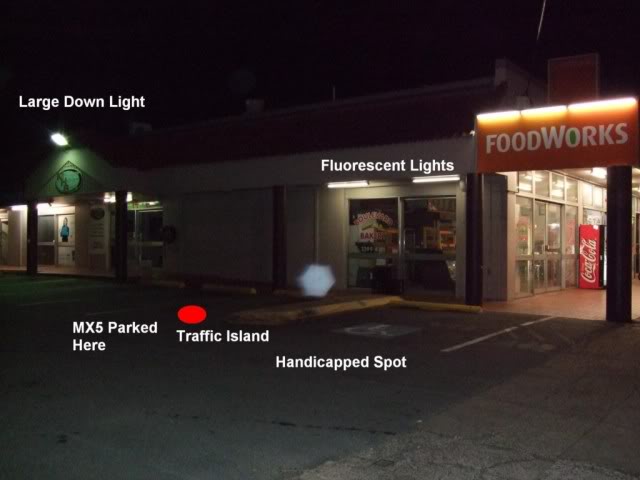
When I arrived in Brisbane after travelling 1,800kms without incident, Gina really needed a wash so I took her to Dolphin Car Wash for a wash and detailing. Gina was looking fine so I had to show her off and took my housemate for a spin. It was getting too late to cook dinner so we decided to grab a bite to eat at a local Indian restaurant. I didn't want to park on the street or in the restaurant's "dodgy" car park so parked across the road in a large, well-lit car park. I parked directly underneath 2 fluorescent lights and to the right of me was a traffic island so figured I was pretty safe. Unfortunately when we returned to Gina, this is what we saw:
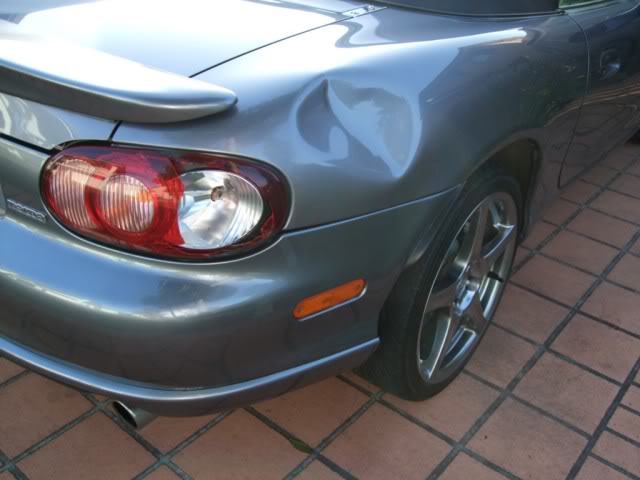
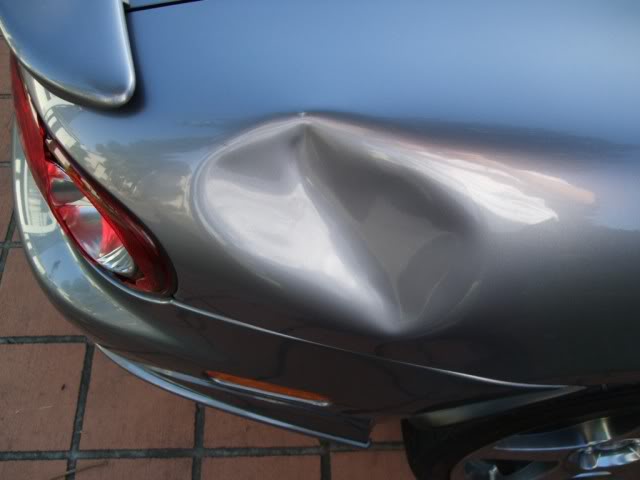
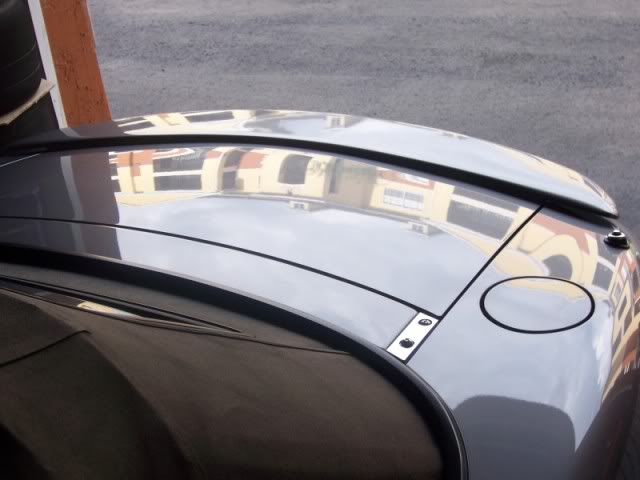
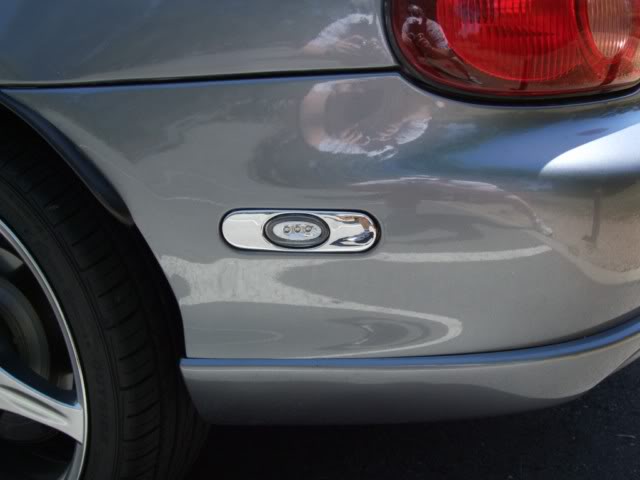
Here's the damage by day:
I yelled more than a few expletives, assuming it was a couple of vandals who'd hit it with baseball bat.
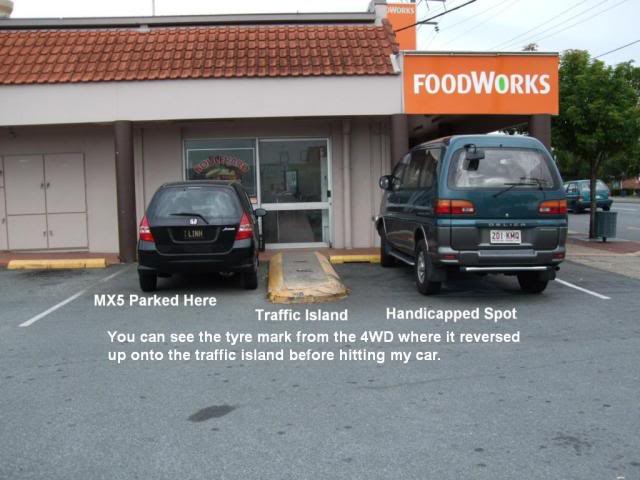
On the drive home, Chris spotted something that had slipped under the bonnet. I stopped Gina and found that it was a note left by the offender. Apparently he and his wife had stopped in at Foodworks and on the way out he'd reversed into me in his Nissan 4WD - I suspect his wife was actually driving based on the width of the car park and that it looked like they had clearly dr ven up the traffic island before hitting Gina (see the pictures below, you can see the tyre marks on the traffic island).
I couldn't believe that I'd dr ven Gina 1,800kms over 3 days without a scratch, only for it to be reversed into within 4 hours of being in Brisbane while parked in a large, well-lit car park. This was obviously the work of the "Ti curse".
Here's the car park by day - you can see how wide it is.
Here's the car park by night, when the accident occurred:
Unfortunately I didn't have a cover note for Gina and assumed it would be covered by my existing insurance. This was a BIG mistake. My "ex-insurer" (I won't name names but it sounds a bit like "Are-Ay-See-Cue") stated that because I had no cover note, the vehicle was not listed on my policy and was not registered to me that they would provide no assistance, even though it wasn't my fault at all. This was a major problem because to register Gina I needed to get a QLD roadworthy certificate and I couldn't get one with the broken tail light or insurance. The afore-mentioned insurer also wouldn't agree to insure Gina because she had existing damage. Luckily Sun-Corp agreed to 3rd-party insurance for Gina provided that I get it fixed within 10 working days so I signed up and promptly told the afore-mentioned insurance company that I wasn't inclined to deal with them ever again.
Several of the crash repairers I contacted said that because I was not at fault I shouldn't have involved my insurance at all and gone directly through the offender's insurance. The offender readily admitted to being at fault (much kudos to him) and we dealt with it using his insurance, AAMI.
All went smoothly on the repairs and QLD registration after that and I was very impressed with AAMI, Gina was back to her good-looking best.
So does this count as my first mod?
More updates to come.
This annual US$399 extortion has rendered millions of images and forum threads useless, "gone dark" is my favourite term I've heard for this, since few personal users, including myself, are willing to pay this massive extortion annual fee.
As a personal user, I'm happy to pay a small annual fee for my image hosting but US$399 is WAY too much.
Due to the frustration with actually using PhotoBucket, their site had become infuriating to actually use because of the volume of pop-up advertising and constant lock-ups in browsers, I wouldn't have actually continued to use it anyway!
To save my Garage thread from "going dark", I've extracted all the posts, translated the PhotoBucket images to their new host site, and re-created it here, along with links to the original posts. Much of this has been automated with Python scripts "scraping" the thread for the posts and doing the translations but by far the biggest effort was creating a file that mapped the PhotoBucket images to their new host location (about 1,000 images).
I've had my 2004 Titanium SE since March 2009 so it's about time I got around to creating an MX5 Garage Chat entry since I often check out what other guys are doing to their cars in there and should contribute something in return. I've been making constant modifications to my car ever since I bought it so will update this in chronological order when I get the time.
Since the MX-5 is a classic styled roadster and the NB has "hips" and cleavage (the middle front two air vents always remind me of that), I decided to name her after a timeless beauty with classic curves. I'm madly in lust with Salma Hayek but "Salma" just doesn't sound like a good name for a car so I've decided to call her "Gina", after the Italian actress Gina Lollobrigida from the 50's and 60's. For those who don't know who Gina Lollobrigida is, here is my inspiration:

Those my friends are truly "dangerous curves".
Here's my "Gina" in her current form:
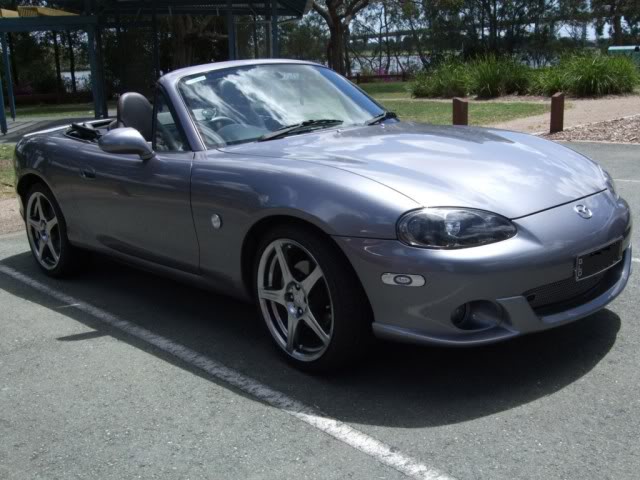
My trusty 1982 Mitsubishi JA Starion that I'd owned and loved for over 20 years had started to develop serious cancer (aka "rust") after moving to Queensland so it was finally time to purchase a new car. I'd put this off many times before because whatever I purchased after the Starion had to be MUCH better to justify the cost of upgrading. My Starion had a larger turbo and an intercooler, it had awesome handling and acceleration and was a fantastic GT. I could drive from Melbourne to Adelaide in 8 hours and have no back problems whatsoever thanks to those fantastic 7-way adjustable seats.
The next car had to be timeless since I planned to keep it at least 10 years. This ruled out cars such as the Nissan 350/370Z, GTR, Suburau WRX, Lancer EVO and Audi TT which really don't look "right" to me now so definitely won't in 10 years time either. The MX-5 is based on the look of a Lotus Elan which is over 20 years old - it looked great then, looks great now and will continue to look good in future (IMHO).
I'd always liked the look of the NA and NB MX-5s (hate the NC though, it looks too bloated and the interior doesn't appeal to me at all) and knew that they handled fantastically but lacked power. After owning a turbocharged car already I knew that any factory-turboed car could easily be improved by aftermarket mods so the SE or SP were the obvious choices.
In the 3 months I spent looking for a car, SPs were almost impossible to find so the SE was pretty much my only option. I finally found one in Victoria with 26,000km on the odometer that looked pretty good and already had the FM downpipe installed on it (which I forgot about since I'd been looking at so many SEs). I bought a one-way ticket to Melbourne to check out Gina. The owner picked me up at the airport, I drove Gina a bit and decided that it was the best I'd seen so far so paid for it then and there and drove it back to Brisbane over a 3 day period. I took the direct route up the "way too straight" Newell Highway, stopping at the Parkes telescope and Dubbo Zoo along the way.
The trip was pretty uneventful until I got into the Darling Downs where I finally hit some serious "twisty bits", leaving Commodores and Falcons in my wake. I knew that the MX-5 handled well but those "twisty-bits" really impressed me once I realised that I was being far too conservative in my initial handling of them. After my Starion, Gina really did need more grunt though.
When I arrived in Brisbane after travelling 1,800kms without incident, Gina really needed a wash so I took her to Dolphin Car Wash for a wash and detailing. Gina was looking fine so I had to show her off and took my housemate for a spin. It was getting too late to cook dinner so we decided to grab a bite to eat at a local Indian restaurant. I didn't want to park on the street or in the restaurant's "dodgy" car park so parked across the road in a large, well-lit car park. I parked directly underneath 2 fluorescent lights and to the right of me was a traffic island so figured I was pretty safe. Unfortunately when we returned to Gina, this is what we saw:
Here's the damage by day:
I yelled more than a few expletives, assuming it was a couple of vandals who'd hit it with baseball bat.
On the drive home, Chris spotted something that had slipped under the bonnet. I stopped Gina and found that it was a note left by the offender. Apparently he and his wife had stopped in at Foodworks and on the way out he'd reversed into me in his Nissan 4WD - I suspect his wife was actually driving based on the width of the car park and that it looked like they had clearly dr ven up the traffic island before hitting Gina (see the pictures below, you can see the tyre marks on the traffic island).
I couldn't believe that I'd dr ven Gina 1,800kms over 3 days without a scratch, only for it to be reversed into within 4 hours of being in Brisbane while parked in a large, well-lit car park. This was obviously the work of the "Ti curse".
Here's the car park by day - you can see how wide it is.
Here's the car park by night, when the accident occurred:
Unfortunately I didn't have a cover note for Gina and assumed it would be covered by my existing insurance. This was a BIG mistake. My "ex-insurer" (I won't name names but it sounds a bit like "Are-Ay-See-Cue") stated that because I had no cover note, the vehicle was not listed on my policy and was not registered to me that they would provide no assistance, even though it wasn't my fault at all. This was a major problem because to register Gina I needed to get a QLD roadworthy certificate and I couldn't get one with the broken tail light or insurance. The afore-mentioned insurer also wouldn't agree to insure Gina because she had existing damage. Luckily Sun-Corp agreed to 3rd-party insurance for Gina provided that I get it fixed within 10 working days so I signed up and promptly told the afore-mentioned insurance company that I wasn't inclined to deal with them ever again.
Several of the crash repairers I contacted said that because I was not at fault I shouldn't have involved my insurance at all and gone directly through the offender's insurance. The offender readily admitted to being at fault (much kudos to him) and we dealt with it using his insurance, AAMI.
All went smoothly on the repairs and QLD registration after that and I was very impressed with AAMI, Gina was back to her good-looking best.
So does this count as my first mod?
More updates to come.
Don't worry about dying, worry about not living!
Garage Thread: http://www.mx5cartalk.com/forum/viewtopic.php?f=57&t=76716
- Lokiel
- Forum legend
- Posts: 4126
- Joined: Thu May 28, 2009 2:39 pm
- Vehicle: NB SE
- Location: Brisbania
Lokiel's "Gina" (once a 2004 Titanium SE) Recreated AGAIN
postimage.org had their domain blocked without notice, resulting in massive problems with broken image links, including mine in my Garage Thread, not long after I'd gone through the massive effort of re-hosting all my images from the PhotoBucket extortioners (they wanted to charge US$399 annually to 3rd-party host my images - WAY too much for personal use and for what had become the worst image hoster, the sheer amount of advertising ground my browser to a halt and would often crash it) to postimage.org and re-creating my garage thread.
I just read this today so have re-created my Garage thread AGAIN to restore the images:
Notice: For any users using Postimage.org to host pictures in their posts, they have posted this notice.
postimg.cc domain is locked by Registry, no prior notice.
While we hope to resolve the issue, we chose postimg.CC as our new home.
Please update codes embedded in your websites.
Your pictures are still there, but any pics links you posted you have to change the .org in the link to .cc to get them to show again.
Don't worry about dying, worry about not living!
Garage Thread: http://www.mx5cartalk.com/forum/viewtopic.php?f=57&t=76716
- Lokiel
- Forum legend
- Posts: 4126
- Joined: Thu May 28, 2009 2:39 pm
- Vehicle: NB SE
- Location: Brisbania
Re: Lokiel's "Gina" (once a 2004 Titanium SE) Recreated AGAIN
Originally posted by Lokiel, Sat Mar 13, 2010 3:33 pm
I've had my 2004 Titanium SE since March 2009 so it's about time I got around to creating an MX5 Garage Chat entry since I often check out what other guys are doing to their cars in there and should contribute something in return.
Don't worry about dying, worry about not living!
Garage Thread: http://www.mx5cartalk.com/forum/viewtopic.php?f=57&t=76716
- Lokiel
- Forum legend
- Posts: 4126
- Joined: Thu May 28, 2009 2:39 pm
- Vehicle: NB SE
- Location: Brisbania
Re: Lokiel's "Gina" (once a 2004 Titanium SE) Recreated AGAIN
Originally posted by Lokiel, Sun Sep 24, 2017 3:24 pm
Starting mid 2017, PhotoBucket introduced a new extortion policy, users MUST pay US$399 per year to 3rd-party host their images, otherwise all hosted images will be displayed as an image indicating that the account needs to be updated to enable 3rd-party image hosting.
This annual US$399 extortion has rendered millions of images and forum threads useless, "gone dark" is my favourite term I've heard for this, since few personal users, including myself, are willing to pay this massive extortion annual fee.
As a personal user, I'm happy to pay a small annual fee for my image hosting but US$399 is WAY too much.
Due to the frustration with actually using PhotoBucket, their site had become infuriating to actually use because of the volume of pop-up advertising and constant lock-ups in browsers, I wouldn't have actually continued to use it anyway!
To save my Garage thread from "going dark", I've extracted all the posts, translated the PhotoBucket images to their new host site, and re-created it here, along with links to the original posts. Much of this has been automated with Python scripts "scraping" the thread for the posts and doing the translations but by far the biggest effort was creating a file that mapped the PhotoBucket images to their new host location (about 1,000 images).
I've had my 2004 Titanium SE since March 2009 so it's about time I got around to creating an MX5 Garage Chat entry since I often check out what other guys are doing to their cars in there and should contribute something in return. I've been making constant modifications to my car ever since I bought it so will update this in chronological order when I get the time.
Since the MX-5 is a classic styled roadster and the NB has "hips" and cleavage (the middle front two air vents always remind me of that), I decided to name her after a timeless beauty with classic curves. I'm madly in lust with Salma Hayek but "Salma" just doesn't sound like a good name for a car so I've decided to call her "Gina", after the Italian actress Gina Lollobrigida from the 50's and 60's. For those who don't know who Gina Lollobrigida is, here is my inspiration:
Those my friends are truly "dangerous curves".
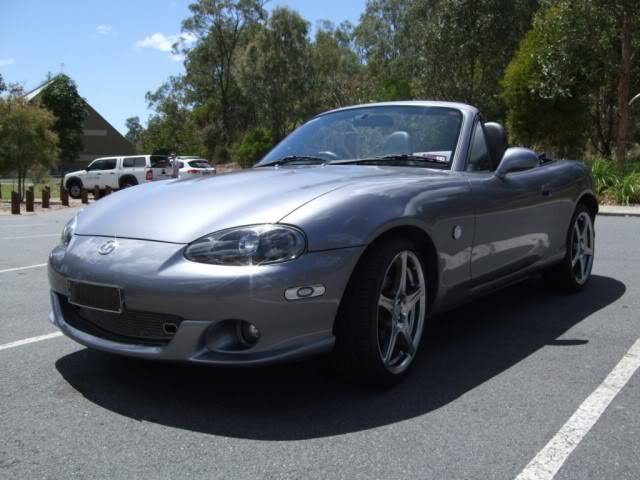
Here's my "Gina" in her current form:
My trusty 1982 Mitsubishi JA Starion that I'd owned and loved for over 20 years had started to develop serious cancer (aka "rust") after moving to Queensland so it was finally time to purchase a new car. I'd put this off many times before because whatever I purchased after the Starion had to be MUCH better to justify the cost of upgrading. My Starion had a larger turbo and an intercooler, it had awesome handling and acceleration and was a fantastic GT. I could drive from Melbourne to Adelaide in 8 hours and have no back problems whatsoever thanks to those fantastic 7-way adjustable seats.
The next car had to be timeless since I planned to keep it at least 10 years. This ruled out cars such as the Nissan 350/370Z, GTR, Suburau WRX, Lancer EVO and Audi TT which really don't look "right" to me now so definitely won't in 10 years time either. The MX-5 is based on the look of a Lotus Elan which is over 20 years old - it looked great then, looks great now and will continue to look good in future (IMHO).
I'd always liked the look of the NA and NB MX-5s (hate the NC though, it looks too bloated and the interior doesn't appeal to me at all) and knew that they handled fantastically but lacked power. After owning a turbocharged car already I knew that any factory-turboed car could easily be improved by aftermarket mods so the SE or SP were the obvious choices.
In the 3 months I spent looking for a car, SPs were almost impossible to find so the SE was pretty much my only option. I finally found one in Victoria with 26,000km on the odometer that looked pretty good and already had the FM downpipe installed on it (which I forgot about since I'd been looking at so many SEs). I bought a one-way ticket to Melbourne to check out Gina. The owner picked me up at the airport, I drove Gina a bit and decided that it was the best I'd seen so far so paid for it then and there and drove it back to Brisbane over a 3 day period. I took the direct route up the "way too straight" Newell Highway, stopping at the Parkes telescope and Dubbo Zoo along the way.
The trip was pretty uneventful until I got into the Darling Downs where I finally hit some serious "twisty bits", leaving Commodores and Falcons in my wake. I knew that the MX-5 handled well but those "twisty-bits" really impressed me once I realised that I was being far too conservative in my initial handling of them. After my Starion, Gina really did need more grunt though.
When I arrived in Brisbane after travelling 1,800kms without incident, Gina really needed a wash so I took her to Dolphin Car Wash for a wash and detailing. Gina was looking fine so I had to show her off and took my housemate for a spin. It was getting too late to cook dinner so we decided to grab a bite to eat at a local Indian restaurant. I didn't want to park on the street or in the restaurant's "dodgy" car park so parked across the road in a large, well-lit car park. I parked directly underneath 2 fluorescent lights and to the right of me was a traffic island so figured I was pretty safe. Unfortunately when we returned to Gina, this is what we saw:
Here's the damage by day:
I yelled more than a few expletives, assuming it was a couple of vandals who'd hit it with baseball bat.
On the drive home, Chris spotted something that had slipped under the bonnet. I stopped Gina and found that it was a note left by the offender. Apparently he and his wife had stopped in at Foodworks and on the way out he'd reversed into me in his Nissan 4WD - I suspect his wife was actually driving based on the width of the car park and that it looked like they had clearly dr ven up the traffic island before hitting Gina (see the pictures below, you can see the tyre marks on the traffic island).
I couldn't believe that I'd dr ven Gina 1,800kms over 3 days without a scratch, only for it to be reversed into within 4 hours of being in Brisbane while parked in a large, well-lit car park. This was obviously the work of the "Ti curse".
Here's the car park by day - you can see how wide it is.
Here's the car park by night, when the accident occurred:
Unfortunately I didn't have a cover note for Gina and assumed it would be covered by my existing insurance. This was a BIG mistake. My "ex-insurer" (I won't name names but it sounds a bit like "Are-Ay-See-Cue") stated that because I had no cover note, the vehicle was not listed on my policy and was not registered to me that they would provide no assistance, even though it wasn't my fault at all. This was a major problem because to register Gina I needed to get a QLD roadworthy certificate and I couldn't get one with the broken tail light or insurance. The afore-mentioned insurer also wouldn't agree to insure Gina because she had existing damage. Luckily Sun-Corp agreed to 3rd-party insurance for Gina provided that I get it fixed within 10 working days so I signed up and promptly told the afore-mentioned insurance company that I wasn't inclined to deal with them ever again.
Several of the crash repairers I contacted said that because I was not at fault I shouldn't have involved my insurance at all and gone directly through the offender's insurance. The offender readily admitted to being at fault (much kudos to him) and we dealt with it using his insurance, AAMI.
All went smoothly on the repairs and QLD registration after that and I was very impressed with AAMI, Gina was back to her good-looking best.
So does this count as my first mod?
More updates to come.
Starting mid 2017, PhotoBucket introduced a new extortion policy, users MUST pay US$399 per year to 3rd-party host their images, otherwise all hosted images will be displayed as an image indicating that the account needs to be updated to enable 3rd-party image hosting.
This annual US$399 extortion has rendered millions of images and forum threads useless, "gone dark" is my favourite term I've heard for this, since few personal users, including myself, are willing to pay this massive extortion annual fee.
As a personal user, I'm happy to pay a small annual fee for my image hosting but US$399 is WAY too much.
Due to the frustration with actually using PhotoBucket, their site had become infuriating to actually use because of the volume of pop-up advertising and constant lock-ups in browsers, I wouldn't have actually continued to use it anyway!
To save my Garage thread from "going dark", I've extracted all the posts, translated the PhotoBucket images to their new host site, and re-created it here, along with links to the original posts. Much of this has been automated with Python scripts "scraping" the thread for the posts and doing the translations but by far the biggest effort was creating a file that mapped the PhotoBucket images to their new host location (about 1,000 images).
I've had my 2004 Titanium SE since March 2009 so it's about time I got around to creating an MX5 Garage Chat entry since I often check out what other guys are doing to their cars in there and should contribute something in return. I've been making constant modifications to my car ever since I bought it so will update this in chronological order when I get the time.
Since the MX-5 is a classic styled roadster and the NB has "hips" and cleavage (the middle front two air vents always remind me of that), I decided to name her after a timeless beauty with classic curves. I'm madly in lust with Salma Hayek but "Salma" just doesn't sound like a good name for a car so I've decided to call her "Gina", after the Italian actress Gina Lollobrigida from the 50's and 60's. For those who don't know who Gina Lollobrigida is, here is my inspiration:
Those my friends are truly "dangerous curves".
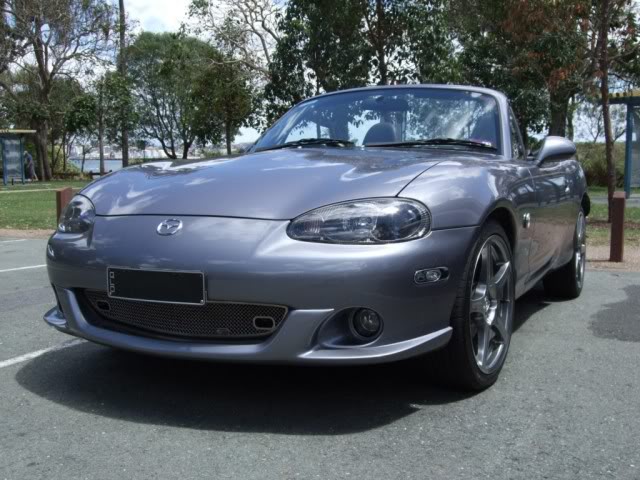
Here's my "Gina" in her current form:
My trusty 1982 Mitsubishi JA Starion that I'd owned and loved for over 20 years had started to develop serious cancer (aka "rust") after moving to Queensland so it was finally time to purchase a new car. I'd put this off many times before because whatever I purchased after the Starion had to be MUCH better to justify the cost of upgrading. My Starion had a larger turbo and an intercooler, it had awesome handling and acceleration and was a fantastic GT. I could drive from Melbourne to Adelaide in 8 hours and have no back problems whatsoever thanks to those fantastic 7-way adjustable seats.
The next car had to be timeless since I planned to keep it at least 10 years. This ruled out cars such as the Nissan 350/370Z, GTR, Suburau WRX, Lancer EVO and Audi TT which really don't look "right" to me now so definitely won't in 10 years time either. The MX-5 is based on the look of a Lotus Elan which is over 20 years old - it looked great then, looks great now and will continue to look good in future (IMHO).
I'd always liked the look of the NA and NB MX-5s (hate the NC though, it looks too bloated and the interior doesn't appeal to me at all) and knew that they handled fantastically but lacked power. After owning a turbocharged car already I knew that any factory-turboed car could easily be improved by aftermarket mods so the SE or SP were the obvious choices.
In the 3 months I spent looking for a car, SPs were almost impossible to find so the SE was pretty much my only option. I finally found one in Victoria with 26,000km on the odometer that looked pretty good and already had the FM downpipe installed on it (which I forgot about since I'd been looking at so many SEs). I bought a one-way ticket to Melbourne to check out Gina. The owner picked me up at the airport, I drove Gina a bit and decided that it was the best I'd seen so far so paid for it then and there and drove it back to Brisbane over a 3 day period. I took the direct route up the "way too straight" Newell Highway, stopping at the Parkes telescope and Dubbo Zoo along the way.
The trip was pretty uneventful until I got into the Darling Downs where I finally hit some serious "twisty bits", leaving Commodores and Falcons in my wake. I knew that the MX-5 handled well but those "twisty-bits" really impressed me once I realised that I was being far too conservative in my initial handling of them. After my Starion, Gina really did need more grunt though.
When I arrived in Brisbane after travelling 1,800kms without incident, Gina really needed a wash so I took her to Dolphin Car Wash for a wash and detailing. Gina was looking fine so I had to show her off and took my housemate for a spin. It was getting too late to cook dinner so we decided to grab a bite to eat at a local Indian restaurant. I didn't want to park on the street or in the restaurant's "dodgy" car park so parked across the road in a large, well-lit car park. I parked directly underneath 2 fluorescent lights and to the right of me was a traffic island so figured I was pretty safe. Unfortunately when we returned to Gina, this is what we saw:
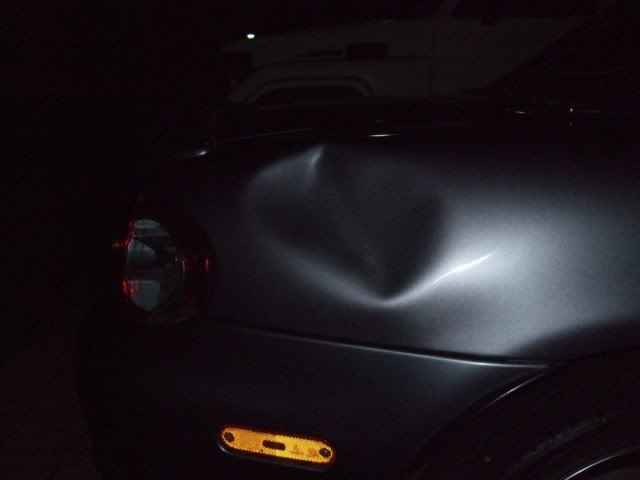
Here's the damage by day:
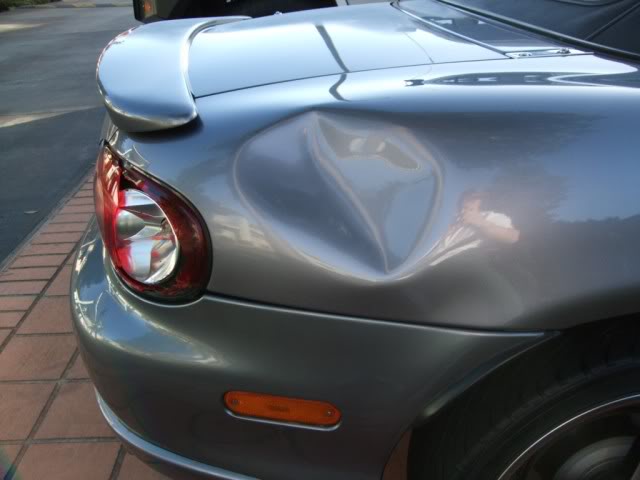
I yelled more than a few expletives, assuming it was a couple of vandals who'd hit it with baseball bat.
On the drive home, Chris spotted something that had slipped under the bonnet. I stopped Gina and found that it was a note left by the offender. Apparently he and his wife had stopped in at Foodworks and on the way out he'd reversed into me in his Nissan 4WD - I suspect his wife was actually driving based on the width of the car park and that it looked like they had clearly dr ven up the traffic island before hitting Gina (see the pictures below, you can see the tyre marks on the traffic island).
I couldn't believe that I'd dr ven Gina 1,800kms over 3 days without a scratch, only for it to be reversed into within 4 hours of being in Brisbane while parked in a large, well-lit car park. This was obviously the work of the "Ti curse".
Here's the car park by day - you can see how wide it is.
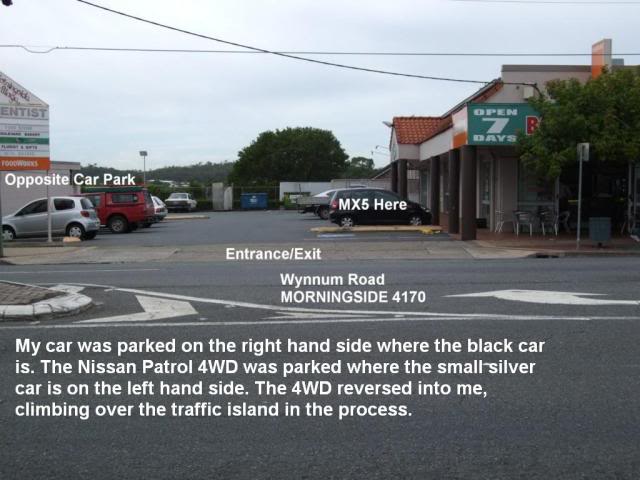
Here's the car park by night, when the accident occurred:
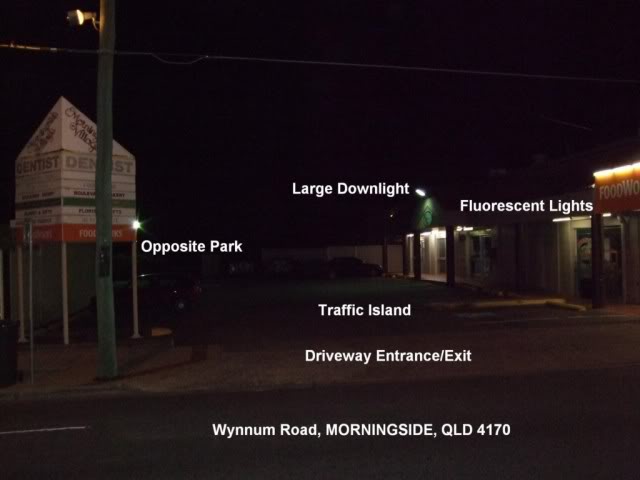
Unfortunately I didn't have a cover note for Gina and assumed it would be covered by my existing insurance. This was a BIG mistake. My "ex-insurer" (I won't name names but it sounds a bit like "Are-Ay-See-Cue") stated that because I had no cover note, the vehicle was not listed on my policy and was not registered to me that they would provide no assistance, even though it wasn't my fault at all. This was a major problem because to register Gina I needed to get a QLD roadworthy certificate and I couldn't get one with the broken tail light or insurance. The afore-mentioned insurer also wouldn't agree to insure Gina because she had existing damage. Luckily Sun-Corp agreed to 3rd-party insurance for Gina provided that I get it fixed within 10 working days so I signed up and promptly told the afore-mentioned insurance company that I wasn't inclined to deal with them ever again.
Several of the crash repairers I contacted said that because I was not at fault I shouldn't have involved my insurance at all and gone directly through the offender's insurance. The offender readily admitted to being at fault (much kudos to him) and we dealt with it using his insurance, AAMI.
All went smoothly on the repairs and QLD registration after that and I was very impressed with AAMI, Gina was back to her good-looking best.
So does this count as my first mod?
More updates to come.
Don't worry about dying, worry about not living!
Garage Thread: http://www.mx5cartalk.com/forum/viewtopic.php?f=57&t=76716
- Lokiel
- Forum legend
- Posts: 4126
- Joined: Thu May 28, 2009 2:39 pm
- Vehicle: NB SE
- Location: Brisbania
Re: Lokiel's "Gina" (once a 2004 Titanium SE) Recreated AGAIN
Originally posted by Lokiel, Sun Sep 24, 2017 3:25 pm
Originally posted by Steampunk, Sat Mar 13, 2010 5:16 pm[
Yes, kudos for the offender leaving a note, but they could have picked a better place than the bonnet to stick a piece of paper.
long live the *bling*
Originally posted by two40, Sat Mar 13, 2010 7:23 pm[
Love the look of the grill. Makes Gina's smile gorgeous. I have to get one for myself when I can part with the cash.
Originally posted by Lokiel, Sat Mar 13, 2010 9:38 pm[
I think he tried to leave it under the driver's windscreen wiper but by the time I arrived it had slid down the windscreen and under the bonnet. WHen driving home I guess the wind buffeting blew it back up the windscreen.
Wait until I post the interior bling
The grille is a Lockwood Stainless Woven Mesh Grille that I actually purchased from a fellow forum member here so it was quite cheap - love this forum! I always liked this grille and was about to purchase it from MX5 Parts & Accessories (see http://www.mx5parts.co.uk/product_info.php/products_id/512) when it was posted in the MX5 Used Parts section.
Originally posted by two40, Sat Mar 13, 2010 11:43 pm[
Yeah, the Lockwood is the only one I would put on my car. Looks the goods.
Originally posted by Steampunk, Sat Mar 13, 2010 5:16 pm[
Yes, kudos for the offender leaving a note, but they could have picked a better place than the bonnet to stick a piece of paper.
long live the *bling*
Originally posted by two40, Sat Mar 13, 2010 7:23 pm[
Love the look of the grill. Makes Gina's smile gorgeous. I have to get one for myself when I can part with the cash.
Originally posted by Lokiel, Sat Mar 13, 2010 9:38 pm[
1red5 wrote:Yes, kudos for the offender leaving a note, but they could have picked a better place than the bonnet to stick a piece of paper.
long live the *bling*
I think he tried to leave it under the driver's windscreen wiper but by the time I arrived it had slid down the windscreen and under the bonnet. WHen driving home I guess the wind buffeting blew it back up the windscreen.
Wait until I post the interior bling
two40 wrote:Love the look of the grill. Makes Gina's smile gorgeous. I have to get one for myself when I can part with the cash.
The grille is a Lockwood Stainless Woven Mesh Grille that I actually purchased from a fellow forum member here so it was quite cheap - love this forum! I always liked this grille and was about to purchase it from MX5 Parts & Accessories (see http://www.mx5parts.co.uk/product_info.php/products_id/512) when it was posted in the MX5 Used Parts section.
Originally posted by two40, Sat Mar 13, 2010 11:43 pm[
Yeah, the Lockwood is the only one I would put on my car. Looks the goods.
Don't worry about dying, worry about not living!
Garage Thread: http://www.mx5cartalk.com/forum/viewtopic.php?f=57&t=76716
- Lokiel
- Forum legend
- Posts: 4126
- Joined: Thu May 28, 2009 2:39 pm
- Vehicle: NB SE
- Location: Brisbania
Re: Lokiel's "Gina" (once a 2004 Titanium SE) Recreated AGAIN
Originally posted by Lokiel, Sun Sep 24, 2017 3:26 pm
Originally posted by Lokiel, Fri Mar 19, 2010 10:15 pm[
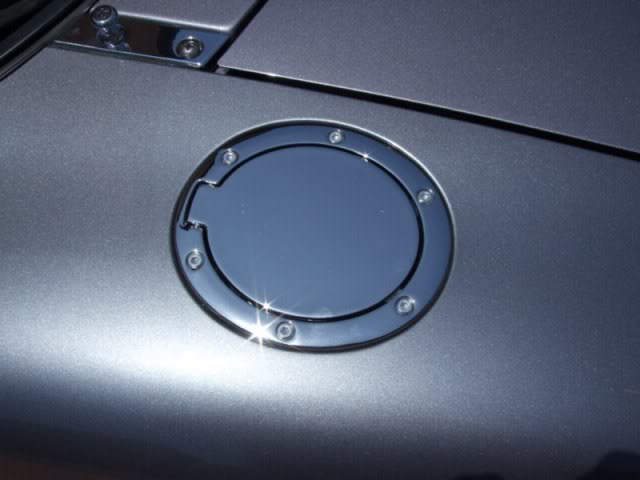
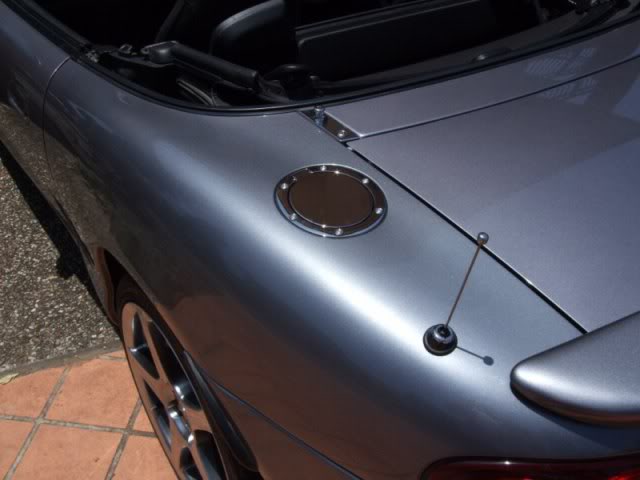
Like many Titanium/Silver MX-5 owners, the first mod I really wanted was the chrome fuel lid since it looks so good. I purchased it from MX-5 Parts & Accessories in the UK. It is quite expensive but is simple to install and was definitely worth the price.
Here's the OEM fuel lid vs the chrome fuel lid:
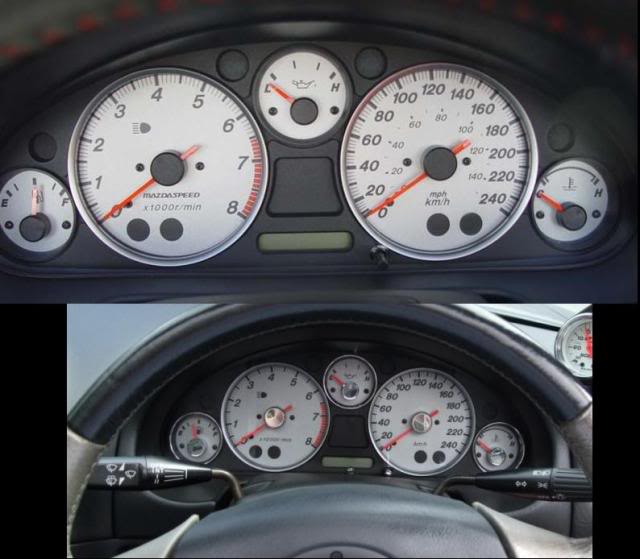
MY love of chrome had been fired up and I decided to upgrade the instrument panel trim. The SE's instrument panel has two faux chrome rings around the two large instruments so I just purchased the 3 small chrome instrument rings, 5 chrome needle cap covers and the chrome odometer needle cap, all from MX-5 Parts & Accessories in the UK again since the service was excellent and the prices beat anything I could find locally, even accounting for S&H charges.
Here's the OEM panel vs the upgraded instrument panel:
The chrome instrument rings make the 2 OEM faux chrome rings look cheap by comparison and I may "chrome them" in the future too. I'm quite happy with these purchases though the chrome odometer needle cap is virtually unnoticeable and does reflect back onto the instrument panel which can be seen above so wouldn't recommend it. It's not glued in so I can removed it if I want.
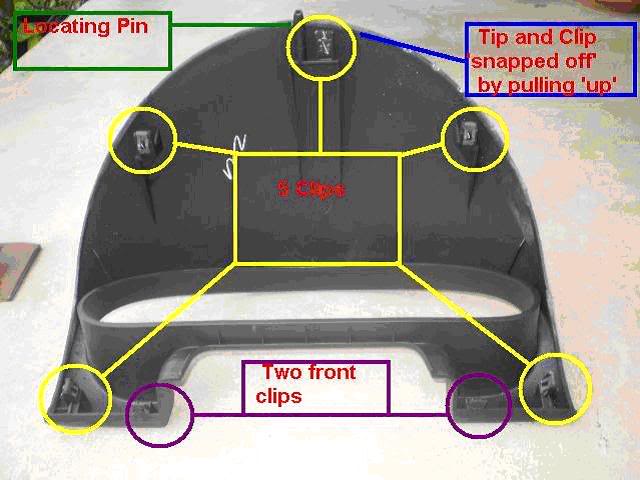
I spent a lot of time Googling just how to get the instrument panel off since I didn't want to break anything or snap off any clips. The following picture of the underside of the instrument hood I found while Googling helped a lot:
Basically, once you've removed the trim around the steering column and unscrewed the 4 front instrument hood screws, you need to feel under the dash for the two front clips shown above and separate them as best as possible from the dash. You then curl your fingers between the instrument panel's plastic and the hood (you can easily force your fingers in between them), get a reasonably good fingertip grip on the hood and pull it sharply straight back towards the steering wheel. DO NOT PULL UPWARD! - this would brake the clips or supporting pin at the rear. It will make a large CRACK/SNAP sound but that's just the clips releasing.
There are 3 harness connections at the top rear of the instrument cluster that need to be removed to pull the instrument cluster out completely.
One word of warning when adding chrome trim to the instrument panel, make sure your hands are as clean as possible and wipe EVERYTHING down when finished before final reassembly because smearing shows up very obviously on chrome trim and the instrument panel's plastic cover.
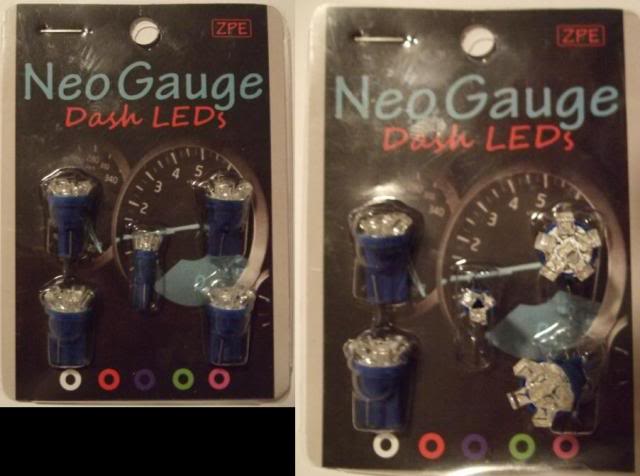
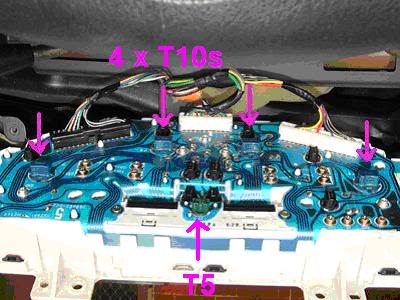
After installing the chrome instrument panel trim I saw someone's MX5 with blue LEDs and thought that when matched with my chrome trim it would look awesome. I purchased the LEDs from eBay Australia (approx A$17). Just enter "MX5 LEDs" as the eBay search criteria and you will get plenty of hits. What you are looking for is a LED pack that contains 4xT10 and 1xT5 LEDs. These LEDs are direct replacements for the existing red globes.
These are the LEDs I purchased:
And here is a rear shot of the instrument cluster showing where the LEDs go (not my picture so I apologise for the lack of clarity). Just twist those 5 knobs 45 degrees, pull them out and swap the OEM bulbs with LEDs:
One thing to be wary of with LEDs is that they only work when installed the right way round so make sure that they all light up before reassembling everything.
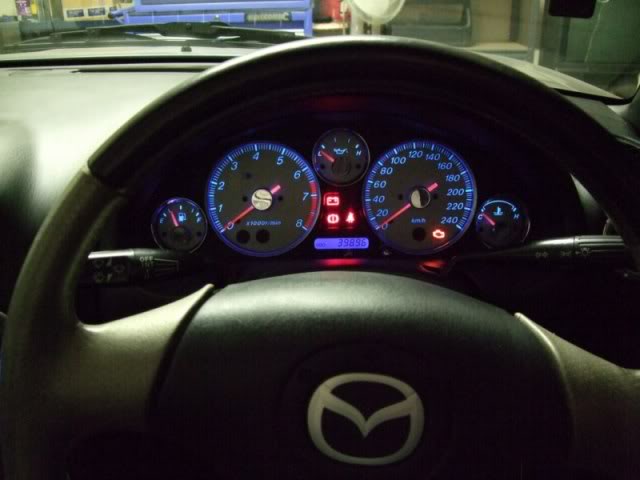
Here's what the instrument panel looks like at night:
I'm MUCH happier with the blue lighting since I never liked the OEM red lighting.
Originally posted by two40, Fri Mar 19, 2010 10:40 pm[
Nice one. Thanks for the tips on how to remove the cluster as well. Will come in handy.
Don't worry about dying, worry about not living!
Garage Thread: http://www.mx5cartalk.com/forum/viewtopic.php?f=57&t=76716
- Lokiel
- Forum legend
- Posts: 4126
- Joined: Thu May 28, 2009 2:39 pm
- Vehicle: NB SE
- Location: Brisbania
Re: Lokiel's "Gina" (once a 2004 Titanium SE) Recreated AGAIN
Originally posted by Lokiel, Sun Sep 24, 2017 3:28 pm
Originally posted by Lokiel, Sun Apr 18, 2010 5:06 pm[
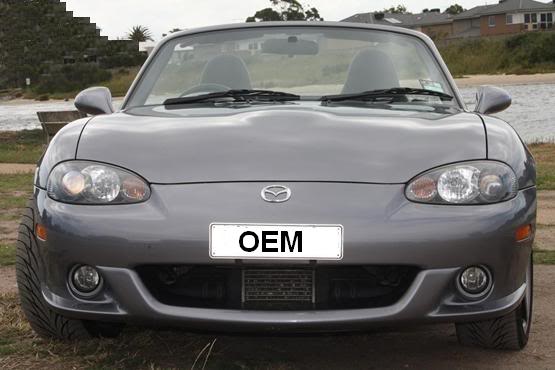
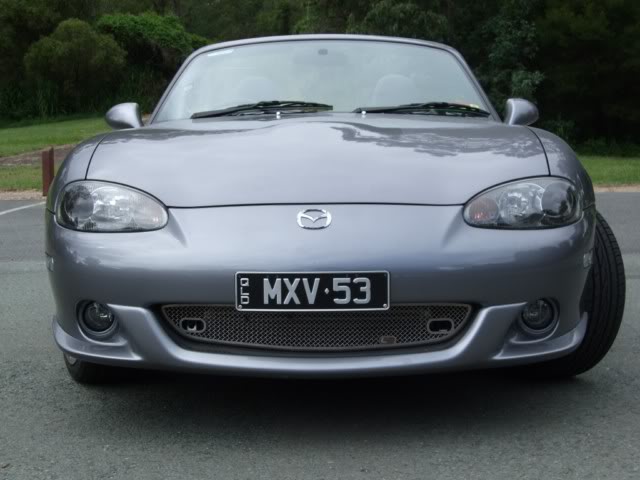
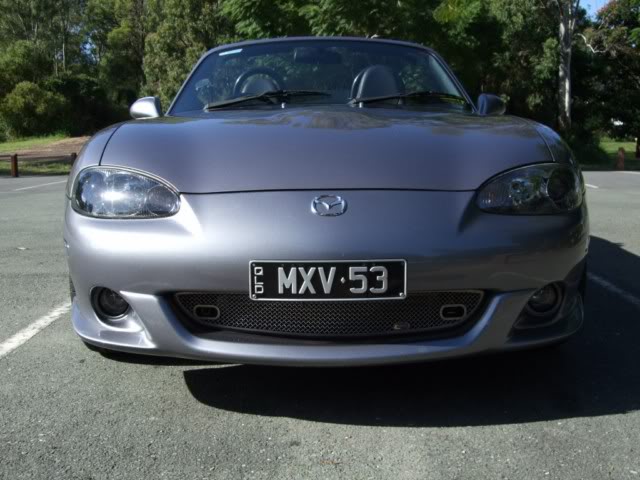
I had my MX5 Plus Twin Hoop roll bar installed last week so took some new photos of Gina to update the garage chat entry with exterior Before and After modifications.
Front Views:
1. This is not mine, it's an OEM front view since I don't have a good OEM closeup front shot.
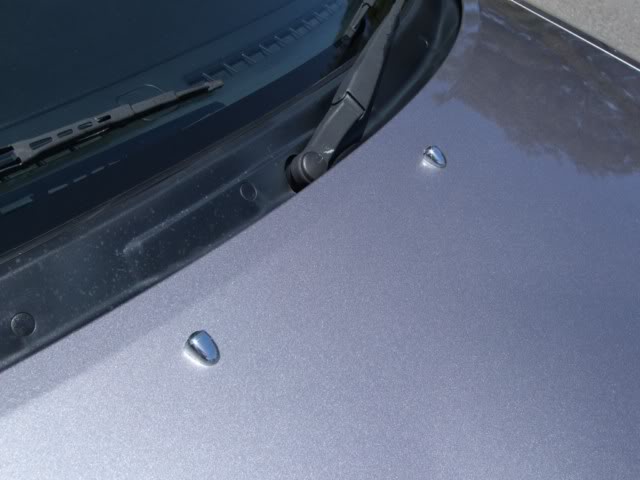
2. Lockwood Grille (bought from a forum member here after I installed the aftermarket intercooler), MX5 Plus number plate holder and chrome washer nozzles from Moss Motors.
3. Roll Bar installed and "Baby Teeth" removed.
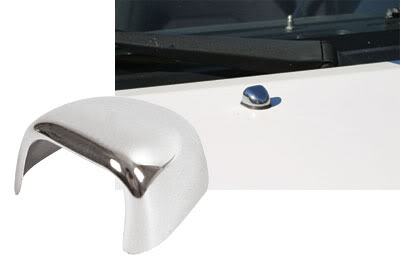
4. Chrome washer cover (from MX5 Parts & Accessories).
5. Closeup of chrome washer covers.
Not sure that the chrome washer nozzle covers were worth it.
Rear Views:
1. OEM view.
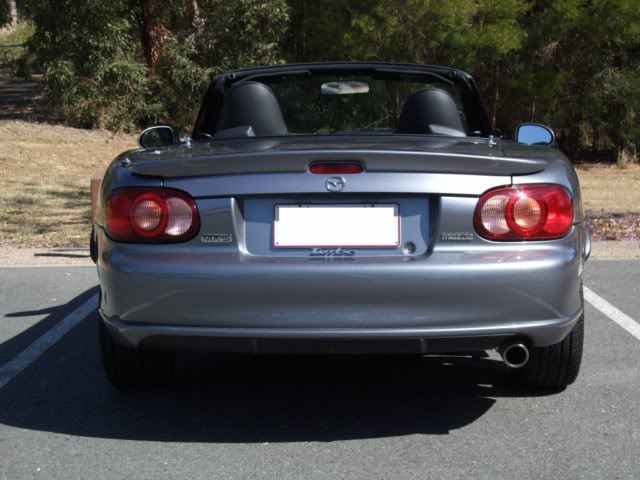
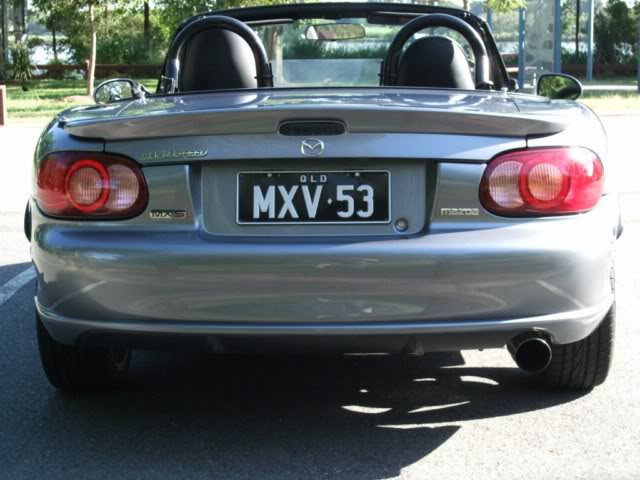
2. Roll Bar installed with DIY windblocker, smoked rear brake light and Flyin' Miata exhaust. The S&H on the FM exhaust was almost as much as the exhaust (bought via a Group Buy).
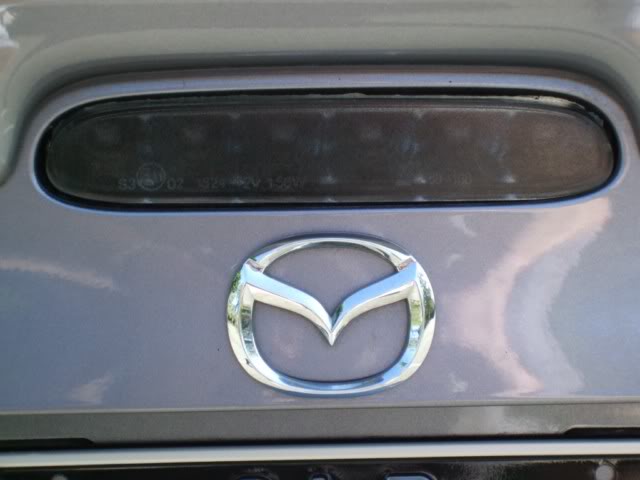
3. Closeup of smoked rear brake light.
I bought a clear rear brake light from Moss motors but thought it looked cheap and nasty when installed so decided to "smoke it" using 5 coatings of VHT Night Shade. By day it's quite dark and matches the number plate but the red LEDs really light it up at night. In hindsight, I think simply spraying the OEM brakelight with VHT Night Shade would have achieved the same effect (with a few less coats). I actually broke one of the rear number plate light covers when removing it to install the new rear brake light - the plastic clip-in hinge snapped. I got a replacement from MX5 Plus (love those guys!).
Side views:
1. This is not mine, it's an OEM sideview since I don't have a good OEM side shot. Hated the orange indicator and reflectors.
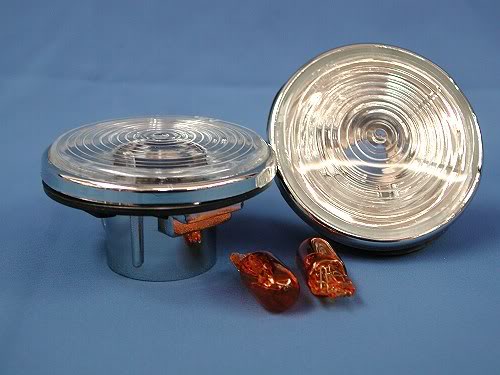
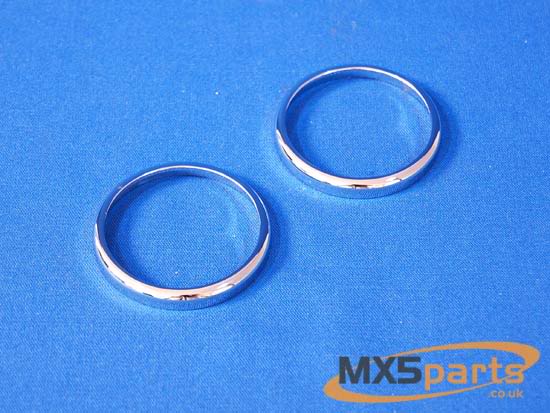
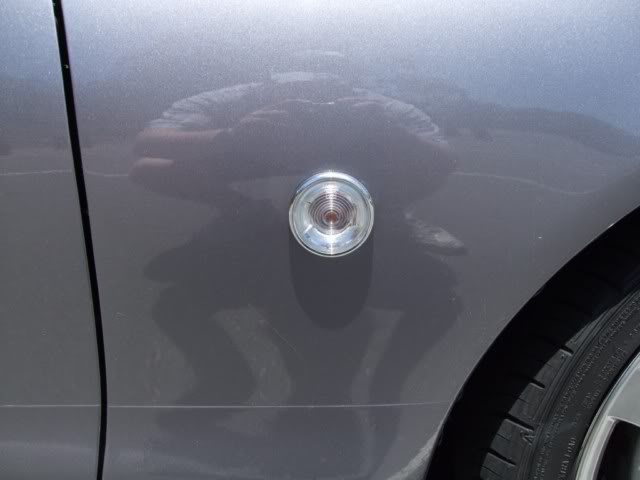
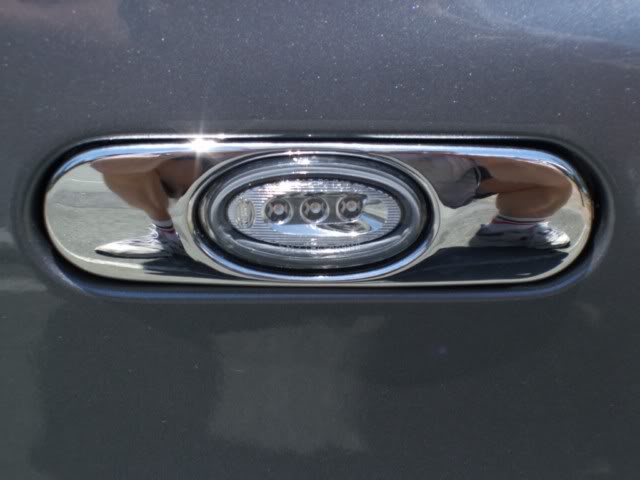
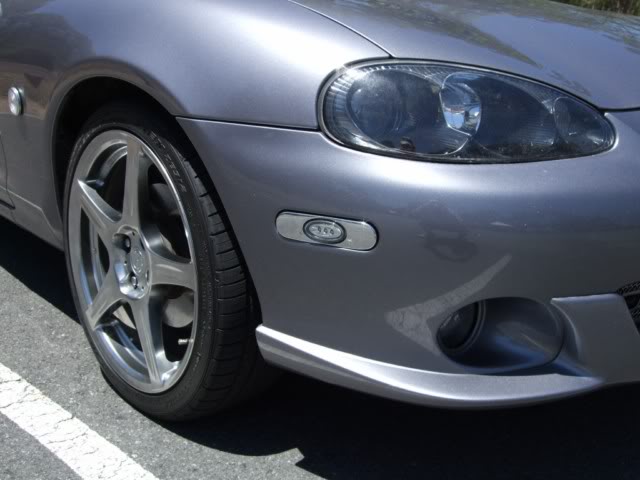
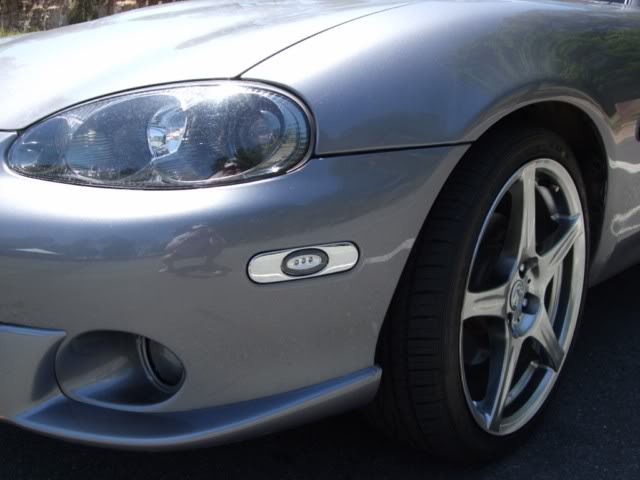
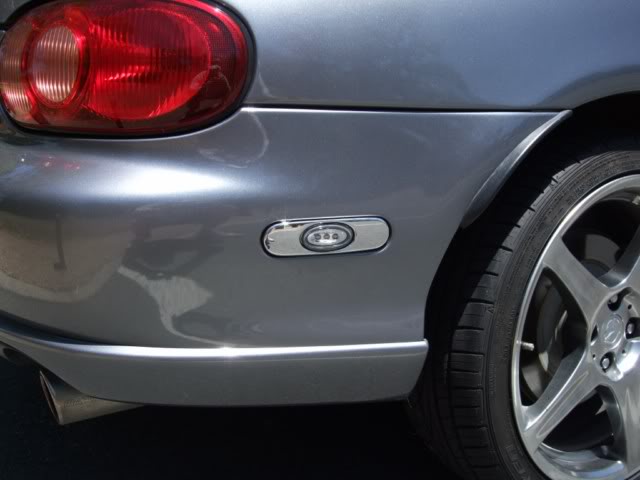
2. Chrome Reflectors/Indicators, Clear Side Indicator and Chrome Side Indicator Trim (all from MX5 Parts & Accessories)
3. Roll bar installed, side indicators smoked and chrome reflectors/indicators.
Clear Side Indicators
Chrome Side Indicator Trim
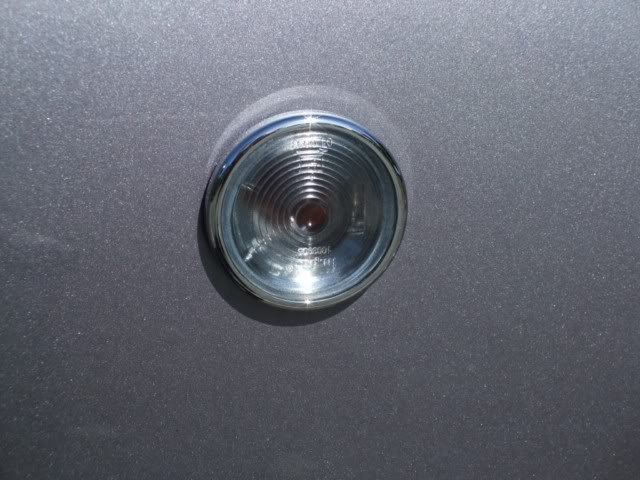
Closeup of Clear Indicators installed
After seeing Stu's (aka MINX) smoked side indicators I decided that the clear indicators looked like crap so decided to "smoke" mine.
Closeup of "smoked" Clear Indicators after 2 coats of VHT Night Shade. I didn't want to make these too dark in case the orange reflector lights weren't bright enough.
Clear Reflectors/Indicators:
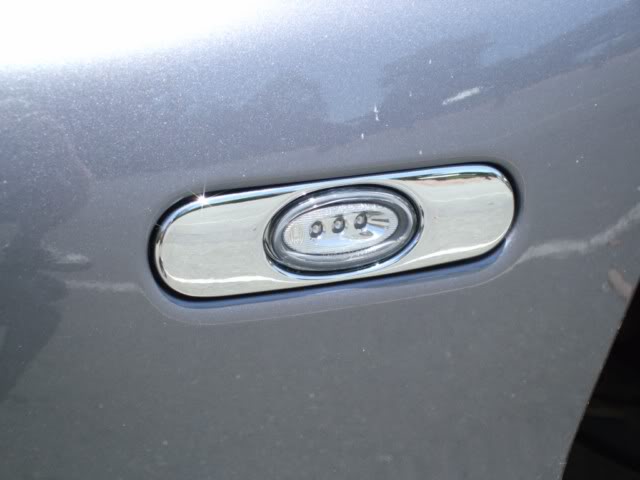
After I saw the chrome reflectors/indicators from MX5 Mania I decided I really wanted those instead but they were way too expensive (approx $300). Moss Motors had them for sale under US$200 so, in a moment of weakness, I bought them and replaced the clear reflectors.
Closeups of chrome Reflectors/Indicators (from Moss Motors).
I'm quite happy with the look of the chrome reflectors/indicators though at night, the clear reflectors are more effective since they light up the entire width of the reflector. Here are some comparison shots of the clear indicators/reflectors vs the chrome indicator/reflectors and smoked indicators:
Interior and engine "modz" still to come.
Don't worry about dying, worry about not living!
Garage Thread: http://www.mx5cartalk.com/forum/viewtopic.php?f=57&t=76716
- Lokiel
- Forum legend
- Posts: 4126
- Joined: Thu May 28, 2009 2:39 pm
- Vehicle: NB SE
- Location: Brisbania
Re: Lokiel's "Gina" (once a 2004 Titanium SE) Recreated AGAIN
Originally posted by Lokiel, Sun Sep 24, 2017 3:29 pm
Originally posted by michelin man, Mon Apr 19, 2010 12:26 am[
Mmmmm like your taste in screen vamps and vehicles.....not sure who has the most bling Gina about to mount the trapeze or Gina showing off her neons?
Originally posted by RawSouth, Mon Apr 19, 2010 9:42 am[
Very very nice Lokiel, your SE is very unique
Originally posted by Hammer, Mon Apr 19, 2010 11:05 am[
You're definately blinging it.
So what's next on the bling plan?
Originally posted by Lokiel, Mon Apr 19, 2010 11:42 am[
I bought another steering wheel from MX5 Plus and plan on retrimming it with black and German Grey leather to match the door trim. Still tossing up whether or not to retrim the centre of the seats in German Grey too. My seats are in great condition - if they were worn I'd do it without hesitation.
I've "blinged-up" the interior quite a bit too and will add these photos next.
Next modz: ECU upgrade and 16" rims. The 17" rims look great but are heavy and harsh - I drove the car when I bought it from Melbourne to Brisbane and aren't too keen on doing another long trip with 17" rims. 15" rims are cheaper but I don't think that they look right on an NB.
Originally posted by Lokiel, Mon May 03, 2010 6:58 pm[
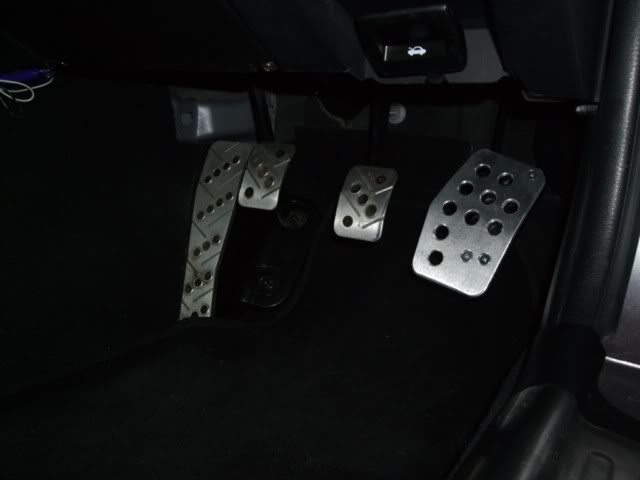
I installed the Rennenmetal "Big Boy" accelerator pedal cover yesterday to make heel-toeing easier:
http://www.rennenmetal.com/proddetail.asp?prod=2280
Here's what it looks like installed:
Here's the comparison to the OEM pedal (sitting below Renenmetal pedal, bottom right):
Still getting used to it. Occasionally when I pull up at the lights the engine starts revving - then I realise that my right foot is catching the accelerator pedal (I'm getting better though).
It was a pain to fit since I didn't remove the driver's seat and had to contort my arms and hands into most un-natural positions to unscrew the OEM cover's nuts and screw in the Rennnenmetal nuts.
Originally posted by michelin man, Mon Apr 19, 2010 12:26 am[
Mmmmm like your taste in screen vamps and vehicles.....not sure who has the most bling Gina about to mount the trapeze or Gina showing off her neons?
Originally posted by RawSouth, Mon Apr 19, 2010 9:42 am[
Very very nice Lokiel, your SE is very unique
Originally posted by Hammer, Mon Apr 19, 2010 11:05 am[
You're definately blinging it.
So what's next on the bling plan?
Originally posted by Lokiel, Mon Apr 19, 2010 11:42 am[
Hammer wrote:You're definately blinging it.
So what's next on the bling plan?
I bought another steering wheel from MX5 Plus and plan on retrimming it with black and German Grey leather to match the door trim. Still tossing up whether or not to retrim the centre of the seats in German Grey too. My seats are in great condition - if they were worn I'd do it without hesitation.
I've "blinged-up" the interior quite a bit too and will add these photos next.
Next modz: ECU upgrade and 16" rims. The 17" rims look great but are heavy and harsh - I drove the car when I bought it from Melbourne to Brisbane and aren't too keen on doing another long trip with 17" rims. 15" rims are cheaper but I don't think that they look right on an NB.
Originally posted by Lokiel, Mon May 03, 2010 6:58 pm[
I installed the Rennenmetal "Big Boy" accelerator pedal cover yesterday to make heel-toeing easier:
http://www.rennenmetal.com/proddetail.asp?prod=2280
Here's what it looks like installed:
Here's the comparison to the OEM pedal (sitting below Renenmetal pedal, bottom right):
Still getting used to it. Occasionally when I pull up at the lights the engine starts revving - then I realise that my right foot is catching the accelerator pedal (I'm getting better though).
It was a pain to fit since I didn't remove the driver's seat and had to contort my arms and hands into most un-natural positions to unscrew the OEM cover's nuts and screw in the Rennnenmetal nuts.
Don't worry about dying, worry about not living!
Garage Thread: http://www.mx5cartalk.com/forum/viewtopic.php?f=57&t=76716
- Lokiel
- Forum legend
- Posts: 4126
- Joined: Thu May 28, 2009 2:39 pm
- Vehicle: NB SE
- Location: Brisbania
Re: Lokiel's "Gina" (once a 2004 Titanium SE) Recreated AGAIN
Originally posted by Lokiel, Sun Sep 24, 2017 3:29 pm
Originally posted by Lokiel, Sun May 09, 2010 1:27 pm[
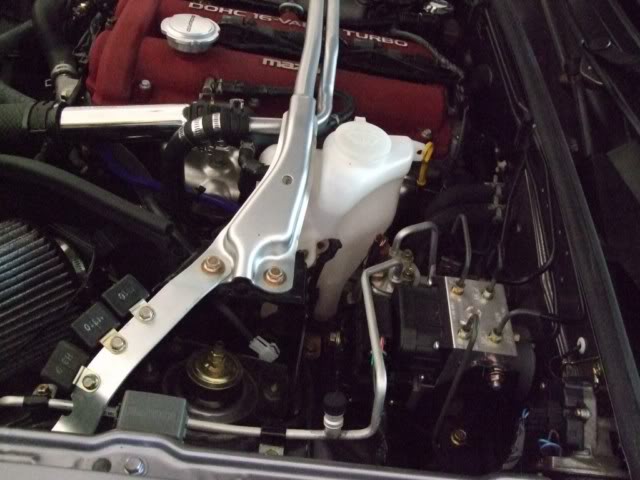
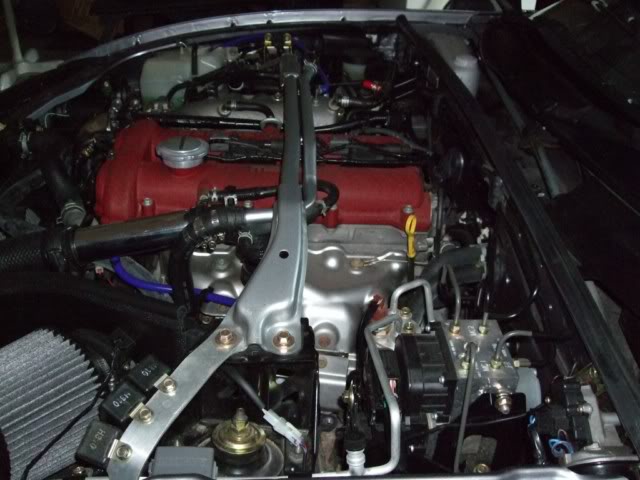
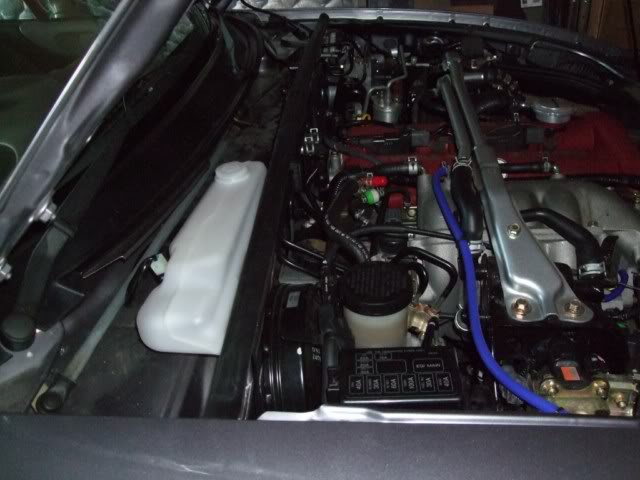
I finally installed the NoPro washer bottle that I purchased in the "[MX5 SHOP] - NOPRO Washer Bottle Group Buy #3" (see http://mx5cartalk.com/forum/viewtopic.php?f=82&t=40274 ). After seeing it on Davex3's, I really liked the way it cleaned up the engine bay so jumped on the Group Buy when it was announced.
The install was straight forward however I did need to drill an additional hole in the firewall since I was using one of the OEM firewall holes required by the NoPro washer Bottle to thread my Gizzmo MS-2 EBC solenoid wires behind the firewall. The solenoid wire now goes through the new firewall hole.
The OEM washer bottle was mounted in the engine bay using a "large" metal bracket and 3 bolts. The NoPro washer bottle kit has very small mounting brackets and two bolts. If nothing else, the mod gets rid of some extra weight which is always a good thing.
Here's some before and after shots to show the difference:
Front View:
Passenger-Side View:
Installed view:
The OEM washer hose mountings on the bonnet are symmetrical so I'm thinking about swapping them over (ie. mirror the existing setup) since the OEM washer bottle was mounted on the passenger side whereas now it's on the driver's side. This would reduce the length of hose required to the washer bottle since it is now longer than than the OEM hose length. Has anyone done this or is the additional hose length not an issue with the OEM washer bottle pump?
Don't worry about dying, worry about not living!
Garage Thread: http://www.mx5cartalk.com/forum/viewtopic.php?f=57&t=76716
- Lokiel
- Forum legend
- Posts: 4126
- Joined: Thu May 28, 2009 2:39 pm
- Vehicle: NB SE
- Location: Brisbania
Re: Lokiel's "Gina" (once a 2004 Titanium SE) Recreated AGAIN
Originally posted by Lokiel, Sun Sep 24, 2017 3:30 pm
Originally posted by Lokiel, Mon Aug 02, 2010 10:47 pm[
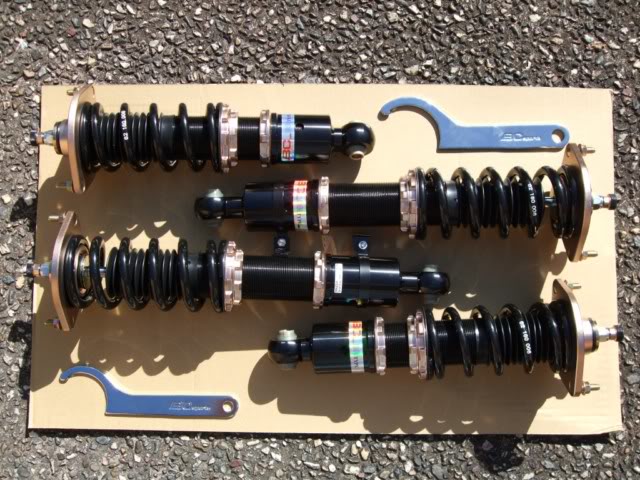
I installed my BC Racing BR-Series Coilovers on Saturday, purchased via eBay from JDM Performance. I've ordered a set of Nickel 15x8 6ULs to replace my hated "bone jarring + heavy" 17x7 OEM Racing Hart rims and decided I needed these to avoid the 4WD-look when installing 15" rims on an NB (ie. lots of sidewall plus a large gap between the wheel and fender).
Here's what they look like unpacked. They look pretty damn good - it's a pity they can't be seen when installed:
I used Keith Tanner's "Performance Projects" book for installation guidelines which suggested that it would take between 4-6 hours. I'm not that naive to believe it would take me only 6 hours on my first go at it but was surprised that it took me 9 hours to complete the installation on my own.
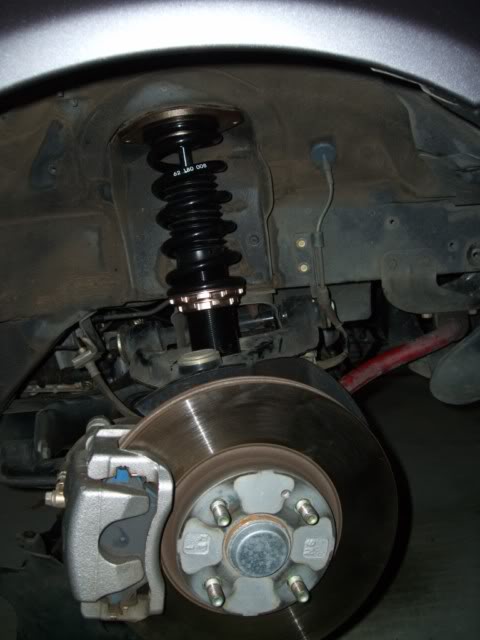
Removing the first front long bolt on the suspension took a long time because that sucker just did not want to "simply slide out", no matter how much jigging I did of the suspension. I ended up going all "Jeremy Clarkson" on it (ie. lots of use of a rubber mallet and steel rod inserts) and it finally came out. The driver's side came out with no issues at all.
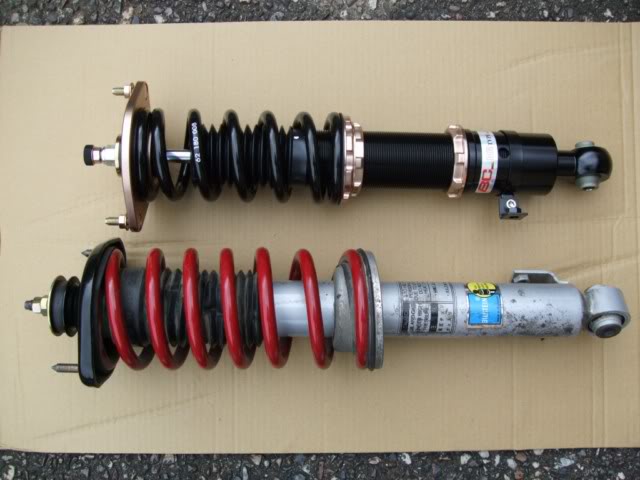
Here's a comparison shot of the front coilovers (OEM on bottom):
Installed:
The rear shocks are much easier to install. The guidelines indicated that you can remove the rear shocks by simply levering down the suspension. Unfortunately no matter how far down I got the suspension, it was always about 10mm too short and prevented me from removing the coilover. Foolishly I persisted with this method for about an hour, figuring that I must have been doing something wrong, until I gave up and "did it my way" by simply unbolting the suspension elbow nearest the brake disc.
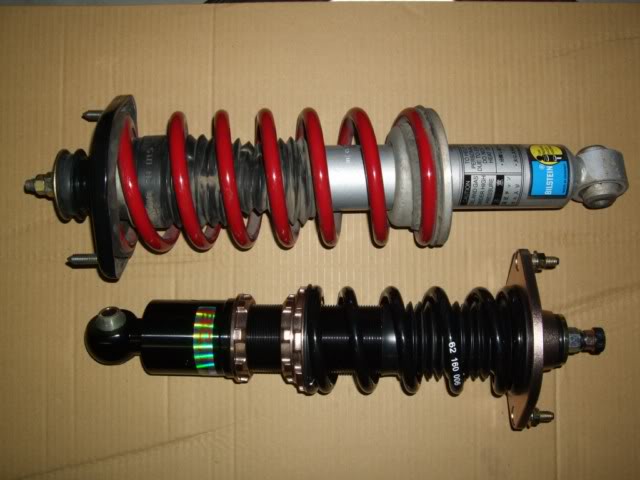
Here's a comparison shot of the rear coilovers (OEM on top):
I used the default BC coilover settings which dropped the car by 40mm and closed that tyre/fender gap nicely. Here's some before and after shots (apologies for the after shot, light was fading when I took it and this was the only unshaded spot I could find as the sun was setting):
Now that I've done the coilover installation once, I believe that I could probably do it in 6 hours on my own.
I'm not going to mess about with the ride height or get a wheel balance until I've installed the 6ULs and tyres.
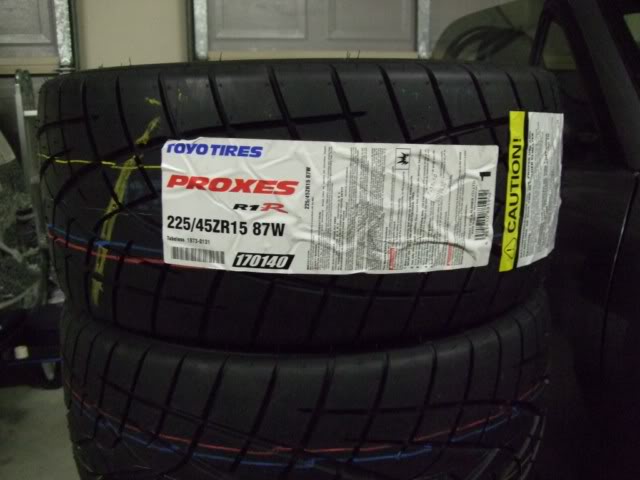
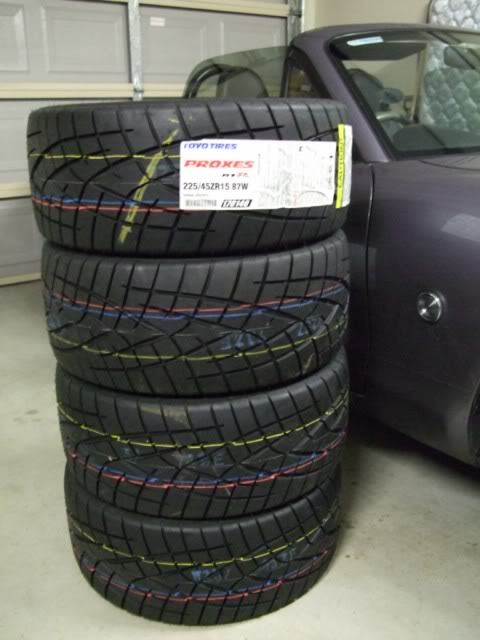
Ideally I'd like to fit 225/45/15 tyres but can only find Kumho V70A 225/45/15 tyres at $380 each here in Australia. That's bloody expensive but since I only use my car weekends they'll probably last me a while. Good-win Racing in the US will NOT export them outside the US since their tyres are rated specifically for the US. I've received feedback directly indicating this so I may end up settling for 205/50/15s.
Originally posted by Veloce, Mon Aug 02, 2010 11:18 pm[
Nice install, swapped some shocks over for ll_spud on Saturday in 2.5 hrs , helped that I used the school's car hoist! Pity you didn't have those Bilsteins for sale a couple of months ago I would have grabbed them!
Nice car!
Originally posted by Crapweasel, Tue Aug 03, 2010 12:23 am[
Looking good Lokiel - but a word to the wise: do NOT import tyres, unless they're brand new, and the supplier is willing to jump through all kinds of documentation hoops to satisfy AQIS. Water collects on the inside of tyres, which encourages mosquito breeding, and we have enough of a problem already without encouraging more - regardless of the origin, they clamp down on it because of the cheap imports from Asia.
Tyres can be imported, but they have to be brand new, unused, still wrapped in their original packaging and the appropriate declarations (new & unused, mosqiuto declaration and the list goes on) completed to the satisfaction of Quarantine here. If Quarantine aren't satisfied, you have to have an import permit for used tyres (along with all the other red tape) or they'll be destroyed at a huge cost...
By the way - how is the ride with the stock wheels? Any rubbing etc? I'm loving the new stance, and I want to stick with the OEM rims...
Cheers
Pete
Originally posted by Lokiel, Tue Aug 03, 2010 10:27 am[
No rubbing whatsoever though I did manage to scrape a speed bump that I normally had no issues with previously. I did have a large passenger at the time and probably drove over it too fast so will take that on as a valuable lesson. From what I've read, rubbing seems to only be an NB issue with 9" wide rims so 17x7 Racing Harts have no problems unless you drop the car ridiculously low (the BR series allow you to drop the car up to 110mm according to their documentation).
I haven't played around with the ride height since I'm hoping to get the 6ULs in the next couple of weeks and I only get to drive the car on weekends
I'm also using the default dampening level (8 clicks from the Hard maximum) which feels OK but I really need to throw the car around a lot more to find my preference.
Bitrusty did a BC coilover install and ended up raising his to improve handling. See http://www.mazda-speed.com/forum2/index.php/topic,19880.msg214235.html#msg214235
Originally posted by MINX, Tue Aug 03, 2010 10:43 am[
Lookin good mate!
Maybe a little ass heavy.
Look fwd to seeing it with the 6uls
Originally posted by bruce, Tue Aug 03, 2010 10:45 am[
They won't import due to manufacturer's restrictions? Is it worth trying priceusa.com.au to avoid that? I've used them sucessfully for running shoes which couldn't be exported from the US (Asics).
Don't know how the Customs/Quarrantine goes.
Originally posted by Lokiel, Tue Aug 03, 2010 1:51 pm[
It probably looks "ass heavy" because the car is actually facing uphill - I angled the camera to make it look parallel. On the flat the front and rear fender gaps are about even.
Can't wait to get the 6ULs. If they don't arrive before my next paycheck I may fork out for Kumho V70A 225/45/15 tyres (I really like the 225/45/15s but they're bloody expensive), otherwise it's probably Kumho KU36 205/50/15 or Toyo R1r 205/50/15 tyres.
Emilio, from 949Racing.com, reckons "For the Miata, I think a 205 on the 15x8 6UL is a great street combination." (see post #280 in http://forum.miata.net/vb/showthread.php?t=290214 ) so the 205s seem to be the sensible option - but then, my dad reckons I've got no common sense anyway.
Originally posted by Lokiel, Wed Aug 04, 2010 12:04 pm[
No problems on the ride/drive Dave - I still owe you for taking me for a spin in yours since that gave me the motivation to attack my modz with gusto (otherwise I'd probably still be procrastinating over doing the AEM CAI upgrade). You really do need to drive it yourself to feel the difference anyway
Regarding the front vs. rear ride height, I never knew that before but based on the BEFORE/OEM photo above, you can clearly see that the rear is higher than the front so I'll take that into account when I get the 6ULs installed and the ride height adjusted.
Originally posted by Lokiel, Mon Aug 02, 2010 10:47 pm[
I installed my BC Racing BR-Series Coilovers on Saturday, purchased via eBay from JDM Performance. I've ordered a set of Nickel 15x8 6ULs to replace my hated "bone jarring + heavy" 17x7 OEM Racing Hart rims and decided I needed these to avoid the 4WD-look when installing 15" rims on an NB (ie. lots of sidewall plus a large gap between the wheel and fender).
Here's what they look like unpacked. They look pretty damn good - it's a pity they can't be seen when installed:
I used Keith Tanner's "Performance Projects" book for installation guidelines which suggested that it would take between 4-6 hours. I'm not that naive to believe it would take me only 6 hours on my first go at it but was surprised that it took me 9 hours to complete the installation on my own.
Removing the first front long bolt on the suspension took a long time because that sucker just did not want to "simply slide out", no matter how much jigging I did of the suspension. I ended up going all "Jeremy Clarkson" on it (ie. lots of use of a rubber mallet and steel rod inserts) and it finally came out. The driver's side came out with no issues at all.
Here's a comparison shot of the front coilovers (OEM on bottom):
Installed:
The rear shocks are much easier to install. The guidelines indicated that you can remove the rear shocks by simply levering down the suspension. Unfortunately no matter how far down I got the suspension, it was always about 10mm too short and prevented me from removing the coilover. Foolishly I persisted with this method for about an hour, figuring that I must have been doing something wrong, until I gave up and "did it my way" by simply unbolting the suspension elbow nearest the brake disc.
Here's a comparison shot of the rear coilovers (OEM on top):
I used the default BC coilover settings which dropped the car by 40mm and closed that tyre/fender gap nicely. Here's some before and after shots (apologies for the after shot, light was fading when I took it and this was the only unshaded spot I could find as the sun was setting):
Now that I've done the coilover installation once, I believe that I could probably do it in 6 hours on my own.
I'm not going to mess about with the ride height or get a wheel balance until I've installed the 6ULs and tyres.
Ideally I'd like to fit 225/45/15 tyres but can only find Kumho V70A 225/45/15 tyres at $380 each here in Australia. That's bloody expensive but since I only use my car weekends they'll probably last me a while. Good-win Racing in the US will NOT export them outside the US since their tyres are rated specifically for the US. I've received feedback directly indicating this so I may end up settling for 205/50/15s.
Originally posted by Veloce, Mon Aug 02, 2010 11:18 pm[
Nice install, swapped some shocks over for ll_spud on Saturday in 2.5 hrs , helped that I used the school's car hoist! Pity you didn't have those Bilsteins for sale a couple of months ago I would have grabbed them!
Nice car!
Originally posted by Crapweasel, Tue Aug 03, 2010 12:23 am[
Lokiel wrote:Ideally I'd like to fit 225/45/15 tyres but can only find Kumho V70A 225/45/15 tyres at $380 each here in Australia. That's bloody expensive but since I only use my car weekends they'll probably last me a while. Good-win Racing in the US will NOT export them outside the US since their tyres are rated specifically for the US. I've received feedback directly indicating this so I may end up settling for 205/50/15s.
Looking good Lokiel - but a word to the wise: do NOT import tyres, unless they're brand new, and the supplier is willing to jump through all kinds of documentation hoops to satisfy AQIS. Water collects on the inside of tyres, which encourages mosquito breeding, and we have enough of a problem already without encouraging more - regardless of the origin, they clamp down on it because of the cheap imports from Asia.
Tyres can be imported, but they have to be brand new, unused, still wrapped in their original packaging and the appropriate declarations (new & unused, mosqiuto declaration and the list goes on) completed to the satisfaction of Quarantine here. If Quarantine aren't satisfied, you have to have an import permit for used tyres (along with all the other red tape) or they'll be destroyed at a huge cost...
By the way - how is the ride with the stock wheels? Any rubbing etc? I'm loving the new stance, and I want to stick with the OEM rims...
Cheers
Pete
Originally posted by Lokiel, Tue Aug 03, 2010 10:27 am[
No rubbing whatsoever though I did manage to scrape a speed bump that I normally had no issues with previously. I did have a large passenger at the time and probably drove over it too fast so will take that on as a valuable lesson. From what I've read, rubbing seems to only be an NB issue with 9" wide rims so 17x7 Racing Harts have no problems unless you drop the car ridiculously low (the BR series allow you to drop the car up to 110mm according to their documentation).
I haven't played around with the ride height since I'm hoping to get the 6ULs in the next couple of weeks and I only get to drive the car on weekends
I'm also using the default dampening level (8 clicks from the Hard maximum) which feels OK but I really need to throw the car around a lot more to find my preference.
Bitrusty did a BC coilover install and ended up raising his to improve handling. See http://www.mazda-speed.com/forum2/index.php/topic,19880.msg214235.html#msg214235
Originally posted by MINX, Tue Aug 03, 2010 10:43 am[
Lookin good mate!
Maybe a little ass heavy.
Look fwd to seeing it with the 6uls
Originally posted by bruce, Tue Aug 03, 2010 10:45 am[
They won't import due to manufacturer's restrictions? Is it worth trying priceusa.com.au to avoid that? I've used them sucessfully for running shoes which couldn't be exported from the US (Asics).
Don't know how the Customs/Quarrantine goes.
Originally posted by Lokiel, Tue Aug 03, 2010 1:51 pm[
MINX wrote:Lookin good mate!
Maybe a little ass heavy.
Look fwd to seeing it with the 6uls
It probably looks "ass heavy" because the car is actually facing uphill - I angled the camera to make it look parallel. On the flat the front and rear fender gaps are about even.
Can't wait to get the 6ULs. If they don't arrive before my next paycheck I may fork out for Kumho V70A 225/45/15 tyres (I really like the 225/45/15s but they're bloody expensive), otherwise it's probably Kumho KU36 205/50/15 or Toyo R1r 205/50/15 tyres.
Emilio, from 949Racing.com, reckons "For the Miata, I think a 205 on the 15x8 6UL is a great street combination." (see post #280 in http://forum.miata.net/vb/showthread.php?t=290214 ) so the 205s seem to be the sensible option - but then, my dad reckons I've got no common sense anyway.
Originally posted by Lokiel, Wed Aug 04, 2010 12:04 pm[
Davex3 wrote:You'll have to take me for a ride when you get the 6uls on!
Apparently the mx5 likes to be about .25 t0 .5 inches higher in the back for best handeling.
No problems on the ride/drive Dave - I still owe you for taking me for a spin in yours since that gave me the motivation to attack my modz with gusto (otherwise I'd probably still be procrastinating over doing the AEM CAI upgrade). You really do need to drive it yourself to feel the difference anyway
Regarding the front vs. rear ride height, I never knew that before but based on the BEFORE/OEM photo above, you can clearly see that the rear is higher than the front so I'll take that into account when I get the 6ULs installed and the ride height adjusted.
Don't worry about dying, worry about not living!
Garage Thread: http://www.mx5cartalk.com/forum/viewtopic.php?f=57&t=76716
- Lokiel
- Forum legend
- Posts: 4126
- Joined: Thu May 28, 2009 2:39 pm
- Vehicle: NB SE
- Location: Brisbania
Re: Lokiel's "Gina" (once a 2004 Titanium SE) Recreated AGAIN
Originally posted by Lokiel, Sun Sep 24, 2017 3:31 pm
Originally posted by Lokiel, Sun Aug 22, 2010 11:34 pm[
After driving around a week with my new BC coilovers, I developed an irrational fear of speed humps after the rear bottomed out on a few of them so I decided to raise the rear end 0.5" above the front as recommended by Davex3 (Keith Tanner from FM recommends 0.5", ranging from 12" front and 12.5" rear to 12.5" front and 13" rear).
When I installed the coilovers, I left them at their original settings since I'm going to replace the rims+tyres soon anyway and didn't want to waste time "dicking about" with them too much. The original settings were in fact Front: 315mm(12.4"), Rear:310mm(12.2") so the rear WAS too low as pointed out above.
Since I was happy with the front I adjusted the rears to 327mm(12.7") - or damn close to that.
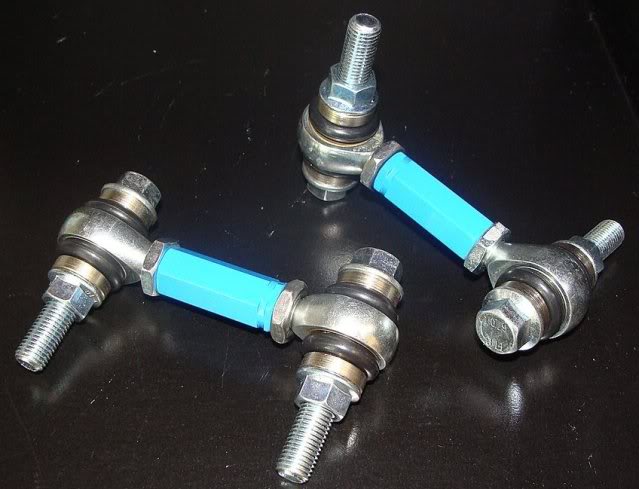
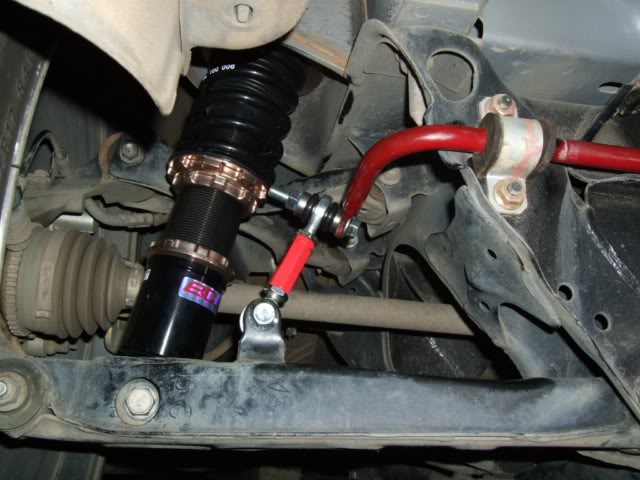
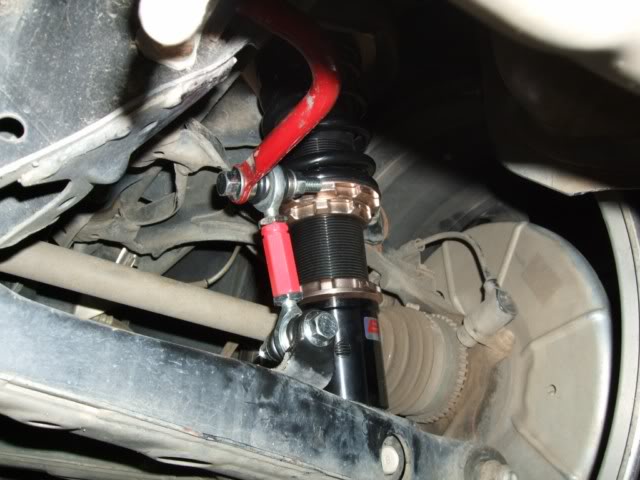
I'd received my Racing Beat sway bar, aluminium support blocks and front+rear End Links during the week so I took advantage of the rear wheels being off and installed the rear end links too. I decided to used the Racing Beat end links instead of the 949racing end links because the latter simply don't exist at this time and it is unknown when they will be available. The Racing Beat end links are not as simple to adjust as the 949racing endlinks though
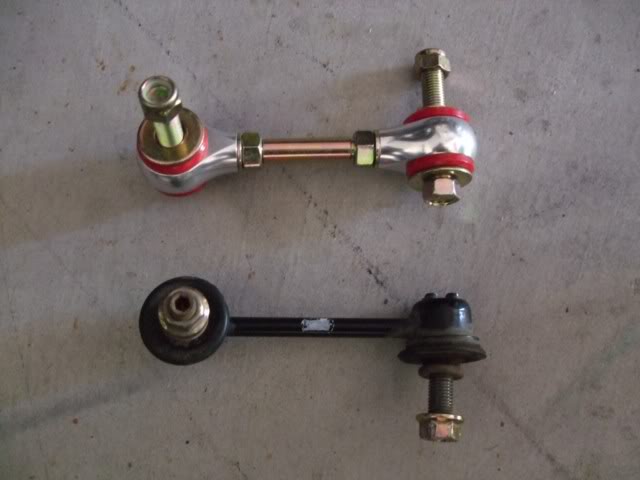
Rear Racing Beat end link vs OEM end link - to adjust these you need to turn the two nuts on the shaft AND spin the ends so you really need to take them off to adjust them:
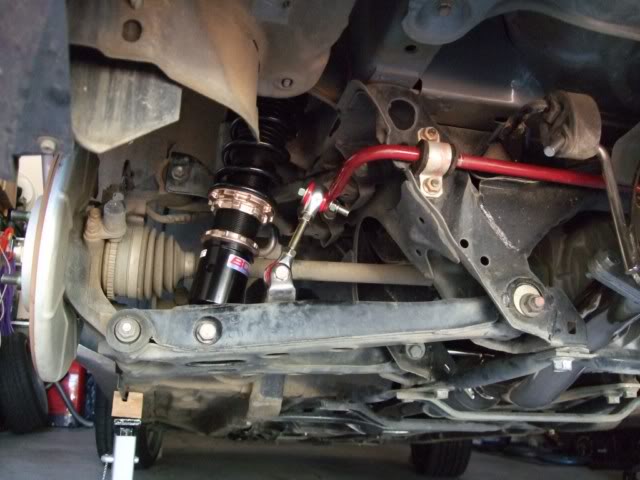
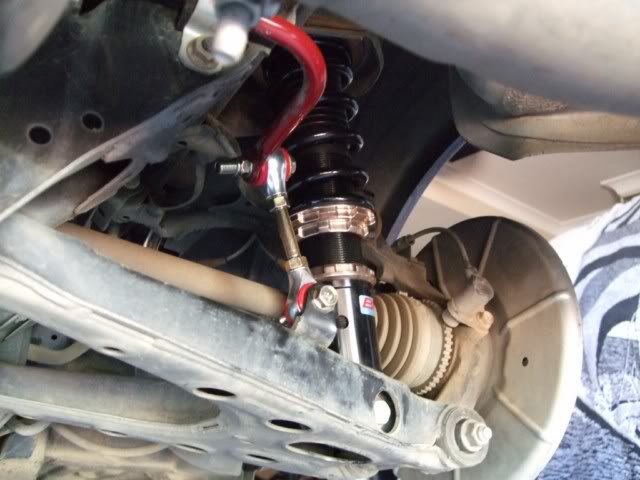
Installed (love the look of the BC coilovers - pity no-one gets to see them but me):
It was about 3:00pm so I decided I had time to fit the front Racing Beat sway bay, aluminium support blocks and end links. That's where the "fun" really started.
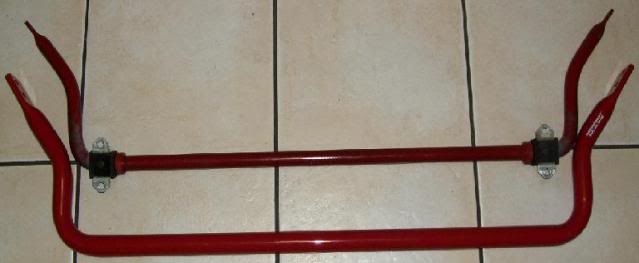
SE OEM sway bar vs Racing Beat sway bar:
I couldn't unbolt the lower driver-side end-link, it was seized so hard that turning the ratchet simply started stripping the nut so I stopped that immediately (yes, I was turning anti-clockwise). I couldn't undo this either when I installed the coilovers and unbolted the top one instead.
The second problem I encountered was unbolting one of the OEM sway bar's retaining bolts on the driver's side. The intercooler pipe is in the way so it took forever to unbolt that bolt. This SHOULD have been a warning to me since the Racing Beat way bar's bracket requires a MUCH longer bolt. With great difficulty, dexterity and swearing I managed to thread out the existing sway bar - the intercooler pipe on the driver's side made it extremely difficult to get out - another early warning that I did not heed. The Racing Beat sway bar is much thicker than OEM sway bar so after MUCH more swearing, difficulty and dexterity, I managed to thread it into place, once again the intercooler pipe causing lots of headaches. I bolted the passenger side sway bar and aluminium block in place with no hassles but could only fit one of bolts on the driver side and at this point realised that the bloody intercooler pipe was going to have to come off - there is just no way around it. This requires the removing front clip which I REALLY hate after doing it twice already (once to fit the intercooler and once to relocate the Nautilus air horn). It was getting dark by then and I was getting hungry so I decided to put it off until next weekend (I'm not quitting, I've just slowed down a bit).
So here's my tip on installing the Racing Beat sway bar in an SE:
REMOVE THE BLOODY INTERCOOLER PIPE BEFORE YOU START!
For now I've zip-tied the two ends of the sway bar to the suspension brace so there's no load on it and I'm going to limp to the nearest garage to see if they can remove that lower driver-side bolt on the end link. If I try it again I know I'm just going to strip the nut completely.
So are there any issues/concerns about driving "sans sway bar"? I plan on driving very cautiously to the closest garage.
Originally posted by Lokiel, Mon Aug 23, 2010 2:12 pm[
Ahhh, that explains why you never warned me about the bloody intercooler pipe.
Did you use the softest setting and have you played around between the two? If so, which do you prefer?
Originally posted by zorak, Mon Aug 23, 2010 2:45 pm[
I emailed them about which hole to use - I use the stiffer setting but haven't tried the softer setting yet...
We suggest you use the inner hole when first installing your sway bar.
This hole setting offers the stiffer setting for the bar and is should
provide more understeer than the outer hole position.
Have a bit of suspension understeer it typical the safer approach, if
you go into a corner to hard the nose of the car will push outwards,
requiring to lift off the throttle to steer through the turn. Oversteer
will allow the rear end of the car come around during cornering, which
requires more skill and finesse to successfully undertake.
Best Regards,
Jim Langer
Racing Beat, LLC.
714-779-8679
http://www.racingbeat.com
Originally posted by Lokiel, Mon Aug 23, 2010 3:28 pm[
Thanks for that info. Zorak.
What front/rear height are you using on your BC coilovers and what size rims plus tyres are you using on your 6ULs?
Originally posted by Lokiel, Sat Aug 28, 2010 8:16 pm[
I finally finished the sway bar install today, thanks to Beaurepaires for removing that stubborn end link nut. Unfortunately they insisted on installing the original end links since they considered Gina unsafe to drive and wouldn't let me take her home without them in place.
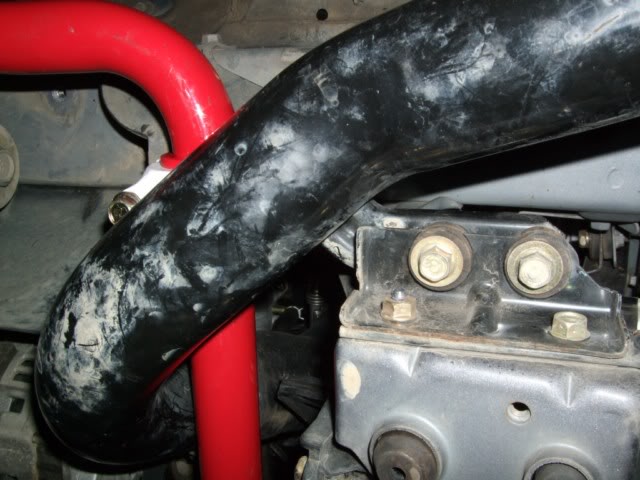
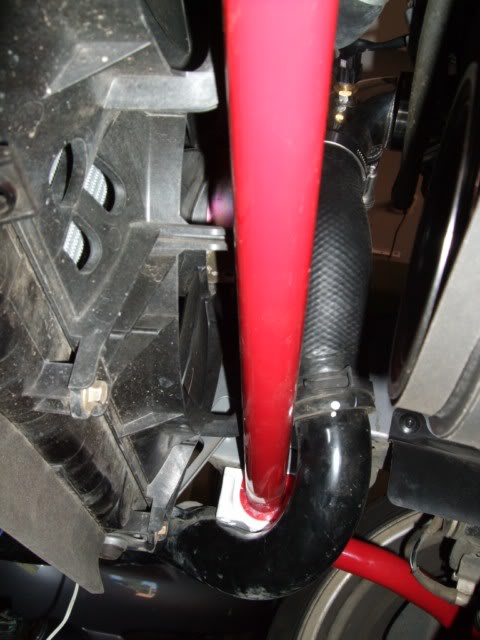
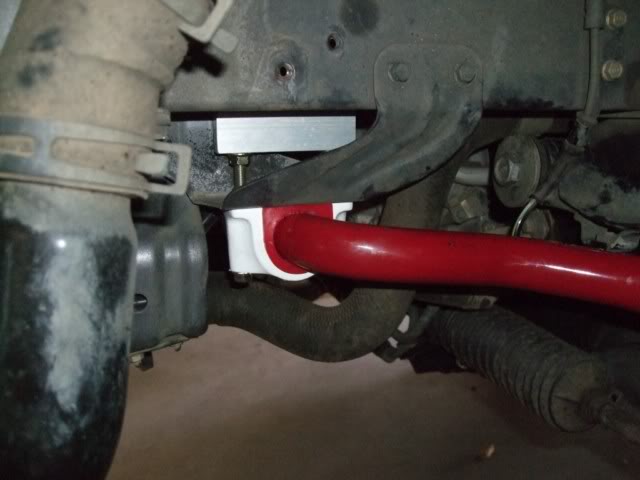
The following two pictures show how the intercooler pipe obscured the Racing Beat sway bar bracket (the white bracket), preventing me from inserting one of the bracket bolts:
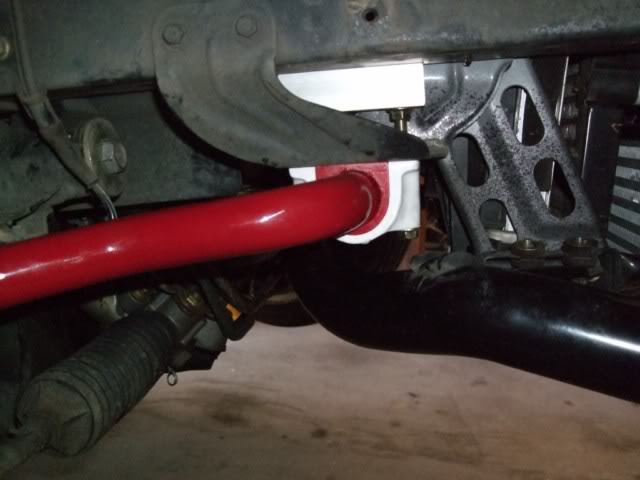
Here's a couple of shots (driver and passenger side) of the installed Racing Beat sway bar and aluminum brace blocks:
Unfortunately the nuts holding the aluminium blocks against the chassis AREN'T metric which is odd given that the bolts themselves are.
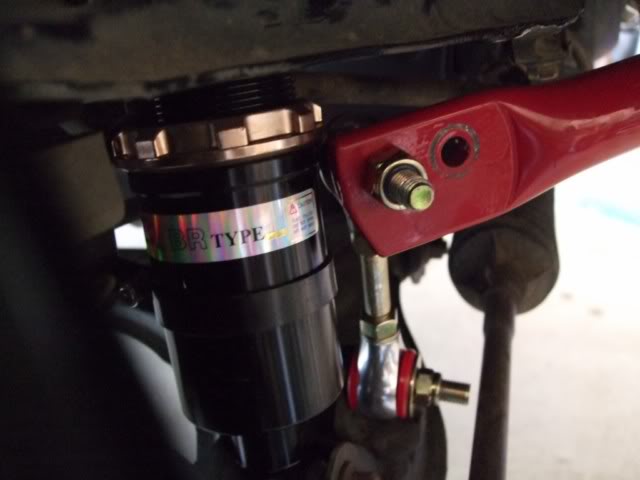
Driver's side shot of the sway bar and end link:
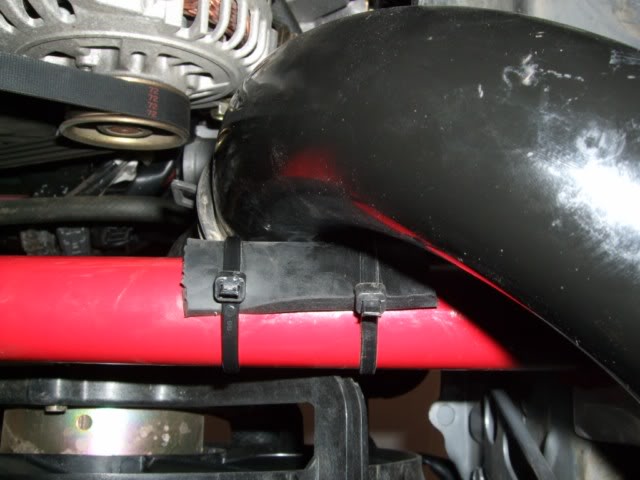
When everthing was all tightened up I thought that the intercooler pipe was a little too close to the sway bar and decided to insert some rubber padding between them to ensure that there was no chance of the two banging together when driving over rough ground (zip ties, what would we do without them?).
That rubber pad is wedged in there quite hard, that's how close the sway bar and intercooler pipe are.
I used the softest sway bar setting (ie. the front hole) so will HAVE to give it a decent windy road test to see how she handles - Mt. Glorious, here I come.
Originally posted by MINX, Sun Aug 29, 2010 7:01 pm[
Well done.
That is my next job. Thanks for the info.
Originally posted by Lokiel, Sun Aug 29, 2010 11:14 pm[
Now that I've done it, I think that it MAY not be necessary to remove the front bumper assembly to get the intercooler pipe out of the way, and if you can avoid that, do it because removing the bumper is a pain in the A**E and takes forever to disassemble and re-assemble.
Try doing it this way instead:
1. Get the car raised as high as possible so that you have a lot of wriggle-room for the sway bar. I bought a larger trolley jack a few weeks ago for this job, the old one only raised to 343mm, the new one goes to 425mm and I always use a block of hardwood on top of it. Now I can use the next notch on my stands and you need the extra height for this job.
2. Unbolt the OEM sway bar and wriggle it out - this is quite a challenge, both mentally and physically. Slide the bar over passenger side hose first then figure out which way is easier to get the bar out over the intercooler pipe. Thankfully there is a decent and high gap betwen the engine and fans which allows you to vertical.
3. If you look at the 2nd picture on this page you can see the OEM clamp connecting the intercooler pipe to its hose (a little south/east of the centre of the photo). With the OEM sway bar out of the way, you SHOULD be able to squeeze it open to separate the pipe from the hose. At this point, replace it with a screw clamp because you may not get it back on when the new sway bar is in place.
4. If you look at the 1st picture on this page, remove those two bolts facing you just right of centre, they hold the intercooler pipe's brace to the chassis. The 3rd photo shows them from the side view.
5. The intercooler pipe is now held only by the rubber hose connected to the intercooler. You should now be able to move the intercooler pipe enough to get it out of the way of the Sway Bar's mounting bracket bolt and it will be a LOT easier to move the new sway bar in place.
Another tip regarding end link removal is to use 6-sided ring spanners, NOT 12 sided ones because the end link nuts will likely be seized and 12 sided ring spanners will strip the nuts. My "El-Cheapo" 6-sided rings spanners worked much better than my expensive ones for this.
Originally posted by Lokiel, Sun Aug 22, 2010 11:34 pm[
After driving around a week with my new BC coilovers, I developed an irrational fear of speed humps after the rear bottomed out on a few of them so I decided to raise the rear end 0.5" above the front as recommended by Davex3 (Keith Tanner from FM recommends 0.5", ranging from 12" front and 12.5" rear to 12.5" front and 13" rear).
When I installed the coilovers, I left them at their original settings since I'm going to replace the rims+tyres soon anyway and didn't want to waste time "dicking about" with them too much. The original settings were in fact Front: 315mm(12.4"), Rear:310mm(12.2") so the rear WAS too low as pointed out above.
Since I was happy with the front I adjusted the rears to 327mm(12.7") - or damn close to that.
I'd received my Racing Beat sway bar, aluminium support blocks and front+rear End Links during the week so I took advantage of the rear wheels being off and installed the rear end links too. I decided to used the Racing Beat end links instead of the 949racing end links because the latter simply don't exist at this time and it is unknown when they will be available. The Racing Beat end links are not as simple to adjust as the 949racing endlinks though
Rear Racing Beat end link vs OEM end link - to adjust these you need to turn the two nuts on the shaft AND spin the ends so you really need to take them off to adjust them:
Installed (love the look of the BC coilovers - pity no-one gets to see them but me):
It was about 3:00pm so I decided I had time to fit the front Racing Beat sway bay, aluminium support blocks and end links. That's where the "fun" really started.
SE OEM sway bar vs Racing Beat sway bar:
I couldn't unbolt the lower driver-side end-link, it was seized so hard that turning the ratchet simply started stripping the nut so I stopped that immediately (yes, I was turning anti-clockwise). I couldn't undo this either when I installed the coilovers and unbolted the top one instead.
The second problem I encountered was unbolting one of the OEM sway bar's retaining bolts on the driver's side. The intercooler pipe is in the way so it took forever to unbolt that bolt. This SHOULD have been a warning to me since the Racing Beat way bar's bracket requires a MUCH longer bolt. With great difficulty, dexterity and swearing I managed to thread out the existing sway bar - the intercooler pipe on the driver's side made it extremely difficult to get out - another early warning that I did not heed. The Racing Beat sway bar is much thicker than OEM sway bar so after MUCH more swearing, difficulty and dexterity, I managed to thread it into place, once again the intercooler pipe causing lots of headaches. I bolted the passenger side sway bar and aluminium block in place with no hassles but could only fit one of bolts on the driver side and at this point realised that the bloody intercooler pipe was going to have to come off - there is just no way around it. This requires the removing front clip which I REALLY hate after doing it twice already (once to fit the intercooler and once to relocate the Nautilus air horn). It was getting dark by then and I was getting hungry so I decided to put it off until next weekend (I'm not quitting, I've just slowed down a bit).
So here's my tip on installing the Racing Beat sway bar in an SE:
REMOVE THE BLOODY INTERCOOLER PIPE BEFORE YOU START!
For now I've zip-tied the two ends of the sway bar to the suspension brace so there's no load on it and I'm going to limp to the nearest garage to see if they can remove that lower driver-side bolt on the end link. If I try it again I know I'm just going to strip the nut completely.
So are there any issues/concerns about driving "sans sway bar"? I plan on driving very cautiously to the closest garage.
Originally posted by Lokiel, Mon Aug 23, 2010 2:12 pm[
Davex3 wrote:I took one look at mine and took it to my local guy to get the sway bar done, took him 3 hours and he knew what he was doing.
You should be right to drive it to them to get it done as they sway bar isn't a vital component to drive the car.
Ahhh, that explains why you never warned me about the bloody intercooler pipe.
Did you use the softest setting and have you played around between the two? If so, which do you prefer?
Originally posted by zorak, Mon Aug 23, 2010 2:45 pm[
I emailed them about which hole to use - I use the stiffer setting but haven't tried the softer setting yet...
We suggest you use the inner hole when first installing your sway bar.
This hole setting offers the stiffer setting for the bar and is should
provide more understeer than the outer hole position.
Have a bit of suspension understeer it typical the safer approach, if
you go into a corner to hard the nose of the car will push outwards,
requiring to lift off the throttle to steer through the turn. Oversteer
will allow the rear end of the car come around during cornering, which
requires more skill and finesse to successfully undertake.
Best Regards,
Jim Langer
Racing Beat, LLC.
714-779-8679
http://www.racingbeat.com
Originally posted by Lokiel, Mon Aug 23, 2010 3:28 pm[
Thanks for that info. Zorak.
What front/rear height are you using on your BC coilovers and what size rims plus tyres are you using on your 6ULs?
Originally posted by Lokiel, Sat Aug 28, 2010 8:16 pm[
I finally finished the sway bar install today, thanks to Beaurepaires for removing that stubborn end link nut. Unfortunately they insisted on installing the original end links since they considered Gina unsafe to drive and wouldn't let me take her home without them in place.
The following two pictures show how the intercooler pipe obscured the Racing Beat sway bar bracket (the white bracket), preventing me from inserting one of the bracket bolts:
Here's a couple of shots (driver and passenger side) of the installed Racing Beat sway bar and aluminum brace blocks:
Unfortunately the nuts holding the aluminium blocks against the chassis AREN'T metric which is odd given that the bolts themselves are.
Driver's side shot of the sway bar and end link:
When everthing was all tightened up I thought that the intercooler pipe was a little too close to the sway bar and decided to insert some rubber padding between them to ensure that there was no chance of the two banging together when driving over rough ground (zip ties, what would we do without them?).
That rubber pad is wedged in there quite hard, that's how close the sway bar and intercooler pipe are.
I used the softest sway bar setting (ie. the front hole) so will HAVE to give it a decent windy road test to see how she handles - Mt. Glorious, here I come.
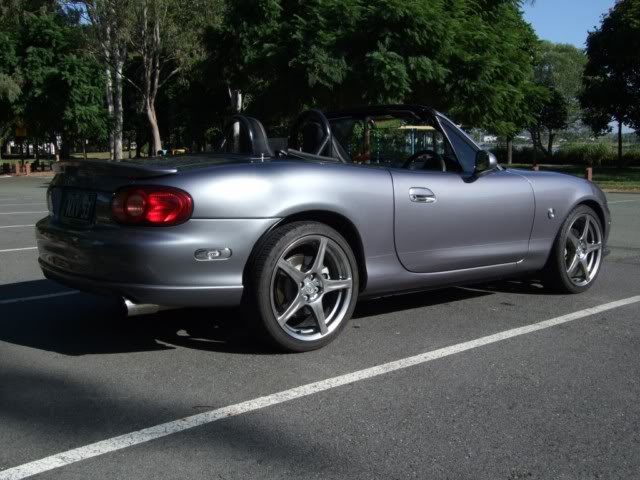
Originally posted by MINX, Sun Aug 29, 2010 7:01 pm[
Well done.
That is my next job. Thanks for the info.
Originally posted by Lokiel, Sun Aug 29, 2010 11:14 pm[
MINX wrote:Well done.
That is my next job. Thanks for the info.
Now that I've done it, I think that it MAY not be necessary to remove the front bumper assembly to get the intercooler pipe out of the way, and if you can avoid that, do it because removing the bumper is a pain in the A**E and takes forever to disassemble and re-assemble.
Try doing it this way instead:
1. Get the car raised as high as possible so that you have a lot of wriggle-room for the sway bar. I bought a larger trolley jack a few weeks ago for this job, the old one only raised to 343mm, the new one goes to 425mm and I always use a block of hardwood on top of it. Now I can use the next notch on my stands and you need the extra height for this job.
2. Unbolt the OEM sway bar and wriggle it out - this is quite a challenge, both mentally and physically. Slide the bar over passenger side hose first then figure out which way is easier to get the bar out over the intercooler pipe. Thankfully there is a decent and high gap betwen the engine and fans which allows you to vertical.
3. If you look at the 2nd picture on this page you can see the OEM clamp connecting the intercooler pipe to its hose (a little south/east of the centre of the photo). With the OEM sway bar out of the way, you SHOULD be able to squeeze it open to separate the pipe from the hose. At this point, replace it with a screw clamp because you may not get it back on when the new sway bar is in place.
4. If you look at the 1st picture on this page, remove those two bolts facing you just right of centre, they hold the intercooler pipe's brace to the chassis. The 3rd photo shows them from the side view.
5. The intercooler pipe is now held only by the rubber hose connected to the intercooler. You should now be able to move the intercooler pipe enough to get it out of the way of the Sway Bar's mounting bracket bolt and it will be a LOT easier to move the new sway bar in place.
Another tip regarding end link removal is to use 6-sided ring spanners, NOT 12 sided ones because the end link nuts will likely be seized and 12 sided ring spanners will strip the nuts. My "El-Cheapo" 6-sided rings spanners worked much better than my expensive ones for this.
Don't worry about dying, worry about not living!
Garage Thread: http://www.mx5cartalk.com/forum/viewtopic.php?f=57&t=76716
- Lokiel
- Forum legend
- Posts: 4126
- Joined: Thu May 28, 2009 2:39 pm
- Vehicle: NB SE
- Location: Brisbania
Re: Lokiel's "Gina" (once a 2004 Titanium SE) Recreated AGAIN
Originally posted by Lokiel, Sun Sep 24, 2017 3:32 pm
Originally posted by Lokiel, Sun Sep 19, 2010 11:28 pm[
I wasn't too impressed with the Racing Beat End Links since it was a real pain to adjust them to ensure that the sway bar had no load on it when the car was sitting on a flat surface. To make large adjustments, you need to jack the car up, undo one end of the End Link to allow a half turn, then you have to bolt it in again and lower the car again to bear weight on the sway bar and then make small adjustments on the end links.
I originally settled for my 3rd adjustment attempt on the front and 2nd adjustment on the rear but wasn't overly happy with them.
During last weekend's Brisbane MX5 Club run, Stuart (aka Minx) had a drive and recommended I use the stiffer setting on the front sway bar so I decided to try that and upgrade to a set of Good-win Racing End Links (see http://www.good-win-racing.com/Mazda-Performance-Part/61-0476NA.html?id=Ns94yibP )
These End Links have a left handed thread end and a right handed thread end so can be adjusted simply by turning the shaft - you don't need to unbolt one end to turn the ring end which allows for much finer adjustments and is a hell of a lot easier.
The only "problem" with these End Links was their colour, I've got enough different colours happening already without adding Baby-Blue, so I painted then Wrinkle Red to match the sway bar's colour:
Here's what they look like fitted (the flash makes then look a bit pink):
Front Right:
Front Left:
Rear Left:
Rear Right:
Adjusting these was simple by comparison to the Racing Beat End Links. With the car on ramps, you can easily adjust the left and right End Links simultaneously with your hands to achieve zero load on the sway bar - they're definitely worth paying a little more for.
Using the stiffer setting on the sway bar (ie. the 2nd hole) reduced the body roll noticeably when "serpentining" (ie. driving and rapidly turning the steering wheel left and right) - MUCH better.
Originally posted by MINX, Mon Sep 20, 2010 9:50 am[
Good to hear Simon.
Looking forward to the arrival of mine.
Don't worry about dying, worry about not living!
Garage Thread: http://www.mx5cartalk.com/forum/viewtopic.php?f=57&t=76716
- Lokiel
- Forum legend
- Posts: 4126
- Joined: Thu May 28, 2009 2:39 pm
- Vehicle: NB SE
- Location: Brisbania
Re: Lokiel's "Gina" (once a 2004 Titanium SE) Recreated AGAIN
Originally posted by Lokiel, Sun Sep 24, 2017 3:32 pm
Originally posted by Lokiel, Tue Sep 21, 2010 11:33 pm[
They're FINALLY here - Toyo Proxes R1R 225x45x15!
I have a set of Nickel 6UL 15x8s on order and decided I wanted 225/45/15 tyres rather than 205/50/15s since they are wider and have slightly less sidewall (they are only 0.03" smaller than the optimal 23" size for an MX5 NB too). Unfortunately the former size is not available in a road tyre here in Australia and Kuhmo V70A 225/45/15s are the only ones available - at A$380 per tyre for what is essentially a track tyre, that's way too expensive for a DD tyre.
Tire Rack in the US didn't have Hankook R-S3 Ventus in stock and had no idea when they'd be available so I decided to purchase Toyo Proxes R1Rs from http://www.treadzone.com since they were available and are better in the wet than the R-S3s (the R1Rs are only US$16 more expensive).
Below is a summary of the saga involved in actually getting these tyres:
25 Aug 2010 Ordered tyres from TreadZone after confirming USPS S&H charges with Joe Specht from TreadZone
26 Aug 2010 Joe Specht from TreadZone sent the tyres, 2 per box.
29 Aug 2010 E-mailed Joe about the status of the tyres, he confirmed they'd been sent on 26 Aug 2010.
03 Sep 2010 Australia Post left a note on my door stating that a heavy package was available for pickup at my local Post Office. I assumed that Australia Post had simply grouped the two boxes of tyres as a single package - boy was I naive back then. The note included a US Postal Service Tracking Number - this number is VERY important.
06 Sep 2010 Rang local Post Office to confirm that the package was available for pickup. They had no record of the package and told me to call the head office. I rang their head office and quoted the USPS Tracking Number. They confirmed that the package DID exist but they had NO idea where it was so I lodged an Investigation number for it.
07 Sep 2010 The package was delived to my home, luckily I was at home, but the driver couldn't give me any information on where it had been for the previous 2 days. Unfortunately there was only one box of tyres, not two as I was expecting. The box had been opened by Australian Quarantine & Inspection Services - ALL imported tyres will be inspected by these guys.
08 Sep 2010 Rang Australia Post about the other missing box of tyres. Australia Post said they couldn't do anything without a Tracking Number - apparently they can't do database searches based on delivery addresses of packages or addressee names - YEAH, RIGHT, must be the crappiest/oldest system in Australia! I then e-mailed "TreadZone" Joe to request the USPS Tracking number for the second package, which he provided the next day.
09 Sep 2010 Informed Australia Post of the USPS Tracking Number and they had no idea where it was so I generated another Investigation number for the missing package. I then rang them every couple of days about the missing tyres but they had no further info.
16 Sep 2010 Received a note in the mail from Australia Poost stating that the tyres were in Brisbane, that I needed to pay Customs Duty on them and details about which forms needed to be completed.
17 Sep 2010 Completed the required forms and e-mailed scanned versions plus details of the tyres and proof of ID to Customs along with a brief cover note explaining the purchase. 15 minutes later, the customs guy rang me and stated that since the goods themselves were less than A$1,000 that I didn't need to pay any Duty so he'd rip up my forms and release the goods.
20 Sep 2010 Australia Post left a note stating that they'd tried to deliver the tyres and that the goods were awaiting collection at the local Post Office - Yeah, right, I'd heard that before.
21 Sep 2010 Rang the local Post Office to confirm that the tyres were actually there - they were, WOO HOO! Picked them up during my lunch hour.
So to sum up what I now know about importing tyres/goods into Australia:
1. Make sure that the sender does NOT include S&H costs in the cost of the goods declaration when they ship them - this is why mine were held because the total cost of the 4 tyres plus S&H was US$1045.
2. Make sure that the sender provides you with the Tracking Number of the goods shipped. Without this number, Australia Post will NOT be able to help you track your package. Knowing this Tracking Number allows you to track it too via the USPS or whoever shipped it,
3. Make sure that you keep goods under A$1,000 to avoid customs duty hassles. Split your goods into multiple packages if necessary to ensure this and ship the packages a few days apart and to different addresses.
4. Australia Post SUCK big time. If you don't have a package Tracking Number they're useless, and even if you do have it, this does not guarantee that they will know where it actually is.
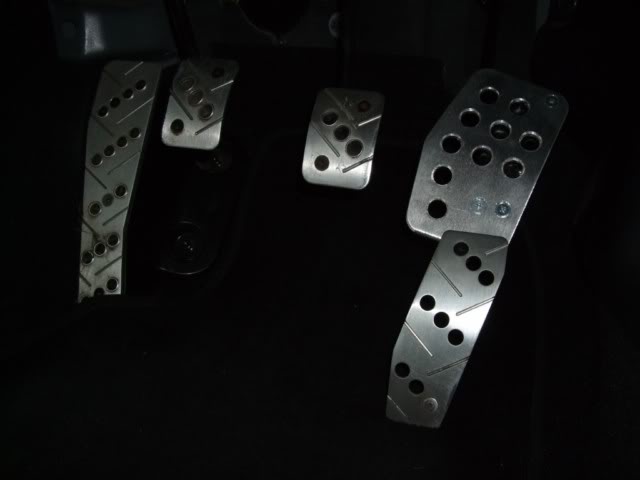
Originally posted by MINX, Wed Sep 22, 2010 3:46 am[
Glad you have finally got your hands on them.
Your garage must smell great.
Now you just need some rims
Then you can toast them at the motokhana day
Originally posted by Lokiel, Wed Sep 22, 2010 12:08 pm[
I've enrolled in an "Advanced Origami" class and am planning to upgrade my OEM airbags with these matresses at some stage.
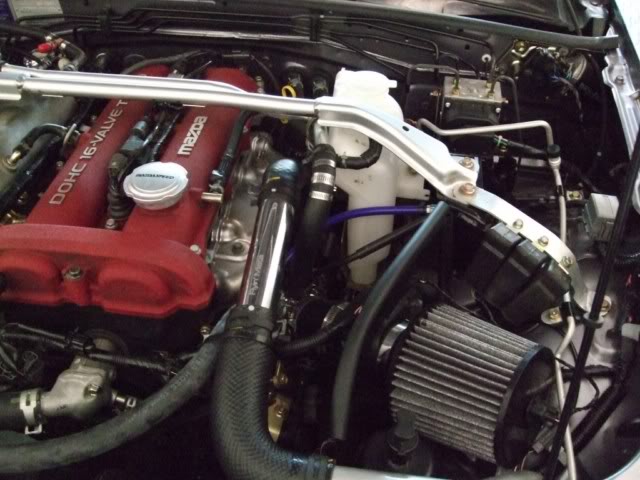
With these babies in place, I can attack even hair-pin bends at ludicrous speeds, safe in the knowledge that even if I crash, I will walk away safely.
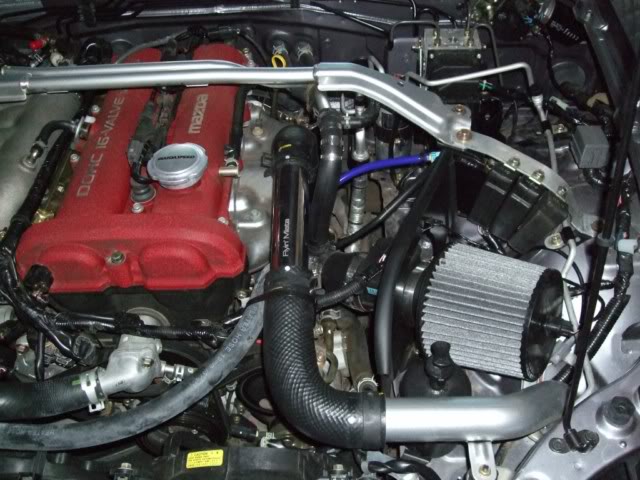
Originally posted by MINX, Wed Sep 22, 2010 12:10 pm[
Wow, your an Ideas Man.
Originally posted by Lokiel, Tue Sep 21, 2010 11:33 pm[
They're FINALLY here - Toyo Proxes R1R 225x45x15!
I have a set of Nickel 6UL 15x8s on order and decided I wanted 225/45/15 tyres rather than 205/50/15s since they are wider and have slightly less sidewall (they are only 0.03" smaller than the optimal 23" size for an MX5 NB too). Unfortunately the former size is not available in a road tyre here in Australia and Kuhmo V70A 225/45/15s are the only ones available - at A$380 per tyre for what is essentially a track tyre, that's way too expensive for a DD tyre.
Tire Rack in the US didn't have Hankook R-S3 Ventus in stock and had no idea when they'd be available so I decided to purchase Toyo Proxes R1Rs from http://www.treadzone.com since they were available and are better in the wet than the R-S3s (the R1Rs are only US$16 more expensive).
Below is a summary of the saga involved in actually getting these tyres:
25 Aug 2010 Ordered tyres from TreadZone after confirming USPS S&H charges with Joe Specht from TreadZone
26 Aug 2010 Joe Specht from TreadZone sent the tyres, 2 per box.
29 Aug 2010 E-mailed Joe about the status of the tyres, he confirmed they'd been sent on 26 Aug 2010.
03 Sep 2010 Australia Post left a note on my door stating that a heavy package was available for pickup at my local Post Office. I assumed that Australia Post had simply grouped the two boxes of tyres as a single package - boy was I naive back then. The note included a US Postal Service Tracking Number - this number is VERY important.
06 Sep 2010 Rang local Post Office to confirm that the package was available for pickup. They had no record of the package and told me to call the head office. I rang their head office and quoted the USPS Tracking Number. They confirmed that the package DID exist but they had NO idea where it was so I lodged an Investigation number for it.
07 Sep 2010 The package was delived to my home, luckily I was at home, but the driver couldn't give me any information on where it had been for the previous 2 days. Unfortunately there was only one box of tyres, not two as I was expecting. The box had been opened by Australian Quarantine & Inspection Services - ALL imported tyres will be inspected by these guys.
08 Sep 2010 Rang Australia Post about the other missing box of tyres. Australia Post said they couldn't do anything without a Tracking Number - apparently they can't do database searches based on delivery addresses of packages or addressee names - YEAH, RIGHT, must be the crappiest/oldest system in Australia! I then e-mailed "TreadZone" Joe to request the USPS Tracking number for the second package, which he provided the next day.
09 Sep 2010 Informed Australia Post of the USPS Tracking Number and they had no idea where it was so I generated another Investigation number for the missing package. I then rang them every couple of days about the missing tyres but they had no further info.
16 Sep 2010 Received a note in the mail from Australia Poost stating that the tyres were in Brisbane, that I needed to pay Customs Duty on them and details about which forms needed to be completed.
17 Sep 2010 Completed the required forms and e-mailed scanned versions plus details of the tyres and proof of ID to Customs along with a brief cover note explaining the purchase. 15 minutes later, the customs guy rang me and stated that since the goods themselves were less than A$1,000 that I didn't need to pay any Duty so he'd rip up my forms and release the goods.
20 Sep 2010 Australia Post left a note stating that they'd tried to deliver the tyres and that the goods were awaiting collection at the local Post Office - Yeah, right, I'd heard that before.
21 Sep 2010 Rang the local Post Office to confirm that the tyres were actually there - they were, WOO HOO! Picked them up during my lunch hour.
So to sum up what I now know about importing tyres/goods into Australia:
1. Make sure that the sender does NOT include S&H costs in the cost of the goods declaration when they ship them - this is why mine were held because the total cost of the 4 tyres plus S&H was US$1045.
2. Make sure that the sender provides you with the Tracking Number of the goods shipped. Without this number, Australia Post will NOT be able to help you track your package. Knowing this Tracking Number allows you to track it too via the USPS or whoever shipped it,
3. Make sure that you keep goods under A$1,000 to avoid customs duty hassles. Split your goods into multiple packages if necessary to ensure this and ship the packages a few days apart and to different addresses.
4. Australia Post SUCK big time. If you don't have a package Tracking Number they're useless, and even if you do have it, this does not guarantee that they will know where it actually is.
Originally posted by MINX, Wed Sep 22, 2010 3:46 am[
Glad you have finally got your hands on them.
Your garage must smell great.
Now you just need some rims
Then you can toast them at the motokhana day
Originally posted by Lokiel, Wed Sep 22, 2010 12:08 pm[
Davex3 wrote:Will be interesting to see how you install those matresses into the car.
I've enrolled in an "Advanced Origami" class and am planning to upgrade my OEM airbags with these matresses at some stage.
With these babies in place, I can attack even hair-pin bends at ludicrous speeds, safe in the knowledge that even if I crash, I will walk away safely.
Originally posted by MINX, Wed Sep 22, 2010 12:10 pm[
Lokiel wrote:Davex3 wrote:Will be interesting to see how you install those matresses into the car.
I've enrolled in an "Advanced Origami" class and am planning to upgrade my OEM airbags with these matresses at some stage.
With these babies in place, I can attack even hair-pin bends at ludicrous speeds, safe in the knowledge that even if I crash, I will walk away safely.
Wow, your an Ideas Man.
Don't worry about dying, worry about not living!
Garage Thread: http://www.mx5cartalk.com/forum/viewtopic.php?f=57&t=76716
- Lokiel
- Forum legend
- Posts: 4126
- Joined: Thu May 28, 2009 2:39 pm
- Vehicle: NB SE
- Location: Brisbania
Re: Lokiel's "Gina" (once a 2004 Titanium SE) Recreated AGAIN
Originally posted by Lokiel, Sun Sep 24, 2017 3:33 pm
Originally posted by Lokiel, Sat Sep 25, 2010 2:32 pm[
I decided that my Twin Hoop Roll Bar's DIY windblocker was looking fairly ordinary and needed something to dress it up a bit:
MINX (aka Stuart) suggested http://www.vinylstickers.com.au so I ordered a LOT in different sizes to see how they'd look and decided on this size in silver:
It must piss off a lot of blokes chasing "Gina" expecting to find a babe behind the wheel and finding this "Studdly Dude" instead
If anyone has a wife/fiance/girlfriend/daughter whose name is Gina and would like a bunch of these vinyl stickers, let me know and I'll send my unused stickers to you (I've got 4 large ones, 2 silver, 2 white, and 5 silver ones in progressively smaller sizes, all in the same font).
Originally posted by Tezzax5, Sat Sep 25, 2010 8:11 pm[
Don't want to sound horrible but it looked better blank..
i think you should of done the rhyming game..
Gina rhymes with....
try W instead of G.... (not the correct spelling but close enough for bogans)
Not out to flame anyone ..."BUT"
tezza (your friendly bogan aussie post worker)
Originally posted by Lokiel, Sun Sep 26, 2010 10:54 pm[
I guess tezzax5 wasn't too happy about my assessment of Australia Post.
Don't worry about dying, worry about not living!
Garage Thread: http://www.mx5cartalk.com/forum/viewtopic.php?f=57&t=76716
- Lokiel
- Forum legend
- Posts: 4126
- Joined: Thu May 28, 2009 2:39 pm
- Vehicle: NB SE
- Location: Brisbania
Re: Lokiel's "Gina" (once a 2004 Titanium SE) Recreated AGAIN
Originally posted by Lokiel, Sun Sep 24, 2017 3:34 pm
Originally posted by Lokiel, Sat Oct 16, 2010 10:27 pm[
I've been wanting to get rid of the OEM front strut brace with its integrated and convoluted oil catch can set up for a while now and replace it with something more efficient and "clean". The SE's oil catch can is known to fail miserably when the car is boosted over 12psi (some have reported this even at 10psi), so that's another reason to get rid of it.
I bought a TrackDog Oil Catch can and Beatrush front strut brace to replace the OEM front strut brace and integrated oil catch can. The Beatrush strut brace is only 1.3kg vs the OEM strut brace which is about 4.7kg, mostly due to the OEM brace's brackets being made of steel, so I've saved a few kgs there.
TrackDog Oil Catch Can, drainage valve closed (looks a bit like a B-grade movie robot):
TrackDog Oil Catch Can, drainage valve open (here it's in "exterminate" mode):
The Beatrush front strut brace originally had a gold finish on its brackets but I thought they'd look better in Wrinkle Red to roughly match the rocker cover (and because I had an almost full can of Wrinkle Red left after doing the end links):
When mounted, you can see that that the Beatrush brace appears off-centre from the shocks - I assume that this is to ensure that it clears the hose between the manifold and rocker cover since the Beatrush brace sits lower than the OEM strut brace.
Finding a place to mount the TrackDog Oil Catch Can was governed by the requirement to be able to access the oil drain valve, thankfully I was able to use the space, and existing bolt holes, of the relocated washer bottle (circled in pink below):
I made a bracket from some checkerboard aluminium scrap I had (never throw out anything potentially useful!):
The bracket is probably a little too chunky, but it'll do for now.
The last job was figuring out where/how to mount the three relays that were originally mounted on a bracket between the OEM front strut brace and chassis (after the AEM CAI install). I had a short length of thin, 25mm wide, aluminium from another job that I figured I could bend somehow into a bracket. I didn't have enough for a trial-and-error approach so grabbed my near-empty box of Vita-Brits and cut it into several 25mm wide strips to try several different brackets and mount points. The best solution was to mount the relays parallell to the DIAGNOSIS box (grey box behind bracket in 1st photo below) on the port side and use angled bends to allow the bracket to mount to existing 10mm bolts - worked out quite well IMHO. I may buy a sandblaster next and sandblast the aluminium brackets to produce a more professional finish.
And here's the finished install - much tidier (need to replace those blue silicon hoses, they look "out of place"):
Originally posted by MINX, Sun Oct 17, 2010 9:17 am[
Great job Simon.
Great work on that relay bracket.
Good to see someone that does things with pride and care.
Originally posted by Lokiel, Sun Oct 17, 2010 10:40 am[
The relay wires are quite short and there's not many existing mount points available so there's not a lot of options regarding how/where to mount the relays unless you're prepared to lengthen the wires - I wasn't. In the end, this was a very simple and practical solution which is why I posted so many pictures of it. Hopefully others may find it useful and save them time manufacturing it; it took me a while to arrive at this solution and simple solutions are usually the best.
Don't worry about dying, worry about not living!
Garage Thread: http://www.mx5cartalk.com/forum/viewtopic.php?f=57&t=76716
Who is online
Users browsing this forum: No registered users and 71 guests