97 MXV's NA8 Gender Transformation

Chat to do with your MX5/Miata/Eunos Garage Ride(s).

Moderators: timk, Stu, zombie, Andrew, The American, Lokiel, -alex, miata, StanTheMan, greenMachine, ManiacLachy, Daffy

97 MXV
Racing Driver
Posts: 1052
Joined: Sun Oct 07, 2012 10:51 am
Vehicle: NA8
Location: Brisbane Southside

97 MXV's NA8 Gender Transformation

Postby 97 MXV » Sat Apr 01, 2017 6:31 am

Scoop !....the world's 1st ever MX5 Sex Change Operation posted up today April 1st 2017.
What if I start you up on some visuals and a bit of a garage chat about Jinba Ittai which has led to this Aussie innovation ?
To be perfectly frank, today is the day to have that Bit of a Chat about Jinba Ittai.
Image ? Image

This bit of a chat begins with Darth, (as in Darth Vader) or Stealth, the names I gave my previous faithful horse, a black beauty that I imagined struck fear in the hearts of men.
A no bling NA8 thoroughbred black stallion that was built to function for my growing need for speed more like a fearless ninja warrior than some cute chick magnet thingy.

Image

I did everything I could to de-bling it, to darken it, even smoking the indicator lights before removing the optional JDM rumble seats.

Image

I ensured no detail could possibly appeal to stereotypical hair dressers....It was totally "Black Tuned" to reflect its dark side.
Riding with Darth I could imagine myself a proud macho warrier grooming a horse not hair dressing others.
Imaging faking First Prize with uncompromising Aussie style Jinba Ittai, horse and rider as one with the Japanese connection forged closer by a demonstrated love of train travel.

But today is the day for Darth to come out, to reveal its sex change from a stallion to a mare ! From crossing over the fine line between the pain of being raced to the pleasure of being RICED !
Darth had to endure the pain of being parted out with little pieces of its heart taken, leaving its body/chassis legal identity intact ready for a root and branch makeover of breathtaking proportions.
Revealed today is a gender transformation, but other days will bring a total transformation to a fully fledged Frankenstein Model NA8B stripped of its dark matter, and Green RICED rather than "Black Tuned".

Given these facts of life, it is possible to imagine a more feminine form of this creature's future....this creature of mine I call....Sparkley
To get your creative juices flowing, just Recomission the Tardis to go back to the future to see a Gender Transformation from a noble Black Knight to a Subversive Sparkley.
Thanks to Dr Who theme music and Photoshop,use this Vision of the Future to subvert all male senses and imagine feminine delight without a hint of pink. 8)

ImageImage
Before-After Side by Side Comparison with Yin-Yang philosophy dominating Le Chatelier's principle right here in this 1997 SR Limited Eunos Roadster.

Sparkley's Past:
Image

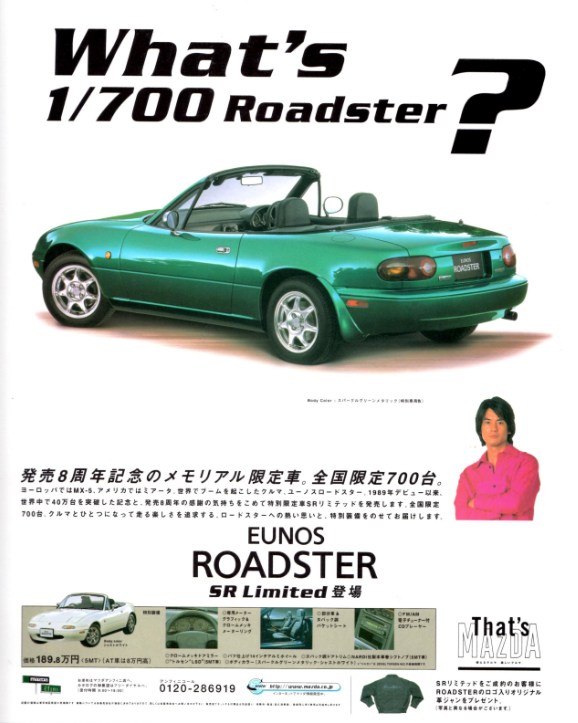
The SR Limited Roadster was a true limited edition, with only 700 manufactured. The signature colour scheme of the SR Limited was Sparkle Green, a left over Astina colour.
The defining specification of the SR Limited Roadster being the Sparkle Green colour and the chrome mirrors and wheels and Momo drivers airbag.
But underneath it was unique in combining a 1.8 BP engine with a 4.3 Torsen 2 limited slip differential and a lightweight flywheel, the pinnacle of Jinba Ittai art prevailing at the time.
The SR Limited was the NA series runout model, and only about half of the 700 were produced in Sparkle Green. (The other half were painted with a mix of all left over colours which physics tells us conveniently turns out to be the colour white).
Sparkle Green was also used along with plastic wood in the 1997 MX5 Berkely sold in the UK. Again only about 400 of these were sold. No Miatas were sold in Sparkle Green.
So in total, I am guessing less than 800 Sparkle Green MX5/Roadsters were sold, making them somewhat a rarity for those interested in such things a thing of beauty and joy forever.

Those Wheels
It took grit and determination to strip away the darkness from rare super lightweight 15 x 7 Enkei LM8s classic style banana rims. I was also determined not to go bigger than 15 inch wheels, particularly when polished. It is a fine line between classic polished rims and "boom boom chromies" and 15 x7 inch is my fine line between visual pleasure and pain and limit for unsprung weight in a road/track NA.

Image

I was stunned when months later and $600 poorer, 4 beautiful things came back from the polisher so bright and shiny that even Liberace would be green with envy.
BTW Subversive Sparkley is also Safe Sparkley because with the change to shiny Enkies it became my duty to manage their magnetic attraction.
Painstaking research of past incidents finally discovered the hidden danger for passengers adorned in long flowing scarfs or bandanas.
Therefore an immediate ban was placed on obviously disappointed Swedish soccer fan passengers left behind sorry, by neck saving Duty of Care considerations.

In the Right Gear
So after deep consideration I have established the only special gear I will need to wear in Sparkley will be a cheesecutter cap, something I would have been so ashamed of in times past, but the safest way to ensure that Sparkley is more a Chick Magnet, than a Police Magnet.
This traditional hair covering will protect the wearer from those fateful days when the world stops..
When Sparkley resplendent in chrome mirrors is pulled over and dashcams record an Officer and a Gentleman soon to start his engine after a Bit of a Chat !

Image

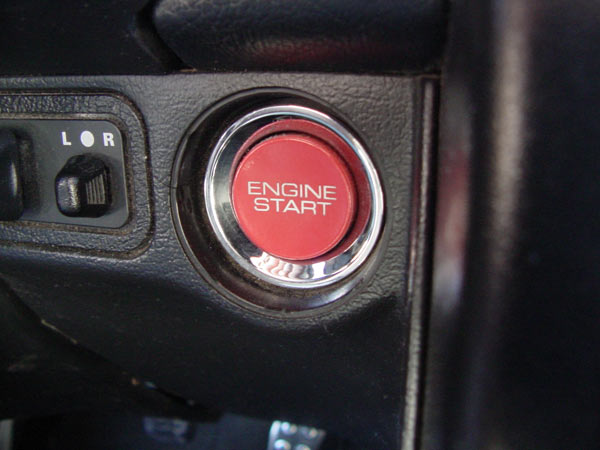
Having stopped, its a matter of starting over again, its a matter of pushing Sparkley's button before the Officer finds the time to find the Fool, find the Fake or fine the Inspiration !
Image

Or looking at it another way and despite Sparkley's operation, that little man is in a car not a canoe and that button is an invitation to get going, to get a grown man started again !

To be continued on a more sensible day with more on that big red button. Mark my words, you'll feel the car come to life under your touch and your face will break into a grin... I promise.

User avatar
LiteIsRite
Fast Driver
Posts: 424
Joined: Mon Apr 08, 2013 8:16 pm
Vehicle: NA6
Location: Northern Rivers NSW

Re: 97 MXV's NA8 Gender Transformation

Postby LiteIsRite » Sat Apr 01, 2017 10:44 am

97 MXV wrote:... the optional JDM rumble seats.

Good one, Keith.
”How you get there is the worthier part.” - Shepherd Book, Firefly
"Cherry" - Classic Red 1990 NA6 :NA6: [sold]

3gress
Racing Driver
Posts: 512
Joined: Tue Apr 14, 2015 6:49 pm
Vehicle: NA6
Location: northern rivers n.s.w.

Re: 97 MXV's NA8 Gender Transformation

Postby 3gress » Sat Apr 01, 2017 8:56 pm

Hi Keith, was the door trim retrofit a success? Any issues post install at all?
My first astina was sparkle green. Not so keen on it initially but grew to appreciate it, with the right contrasting accent colors it can really pop.
Eager to see the progress and will read up on Darth in the meantime.

User avatar
Tony
Racing Driver
Posts: 510
Joined: Sun Apr 11, 2010 6:52 pm
Vehicle: NC
Location: Bathurst, NSW

Re: 97 MXV's NA8 Gender Transformation

Postby Tony » Sat Apr 01, 2017 9:12 pm

97 MXV wrote:Scoop !....the world's 1st ever MX5 Sex Change Operation posted up today April 1st 2017.
'09 NC2

3gress
Racing Driver
Posts: 512
Joined: Tue Apr 14, 2015 6:49 pm
Vehicle: NA6
Location: northern rivers n.s.w.

Re: 97 MXV's NA8 Gender Transformation

Postby 3gress » Sun Apr 02, 2017 4:34 am

While the context of the post regarding date was not lost on me, i have actually worked on this car and was hoping to hear what Keith thought of the work i did for him.
It was a little blinged up when last i saw it :wink:

97 MXV
Racing Driver
Posts: 1052
Joined: Sun Oct 07, 2012 10:51 am
Vehicle: NA8
Location: Brisbane Southside

Re: 97 MXV's NA8 Gender Transformation

Postby 97 MXV » Sun Apr 02, 2017 8:12 am

3gress wrote:While the context of the post regarding date was not lost on me, i have actually worked on this car and was hoping to hear what Keith thought of the work i did for him.
It was a little blinged up when last i saw it :wink:

Hey Dan Sparkley is just about ready to come down to God's Country, Northern New South Wales, to sort you lot out, but Debbie did you over first ! OMG what an incredible event.
Sparkley's not designed for streets like this.

Image

Back on topic, Dan was succonded from NSW for a key aspect of Sparkley's build (now on road) and a change of scenery for his lovely daughter.
Dan stepped up to the challenge to help solve a puzzle that had exhausted the research capabilities of myself and Dr Google. How to fit an NB8B door trim to an NA door without welding. :?:
The NB8A door trim retrofit is a cynch by comparison, but that was the very reason I had to have the NB8B. I wanted to risk blood sweat and tears, but had run out of those years ago.

Dan did not disappoint. Imagine being confronted with a gaping hole in an NA inner door skin where the door opener and handle were supposed to go, an NB8B door trim and part of the inner skin of another NB8B door, a pop rivitor, epoxy, and no advice from me except to say I don't have any spare doors. :shock:
However I did provide some precedent because a Queensland researcher, Chewy had also solved the puzzle on the other door before that research grant ran out.

So the competition was now on to see who did the best install. I left it to both researchers to write up their work, so happy for them to use this thread for that purpose. There are still some further adjustments to get them to concours, but still looking pretty good.
Also I would like to thank thehillsarecalling for providing FOC the NB8B door skins all the way from South Australia.
All I can say is it is a big job and don't try this at home. The NB8A trims are much easier and here are some I prepared earlier !

97 MXV
Racing Driver
Posts: 1052
Joined: Sun Oct 07, 2012 10:51 am
Vehicle: NA8
Location: Brisbane Southside

Re: 97 MXV's NA8 Gender Transformation

Postby 97 MXV » Tue Apr 04, 2017 7:17 am

Just recapping, Sparkley has undergone an unusual procedure and transformation which may take time to accept as normal...to not blat an eyelid over.

ImageImage

However using Taxonomy, the science of its classification, we can learn ways to create a place for Sparkley in the community of "normal" ADM MX5s, personal Imports and the "new normal" 15 year plus JDM import Eunos Roadsters.
Scientifically speaking, Sparkley is none of these, nor is it a rebirth or ICV (individually constructed car); it is just Sparkley and only Sparkley, a special treasure coming out from behind the black painted mask I planned as a black body....welcome Sparkley !
He/She was collected One Piece at a Time with approved essential 1997 SR Limited parts from MX5 Plus, a JDM parts import business owned at the time by my brother Richard.
As part of the replacement shell repair of an 1990 ADM MX5, I was forced to provide Government inspection authorities with all receipts of body parts used.
(Big thanks to C-Gazer for contributing the awesome song link which cites the importance of those receipts. :D )

The SR Limited Body
The body, a repainted black 1997 SR Limited shell, was recognized by Qld Authorities over 15 years ago as a way to repair a 1990 ADM MX5, that was not a write off, simply by granting it a Surrogate VIN number designated REP for Replacement supported by an exhaustive L01 Certification in lieu of an Australian Compliance Plate.
So sensible was the repair that such means could not last and soon after, no further Replacement VIN's were granted by authorities. Sparkley/Darth was one of the last JDM replacement shells and can easily be found and verified by Qld registration search.
So it happened that the one and only 1990 body part not replaced with 1997 JDM body parts was the ADR Compliant Fuel Filler Neck necessary in Australia for unleaded fuel cars.
Then many years later following a hard life, parts of the shell were parted out and replaced in order for it to re-emerge Sparkle Green, with a full respray of original Mazda Paint Code 11R metallic Sparkle Green, with all traces of black removed, except for remnants left in its Euro style rear garnish and windscreen surround.
Sparkley was then officially inspected to ensure it preserved its identity in all respects as well as for the registration of its "new colour".

Agonizing Decisions Upfront
Sparkley's front bar has turned out like this:

Image

However one of the parts originally collected from MX5 Plus was a rare prized Mazdaspeed A-Spec Type 1 Front Bar like this one.

Image

I agonized about parting with it because you don't see many wide mouth openings these days. In the end I decided to stick with a blinged up standard opening until the day I actually need more cool air entry.
Even with a number plate, an Il Motorsports grill, lights I never have to turn off, and fancy lightweight tow hooks from bear2230 all sitting in that cute little mouth, cooling so far is not an issue.

Image

Interestingly the round lights generated worthwhile comment:
hks_kansei in another thread wrote:They look like generic driving/fog lamps.
You can buy them at most auto shops, ebay, etc.
If you want to use them as a daytime light then make sure you buy dim ones, Driving lights are like high beams and WILL just annoy other road users.
Fogs being used when it's not foggy/raining can get you a fine in some states. (and driving lights can when used without high beams)
Also be aware that the cheaper ones tend to be crap at beam control,

To think I avoided all these issues with a simple solution by ignoring the installation instructions to wire them in.
Consequently they now function to a precise targeted specification with exceptional reliability by delivering a zero probability of failure on demand from a well hidden switch similarly configured. Just goes to show bespoke lights could function in ways not normally accepted.

Image.

The clear indicators came without the bayonet receptacles for the parking light bulbs. Thanks and mainly free parts went to C-Gazer as motivation to machine bayonet receptacles into the lights plastic housings so very neatly and professionally. They look so cool, but I panic I have no spares lying around.

Initially a Garage Vart front lip was lovingly collected. However the more subtle appearance of the OEM lip carried the day and the GV lip sold to enthusiastic response...
GV lips sure are well accepted yet I just could not accept it over the standard OEM spec !
To address this failing I should have instead honoured the poor GV lip another way by putting it to good use mounting it boot wing style !

ImageImage

The Evolution of Banana Spoked Wheels from Watta's to Enkei LM8s
One piece at a time, I collected a heap of 15 x 7 Enkei LM8s's and at the same time was losing a little piece of my heart having to say goodbye to my beloved 15 x7 and 16 x7 Watanabe's.
This is how the Enkei's looked on Darth who used to run much lower than Sparkley now does. Sparkley's higher ride height is to reduce bump stop impact and explore more thoroughly, the designers original intent closer to their specified ride height.
Darth was more interested in sitting closer to the road than the height Sparkley will eventually settle.

Image
Image
Image

Currently Sparkley is sitting at 320 mm front and 330 mm rear using the accepted wheel centre to guard lip dimension method and the Enkei;s are running R888's at 3 deg negative camber front and 3.5 deg negative camber rear setup at home.
I am hoping to push 3.5 deg negative at the front also subject to closer assessment of the thread engagement of the OEM tie rod ends, so am seeking slightly longer tie rod ends to gain more confidence for that change.

Compared to Watanabes:
Enkei LM8s provide much of the classic style with more lightness than gorgeous 15 and 16 inch Wattas my 1st love demonstrated here:

Image15 x 7 Wattas with 195/50 Radials

Image 15 x 7 Wattas with 205/50 R888 Semi Slicks

Image 15 x 7 Wattas with R888 205/50 Semi Slicks

Image 16 x7 Wattas with 205/45 Radials
i
Image 15 x 7 Semi Slick and 16 x7 Radial - 205 Road/Race Watta Combo

Image 15 x 7 Semi Slick and 16 x7 Radial - 205 Road/Race Watta Combo

Sparkley is getting a tighter/lighter tyre/rim spec with much more negative camber. Therefore it is going instead for the 195 Road/Race Enkei Combo.
Accordingly another set of 15 x7 Enkei LM8s rims are waiting to be polished and prepared to take a set of 195/50 Radials. In the meantime Sparkley will run street and track on 195/50 R888s.

A Closer Look at those Enkei's
Here are close up pics of those polished Enkei LM8s rims mounted to Sparkley with steel Watanabe lugs and finished off with new Enkei caps with Enkei logo displayed.

Image Rear-----------------------------------------------Front Image

To fit the bespoke Brembos seen inside the 15 inch rims front and rear, I used quick release fittings and bespoke aluminium caliper mounting brackets. Also the perfect discs needed just happen to be the big 10.6 inch NB8B rotors.
I thought a quick change mounting bracket configuration to fit within the Enkei's would be a great idea, because the sight of Brembo's stopping people in the street is enough to meet one aspect of my required specification.
So far so good, but I have yet to fully performance test this specific Brembo configuration including static heat soak from foreseeable high energy, high speed limits of use.

97 MXV
Racing Driver
Posts: 1052
Joined: Sun Oct 07, 2012 10:51 am
Vehicle: NA8
Location: Brisbane Southside

Re: 97 MXV's NA8 Gender Transformation

Postby 97 MXV » Wed Apr 05, 2017 7:27 am

97 MXV wrote:Sparkley is getting a tighter/lighter tyre/rim spec with much more negative camber. Therefore it is going instead for the 195 Road/Race Enkei Combo.
Accordingly another set of 15 x7 Enkei LM8s rims are waiting to be polished and prepared to take a set of 195/50 Radials. In the meantime Sparkley will run street and track on 195/50 R888s


I will have a bit of a chat later about suspension mods, suffice to say right now I want to have the wheels with much more negative camber whilst having the car supported on springs not bump stops; but with all OEM suspension parts, one cannot have that cake and eat it too...should be an interesting chat.

Now for a bit of a chat about my use of semi slicks verses road radials and that fancy looking "Road/Race Combo", an MX5 with an additional 4 race rims/tyres parading the streets held high for all to see.

Image

Is the rack of race tyres just a pose to create the image of a great driver chasing better times ?
To be perfectly frank, it is a subject I find hard to talk about, but the painful truth is I am just an "improving" driver needing higher levels of safety for myself and others on the track.

For us "improvers', the progressive feel and breakaway and awesome ability to wash off speed once in a skid increase safety levels far beyond that possible with the use of road tyres.
Simply put it means semi slicks are much more fool proof and forgiving for those awkward moments which otherwise unexpectedly can send the car well off the track intended.
For me, semi slicks are there for safety not for speed.

The safety of the tyre rack itself is also worth a bit of a chat sometime also. It was covered in part in another thread some years back, but now it has re-emerged as a possibility in Sparkley's future maybe worth reassessing its future in due course.
For a start it looks like the rack will clash with any rear wings or spoilers. But then again, is a wing or spoiler at the rear of an open MX5 on the track with full height windscreen and mighty "Tall Boy" roll bar and maybe even a wind blocker, just a placebo ?

Image

To Rack On or Rack Off ?....That is the question for another day.

lucmor444
Racing Driver
Posts: 517
Joined: Thu Dec 29, 2016 9:41 pm
Vehicle: NA8

Re: 97 MXV's NA8 Gender Transformation

Postby lucmor444 » Wed Apr 05, 2017 9:16 am

Enjoying the read Keith - what type of roll bar do you have as it looks great.

Magpie
Speed Racer
Posts: 7468
Joined: Fri Feb 11, 2011 12:49 pm
Vehicle: NA6
Location: Purga, QLD

Re: 97 MXV's NA8 Gender Transformation

Postby Magpie » Wed Apr 05, 2017 9:39 am

97 MXV wrote:For us "improvers', the progressive feel and breakaway and awesome ability to wash off speed once in a skid increase safety levels far beyond that possible with the use of road tyres.

As a counterpoint, the extra grip offered by a R Spec tyre increases the chance of reaching the limits of grip... However, increased grip allows you to run more aggressive pads...

You will find that as you improve, you will need to go to a wider tyre/rim combination. Indications are a 205/8 is very good, plus you can get a 225 on an 8" rim. This is the quandary I'm at, changing to 15x8's having a 'small' collection of 15x7's and 15x6.5's to deal with.

3gress
Racing Driver
Posts: 512
Joined: Tue Apr 14, 2015 6:49 pm
Vehicle: NA6
Location: northern rivers n.s.w.

Re: 97 MXV's NA8 Gender Transformation

Postby 3gress » Wed Apr 05, 2017 2:25 pm

Keith...those Brembo upgrades, are you confident they will stand up to the abuse you plan to put them through? I remember you showing me the 'eye catching' hardware and your plans for their use.
Keep us up to date on their performance regarding intended purpose :wink:


Have tools and will travel. Happy to perform more open door hack surgery or the like :twisted:

97 MXV
Racing Driver
Posts: 1052
Joined: Sun Oct 07, 2012 10:51 am
Vehicle: NA8
Location: Brisbane Southside

Re: 97 MXV's NA8 Gender Transformation

Postby 97 MXV » Wed Apr 05, 2017 6:05 pm

lucmor444 wrote:what type of roll bar do you have as it looks great.

I loved it too but Sparkley now runs an MX5 Plus Tall Boy, a full width bar I felt I needed after imagining myself upside down in a soft sand pit at the end of the straight !

Image

The great looking tight double hoop torque box roll bar pictured below was one I designed and had made years ago as the original concept that inspired and launched the MX5 Plus Torque Box range of roll bars. The need for flotation in soft sand pits was not a design consideration at the time, but great looks were.

Image

Its main feature, no diagonal bracing using a torque box cross member seen here after I removed it prior to selling it. It featured an extended rear base beam mount which extended back to the rear spring/shock mount and a front tension strap mount which extended down to the cabin floor.
It this form, the design was too heavy duty for MX5 Plus to commercialise, so was optimised for weight in particular soon after this concept was built.

Magpie wrote:You will find that as you improve, you will need to go to a wider tyre/rim combination
However, increased grip allows you to run more aggressive pads...

Agree re tyre/rim combo but maybe first I should establish benchmark times for the car with 15 x 7's, by sharing track days with a faster driver to help establish if the horse and this rider are as one after all !

In the past I did not find 205/50 tyres giving up under relentless cornering and braking I demanded, so am comfortable in dropping down a size to 195/50 at this stage to see what happens.
Being a smaller mass tyre it might run on average hotter, so making tyre pressures and geometry possibly more critical to even out temperatures across the tyres, once I pick up the pace.
So the hope is I can learn to manage the smaller tyre with a good tyre pressure gauge, a tyre pyrometer, adjustable shocks and sways and much head scratching.
First brainwave is to keep smaller tyres cooler using Brembo brake heat shields :D

3gress wrote:Keith...those Brembo upgrades, are you confident they will stand up to the abuse you plan to put them through? I remember you showing me the 'eye catching' hardware and your plans for their use. Keep us up to date on their performance regarding intended purpose

It is early days, but the quick change caliper mounting system devised is intended to help manage the establishment of levels of stopping performance other than just the already proven performance of stopping people on the street.
I am struggling to find definitive performance limits by searching for actual documented issues, so may need to test significance of issues raised.

lucmor444
Racing Driver
Posts: 517
Joined: Thu Dec 29, 2016 9:41 pm
Vehicle: NA8

Re: 97 MXV's NA8 Gender Transformation

Postby lucmor444 » Wed Apr 05, 2017 9:23 pm

Thx for the history on the roll bar - an impressive design. I have an unfitted MX5 Plus twin hoop bar and am thinking I will use it over the Brown Davis Bar currently fitted to my car. I prefer the aesthetics of the MX5 Plus bar although both bars look good. I do not track my car and am not intending to.

97 MXV
Racing Driver
Posts: 1052
Joined: Sun Oct 07, 2012 10:51 am
Vehicle: NA8
Location: Brisbane Southside

Re: 97 MXV's NA8 Gender Transformation

Postby 97 MXV » Thu Apr 06, 2017 9:07 am

97 MXV wrote:Currently Sparkley is sitting at 320 mm front and 330 mm rear using the accepted wheel centre to guard lip dimension method and the Enkei;s are running R888's at 3 deg negative camber front and 3.5 deg negative camber rear setup at home.
I am hoping to push 3.5 deg negative at the front also subject to closer assessment of the thread engagement of the OEM tie rod ends, so am seeking slightly longer tie rod ends to gain more confidence for that change.

Sparkley's alter ego, Darth was sitting at about 290 mm ride height all round using the accepted wheel centre to guard lip dimension method and ran between 1.5 deg and 1.75 deg negative camber.
With Sparkley more ride height and more negative camber could only come with suspension change.

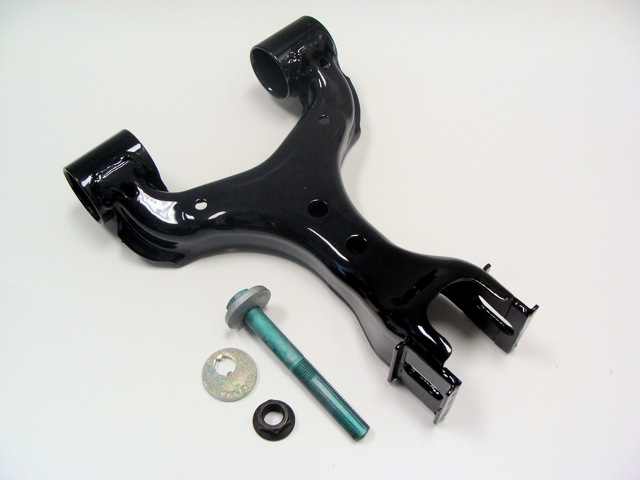
To get 3.5 degrees negative at the back was simple. A rat tail file taken to the upper wishbone to transform at no cost, mounting holes into slots allowing the bolt to slide inwards and be clamped in place of the fixed position standard round hole....easy.
Longer term I can imagine with the spare wishbones collected, also adding adjust-ability via the full OEM eccentric bolt system, used for the inner lower joints, to the upper outer joint.
This is a more stealthy OEM approach than ugly adjustable tubular wishbones that look like fatigue cracks just waiting to happen.

Image

To get 3.5 degrees negative camber at the front, Bauer extended lower ball joints were fitted. However I found 3.5 degrees a bridge too far.

Image

Product Description
Bauer Limited Production camber extending ball joints extend the range of camber adjustment by offsetting the location of the ball joint relative to the bolt that mounts it to the front lower control arm.
See the second gallery image showing the stock Mazda ball joint on the left vs. the BLP on the right illustrating how the axis of the ball joint is shifted away from the center axis of the car by 6mm.
FEATURES:
• range of camber adjustment from -.5° to -3.5° (measured at stock ride height — negative camber increases as ride height is lowered)
• allows street or race camber settings
• manufactured to ISO9001 quality management standards
• sold by the pair


A lower limit of 3 degrees arises in my case from the length of thread engagement left in the tie rod/tie rod end screw joint after steering is aligned straight ahead.
In my case I measured thread engagement at 1.4 times the screw thread diameter (1.4D). This is not significantly different from 1.5D which i consider to have a safe margin for steering.
However if I adjusted to 3.5 degrees negative I would lose about 2mm thread engagement bringing thread engagement down to 1.25D which is significantly less than 1.5D.

Therefore I have deemed in my case that 3 degrees is my target and only an extraordinary amount of care will convince me to go to 3.5 degrees and hell will freeze over before I ventured beyond 3.5 degrees. In short...3 degrees negative is the limit of my tolerance for technical risk of issues with this threaded joint.

A look at my setup:

Image
90 degrees less 87 degrees = 3 degrees negative

Image
OEM Camber Adjustment within standard range

Image
This 26 mm exposed thread is the edge of my comfort zone for reasoning that follows:

I measured NB8B and NA8 tie rods and tie rod ends and found the tie rod ends identical and thread engagement configuration of the tie rods also identical.
Therefore the same limits apply to both NA8 and NB8B. I assume the same applies for NA6 and NB8A also.
The tie rod thread length is nominally 43mm.
Tie rod thread diameter is 12mm
Nut thickness is 10mm

At 3 degrees negative I measured nominally 26mm un-engaged thread, 10mm of which is under the nut, leaving 43 -26 = 17mm engaged thread = 1.4 Thread Diameter engaged.

The thread length we have to work with is 43 mm.
Image Image
------------------------------NB8B-----------------------------------------------------NA8 Power Steer--------------------------

Image
The Baseline is this....One Diameter (1D) Thread Engagement....At 1st glance it is enough given that the a typical nut is only 10 mm....BUT !

It is true that 1D thread engagement is considered enough for threaded joints while things are good and tight. However if the locking nut gets loose, 1D thread engagement will wear out and catastrophically fail much quicker than 1.5D thread engagement.
The potential is real world failure modes of this steering joint with lower than OEM thread engagement. The presence of fine threads suggests that it won't get very sloppy before being able to finally pull out.
Now imagine the steering rack actually not centred properly when the thread is adjusted at the tyre shop. 1D can easily be less than 1D on one side and more than 1D on the other, because it is impossible to see thread engagement directly. It must be inferred and inference can easily lead to error.
Furthermore the locking nut is tensioned against the tie rod end by opposing open ended spanners, the most unreliable spanners and tensioning method imaginable.

Some suppliers advertise negative cambers possible with the Bauer ball joint in excess of 4 degrees negative.It is obvious in my case this is achievable via the remaining OEM adjustment in the inner lower wishbones.
Given what is presented here I warn against an advertised specification beyond 3 degrees negative....some could argue less...few would argue more.
Therefore to support such a specification I believe extended tie rod ends should also be offered by Bauer with the extended lower ball joints as matching pairs.
However if a lower specification is made clear, then I think a proper tool and procedure/instruction/warning to gauge exposed thread and a limit of negative to 3 degrees is enough.

97 MXV
Racing Driver
Posts: 1052
Joined: Sun Oct 07, 2012 10:51 am
Vehicle: NA8
Location: Brisbane Southside

Re: 97 MXV's NA8 Gender Transformation

Postby 97 MXV » Thu Apr 06, 2017 6:23 pm

lucmor444 wrote:Thx for the history on the roll bar - an impressive design. I have an unfitted MX5 Plus twin hoop bar and am thinking I will use it over the Brown Davis Bar currently fitted to my car. I prefer the aesthetics of the MX5 Plus bar although both bars look good. I do not track my car and am not intending to.

I would have kept the twin hoops for sure except I do not want to be taken by a Divine Wind next time the car bulldozes sideways through the sand at the end of Lakeside's main straight balanced on just two wheels with two hoops to save me. :shock:
So twin hoops also not recommended for those wanting to drive MX5s on the beach a lot.


Return to “MX5 Garage Chat”

Who is online

Users browsing this forum: No registered users and 169 guests