lolmx5's NA8

Chat to do with your MX5/Miata/Eunos Garage Ride(s).

Moderators: timk, Stu, zombie, Andrew, The American, Lokiel, -alex, miata, StanTheMan, greenMachine, ManiacLachy, Daffy

lolmx5
Fast Driver
Posts: 128
Joined: Mon Aug 29, 2016 2:28 pm
Vehicle: NA8

Re: lolmx5's NA8

Postby lolmx5 » Tue Jan 17, 2017 5:59 pm

MJT_MX5 wrote:Cars looking great.
I thinking about that OEM boot spoiler for mine.
The car will max out 180km on a long straight.


Bruce on the forums is selling one ATM :)


Sent from my iPhone using Tapatalk

lolmx5
Fast Driver
Posts: 128
Joined: Mon Aug 29, 2016 2:28 pm
Vehicle: NA8

Re: lolmx5's NA8

Postby lolmx5 » Tue Jan 24, 2017 11:57 pm

ok so quick update on whats happening with the car. Started to take apart the engine for the purpose of a major service and to clean the lifters. Ive got most of the parts exposed atm and ready to remove cam shafts so i can get to the lifters.

while taking apart the necessary parts off for timing i found that the front crank seal has failed and a very minor coolant leak at the water pump. This caused oil to collect at the base of the engine i saw it before i told it all off but didn't see how it bad it was till everything was exposed.

here what it looked like

ImageUntitled by lol mx5, on Flickr

ImageUntitled by lol mx5, on Flickr

car had some sort of aftermarket woodruff key, looked way to long for what my replacement part is. (also can see the small coolant leat coming from the bottom of the water pump
ImageUntitled by lol mx5, on Flickr

timing covers have been coated in oil as well so they will be cleaned up before reinstall
ImageUntitled by lol mx5, on Flickr

both thermostat housing and water pump gasket have become very brittle and i was not able to remove them without braking them. these are all getting replaced.
coolant hoses also have become very brittle, i had to cut the mid coolant line out because it would not come off.

ImageUntitled by lol mx5, on Flickr

ImageUntitled by lol mx5, on Flickr
this will be replaced with silicon hoes kit soon :) glad i caught it before it blow up

ImageUntitled by lol mx5, on Flickr

once most things were removed i got the water pump off and cleaned all the gunk off the engine.

ImageUntitled by lol mx5, on Flickr

Everything looks good underneath new seals are waiting to be installed hopefully within a week or so once i complete cleaning all the lifters.

also got around to painting my rear rotors since they started to get surface rust. front rotors had a coat on them from new and looked nice so i decided to do the same to the rear. used high temp paint had gave them a quick sand. makes such a big difference. Someone told me to do this early on and i just got around to doing it now ahah.

ImageUntitled by lol mx5, on Flickr

ImageUntitled by lol mx5, on Flickr

thanks guys ill be sure to keep the updates coming as they happen, been a bit slow but getting back on it now :)

lolmx5
Fast Driver
Posts: 128
Joined: Mon Aug 29, 2016 2:28 pm
Vehicle: NA8

Re: lolmx5's NA8

Postby lolmx5 » Sun Feb 05, 2017 11:15 am

ok so its been a bit since the last update but here we go,

i havent had much progress since last update since ive been really busy and waiting on parts, but ive had time to go along and clean all the lifters on the intake side, (currently doing exhaust side lifters atm as well).

i decided it would be best to do it one at a time, makes it easier to put ever thing back in place when it comes time to reassemble.

followed this little guild i found online tells you how to do it in detail.
https://www.miata.net/garage/hla/cleaning.html

this what how my lifters looked like when i took it apart (engine oil was last changed 1200kms ago)

ImageUntitled by lol mx5, on Flickr

i took them in apart and gave them a little degreaser bath, oil in the lifters was black and looked way older then the engine oil in the car at the time. After a degreaser bath i cleaned it off with brake cleaner and let it soak in fresh engine oil. one it sat for 5 mins in the engine oil reasembled lifter making sure it was as bleed as possible before i put them back in.

ImageUntitled by lol mx5, on Flickr

degreaser bath
ImageUntitled by lol mx5, on Flickr

oil bath
ImageUntitled by lol mx5, on Flickr

also while im here ive order new genuine keys, i had 2 aftermarket keys and well genuine keys are a lot better ahah. i have to get them cut soon.

ImageUntitled by lol mx5, on Flickr

more updates soon

User avatar
smy0003
Racing Driver
Posts: 1870
Joined: Mon Dec 30, 2013 12:35 pm
Vehicle: NA8
Location: Melbourne

Re: lolmx5's NA8

Postby smy0003 » Sun Feb 05, 2017 11:39 am

Very nice, how much did you pay for the keys/where'd you source them?
[b]Then: Sunlight Silver NB8B
Now: Chaste White NA8

lolmx5
Fast Driver
Posts: 128
Joined: Mon Aug 29, 2016 2:28 pm
Vehicle: NA8

Re: lolmx5's NA8

Postby lolmx5 » Sun Feb 05, 2017 11:47 am

smy0003 wrote:Very nice, how much did you pay for the keys/where'd you source them?


got it from amayama, i think it was 53 all up with shipping for both :)

User avatar
smy0003
Racing Driver
Posts: 1870
Joined: Mon Dec 30, 2013 12:35 pm
Vehicle: NA8
Location: Melbourne

Re: lolmx5's NA8

Postby smy0003 » Sun Feb 05, 2017 11:47 am

Good price, much nicer than the Bunnings-style blanks.
[b]Then: Sunlight Silver NB8B
Now: Chaste White NA8

lolmx5
Fast Driver
Posts: 128
Joined: Mon Aug 29, 2016 2:28 pm
Vehicle: NA8

Re: lolmx5's NA8

Postby lolmx5 » Sun Feb 05, 2017 11:49 am

smy0003 wrote:Good price, much nicer than the Bunnings-style blanks.


ahha 100% better

lolmx5
Fast Driver
Posts: 128
Joined: Mon Aug 29, 2016 2:28 pm
Vehicle: NA8

Re: lolmx5's NA8

Postby lolmx5 » Wed Feb 15, 2017 10:58 pm

Ok so where I'm at right now,

Went along and removed all rubber hoses, there were all very crusty and was a big hassle to remove. While working on the heater core I found that the right hose was lose. Now I'm thinking that all that rust and water in the passenger side floor was actually coolant. So I've decided to replace the heater core.

After some research I decided best option would be to go for a nb aluminum heat core and housing to match. Gonna hopefully remove the dash on the weekend and get to cleaning replacing parts.

In turns of engine work, decided to remove the rad ready for replacement to arrive. While removing I found that the ac lines were in the way. From looking at the lines I can tell there aftermarket and just not done with care to how things are put together. I had to remove the right side rad bracket to get the rad out. Now searching for factory ac lines, if I can't find any I will see if I can make some up custom that run along were factory intended (driver side has much more space for lines)

Anyways I've got all new seals in all lifters are cleaned and all rubber hoses removed ready for the new silicon hose kit. Installed water pump and cleaned everything I could and replaced a few bolts and other small things.

Have new water pump gaskets and cooling o ring and have been placed along with the water pump and new pulleys. Decided to go with GMB pulleys.

Used nb heater core, lines and housing
Image

Silicon kit
Image

Image

Old crank seal was oem so that was good to see, new seal has been placed.
Image

Here was the heater core hoes, there were the worst.
Image

Replaced the cas seal and cleaned the surface.
Image

Cams are in and staring to look like an engine again
Image

Replaced the o ring and place the hardline back on
Image

Got new bolts and washers for the cam gears.
Image

Cleaned them up and they turned out great
Image

Next bolted up the water pump with new seals
Image

Then bolted up the thermostat housing with seal
Image

New bolts and pulleys
Image

Image

Placed new spring and cleaned and placed backing plate
Image

Placed cam gears back on
Image

New crank bolt, pulley and key
Image

Placed belt and torqued everything down
Image
More updates to come. I'll update you when somthing new happened


Sent from my iPhone using Tapatalk

speed
Speed Racer
Posts: 3471
Joined: Sun Jan 19, 2014 9:52 am
Vehicle: NA6
Location: Lugarno, Sydney

Re: lolmx5's NA8

Postby speed » Thu Feb 16, 2017 8:18 am

It's looking good.

Would be a good time to fit a coolant reroute and a freeze plug in the front of the motor where the thermostat neck is.

Sent from my GT-I9506 using Tapatalk
NA6 turbo - 140kw atw - not the most powerful but so much fun :D

User avatar
Rolley
Racing Driver
Posts: 564
Joined: Fri Nov 15, 2013 6:59 am
Vehicle: NA6
Location: Brisbane

Re: lolmx5's NA8

Postby Rolley » Thu Feb 16, 2017 8:51 am

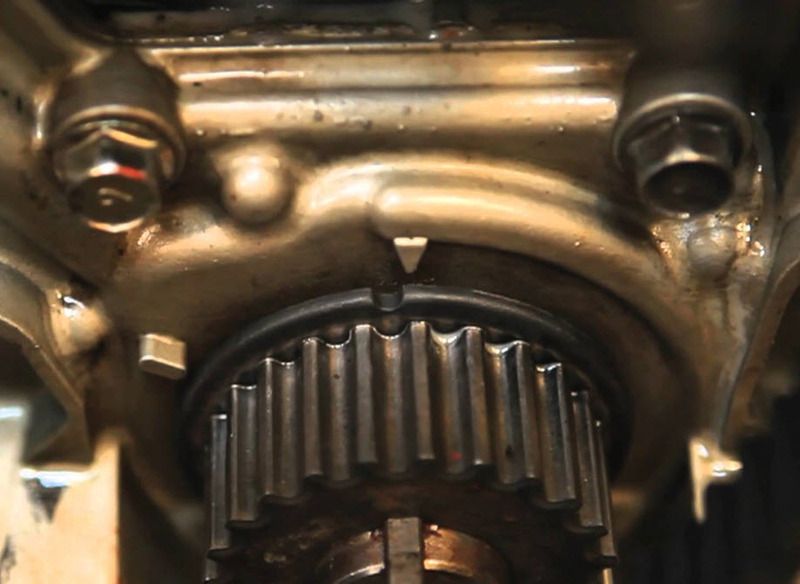
In your last picture is it just the angle its taken from or has the crank timing mark been lined up to the tension mark (around 10 o'clock) instead of the timing mark? (arrow at 12 o'clock)
Image


I just want to save you some time if it's caught now instead of when it runs rough or won't start at all later... The mark at 10 o'clock is where you stop the crank when turning it over by hand and release the tensioner bolt so the spring can put the right tension on the belt before everything gets locked down.

With all the bits and bolts you're replacing this is going to be a new car by the time you're finished! Great work.

lolmx5
Fast Driver
Posts: 128
Joined: Mon Aug 29, 2016 2:28 pm
Vehicle: NA8

Re: lolmx5's NA8

Postby lolmx5 » Thu Feb 16, 2017 8:56 am

Rolley wrote:In your last picture is it just the angle its taken from or has the crank timing mark been lined up to the tension mark (around 10 o'clock) instead of the timing mark? (arrow at 12 o'clock)
Image


I just want to save you some time if it's caught now instead of when it runs rough or won't start at all later... The mark at 10 o'clock is where you stop the crank when turning it over by hand and release the tensioner bolt so the spring can put the right tension on the belt before everything gets locked down.

With all the bits and bolts you're replacing this is going to be a new car by the time you're finished! Great work.


I pulled it back to top dead center as cams were out. I've place the cams to line up with new crank position. I've made sure it was top dead center by taking the spark plug out and using a screwdriver to moved the crank to the correct position.


Sent from my iPhone using Tapatalk

lolmx5
Fast Driver
Posts: 128
Joined: Mon Aug 29, 2016 2:28 pm
Vehicle: NA8

Re: lolmx5's NA8

Postby lolmx5 » Thu Feb 16, 2017 9:00 am

I'll take a new photo of it when I get home ahah


Sent from my iPhone using Tapatalk

lucmor444
Racing Driver
Posts: 517
Joined: Thu Dec 29, 2016 9:41 pm
Vehicle: NA8

Re: lolmx5's NA8

Postby lucmor444 » Thu Feb 16, 2017 9:16 am

lolmx5 - did you use a spray or brush on your rotors?

lolmx5
Fast Driver
Posts: 128
Joined: Mon Aug 29, 2016 2:28 pm
Vehicle: NA8

Re: lolmx5's NA8

Postby lolmx5 » Thu Feb 16, 2017 10:21 am

speed wrote:It's looking good.

Would be a good time to fit a coolant reroute and a freeze plug in the front of the motor where the thermostat neck is.

Sent from my GT-I9506 using Tapatalk


It defiantly would but I don't see the need as this is only gonna be a street car and not gonna be racing it. Maybe one day in the future ahha


Sent from my iPhone using Tapatalk

lolmx5
Fast Driver
Posts: 128
Joined: Mon Aug 29, 2016 2:28 pm
Vehicle: NA8

Re: lolmx5's NA8

Postby lolmx5 » Thu Feb 16, 2017 10:47 am

lucmor444 wrote:lolmx5 - did you use a spray or brush on your rotors?


Sanded then and sprayed them


Sent from my iPhone using Tapatalk


Return to “MX5 Garage Chat”

Who is online

Users browsing this forum: No registered users and 183 guests