Mx5, Chapter 2

Chat to do with your MX5/Miata/Eunos Garage Ride(s).

Moderators: timk, Stu, zombie, Andrew, The American, Lokiel, -alex, miata, StanTheMan, greenMachine, ManiacLachy, Daffy

The American
Forum Guru
Posts: 1525
Joined: Fri Jun 29, 2012 9:23 pm
Vehicle: NB8B - Turbo
Location: Brisbane, Qld. Previously Perth WA
Contact:

Re: Mx5, Chapter 2

Postby The American » Sun Dec 11, 2016 5:28 pm

Magpie wrote:So glad you opted to do the engine mounts and diff at home and not on the dodgy day :)


I would have had to stay the night and get a lift to work on Monday!

Magpie
Speed Racer
Posts: 7468
Joined: Fri Feb 11, 2011 12:49 pm
Vehicle: NA6
Location: Purga, QLD

Re: Mx5, Chapter 2

Postby Magpie » Sun Dec 11, 2016 5:49 pm

The shed has running water, TV, wifi, air con and space to sleep :) If you wanted a lift to work it would have been on the bike...

The American
Forum Guru
Posts: 1525
Joined: Fri Jun 29, 2012 9:23 pm
Vehicle: NB8B - Turbo
Location: Brisbane, Qld. Previously Perth WA
Contact:

Re: Mx5, Chapter 2

Postby The American » Mon Dec 19, 2016 10:55 pm

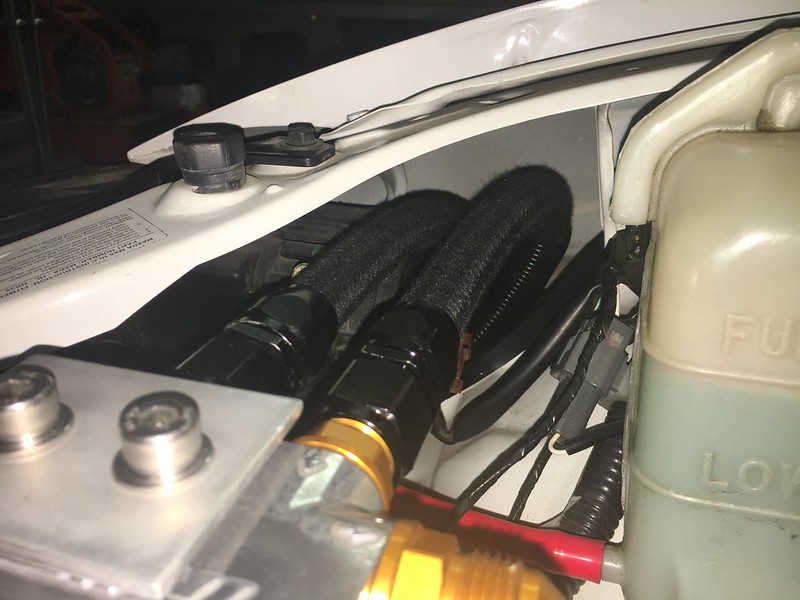
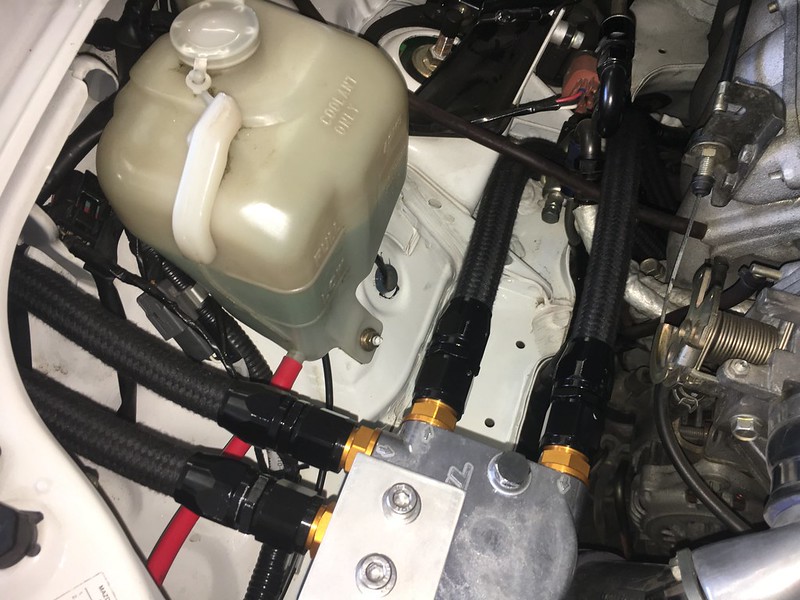
I've been working on my own interpretation of the fog light/front wing oil cooler and filter relocation kit. I was inspired by Lokiel's effort and he helped short cut some of my hardware purchases with the details of what he'd used.

I'm not finished yet, and I have not documented with the precision and detail you'll find in Lokiel's thread, so make sure to read there if you're planning something similar!

Image
Image
Image
Image


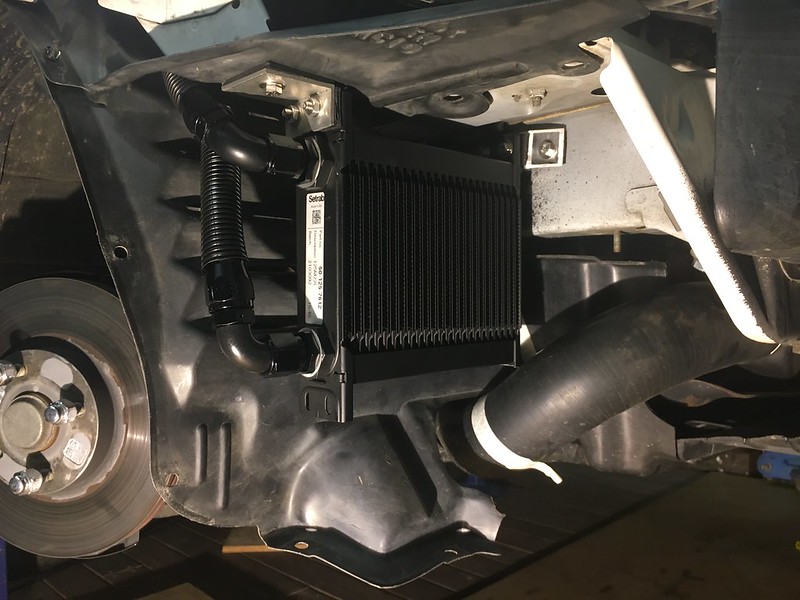
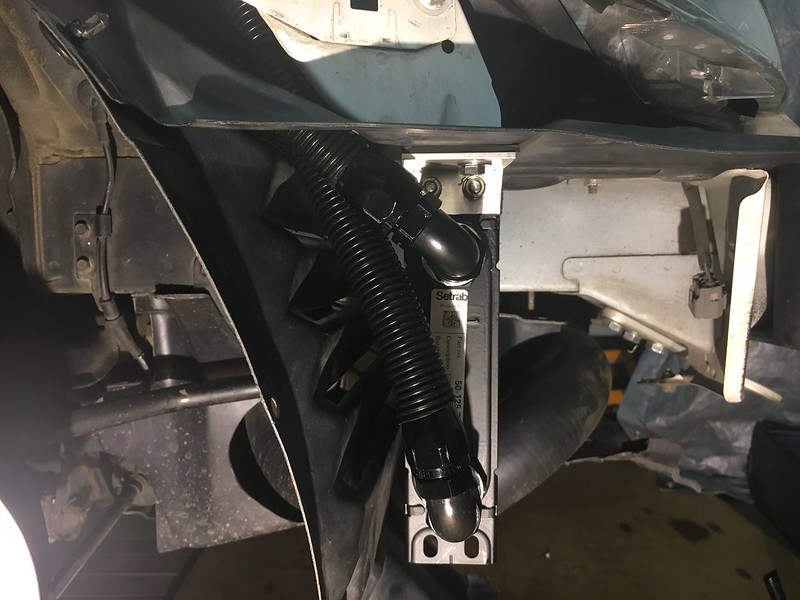
My arrangement has a few differences because I wanted to position the oil filter facing downwards to minimise spills when changing it. I've made a bracket for the oil filter block that allows the filter to face down, and as result it directs the lines for the cooler towards the outside of the car. There is room to route the houses down behind the headlight without going through the sheet metal behind the light (which was my original plan). This means that the cooler inlet and outlet needed to face the outside of the car, and the cooler itself needs to sit inboard close to the rail.

My car is not a factory turbo, and the coldside charge pipe appears to be further outboard than on Lokiel's machine. This, along with my decision to route the oil lines behind the headlight, required some trimming of one of the mounting tabs on the cooler in order to clear the charge pipe.

I am at the point now of assembling the hoses between the cooler and filter block.

TBC...

User avatar
ManiacLachy
Forum Guru
Posts: 3266
Joined: Mon Jan 13, 2014 2:35 pm
Vehicle: NB SE
Location: Brisbane

Re: Mx5, Chapter 2

Postby ManiacLachy » Tue Dec 20, 2016 7:57 am

That is a really neat solution to the oil cooler, and Lokiel's shows the complete solution. Much better than the FM one I bought from you some time ago - it scrapes quite easily, and I don't think the cut to the undertray helps much with airflow through the radiator.

As for the oil filter, the ones that mount with the filter facing down don't make much mess actually. Once you break the seal, the oil will drain back into the oil pan in a few minutes, then you remove the filter with nary a drop spilled.

User avatar
Lokiel
Forum legend
Posts: 4126
Joined: Thu May 28, 2009 2:39 pm
Vehicle: NB SE
Location: Brisbania

Re: Mx5, Chapter 2

Postby Lokiel » Tue Dec 20, 2016 10:13 am

Looks great so far.

The routing of oil lines to the cooler is much simpler than my solution which is always a big plus.

Almost looks like "someone" could use this as a template to make an NB kit that actually works well - HINT, HINT.
IMO, the FM kit isn't worth fitting, not enough air flow and oil lines are too small (MT.net shun using anything smaller than 10-AN lines).
Their kit was designed to fit on all NA/NBs which is why they mounted it to the steering rack - common to NA/NBs.
FM themselves even recommend adding a duct to force air into their cooler to make it more effective.
Hanging an oil cooler that low is a recipe for disaster.
Don't worry about dying, worry about not living!
Garage Thread: http://www.mx5cartalk.com/forum/viewtopic.php?f=57&t=76716

The American
Forum Guru
Posts: 1525
Joined: Fri Jun 29, 2012 9:23 pm
Vehicle: NB8B - Turbo
Location: Brisbane, Qld. Previously Perth WA
Contact:

Re: Mx5, Chapter 2

Postby The American » Tue Dec 20, 2016 12:03 pm

Lokiel wrote:Looks great so far.

The routing of oil lines to the cooler is much simpler than my solution which is always a big plus.

Almost looks like "someone" could use this as a template to make an NB kit that actually works well - HINT, HINT.


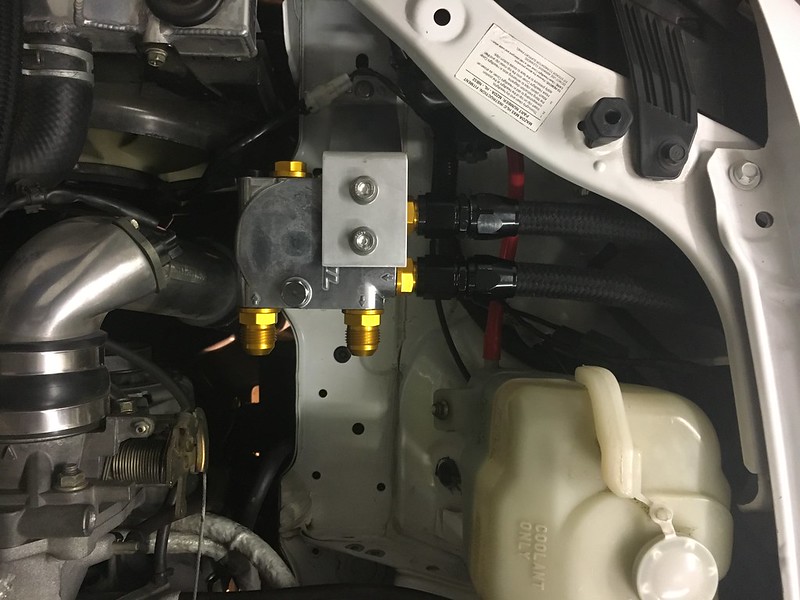
I think I can get the hoses between cooler and filter to be quite short, with no sharp turns and without coming close to any moving parts. I went with the Nomex/Kevlar hose to make for easier bends and fitting, but now that I see the hose in place, I could have used stainless braid.

My filter block mounting bracket is the potential weak link at this point. I've tried to make it as robust as possible with the materials I can bend, but it is not quite as rigid as I'd like. I'm thinking about how to brace it, or remake it with thicker materials (or perhaps use steel which I can weld).

User avatar
Lokiel
Forum legend
Posts: 4126
Joined: Thu May 28, 2009 2:39 pm
Vehicle: NB SE
Location: Brisbania

Re: Mx5, Chapter 2

Postby Lokiel » Tue Dec 20, 2016 12:29 pm

I don't like stainless steel braids anywhere tight, there's a photo I've seen where one has sawed through the guy's aluminium hotside intercooler pipe.
It's also hard to get tight bends in 10-AN stainless hoses too, you need lots of space to get a gentle curve - SpeedFlow's Nomex/Kevlar hose is MUCH nicer for bends.

I assume that your filter mount is made from aluminium. What thickness is it?
My cold air box side walls and sensor bracket in the glovebox are made from 3mm aluminium which are incredibly solid.
I reckon the glovebox bracket shelf could even support my body weight while eating a "sammich".

A welded bracket would be a nice touch though.
Don't worry about dying, worry about not living!
Garage Thread: http://www.mx5cartalk.com/forum/viewtopic.php?f=57&t=76716

The American
Forum Guru
Posts: 1525
Joined: Fri Jun 29, 2012 9:23 pm
Vehicle: NB8B - Turbo
Location: Brisbane, Qld. Previously Perth WA
Contact:

Re: Mx5, Chapter 2

Postby The American » Tue Dec 20, 2016 12:54 pm

it's 3mm x 50mm Bunnings spec :-)

The American
Forum Guru
Posts: 1525
Joined: Fri Jun 29, 2012 9:23 pm
Vehicle: NB8B - Turbo
Location: Brisbane, Qld. Previously Perth WA
Contact:

Re: Mx5, Chapter 2

Postby The American » Wed Dec 21, 2016 10:32 pm

Little bits of progress...

This is what the cooler looks like with lines installed, and the splash guard sitting back in position:
Image

I have used some split loom to shield the pipe where it passes through the trimmed plastic liner:
Image

The bracket and filter location has worked out quite nicely, providing a nice straight line down behind the headlight. The wiring for the headlights and bulbs are also still easy to access.
Image
Image

The next task is to pick two pathways through the sphagetti of existing fuel lines and what-have-you, and work out the best orientation of the Greddy filter relocation block to provide the shortest and straightest pathway up to the filter and back.

The American
Forum Guru
Posts: 1525
Joined: Fri Jun 29, 2012 9:23 pm
Vehicle: NB8B - Turbo
Location: Brisbane, Qld. Previously Perth WA
Contact:

Re: Mx5, Chapter 2

Postby The American » Wed Dec 28, 2016 4:07 pm

The filter relocation bits and the oil cooler are all fitted, and nothing leaks.

I was concerned that the bracket that mounts the filter might flex and vibrate. After starting it up and reving the engine, I can see it doesn't move at all with engine vibration. Having the four hoses connected to it also appears to have provided a significant damping effect.

I had removed the intake manifold brace for more room to tighten fittings at the engine block. Lots of people leave these off. In my case, it still fits and does not contact or obstruct anything so I put it back on.

After the last second check of all the new fittings, I filled the new filter with oil, disconnected the cam angle sensor, and cranked the engine over for a few seconds, until I could see the oil pressure gauge in the dash pulsing a little with each crank. Then I reconnected the sensor on the cam and started the engine. Oil pressure came up straight away, so I checked for leaks - nil.

Image

With the bonnet down, you would not know it is there:

Image

The other task, I have been wanting to tackle was a brake fluid flush/bleed. This gadget - a vacuum brake bleeder - made the job incredibly simple. I'm still scarred from a childhood as the designated brake pumper for my dad's few forays into DIY brake repair. I think it took me 20 minutes to complete the task (a full flush of the system) by myself, including removing the wheels and sucking out the old fluid from the master cylinder reservoir. Nobody yelled at anyone to pump and hold anything! The healing continues...

Image

It cost $130 plus a few dollars for the nitto fitting for the compressor.

Magpie
Speed Racer
Posts: 7468
Joined: Fri Feb 11, 2011 12:49 pm
Vehicle: NA6
Location: Purga, QLD

Re: Mx5, Chapter 2

Postby Magpie » Wed Dec 28, 2016 8:26 pm

I have a very similar tool to bleed the brakes, well worth the investment.

Snowmotion
Racing Driver
Posts: 750
Joined: Mon Jul 29, 2013 8:47 pm
Vehicle: NC
Location: Sydney

Re: Mx5, Chapter 2

Postby Snowmotion » Wed Dec 28, 2016 8:51 pm

What brand Brake bleeder is it?
NB8A| WP 1:15.6 | SMP-S 1:08.56 | SMP-N 1:21.35
NC1| WP 1:09.42 | SMP-S 1:03.191 | SMP-N 1:16.1856 | SMP-GP 1:48.288

Magpie
Speed Racer
Posts: 7468
Joined: Fri Feb 11, 2011 12:49 pm
Vehicle: NA6
Location: Purga, QLD

Re: Mx5, Chapter 2

Postby Magpie » Wed Dec 28, 2016 9:00 pm


The American
Forum Guru
Posts: 1525
Joined: Fri Jun 29, 2012 9:23 pm
Vehicle: NB8B - Turbo
Location: Brisbane, Qld. Previously Perth WA
Contact:

Re: Mx5, Chapter 2

Postby The American » Wed Dec 28, 2016 9:05 pm

Snowmotion wrote:What brand Brake bleeder is it?


It says "Force" and "Model: PX-3030" on the user manual. There is no other obvious branding on the box. There's also a barcode with "9t3608" which brings it up in google, but not in English.

Snowmotion
Racing Driver
Posts: 750
Joined: Mon Jul 29, 2013 8:47 pm
Vehicle: NC
Location: Sydney

Re: Mx5, Chapter 2

Postby Snowmotion » Wed Dec 28, 2016 9:23 pm

The American wrote:It says "Force" and "Model: PX-3030" on the user manual. There is no other obvious branding on the box. There's also a barcode with "9t3608" which brings it up in google, but not in English.


I found one the same on Ebay out of the UK but I saw a Video also saying it was a SnapOn part.
Will check with a mate about the Snap option.

Getting help brake bleeding is as hard as getting blood from a stone in my house
NB8A| WP 1:15.6 | SMP-S 1:08.56 | SMP-N 1:21.35
NC1| WP 1:09.42 | SMP-S 1:03.191 | SMP-N 1:16.1856 | SMP-GP 1:48.288


Return to “MX5 Garage Chat”

Who is online

Users browsing this forum: No registered users and 71 guests