MADJAK's NA8 - 200+HP N/A
Moderators: timk, Stu, zombie, Andrew, The American, Lokiel, -alex, miata, StanTheMan, greenMachine, ManiacLachy, Daffy
- zossy1
- Racing Driver
- Posts: 1979
- Joined: Wed Aug 18, 2010 8:48 am
- Vehicle: NA8
- Location: Southern Highlands, NSW
- Contact:
Re: MADJAK's NA8 - 200+HP N/A
We have done it for our next build, currently underway.
That crank is a bloody good piece of steel. It's not a fun job.
Don't cut too much off or you will find the engine starts to chew up big end bearings.
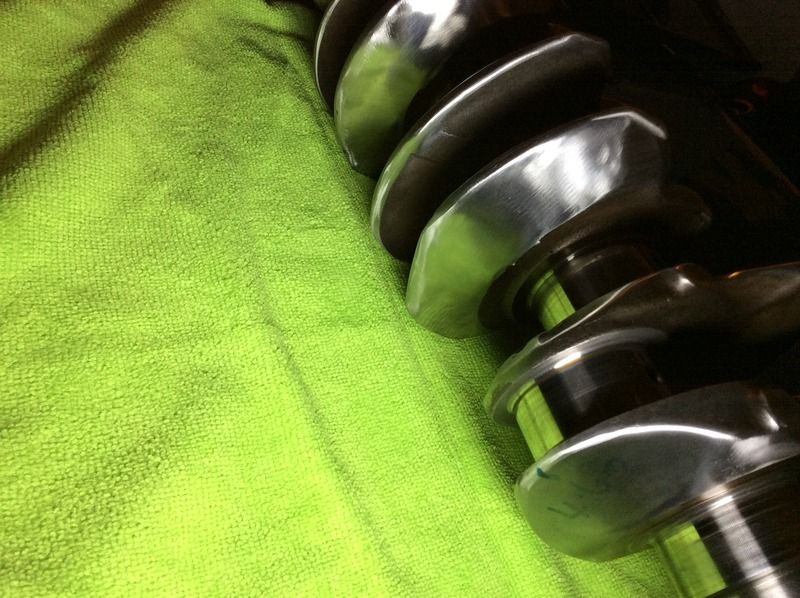
That crank is a bloody good piece of steel. It's not a fun job.
Don't cut too much off or you will find the engine starts to chew up big end bearings.
-
- Racing Driver
- Posts: 1117
- Joined: Tue Dec 31, 2013 12:11 pm
- Vehicle: NA6
Re: MADJAK's NA8 - 200+HP N/A
I'm planning only taking a little off the side wedges, then load it up in a lathe and knife edge it similar to the 949 Whammy crank, but on a bit steeper angle, so taking less meat off. I'm not sure my hobby mill will be heavy enough duty to machine the crank. I've done some metal in it in the past, but the crank might be hard work. If it is I'll just do the lathing instead.
My understanding is that most stock cranks are over weighted, especially when you run aftermarket rods & pistons. So removing 20-30% generally doesn't do anything destructive, but it will need to be balanced well.
Here is the reference image of the whammy crank:
In regards to the big end failures, have you any more info? I wouldn't have thought a 5 bearing crank would pick up enough twist to effect the big end over the main bearings. I've struggled to find much info other from Emilio who said he ran the crank in a 180whp car. Whammy engines now get a billeted crank that retains mushroom center and outside weights but with the rest slimmer.
My plans are to modify this crank, put it into a stock engine and run it for a while see if anything goes kaboom or there are additional vibrations. When I'm happy nothing is going to explode I'll drop it into my race engine.
NA8: N/A 200whp | Haltech | Skunk2 Intake | S90 TB | RCP | 5 speed c/r dogbox | 4.78 diff | AST Shocks
Barbs L: 64.12 | S: 58.62 | Collie: 49.72
- zossy1
- Racing Driver
- Posts: 1979
- Joined: Wed Aug 18, 2010 8:48 am
- Vehicle: NA8
- Location: Southern Highlands, NSW
- Contact:
Re: MADJAK's NA8 - 200+HP N/A
The whammy crank is one of my references for chewed up big end bearings. Emilio has admitted it was a failed experiment which is why they now use the billet unit.
My other source is Mike Keegan. In truth, he machined the original whammy crank so the source is probably one and the same.
On the other side of the ledger, I have had discussions with an active forum member and engine builder (who no doubt will speak up if he wants to reveal himself) who has worked with a crank machined in a manner more consistent with ours... And it has run successfully, at high power levels, for some years with no problem.
- zossy1
- Racing Driver
- Posts: 1979
- Joined: Wed Aug 18, 2010 8:48 am
- Vehicle: NA8
- Location: Southern Highlands, NSW
- Contact:
Re: MADJAK's NA8 - 200+HP N/A
Further to this, and FYI... Balancing the knifed crank is, according to our engine balancer, an absolute bitch of a job. Factor in $$$ above and beyond a normal balancing job.
-
- Racing Driver
- Posts: 1117
- Joined: Tue Dec 31, 2013 12:11 pm
- Vehicle: NA6
Re: MADJAK's NA8 - 200+HP N/A
zossy1 wrote:Further to this, and FYI... Balancing the knifed crank is, according to our engine balancer, an absolute bitch of a job. Factor in $$$ above and beyond a normal balancing job.
Thanks for all that info... exactly what I was looking for. I was initially toying with the idea of matching the protege SOHC design with the missing counterweights. So lopping off 2&3 , 6&7. Now I'm undecided what the best path is, maybe I should just wedge the crank and not knife edge it. I'm guessing the balancing is harder when the crank is knife edged as there is nowhere to drill out the metal.
NA8: N/A 200whp | Haltech | Skunk2 Intake | S90 TB | RCP | 5 speed c/r dogbox | 4.78 diff | AST Shocks
Barbs L: 64.12 | S: 58.62 | Collie: 49.72
- zossy1
- Racing Driver
- Posts: 1979
- Joined: Wed Aug 18, 2010 8:48 am
- Vehicle: NA8
- Location: Southern Highlands, NSW
- Contact:
Re: MADJAK's NA8 - 200+HP N/A
Yep - it can require taking to the edges with a flap disk. Inelegant but ultimately, it works.
-
- Racing Driver
- Posts: 1117
- Joined: Tue Dec 31, 2013 12:11 pm
- Vehicle: NA6
Re: MADJAK's NA8 - 200+HP N/A
I have started on my race spec NA tombstone control panel. This is the start to a complete rewire of my car. What can I say.... I'm a sucker for punishment... there will probably be weeks of back breaking wiring and then debugging.
I cut out all the holes with a dremel. For anyone copying this, be careful cutting carbon fibre as the dust is nasty. I had my woodworking extractor fan hooked up just above where I was working and it was very effective of sucking up the dust.
The layout is designed so that my hand when changing gears is inline with the gauges so if I slip off I won't accidently kill the engine.
I'll be removing the steering lock off the car so I may as well take out the key barrel too. I have a 6 pole isolation switch and a small key for security. When I park the car overnight I unplug the ecu and take away the QR steering wheel. Plus I'm pretty much the only person who can start the car when it's cold anyway. I have installed a start engine button in the cigarette lighter spot.
The buttons are for hazard and pop up headlights. They are basically in the same location as factory. Its nice to refect the original design.
All circuits will be fused down the bottom with the appropriate pop out circuit breaker. Above are the switches for various engine and chassis controls. In the background are the momentry switches for the windows and below them will be a spot for my brake bias adjustment knob. Eventually I'll 3d print a shorty console and remove the arm rest.
Progress will be slow but I'll update the thread at major milestones.
NA8: N/A 200whp | Haltech | Skunk2 Intake | S90 TB | RCP | 5 speed c/r dogbox | 4.78 diff | AST Shocks
Barbs L: 64.12 | S: 58.62 | Collie: 49.72
- plohl
- Racing Driver
- Posts: 1922
- Joined: Wed Oct 14, 2009 12:13 am
- Vehicle: NA8
- Location: Brisbane
- NitroDann
- Forum sponsor
- Posts: 10280
- Joined: Thu Nov 05, 2009 12:10 pm
- Vehicle: NA6
- Location: Newcastle NSW
- Contact:
Re: MADJAK's NA8 - 200+HP N/A
madjak wrote:there will probably be weeks of back breaking wiring and then debugging.
Yep.
You got 2 options with car wiring in my experience.
You either leave it as stock as possible, or you redo the entire thing from scratch using only very high quality millspec connectors and cable, or you hate yourself for weeks.
http://www.NitroDann.com
speed wrote:If I was to do it again, I wouldn't even consider the supercharger.
- plohl
- Racing Driver
- Posts: 1922
- Joined: Wed Oct 14, 2009 12:13 am
- Vehicle: NA8
- Location: Brisbane
Re: MADJAK's NA8 - 200+HP N/A
Anyone thought of using a PDM of some description? Obviously you need more gold coins...
Cheers,
plohl
plohl
- NitroDann
- Forum sponsor
- Posts: 10280
- Joined: Thu Nov 05, 2009 12:10 pm
- Vehicle: NA6
- Location: Newcastle NSW
- Contact:
Re: MADJAK's NA8 - 200+HP N/A
Far too many fun tokens for most people, but its clearly the best solution.
Dann
Dann
http://www.NitroDann.com
speed wrote:If I was to do it again, I wouldn't even consider the supercharger.
- zossy1
- Racing Driver
- Posts: 1979
- Joined: Wed Aug 18, 2010 8:48 am
- Vehicle: NA8
- Location: Southern Highlands, NSW
- Contact:
Re: MADJAK's NA8 - 200+HP N/A
Using Aviation or marine grade circuit breakers is a nice middle ground to a full centralised power module.
-
- Racing Driver
- Posts: 1117
- Joined: Tue Dec 31, 2013 12:11 pm
- Vehicle: NA6
Re: MADJAK's NA8 - 200+HP N/A
I'm not sure a PDM would make it much simpler. My main goals
are to tidy up the engine bay which means removing the factory fuse boxes, my Haltech fuse box and making a new engine and chassis harness. As with everything I do... try and achieve a good outcome without costing a fortune.
Secondary to that I want to be able to control my cooling fan, fuel pump seperately to the ecu as well as turn on the Ecu and Racecapture without the ignition being on. Also master cuttoff is handy.
NA8: N/A 200whp | Haltech | Skunk2 Intake | S90 TB | RCP | 5 speed c/r dogbox | 4.78 diff | AST Shocks
Barbs L: 64.12 | S: 58.62 | Collie: 49.72
- greenMachine
- Forum Guru
- Posts: 4053
- Joined: Thu Apr 24, 2003 11:00 am
- Vehicle: NB SE
- Location: Sports car paradise - Canberra
- Contact:
Re: MADJAK's NA8 - 200+HP N/A
madjak wrote:I cut out all the holes with a dremel. For anyone copying this, be careful cutting carbon fibre as the dust is nasty. I had my woodworking extractor fan hooked up just above where I was working and it was very effective of sucking up the dust.
It is! I killed a dremel that way, it still works but gives shocks as the current follows the CF strands/dust. I will see if I can clean it, but for all intents and purposes it is as good as in the bin.
My replacement has an extension shaft, so I can keep the electrical part well away from any CF. I would recommend this (as well as the dust extractor) for anyone working with CF.
I never met a horsepower I didn't like (thanks bwob)
Build thread
NB SE - gone to the dark side (and loving it )
Build thread
NB SE - gone to the dark side (and loving it )
-
- Racing Driver
- Posts: 1117
- Joined: Tue Dec 31, 2013 12:11 pm
- Vehicle: NA6
Re: MADJAK's NA8 - 200+HP N/A
My 3" extractor fan pulls the dust away from everything. Works great with the dremel or angle grinder. Maybe try blowing it out with an air gun.
NA8: N/A 200whp | Haltech | Skunk2 Intake | S90 TB | RCP | 5 speed c/r dogbox | 4.78 diff | AST Shocks
Barbs L: 64.12 | S: 58.62 | Collie: 49.72
Who is online
Users browsing this forum: No registered users and 77 guests