Mentalpopcorn's MX5 SE

Chat to do with your MX5/Miata/Eunos Garage Ride(s).

Moderators: timk, Stu, zombie, Andrew, The American, Lokiel, -alex, miata, StanTheMan, greenMachine, ManiacLachy, Daffy

User avatar
mentalpopcorn
Driver
Posts: 70
Joined: Wed Oct 26, 2005 8:54 am
Vehicle: NB SE
Location: Melbourne

Mentalpopcorn's MX5 SE

Postby mentalpopcorn » Thu Jun 28, 2012 7:58 pm

Small upgrade to report. After selling my other shift knobs I've now received and installed a TWM Performance shift knob.

I'm not sure whether I should say well packaged or over packaged but it certainly arrived safely. See photo.

Looks really well made, heavy and allows for adjustable height. At the moment I'm running it low but will try various heights to see what's comfortable.

No more experimenting with shift knobs..this one will do....I'm done.


Weekend I'm planning on building a bracket for the Motec ECU and secure the cover plate...it's rattling around and annoying the hell out of me. Or, something else is rattling and I'll spend all weekend trying to find it. Then I'll be making plans to install my new 550 injectors and re-tune.

Not sure I've mentioned by hardtop purchase, but I have and it's currently getting some minor repair and respray in Velocity Red. Need to set some time aside to install the striker plate.

Mentalpopcorn
Sent from my iPad using Tapatalk HD
You do not have the required permissions to view the files attached to this post.
Mentalpopcorn
MX5 Club of Victoria #1700

Previous '05 SE Velocity Red
Previous: '99 NB Silver

User avatar
mentalpopcorn
Driver
Posts: 70
Joined: Wed Oct 26, 2005 8:54 am
Vehicle: NB SE
Location: Melbourne

Mentalpopcorn's MX5 SE

Postby mentalpopcorn » Sat Jun 30, 2012 6:04 pm

Had a rush of blood when I got home from work and started pulling the car apart to install my hardtop side latches.

It was easier than I expected. The trim came off relatively easily, after removing the a clip or two and removing the windbreaker, it was just a matter of maneuvering the seat belt out of the way.

As I've read, there is a tool mark behind the trim which needs to be cut away to reveal the factory mounting point. Out came the Dremel. I cut out a square first and then used a half round file to shape it up. It was quite a quick and easy job.

Once both sides where done, everything went back in and the striker plates screwed up no problem. The bolts required a T40 Torx Bit, so that was an excuse to add to the tool kit.

After that, I decided to mount the Motec ECU in preparation for the new injectors and tune. Prior to this, it was just sitting next to the factory ECU which isn't ideal for the long term. Got some flat plate and cut an appropriately sized piece, then folded a couple of sides to provide a snug fit. Used some material tape for support and some Velcro. Really happy with the result, there is no movement and the Motec is well protected. Fits under the cover plate well.


Mentalpopcorn
Sent from my iPad using Tapatalk HD
You do not have the required permissions to view the files attached to this post.
Mentalpopcorn
MX5 Club of Victoria #1700

Previous '05 SE Velocity Red
Previous: '99 NB Silver

User avatar
Lokiel
Forum legend
Posts: 4126
Joined: Thu May 28, 2009 2:39 pm
Vehicle: NB SE
Location: Brisbania

Re: Mentalpopcorn's MX5 SE

Postby Lokiel » Sat Jun 30, 2012 7:32 pm

That ECU's tiny compared to my Adaptronic e440 Select:

Image

The space to the right of the OEM unit almost seems like it was designed to accommodate an aftermarket ECU; I feel sorry for American owners since their ECU is mounted underneath the dashboard, making location of aftermarket ECUs a real hassle.

What injectors are you getting?
Don't worry about dying, worry about not living!
Garage Thread: http://www.mx5cartalk.com/forum/viewtopic.php?f=57&t=76716

User avatar
timk
Racing Driver
Posts: 1928
Joined: Fri Dec 31, 2004 3:16 pm
Vehicle: NC

Re: Mentalpopcorn's MX5 SE

Postby timk » Sat Jun 30, 2012 8:23 pm

Lokiel wrote:The space to the right of the OEM unit almost seems like it was designed to accommodate an aftermarket ECU.


My early NB with ABS (Jap import) had an ABS computer that occupied that space to the right. On the later models I think it has been incorporated into the main ECU?

User avatar
Lokiel
Forum legend
Posts: 4126
Joined: Thu May 28, 2009 2:39 pm
Vehicle: NB SE
Location: Brisbania

Re: Mentalpopcorn's MX5 SE

Postby Lokiel » Sat Jun 30, 2012 8:52 pm

saboteur wrote:
Lokiel wrote:The space to the right of the OEM unit almost seems like it was designed to accommodate an aftermarket ECU.


My early NB with ABS (Jap import) had an ABS computer that occupied that space to the right. On the later models I think it has been incorporated into the main ECU?


That worked out really well for us then :)
Don't worry about dying, worry about not living!
Garage Thread: http://www.mx5cartalk.com/forum/viewtopic.php?f=57&t=76716

User avatar
mentalpopcorn
Driver
Posts: 70
Joined: Wed Oct 26, 2005 8:54 am
Vehicle: NB SE
Location: Melbourne

Mentalpopcorn's MX5 SE

Postby mentalpopcorn » Sun Jul 01, 2012 6:58 pm

Lokiel, Injectors are 550's from Fiveomotorsport. I'm drooling over the length of your wiring. Mine was made quite short, so it's all a tight fit, still, once it's in next, it's not coming out.

Mentalpopcorn
Sent from my iPad using Tapatalk HD
Mentalpopcorn
MX5 Club of Victoria #1700

Previous '05 SE Velocity Red
Previous: '99 NB Silver

User avatar
Lokiel
Forum legend
Posts: 4126
Joined: Thu May 28, 2009 2:39 pm
Vehicle: NB SE
Location: Brisbania

Re: Mentalpopcorn's MX5 SE

Postby Lokiel » Sun Jul 01, 2012 8:08 pm

Sitting on top of this photo are the original harnesses that came with the ECU:

Image

There was no way those were usable and I really didn't want to extend them myself - way too much work. I found out that the US versions were 3x longer since their ECU is mounted under their dashboard and Andy agreed to send me the longer harnesses for free - he's great to deal with. I believe that he is now only shipping the longer harnesses after my install experience and feedback.
Don't worry about dying, worry about not living!
Garage Thread: http://www.mx5cartalk.com/forum/viewtopic.php?f=57&t=76716

User avatar
mentalpopcorn
Driver
Posts: 70
Joined: Wed Oct 26, 2005 8:54 am
Vehicle: NB SE
Location: Melbourne

Mentalpopcorn's MX5 SE

Postby mentalpopcorn » Thu Jul 12, 2012 7:57 pm

Getting excited...my new hardtop has been repaired and sprayed. Ready for pick up tomorrow. Pic will follow.

Also grabbed a Project G gear shift and handbrake boot that arrived yesterday. Have tomorrow off so will install and post some pics.


Mentalpopcorn
Sent from my iPad using Tapatalk HD
Mentalpopcorn
MX5 Club of Victoria #1700

Previous '05 SE Velocity Red
Previous: '99 NB Silver

User avatar
mentalpopcorn
Driver
Posts: 70
Joined: Wed Oct 26, 2005 8:54 am
Vehicle: NB SE
Location: Melbourne

Re: Mentalpopcorn's MX5 SE

Postby mentalpopcorn » Fri Jul 13, 2012 10:18 pm

Had a great day today doing a little work on the car and picking up a new toy.

Firstly...ProjectG. Really liking the new boots. They arrived with a few Project G Stickers, a number plate surround, some postcards (featuring slammed MX5's) and a lollie. It was like a little MX5 showbag. The boots were an easy install. Removed the center console and the factory boot. Four screws hold in a little cradle and the boot has several holes which fit over some plastic clips. The Project G boot has the same holes, so it was a direct replacement.

The handbrake boot was a simple matter of removing the plastic factory surround which is held on with just one screw. Then slide the leather boot on. I just pushed the excess into the carpet. There is nothing holding it down but it sits well and looks a lot better than the factory plastics. The red stitching also matches the factory SE stitching very well...you would think it was factory if you didn't know better.

Image
Image

Then I picked up the HardTop. Followed the instructions from the UK MX5 Owners Club.
http://www.mx5oc.co.uk/forum/forums/t/297.aspx

It's on, but still needs some tweaking to get all the seals right and all the latches tight. Also needs a good clean inside. I've ordered some new seals and the strip along the bottom of the hardtop...its become brittle and has broken in a few places.

I also want to clean up all my latches and striker plates...they are all showing signs of oxidisation (my originals and the hardtops). If anyone knows if a good way to do this, please let me know.

Here are the quick down and dirty photo's. I'll do some nicer ones soon.

Image
Image

Next jobs...

1) Receive and fit the new hardtop seals and tweak the hardtop fitment

2) Decided to run the Oil Catch Can return line and a sealed unit (rather than the air filtered Track Dog Can I have). So I've purchased a Moroso Oil/Air Separator. After various pieces of advice and lots of reading, I'm just more comfortable running it this way, particularly once I up the boost at the next tune. The Track Dog can will end up on the for sale thread soon enough.

3) Install the 550 injectors and re-tune

I think that will take me through to the end of the year. Then I'll start saving as the big outlays are approaching....Suspension and Rims/Tires. At this stage I'm thinking Nickel 6UL's 15x9 with RS3's 225/45/15. Suspension I'm still investigating, so any thoughts are appreciated...I guess I'm leaning to Fat Cat Motorsport or Ohlins...but my plan has been from the start to do a couple of track days to really work out what I need.

If anyone has questions or advice, it's always appreciated.
Mentalpopcorn
MX5 Club of Victoria #1700

Previous '05 SE Velocity Red
Previous: '99 NB Silver

User avatar
mentalpopcorn
Driver
Posts: 70
Joined: Wed Oct 26, 2005 8:54 am
Vehicle: NB SE
Location: Melbourne

Tuned at last

Postby mentalpopcorn » Sun Jun 16, 2013 9:01 pm

I was surprised to see how long it has been since my last post. Time certainly does fly. Over the last 12 months there have been some minor tweaks done, but recently two more significant pieces of work worth posting on. I have spent some time detailing the paint work (which I will post later on products and techniques used) and the car has had 550cc injectors installed and it has been tuned. I'll post today on the tune and performance outcomes.

I will state that I am not a mechanic and although I have installed all previous performance upgrades myself, the following work was done by a professional to get the best outcome.

Hardware changes (I'll upload some photos in a separate post)
- A MAC Boost Control Valve was fitted and re-plumbed to be fed from the comp outlet. Because I have an analogue boost gauge, there is a volume of air in the pipe that can effect readings to the ECU. Blocking the factory piping and re-plumbing to the comp outlet eliminates this.
- The Wideband O2 sensor which I installed into the exhaust behind the CAT was moved to the turbo housing for a better response
- The Engine Temp sensor to the ECU which I installed in the top radiator hose (purely for ease) was relocated to the rear of the cylinder head to detect engine warm-up before the thermostat (rather than after)
- EGT Thermocouple was drilled and tapped into the exhaust manifold to monitor temps during the tune.

Tune details
- Fuel was mapped from 500-7500rpm although redline was changed to around 6700 for safety
- Gear detections parameters were calibrated as well as vehicle drive speed from speed sensors (allowing a gear based boost table)
- 3D mapping of boost request based on rpm and driver pedal position
- Reduced boost during warmup and high engine temps for protection
- Full closed loop idle speed mapping and cold warmup calibration, including air con, pwr steering and fans/alternator compensation.
- Boost compensation with engine & air temps for engine/turbo protection
- The car was dyno tuned and validated on the road
- any variation in primary sensors will trigger the factory engine light

Result and impressions
Final result is 159.6kw at 6000-6500rpm (picture of the chart is below with two runs at different temperatures). Prior to any modification the car was 94kw (although this was on a different dyno, so not an absolute direct comparison). Still...paints a picture!

I was lucky enough to be able to hand over my car for 4 weeks (while on holiday), so it got a lot of TLC. It is incredibly smooth and responsive and as close to a factory feel you can get until you put the boot in. The turbo is working from around 2000rpm, so there is a constant feel the car is ready go. I'm incredibly impressed and excited with the final result

The car will require some tweak once summer hits. I will also be fitting a switch so I can have a two stage Hi/Low boost control enable via the ECU. This will allow me to decrease the boost in wet weather (as it will spin the wheels in four gear in the rain at about 50% pedal position).

Here's the chart.
Image
Mentalpopcorn
MX5 Club of Victoria #1700

Previous '05 SE Velocity Red
Previous: '99 NB Silver

User avatar
fastfreddygassit
Waitin' for a mate
Posts: 1773
Joined: Sat Jun 25, 2005 8:00 pm
Vehicle: NB SE
Location: Waitin' for a mate in Melbourne somewhere
Contact:

Re: Mentalpopcorn's MX5 SE

Postby fastfreddygassit » Mon Jun 17, 2013 10:02 pm

Nice work :BROADY:
Love the car

User avatar
Lokiel
Forum legend
Posts: 4126
Joined: Thu May 28, 2009 2:39 pm
Vehicle: NB SE
Location: Brisbania

Re: Mentalpopcorn's MX5 SE

Postby Lokiel » Tue Jun 18, 2013 7:14 pm

You're going to burn out your wideband O2 sensor quickly if you leave it mounted on the turbo housing.

You need it mounted further away - you should weld in a bung further along the downpipe for it.
Don't worry about dying, worry about not living!
Garage Thread: http://www.mx5cartalk.com/forum/viewtopic.php?f=57&t=76716

User avatar
mentalpopcorn
Driver
Posts: 70
Joined: Wed Oct 26, 2005 8:54 am
Vehicle: NB SE
Location: Melbourne

December Update

Postby mentalpopcorn » Tue Dec 17, 2013 8:20 pm

Car has been running fantastic. I'm so happy with it. Have been doing a little work on it, and have a few things in planning stages.

Firstly, I've been meaning to provide a run down of the process I followed to detail the car just in case anyone is planning on doing the same. After doing a Detailing Day with the MX5 Club, I got the bug and although a lot of work, I found it quite satisfying. The end result was amazing. I should also recognise and thank Waxit Car Care in Tullamarine…truly taught me everything I know..how little that may be.

Step 1 - Decontamination
Used Concours Clay Lubricant and Clay. Flattened into a small paddy, sprayed some lube and rubbed a section at a time. To shape the clay I used a little hot water for 30 seconds or so.

Step 2 - Paint Correction
I borrowed a Concours 900 orbital buffer from the MX5 Club…it was basically brand new..hardly anyone had used it. Highly recommended if you are in the club. Used Scholl Concepts S3GOLD and a white spider pad for the first cutting step. 5 or 6 drops of compound on the pad and wiped it in to prime. Then added one more pea sized drop (when the pad is new). Worked section by section, approximately 40-50cm sq.

Apply only enough pressure to change the sound of the pad and machine and so as to keep the pad as flat and level as possible. Spread the compound on speed 3 for one pass and the increase to 4 or 5 for 4-5 full overlapping passes. For the last pass, reduce speed to 3 for finishing. Each pass changed direction, first left to right overlapping, and then up and down overlapping. Remove the compound with a micro fibre cloth. After every pass spur the pad with a soft brush.

Once happy with the finish, repeated the above with the Scholl Concepts S30+ and orange finishing pad. Removing residue with clean micro fibre cloth.

Step 3 - Protection
Used CarPro Eraser spray to remove any residue with yet another micro fibre cloth. Used Cquartz following the instructions. Basically adding a few drops to the provided applicator and run down each panel. Depending on temperature, leave it on for a length of time and then remove residue with, you guessed it…another micro fibre cloth.

I then used another Cquartz product on all the black plastics.

Here's a picture of what I used.

Image

I did this a while ago and plan on refreshening it up for summer, so once done I'll post some pictures.

Some of the other plans I have:

Brakes..have some DBA front rotors on order and some Hawk Blue pads waiting on the garage. Also have some braided lines on the way. So in January brakes are getting an upgrade.

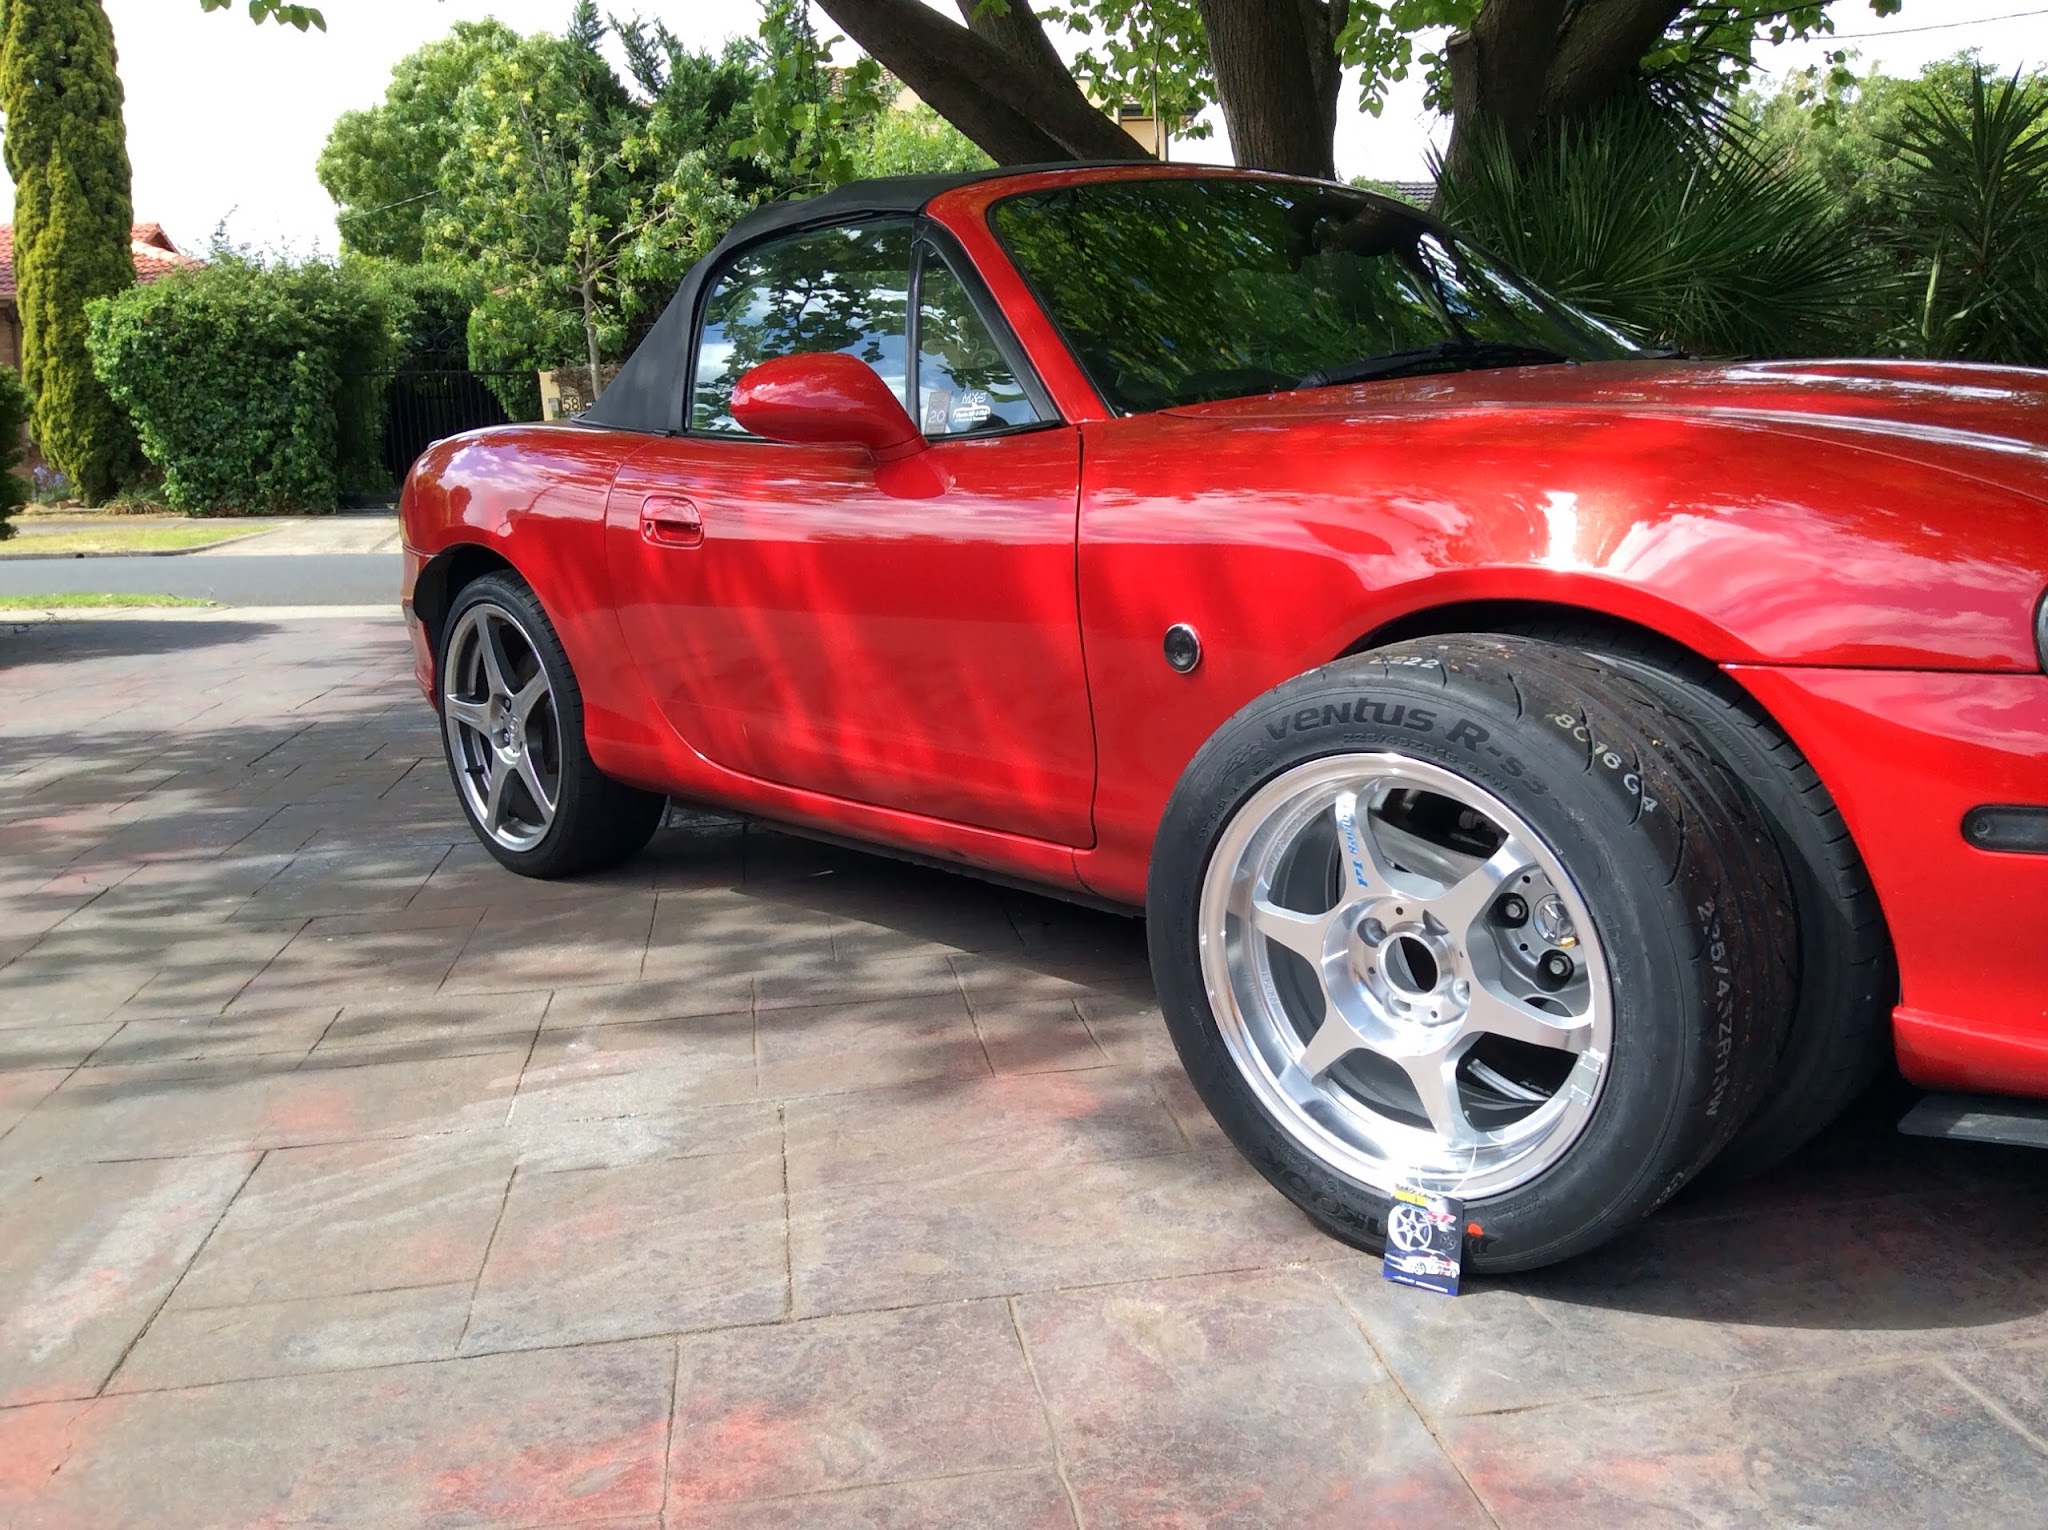
Rims…after what felt like years of staring at photos, reading forums and not making up my mind I have bit the bullet. Buddy Club Limited Edition P1 OneFive8 Racing Wheels - Polished. 15x8 +32 with Hankook Ventus RS3 225/45/15. So I will soon say goodbye to the old faithful, incredibly buckled Racing Harts…you have served me well. Once I get them I will weigh both just for the comparison.

Spark…heading around to 106,000km, so spark plugs are due. NGK Iridium IX Sparks plugs on the way, and some Magnacor Spark Pug leads.

Also due is timing belt, but decided to farm that out to someone smarter than myself and with more time on their hands. Looking around the forum for some suggestions of a good workshop in Melbourne.

OOhhh…one last thing. My first time on a track coming up in January at Sandown. Really looking forward to it. Hope to get some video of that one.
Mentalpopcorn
MX5 Club of Victoria #1700

Previous '05 SE Velocity Red
Previous: '99 NB Silver

User avatar
Lokiel
Forum legend
Posts: 4126
Joined: Thu May 28, 2009 2:39 pm
Vehicle: NB SE
Location: Brisbania

Re: Mentalpopcorn's MX5 SE

Postby Lokiel » Tue Dec 17, 2013 10:45 pm

Good to see you've finally decided to get to the track. MINX used to tell me that a lot too when I first got my car but I wanted to wait until I deemed it "track ready" (ie. oil cooler, upgraded suspension and the like). All MX5s are track-ready from the factory, they're reliable and handle well from the start - I should have listened to him, I wasted a lot of track-day opportunities.

One tip I found, especially relevent to Lakeside, is to watch a lot of YouTube videos of other drivers at the track you're going to with similar cars. It really made Lakeside feel very familiar, even on my first lap, and knowing the track is BIG help, especially the lines you should be taking.
Don't worry about dying, worry about not living!
Garage Thread: http://www.mx5cartalk.com/forum/viewtopic.php?f=57&t=76716

User avatar
mentalpopcorn
Driver
Posts: 70
Joined: Wed Oct 26, 2005 8:54 am
Vehicle: NB SE
Location: Melbourne

Re: Mentalpopcorn's MX5 SE

Postby mentalpopcorn » Mon Jan 06, 2014 5:04 pm

Present arrived today but family holding put until my birthday in a few weeks. For now I just have photos.

Buddy Club P1 SF with Hankook Ventus RS3 225/45/15

Image

Image

Mentalpopcorn
Sent from my iPad using Tapatalk HD
Mentalpopcorn
MX5 Club of Victoria #1700

Previous '05 SE Velocity Red
Previous: '99 NB Silver


Return to “MX5 Garage Chat”

Who is online

Users browsing this forum: No registered users and 160 guests