Emily's 04 VR SE
Moderators: timk, Stu, -alex, miata, StanTheMan, greenMachine, ManiacLachy, Daffy, zombie, Andrew, The American, Lokiel
-
the_darkside
- Fast Driver
- Posts: 283
- Joined: Sat Apr 03, 2010 9:44 am
- Location: Gold Coast, QLD
Re: Emily's NA6 V-Special Roadster
Loving the work, I've been outdone by a girl, I feel emasculated  Oh, put the P plate in your windscreen, would look heaps better. But great work, subscribed.
I like my girls how I like my cars, topless.
-
emily_mx5
- Racing Driver
- Posts: 1720
- Joined: Wed Aug 03, 2011 5:57 pm
- Vehicle: NB SE
- Location: Sydney
Re: Emily's NA6 V-Special Roadster
red devil wrote:arrrrrr more wire = more weight
lol man you don't even wanna know how much my subwoofers weigh haha
the_darkside wrote:I've been outdone by a girl, I feel emasculated
Thanks? I'll take that unintentional sexism as a compliment
put the P plate in your windscreen, would look heaps better.
Yeah it would deffs look heaps better, but thats not legal in NSW
-
Apu
- Speed Racer
- Posts: 2399
- Joined: Tue Apr 12, 2011 3:04 pm
- Vehicle: NB8B
- Location: North West, NSW
Re: Emily's NA6 V-Special Roadster
Re the 'P' plates...or don't put them on like Dann. You've got longer eyelashes to flutter at the police officer 
(not that I'd encourage you to break the law...)
(not that I'd encourage you to break the law...)
-
the_darkside
- Fast Driver
- Posts: 283
- Joined: Sat Apr 03, 2010 9:44 am
- Location: Gold Coast, QLD
Re: Emily's NA6 V-Special Roadster
It was intended more based on stereotypes but I see where you're coming from, sorry if I offended you.
I like my girls how I like my cars, topless.
-
emily_mx5
- Racing Driver
- Posts: 1720
- Joined: Wed Aug 03, 2011 5:57 pm
- Vehicle: NB SE
- Location: Sydney
Re: Emily's NA6 V-Special Roadster
Rain Rain Replacement
So when I bought the car, it had a brand new soft top on.
I thought "Well thats good, no leaks, right!"
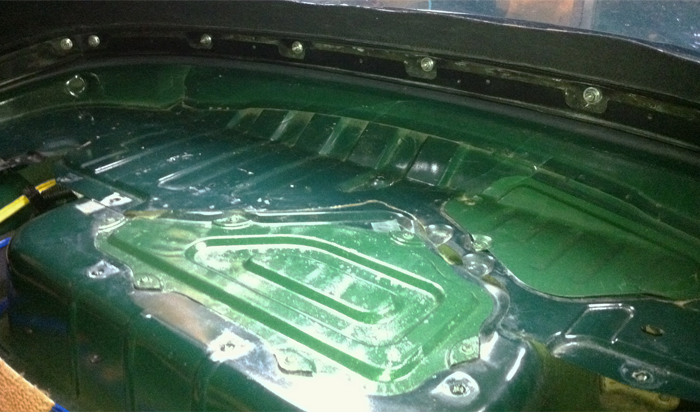
Wrong. Oh so very very wrong. You see, the f**king moron who put the soft top on somehow managed to completely leave out the rain rail, y'know the thing that makes the car waterproof...
So whenever it rained/washed the car, 99% of the water that ran down the soft top went straight into the cabin and boot of the car.
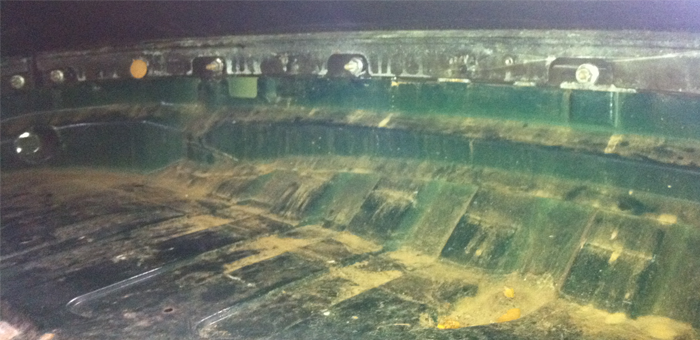
Causing a lot of dirt to deposit on the parcel shelf,
surface rust
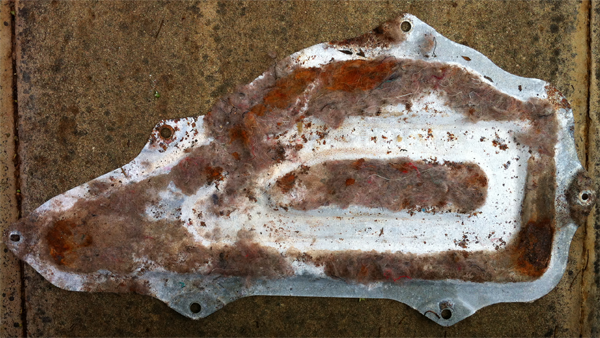
and oh yeah, it freakin flooded I just didn't notice till now because (luckily) the carpet/sound proofing absorbed a lot of the water.
Didn't help that the drainage holes were severely blocked aswell
Luckily I managed to grab a second hand OEM rain rail for a good price
TBH I was looking forward to NOT drilling the rivets out of the softtop, butttt the rain rail was attached to the base of its old soft top
So I did end up drilling them out
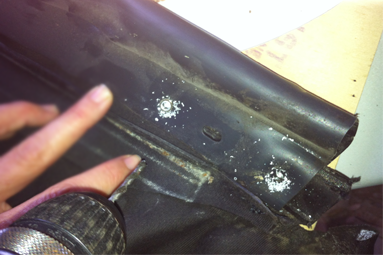
Unfortunately it wasn't really designed for this, so many little crack appeared


After putting it on, testing, and taking it off again about 10 times, I finallyyyy patched up all the rivet holes and cracks. I used silicon to seal and marine tape to patch over the top.
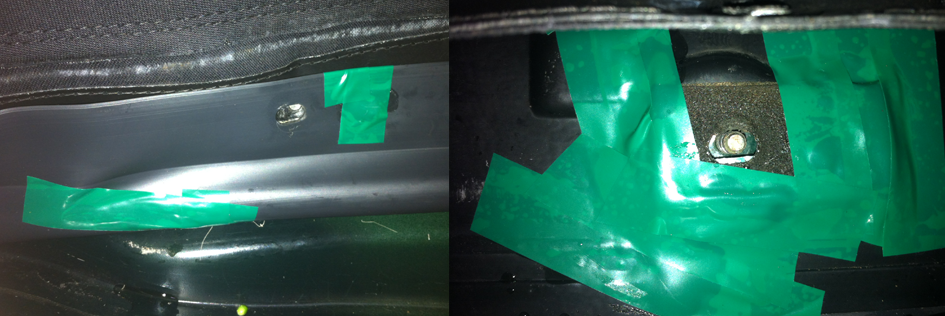
Doesn't look to professional lol but NO LEAKS!
I am quite pleased with the results and now I can drive/park in the rain and wash the car aswell!
So when I bought the car, it had a brand new soft top on.
I thought "Well thats good, no leaks, right!"
Wrong. Oh so very very wrong. You see, the f**king moron who put the soft top on somehow managed to completely leave out the rain rail, y'know the thing that makes the car waterproof...
So whenever it rained/washed the car, 99% of the water that ran down the soft top went straight into the cabin and boot of the car.
Causing a lot of dirt to deposit on the parcel shelf,

surface rust

and oh yeah, it freakin flooded
Didn't help that the drainage holes were severely blocked aswell
Luckily I managed to grab a second hand OEM rain rail for a good price
TBH I was looking forward to NOT drilling the rivets out of the softtop, butttt the rain rail was attached to the base of its old soft top
So I did end up drilling them out

Unfortunately it wasn't really designed for this, so many little crack appeared
After putting it on, testing, and taking it off again about 10 times, I finallyyyy patched up all the rivet holes and cracks. I used silicon to seal and marine tape to patch over the top.

Doesn't look to professional lol but NO LEAKS!
I am quite pleased with the results and now I can drive/park in the rain and wash the car aswell!

-
Hjt
- Speed Racer
- Posts: 2499
- Joined: Thu Jan 13, 2011 12:46 pm
- Vehicle: NB8A
Re: Emily's NA6 V-Special Roadster
Very proud that you persisted, it paid off.
-
Apu
- Speed Racer
- Posts: 2399
- Joined: Tue Apr 12, 2011 3:04 pm
- Vehicle: NB8B
- Location: North West, NSW
Re: Emily's NA6 V-Special Roadster
Gosh golly gee, Miss Em!
Admirable work. Put a few guys to shame here. You quietly got on with it...a few guys I know would have just had a good old whinge and chucked their toys out of the cot...
Admirable work. Put a few guys to shame here. You quietly got on with it...a few guys I know would have just had a good old whinge and chucked their toys out of the cot...
- Aussie Stig
- Stig
- Posts: 540
- Joined: Wed Aug 10, 2011 9:14 pm
Re: Emily's NA6 V-Special Roadster
Apu wrote:Gosh golly gee, Miss Em!
Admirable work. Put a few guys to shame here. You quietly got on with it...a few guys I know would have just had a good old whinge and chucked their toys out of the cot...
Nothing wrong with a whinge, but just a great job!
Your daddy an engineer or mechanic by any chance?

It is a known fact that 50% of people are of less than average intelligence
-
emily_mx5
- Racing Driver
- Posts: 1720
- Joined: Wed Aug 03, 2011 5:57 pm
- Vehicle: NB SE
- Location: Sydney
Re: Emily's NA6 V-Special Roadster
the_darkside wrote:It was intended more based on stereotypes but I see where you're coming from, sorry if I offended you.
haha nah no offence taken at all! I was joking back
Apu wrote:Put a few guys to shame here. You quietly got on with it...a few guys I know would have just had a good old whinge and chucked their toys out of the cot...
Nahh, there was a fair bit of whinging, sorry Hayden!
Aussie Stig wrote:Your daddy an engineer or mechanic by any chance?
ROFL
-
Apu
- Speed Racer
- Posts: 2399
- Joined: Tue Apr 12, 2011 3:04 pm
- Vehicle: NB8B
- Location: North West, NSW
Re: Emily's NA6 V-Special Roadster
Mmm..Apu is Bryan, Hjt is Hayden
How did you do in your exams anyway?
How did you do in your exams anyway?
-
emily_mx5
- Racing Driver
- Posts: 1720
- Joined: Wed Aug 03, 2011 5:57 pm
- Vehicle: NB SE
- Location: Sydney
Re: Emily's NA6 V-Special Roadster
Hahahaa yes Bryan i know who you are.
But I think I missed out on vet science by 0.75mark maybe I can still squeeze in though, "flutter my eyelashes" and all
But I think I missed out on vet science by 0.75mark
-
Hjt
- Speed Racer
- Posts: 2499
- Joined: Thu Jan 13, 2011 12:46 pm
- Vehicle: NB8A
Re: Emily's NA6 V-Special Roadster
B of arts possible?
D/w Bryan, Emily was referring to the texts I got!
D/w Bryan, Emily was referring to the texts I got!
-
Apu
- Speed Racer
- Posts: 2399
- Joined: Tue Apr 12, 2011 3:04 pm
- Vehicle: NB8B
- Location: North West, NSW
Re: Emily's NA6 V-Special Roadster
.75! That's bad luck, but don't give up. Give it another go!
-
emily_mx5
- Racing Driver
- Posts: 1720
- Joined: Wed Aug 03, 2011 5:57 pm
- Vehicle: NB SE
- Location: Sydney
Re: Emily's NA6 V-Special Roadster
Stebel Dual Air Horn Installation
I found these in my grandfather's garage, brand new in packaging! They are twin tone Stebel GR-90 air horns, probably 20 or 30 years old hahaaaa = perfectly vintage/retro for Ziggy
Just a bit of fun
After about an hour of research, this is what I came up with (obviously a visual learner )
)

relay 30 to power
relay 85 to oem horn
relay 86 to ground (also ground compressor)
relay 87 to compressor
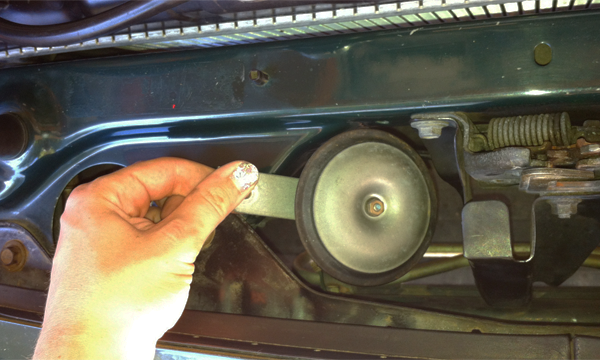
Step 1: Remove OEM horn and unplug wire. This red/green wire plugs directly on to relay pin 85
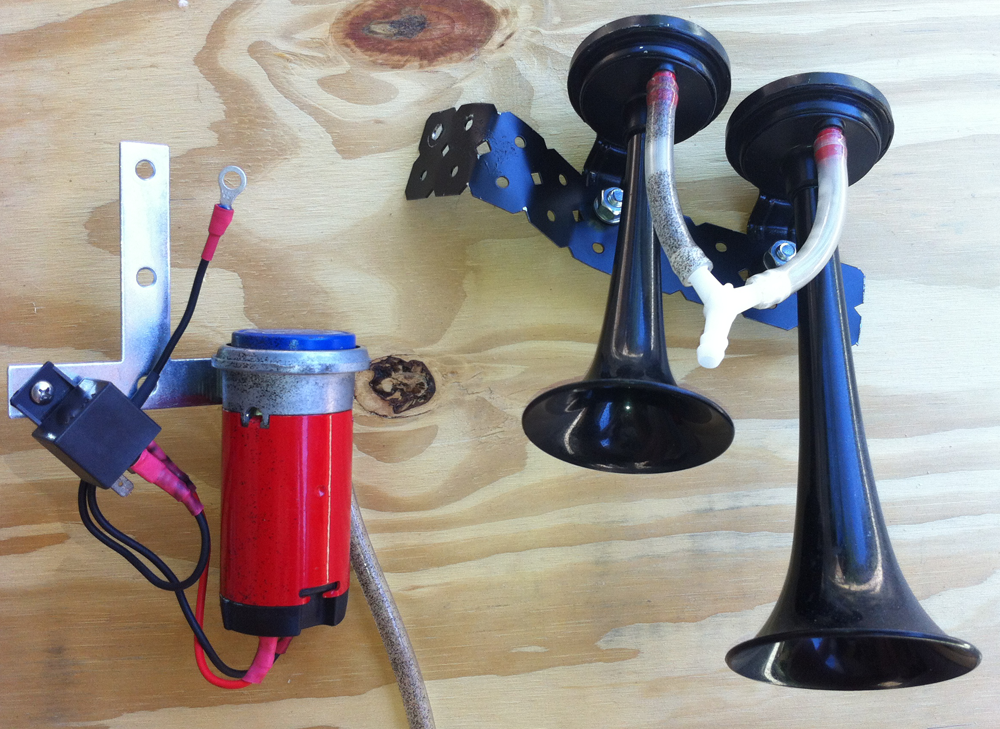
Step 2: Construct a bracket for the compressor and relay.
I used a T-bracket from Bunnings. Connect using push blade connectors.
Step 3: Construct a bracket for the 2 horns. I used a strip of metal also from Bunnings, easy to bend but strong enough to stay in shape.
Step 4: Run 12V power lead.
I used a spare blue plug (for foglights?). A push-blade-connector-terminal-clip-thing plugs right on!

I also opted for a 20amp inline fuse, just incase something goes wrong ect.

Note the neat cable ties
Step 4: Connect everything up.
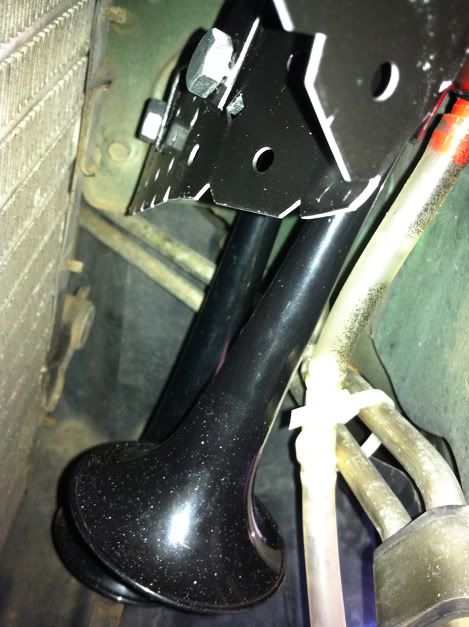
I found it was easiest to get it all in place by going from underneath through the 'mouth'.
I mounted the compressor/relay bracket in the original horn place.
I mounted the horns off a spare hole opposite stock horn.

plenty of room for 2 horns.
Done! incase you were wondering, they are f*cking LOUD. Like so loud it hurts your ears. But so melodic! being 2 toned and all haha.
Quite perfect for our little MX5's
The only downside to this is that now the horn only works with the ignition on. Still worth it though I reckon.
I found these in my grandfather's garage, brand new in packaging! They are twin tone Stebel GR-90 air horns, probably 20 or 30 years old hahaaaa = perfectly vintage/retro for Ziggy
Just a bit of fun
After about an hour of research, this is what I came up with (obviously a visual learner

relay 30 to power
relay 85 to oem horn
relay 86 to ground (also ground compressor)
relay 87 to compressor
Step 1: Remove OEM horn and unplug wire. This red/green wire plugs directly on to relay pin 85

Step 2: Construct a bracket for the compressor and relay.
I used a T-bracket from Bunnings. Connect using push blade connectors.
Step 3: Construct a bracket for the 2 horns. I used a strip of metal also from Bunnings, easy to bend but strong enough to stay in shape.

Step 4: Run 12V power lead.
I used a spare blue plug (for foglights?). A push-blade-connector-terminal-clip-thing plugs right on!

I also opted for a 20amp inline fuse, just incase something goes wrong ect.

Note the neat cable ties
Step 4: Connect everything up.
I found it was easiest to get it all in place by going from underneath through the 'mouth'.
I mounted the compressor/relay bracket in the original horn place.
I mounted the horns off a spare hole opposite stock horn.

plenty of room for 2 horns.

Done! incase you were wondering, they are f*cking LOUD. Like so loud it hurts your ears. But so melodic! being 2 toned and all haha.
Quite perfect for our little MX5's
The only downside to this is that now the horn only works with the ignition on. Still worth it though I reckon.
-
the_darkside
- Fast Driver
- Posts: 283
- Joined: Sat Apr 03, 2010 9:44 am
- Location: Gold Coast, QLD
Re: Emily's NA6 V-Special Roadster
Post a vid? I want to hear these in action.
I like my girls how I like my cars, topless.
Who is online
Users browsing this forum: No registered users and 3 guests


