Bloody hell that's awesome! Matsuri would be epic!
Shame to hear about your blown engine man, Are you going to use the same manifold and shiz with the bigger turbo?
Wazman's NB8a
Moderators: timk, Stu, -alex, miata, StanTheMan, greenMachine, ManiacLachy, Daffy, zombie, Andrew, The American, Lokiel
-
RG.net
- Racing Driver
- Posts: 1692
- Joined: Thu Apr 06, 2006 7:48 pm
- Vehicle: NA6
- Location: Sydney
- Contact:
Re: Wazman's NB8a
http://Run-It-Hard.com - We're here to have fun!
-
wazman

- Fast Driver
- Posts: 394
- Joined: Sun Feb 15, 2009 11:39 pm
Re: Wazman's NB8a
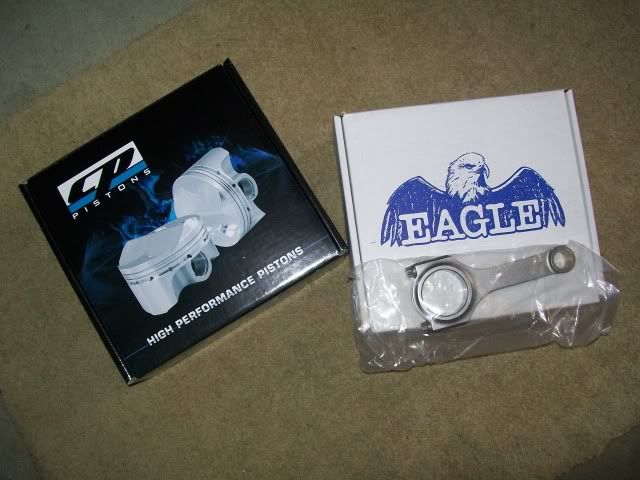
Yeah same manifold.....Got a garret t28, cam gears, valve springs, eagle rods and CP forgies......
xmas present to myself....
xmas present to myself....
ilovedrift.com
-
Okibi

- Speed Racer
- Posts: 10912
- Joined: Thu Aug 21, 2003 11:00 am
- Vehicle: NB SE
- Location: Perth, Western Australia
- Contact:
Re: Wazman's NB8a
Wow i'd love to make that Japan trip (and I cant even drive sideways)!
Thanks for sharing it all with the forum, I love DIY. I'll be keeping an eye on the engine build thread for sure, make sure you take loads of pics.
Thanks for sharing it all with the forum, I love DIY. I'll be keeping an eye on the engine build thread for sure, make sure you take loads of pics.
If you had access to a car like this, would you take it back right away? Neither would I.
-
wazman
- Fast Driver
- Posts: 394
- Joined: Sun Feb 15, 2009 11:39 pm
Re: Wazman's NB8a
I ordered a few parts over the christmas break....and they have started to turn up  I am not loaded in cash so i am trying to make the most power and spend the least amount of money...... i have a crap memory so i'll try and post costs where i can remember what i payed....
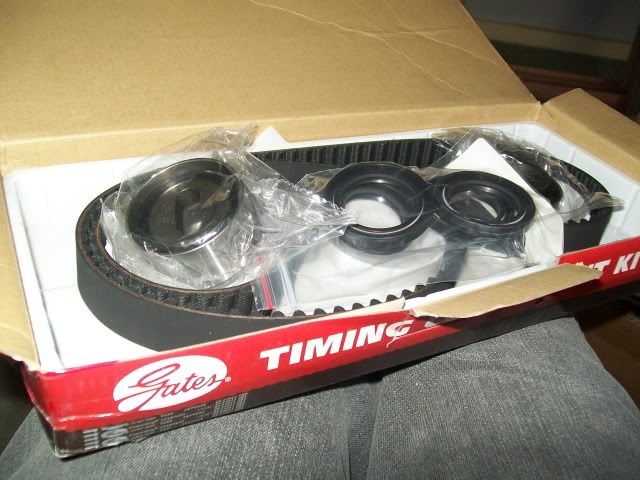
Gates timing belt.....not exciting but necessary $180 ish ...ebay
"Performance Springs" sent me my new higher spring rate valve springs....... $132.55

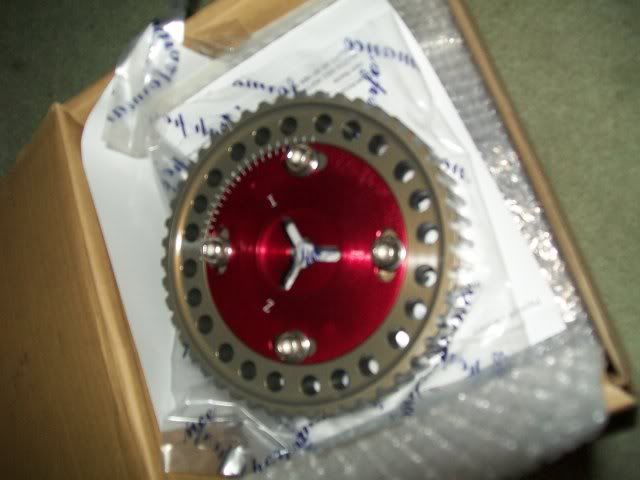
"ULTREX PERFORMANCE" adjustable cam gears $170 delivered from ebay
Engine machinest opens on the 10th so it all ready and waiting for him to open shop
Gates timing belt.....not exciting but necessary
"Performance Springs" sent me my new higher spring rate valve springs....... $132.55
"ULTREX PERFORMANCE" adjustable cam gears $170 delivered from ebay
Engine machinest opens on the 10th so it all ready and waiting for him to open shop
ilovedrift.com
-
wazman
- Fast Driver
- Posts: 394
- Joined: Sun Feb 15, 2009 11:39 pm
Re: Wazman's NB8a
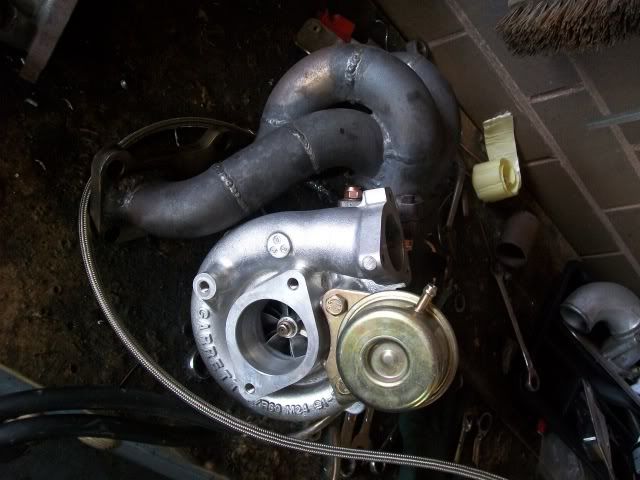
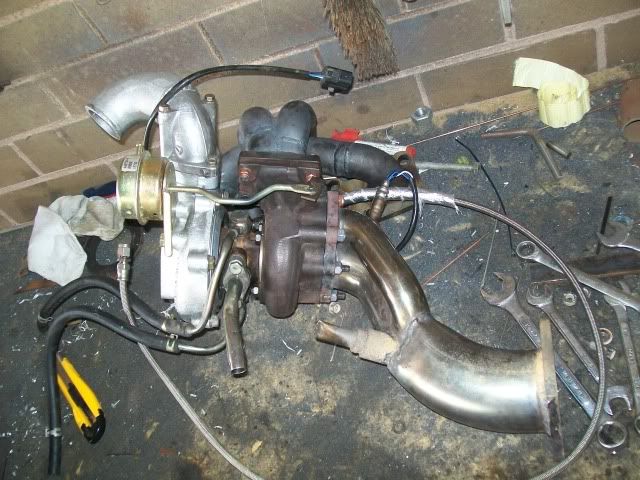
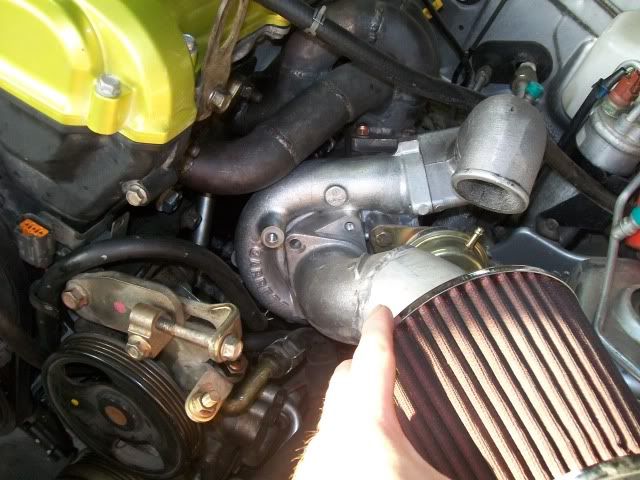
In the mean time i pottered around today and fitted the new second hand T28 garret turbo up to my manifold and dump.
I was worried that the front housing would foul on the manifold because its quite a bit bigger than the T25g......
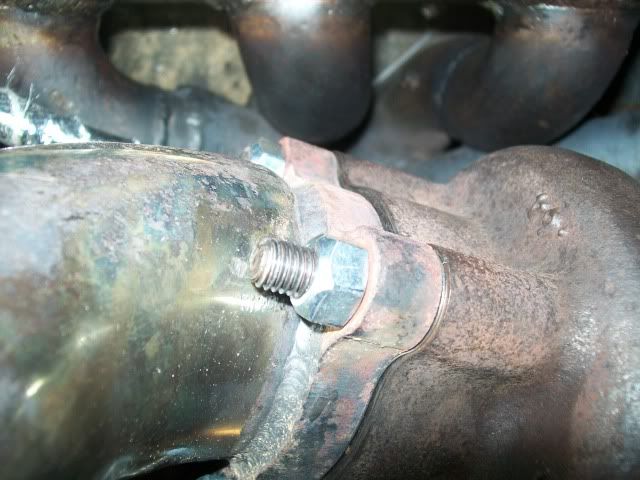
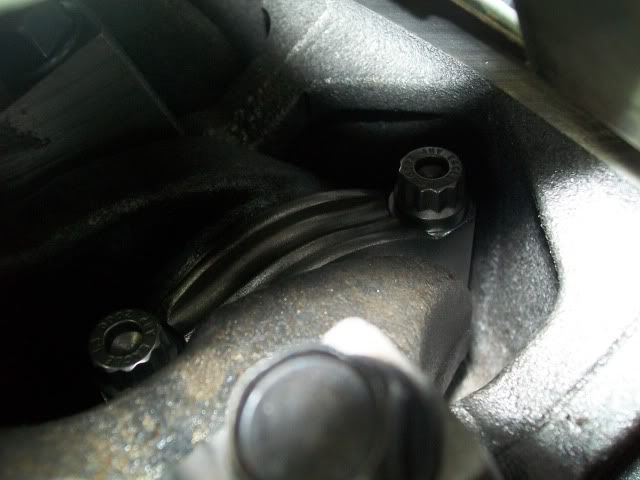
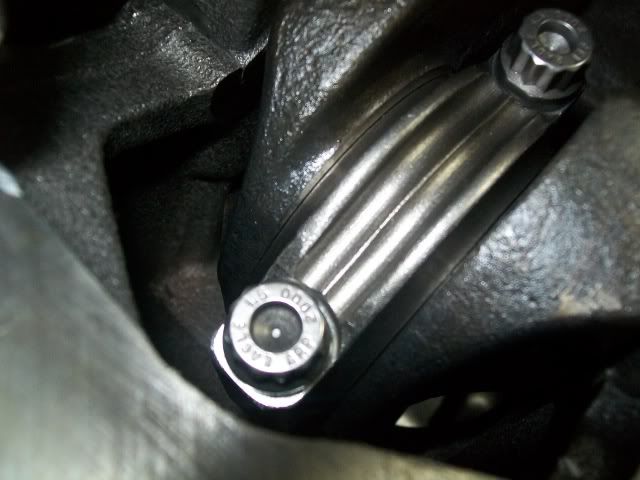
First thing you do when you are bolting up a turbo is make sure you use new BRASS nuts and new studs where you can. Brass dosn't expand and contract as much as metal nuts do (which is the reason that metal nuts always seem to come loose).
I went to MTQ in dandenong as they have in stock the range of "sonic performance" turbo gaskets, banjo's, oil feed fittings and stud kits.....also flanges.
I bought the stud kit which comes with crimped brass nuts, the crimp ensures the nut binds on the thread slightly so it cant vibrate loose.

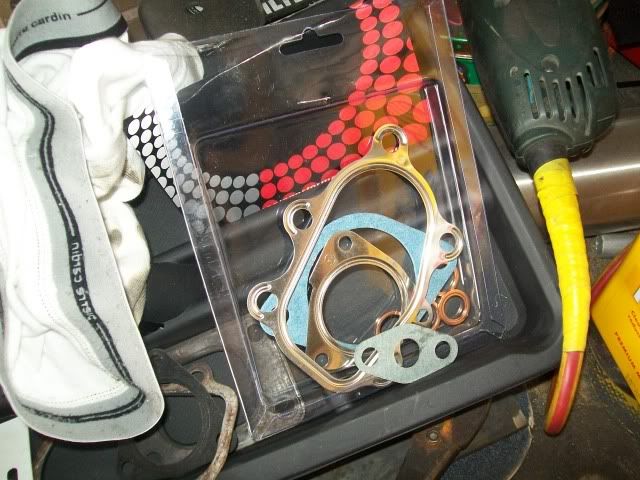
I also bought the T28 Sonic gasket kit......both these kits together cost me $35 ish
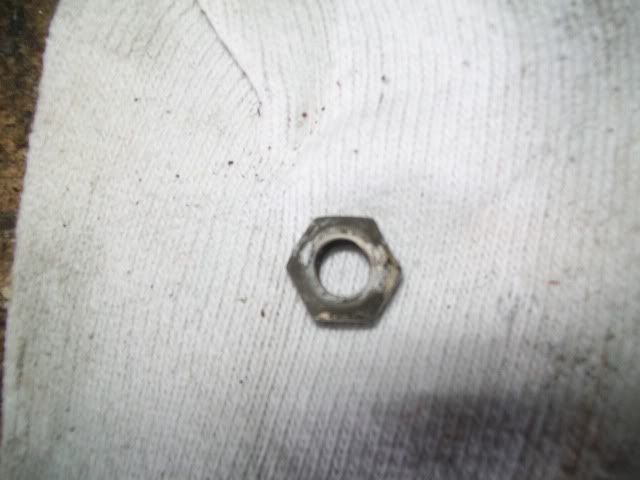
I also went to melb bolt co at 271 Boundary Road to get some crimped steel nuts to hold the dump pipe on... 80c each ish
If you look closely you can see they crimp the last thread or so into an oval shape so it binds on the thread slightly and cant vibrate loose !
Picture bellow is the brass nuts that i used to hold the turbo to the manifold and the new pressed stainless steel gasket in between.
The sonic dump pipe gasket is also a stainless steel pressed type. ( i have found this style to be very reliable in the past 8 years of turbo car owner ship)
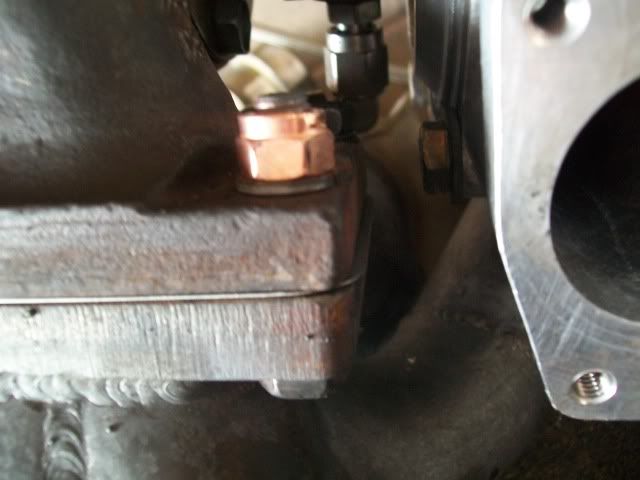
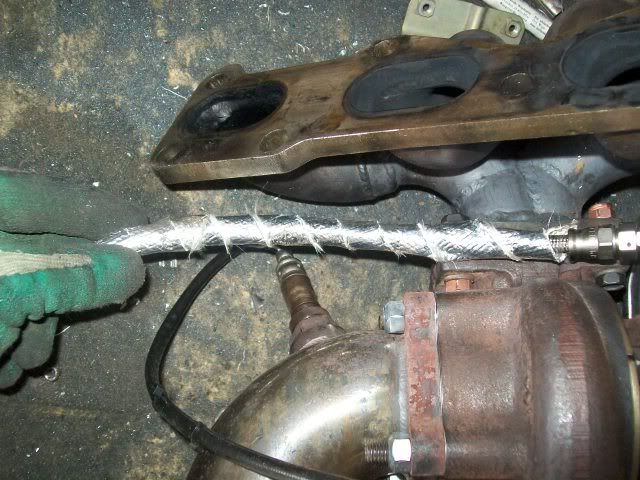
Since the T25g and the T28 use the same water and oil lines in the same place its just a matter of swapping them over. I added some heat wrap to my oil line this time ( i'm trying to do all the little things to get my temps under control)
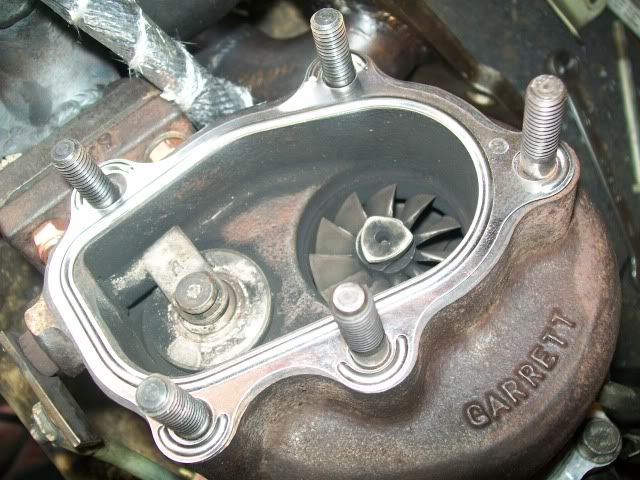
This pic shows how close the front of the turbo housing on the T28 is to the manifold runner......the t25 had a 12mm gap ! now its about 2mm with the T28 fitted ! YAY no need to modify the manifold
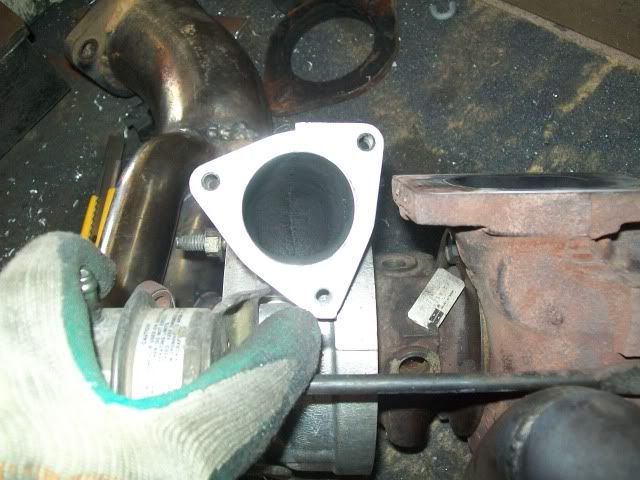
The only annoying thing that i did notice is that where the outlet snout bolts onto the front turbo housing......its a different rotation !! argh !!!
Bad ! because my snout had a custom alloy bend welded onto it.....and when fitted to the new turbo, it wont line up with my cooler piping anymore
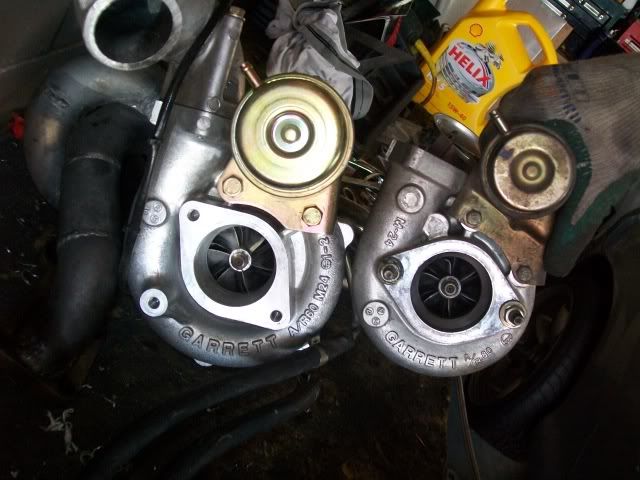
T25
T28
Lucky i havn't kicked out my welder house mate yet!
All fitted up !
The money shot ! size comparison of the front housing is most obvious like this The T28 was $300 found on Hardtuned.net classifieds
I was worried that the front housing would foul on the manifold because its quite a bit bigger than the T25g......
First thing you do when you are bolting up a turbo is make sure you use new BRASS nuts and new studs where you can. Brass dosn't expand and contract as much as metal nuts do (which is the reason that metal nuts always seem to come loose).
I went to MTQ in dandenong as they have in stock the range of "sonic performance" turbo gaskets, banjo's, oil feed fittings and stud kits.....also flanges.
I bought the stud kit which comes with crimped brass nuts, the crimp ensures the nut binds on the thread slightly so it cant vibrate loose.
I also bought the T28 Sonic gasket kit......both these kits together cost me $35 ish
I also went to melb bolt co at 271 Boundary Road to get some crimped steel nuts to hold the dump pipe on... 80c each ish
If you look closely you can see they crimp the last thread or so into an oval shape so it binds on the thread slightly and cant vibrate loose !
Picture bellow is the brass nuts that i used to hold the turbo to the manifold and the new pressed stainless steel gasket in between.
The sonic dump pipe gasket is also a stainless steel pressed type. ( i have found this style to be very reliable in the past 8 years of turbo car owner ship)
Since the T25g and the T28 use the same water and oil lines in the same place its just a matter of swapping them over. I added some heat wrap to my oil line this time ( i'm trying to do all the little things to get my temps under control)
This pic shows how close the front of the turbo housing on the T28 is to the manifold runner......the t25 had a 12mm gap ! now its about 2mm with the T28 fitted ! YAY no need to modify the manifold
The only annoying thing that i did notice is that where the outlet snout bolts onto the front turbo housing......its a different rotation !! argh !!!
Bad ! because my snout had a custom alloy bend welded onto it.....and when fitted to the new turbo, it wont line up with my cooler piping anymore
T25
T28
Lucky i havn't kicked out my welder house mate yet!
All fitted up !
The money shot ! size comparison of the front housing is most obvious like this
Last edited by wazman on Sat Jan 08, 2011 6:25 pm, edited 1 time in total.
ilovedrift.com
-
wazman
- Fast Driver
- Posts: 394
- Joined: Sun Feb 15, 2009 11:39 pm
Re: Wazman's NB8a
Note the BENT fin on the T25 in the comparison shot !?!
we believe that was caused the by the piece of piston that broke off going the the exhaust side of the turbo ! making the shaft jump just enough to cause the front impeller to hit the side of the front housing ! and bend the fin.........as i always run a pod filter so nothing else could get in there
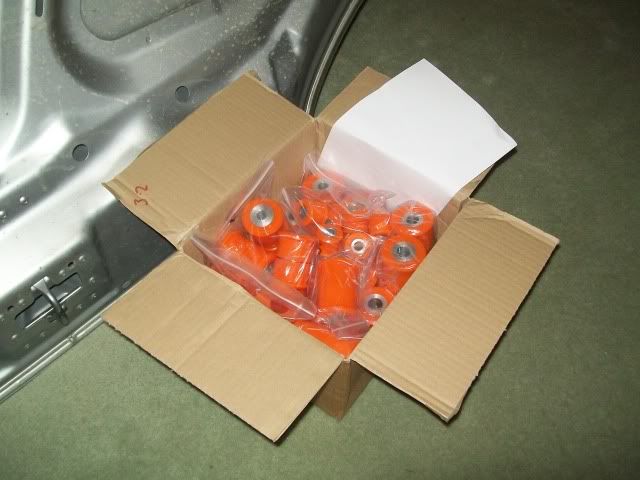
I have a whole Polyurethane bush set for the suspension coming from the UK .......
so there is more to come........
we believe that was caused the by the piece of piston that broke off going the the exhaust side of the turbo ! making the shaft jump just enough to cause the front impeller to hit the side of the front housing ! and bend the fin.........as i always run a pod filter so nothing else could get in there
I have a whole Polyurethane bush set for the suspension coming from the UK .......
so there is more to come........
ilovedrift.com
-
Okibi
- Speed Racer
- Posts: 10912
- Joined: Thu Aug 21, 2003 11:00 am
- Vehicle: NB SE
- Location: Perth, Western Australia
- Contact:
Re: Wazman's NB8a
Great photos and explanations, hope to see the engine build pics too.
If you had access to a car like this, would you take it back right away? Neither would I.
-
wazman
- Fast Driver
- Posts: 394
- Joined: Sun Feb 15, 2009 11:39 pm
Re: Wazman's NB8a
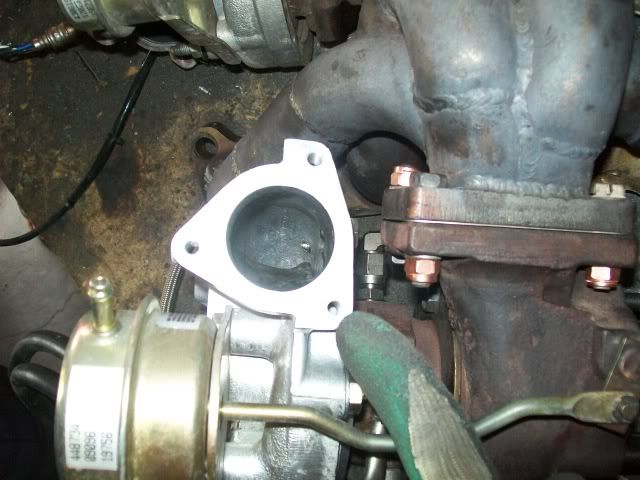
URGH !!!! i just noticed that where the intake bolts onto the front of the T28 is also at a different rotation ! mutter mutter grumble grumble T28 proving not to be a simple "bolt on" replacment for the t25........ 
On the bright side, I dropped the goodies off to the B'n'B engines this morning to get the ball rolling and they said should be done by wed ! YAY!
Also these suckers turned up this morning.......they were on sale on ebay from flo flex....$224 aus, i payed for em on the 29th dec and they arrived on the 10th jan.
ilovedrift.com
-
gobsmax

- Racing Driver
- Posts: 975
- Joined: Wed Jan 09, 2008 10:48 am
- Vehicle: NA6
- Location: Sydney, Inner West
Re: Wazman's NB8a
Let us know how the Flo_Flex are. I saw them on special for $99 pounds + shipping about a month ago but held back because I didn't know much about them.
Red '91 NA6 (R.I.P.)
Black '07 NC PRHT (R.I.P.)
Gold '98 NB8A (SOLD)
Soul Red '15 ND 1.5 GT
Black '07 NC PRHT (R.I.P.)
Gold '98 NB8A (SOLD)
Soul Red '15 ND 1.5 GT
-
rxmx
- Fast Driver
- Posts: 338
- Joined: Tue Dec 16, 2003 11:43 pm
- Vehicle: NA6 - Turbo
- Location: Sydney
Re: Wazman's NB8a
Hey wazman, nice build mate, looking forward to see it complete again.
What sort of specs are on the valve springs and do they just drop in?
Suli,
What sort of specs are on the valve springs and do they just drop in?
Suli,
http://www.facebook.com/purefabcustom
EFR6758 run-in tune 259hp atw on 10psi pump 98 dyno dynamics
E85 tune - 445hp @ wheels 17psi
EFR6758 run-in tune 259hp atw on 10psi pump 98 dyno dynamics
E85 tune - 445hp @ wheels 17psi
-
MX51MN
- Driver
- Posts: 46
- Joined: Thu Oct 21, 2010 1:11 am
- Vehicle: NB8A
- Location: liverpool
Re: Wazman's NB8a
far i just spent a good hour reading the whole 19 page. exciting stuff man, hope to see more of this beast.
im envious, wish i can drive turbo.
keep up the awesome work.
im envious, wish i can drive turbo.
keep up the awesome work.
-
wazman
- Fast Driver
- Posts: 394
- Joined: Sun Feb 15, 2009 11:39 pm
Re: Wazman's NB8a
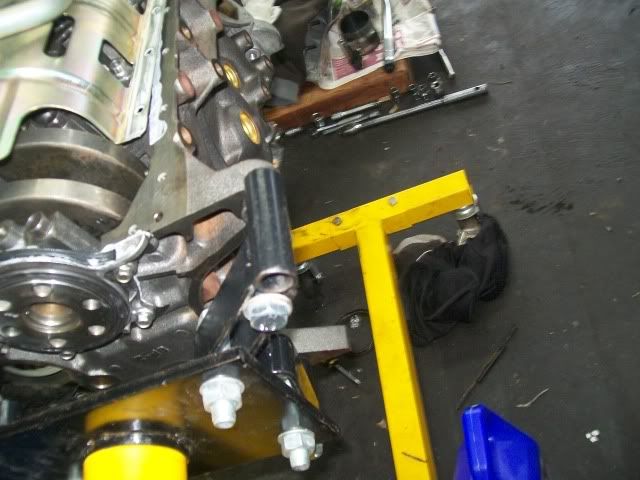
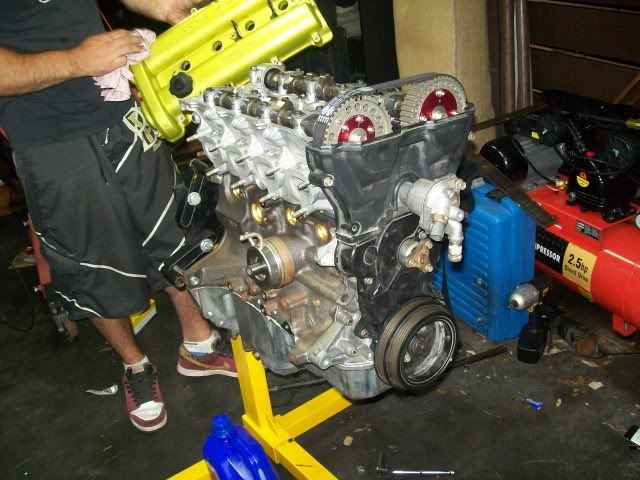
So two weeks ago i got all my stuff back from the motor machinest (B'n'B engines on westal rd).......
I'm sorry to all those that were hoping for a nut by nut build..... I got it all home and my house mate decided that he would help and went at it like a bull at a gate and i did not take any where near as many photo's as i might have liked....
He had the pistons in even before i could get the camera out of the house.
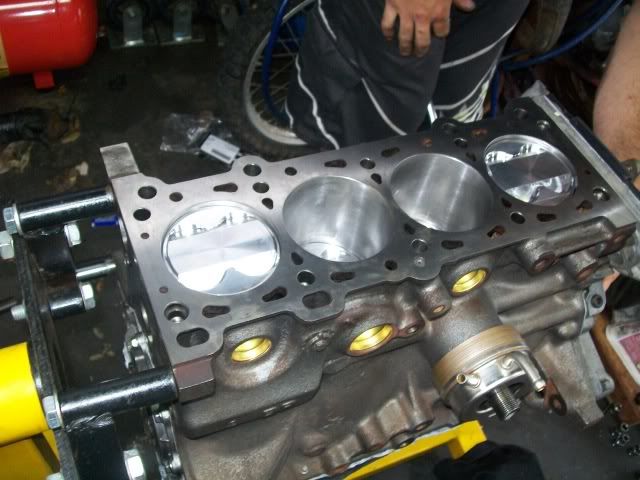
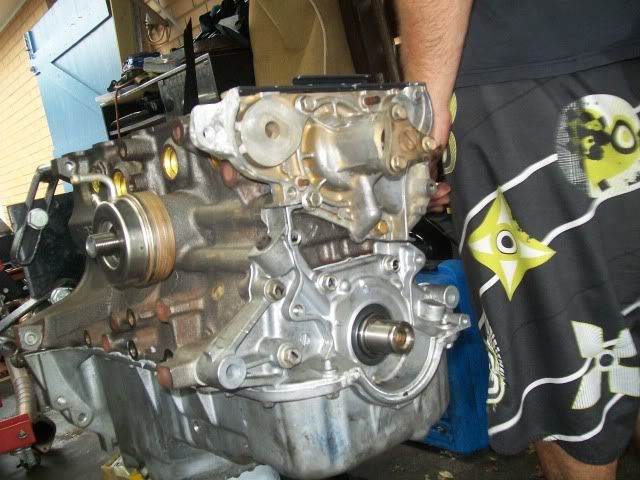
Eagle rods and Cp pistons all went in with no probs, 20 thou oversize.
big end caps are numbered and have an arrow thingy moulded into the casting that needs to point to the front of the motor on each one.
I didn't use "ACL race bearing as the machinest said they are over kill and more likely to damage the crank as it is not billet.....so i used normal ones that he supplied. You can see there is a sump oil drip collector thingy that goes on before the sump, stick that down first then the sump goes on after and sump bolts hold it all down.
The Cp pistons have valve relief cut into them in case you choose to run aggressive cams. Block was chem cleaned, bored, decked and reemed.
Get the crank and pistons in and torqued down (thanks Okibi) then make sure it turns relatively easily. I used engine building grease on all the bearings and cams.....When you get your block chem cleaned you have to put in new welsh plugs (the gold round thingys in the side of the block) I used a socket slightly smaller than each plug and tapped them gently into place until they were just a bee's dick bellow the surface of the block.
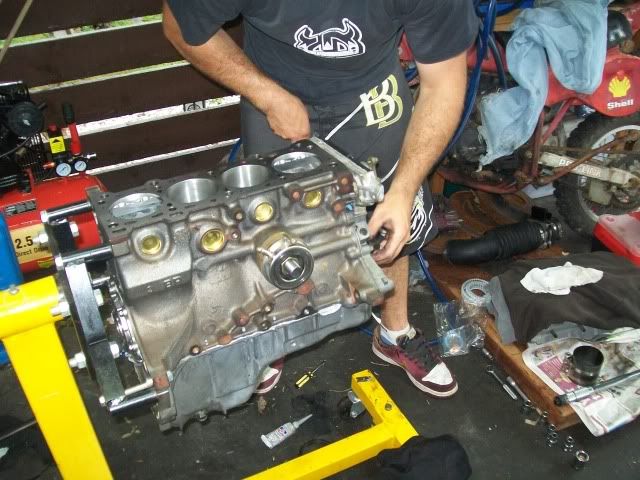
On goes the oil pump and sump, sealed with plenty of grey stuff! (engine silicon)
I'm sorry to all those that were hoping for a nut by nut build..... I got it all home and my house mate decided that he would help and went at it like a bull at a gate and i did not take any where near as many photo's as i might have liked....
He had the pistons in even before i could get the camera out of the house.
Eagle rods and Cp pistons all went in with no probs, 20 thou oversize.
big end caps are numbered and have an arrow thingy moulded into the casting that needs to point to the front of the motor on each one.
I didn't use "ACL race bearing as the machinest said they are over kill and more likely to damage the crank as it is not billet.....so i used normal ones that he supplied. You can see there is a sump oil drip collector thingy that goes on before the sump, stick that down first then the sump goes on after and sump bolts hold it all down.
The Cp pistons have valve relief cut into them in case you choose to run aggressive cams. Block was chem cleaned, bored, decked and reemed.
Get the crank and pistons in and torqued down (thanks Okibi) then make sure it turns relatively easily. I used engine building grease on all the bearings and cams.....When you get your block chem cleaned you have to put in new welsh plugs (the gold round thingys in the side of the block) I used a socket slightly smaller than each plug and tapped them gently into place until they were just a bee's dick bellow the surface of the block.
On goes the oil pump and sump, sealed with plenty of grey stuff! (engine silicon)
ilovedrift.com
-
wazman
- Fast Driver
- Posts: 394
- Joined: Sun Feb 15, 2009 11:39 pm
Re: Wazman's NB8a
Before i pulled the motor out i drained the coolant into a bucket and this is where i put the water pump while the engine was pulled down! The reason for this is because the seals dry out if its not a new pump then the old seals shrink during the engine down time while not submerged in coolant! and it sucks when you get it all back in the car and driving and then it starts leaking !
shiny stuff !
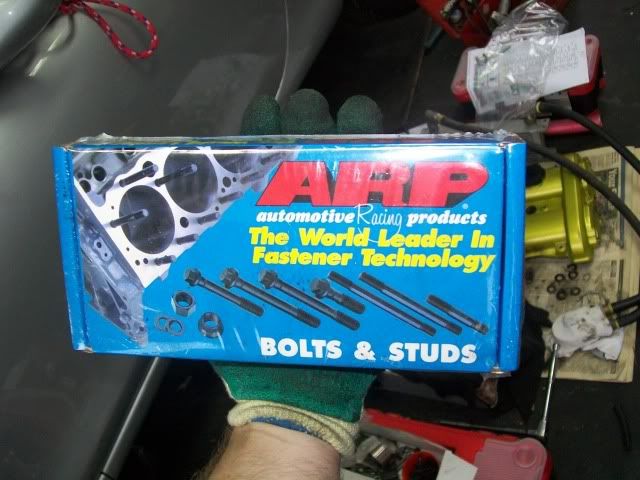
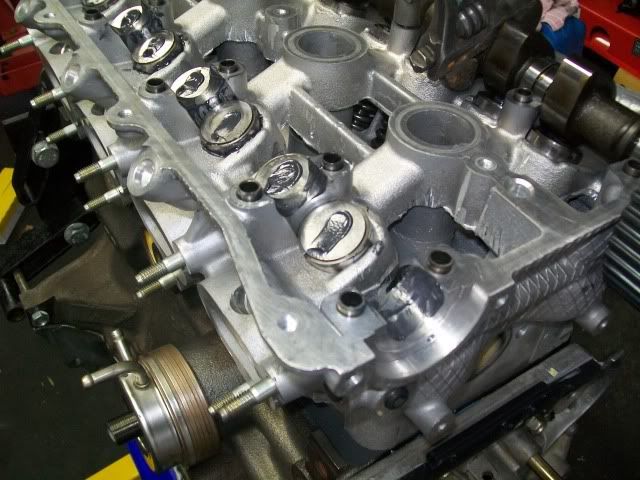
Arp head stud kit went in.....there was some confussion as to what torque setting to use as some guy was saying in one thread i read somewhere that he managed to crush the bolt seat by torquing it to the Arp spec's ! i chose to do them to 75 with the arp lube..... cant see any cracks 
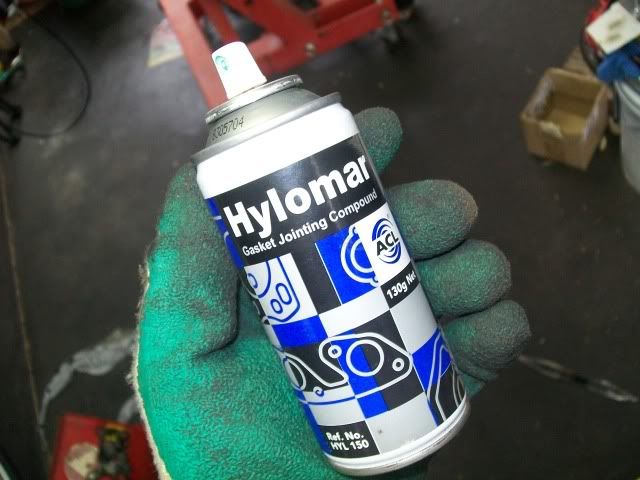
The sticky metal head gasket goo needs to be sprayed onto the head gasket before putting the head on..... both sides and wait the required time then slap her together !
Arp are American i presume because they use the stupid imperial system.......I fecked around for an hour looking for a stupid imperial allen key to screw the ARP studs in!
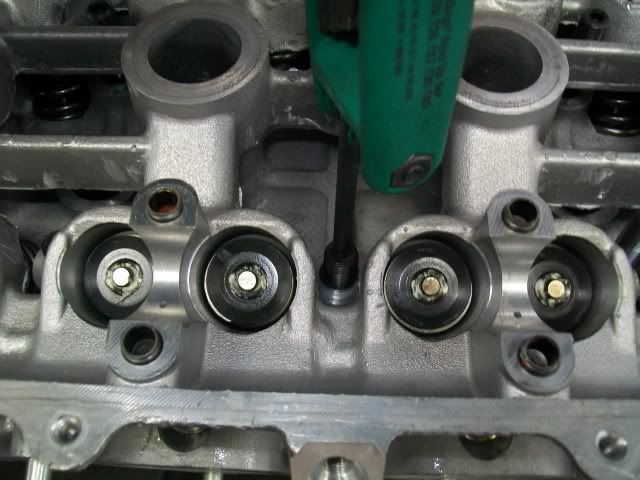

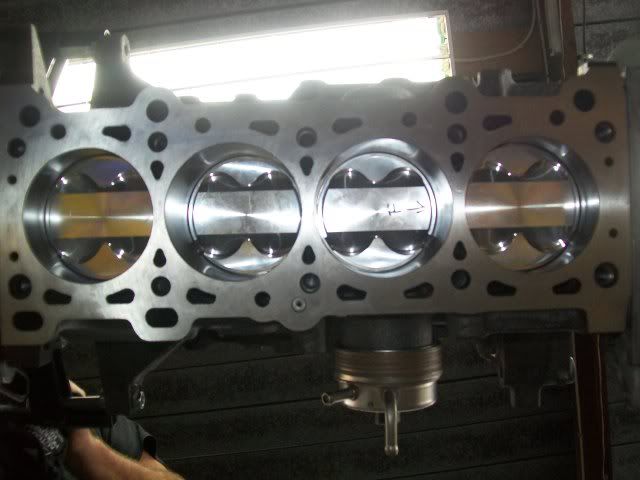
The buckets and shim's go into their respective sides.
I had the machinest check the valve seats and guids to make sure they were not wore bad..... all ok and he installed the performance valve springs because i dont have a spring compressor. The spring are just a higher rate than the originals....... more building grease on top of the buckets to prevent wear on start up while the oil takes its time to pump through the motor.
I did forget what order all the stuff went back on the front of the motor but i worked it out in the end.
I also fitted the adjustable cam gears at this stage.....
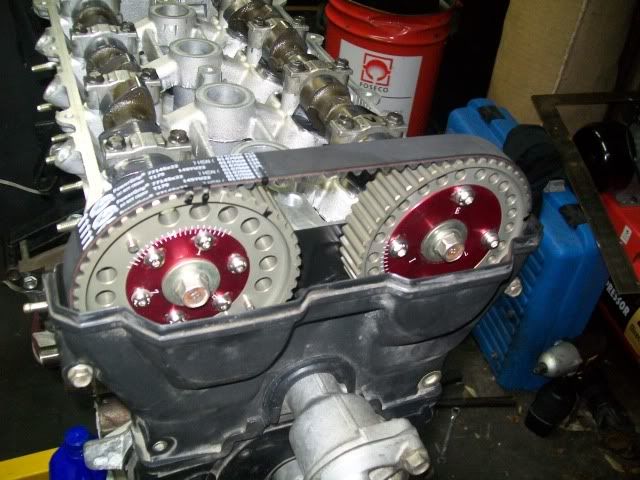
New "GATES" timing belt installed as well.
The cam saddles are torqued down and cam cover can go on with new gaskets everywhere
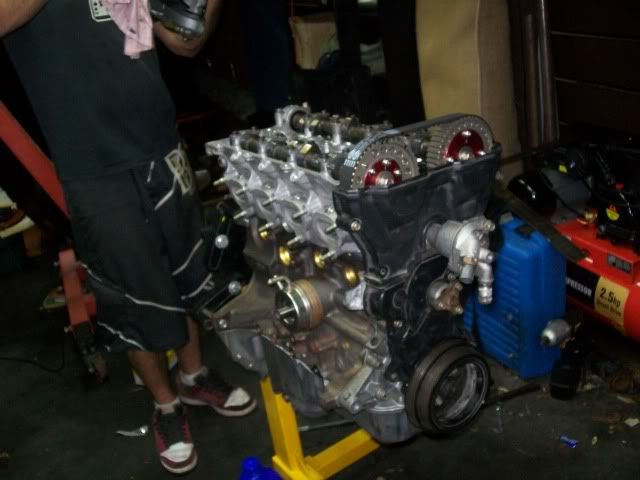
not the cleanest engine building shop you've ever seen ! lol but in the end it all worked out sweet !

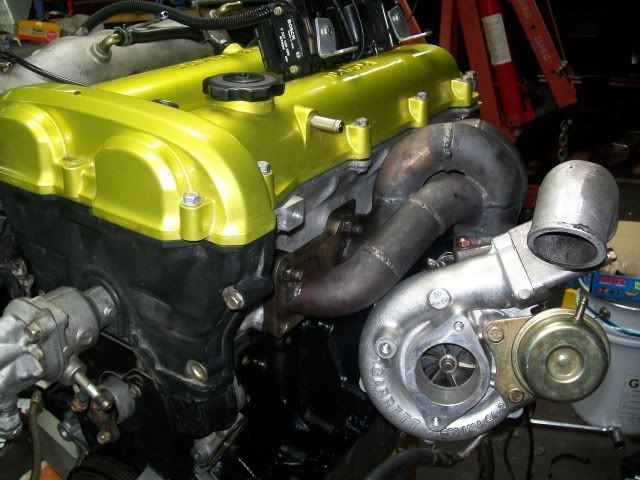
On go the plenum and turbo kit....
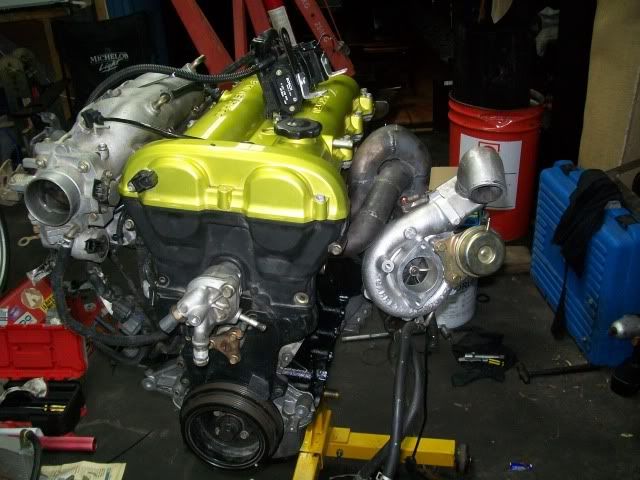
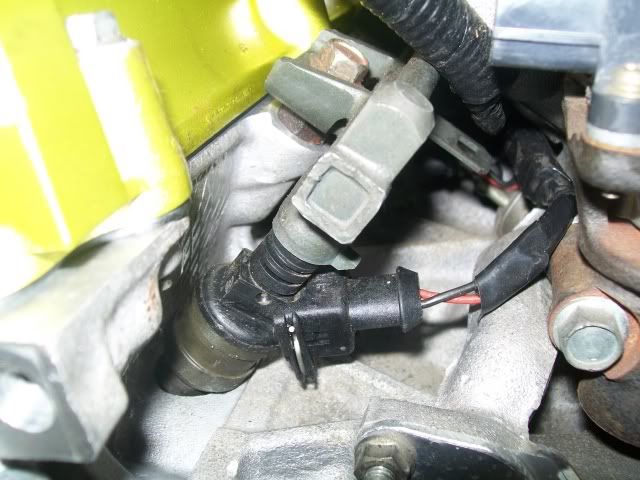
These are the SARD 550's that i had installed previously.....but never showed a pic, so here it is. I had a problem on start up ! the injectors were leaking !!!
Turns out that the injector seals also shrink when not kept in contact with petrol !!! time for new injector seals
Here you can see the difference in the rotation of the intake bolt holes......time to cut and weld again !
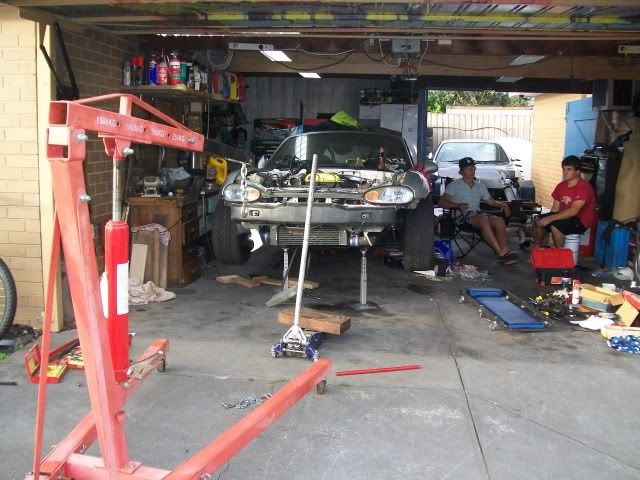
In she goes and hook everything back up!
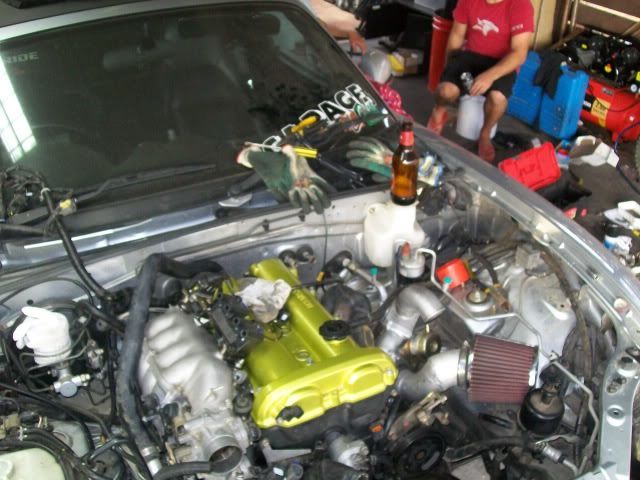
built and installed in 3 days......with excessive sleep in's involved !
shiny stuff !
Arp head stud kit went in.....there was some confussion as to what torque setting to use as some guy was saying in one thread i read somewhere that he managed to crush the bolt seat by torquing it to the Arp spec's !
The sticky metal head gasket goo needs to be sprayed onto the head gasket before putting the head on..... both sides and wait the required time then slap her together !
Arp are American i presume because they use the stupid imperial system.......I fecked around for an hour looking for a stupid imperial allen key to screw the ARP studs in!
The buckets and shim's go into their respective sides.
I had the machinest check the valve seats and guids to make sure they were not wore bad..... all ok and he installed the performance valve springs because i dont have a spring compressor. The spring are just a higher rate than the originals....... more building grease on top of the buckets to prevent wear on start up while the oil takes its time to pump through the motor.
I did forget what order all the stuff went back on the front of the motor but i worked it out in the end.
I also fitted the adjustable cam gears at this stage.....
New "GATES" timing belt installed as well.
The cam saddles are torqued down and cam cover can go on with new gaskets everywhere
not the cleanest engine building shop you've ever seen ! lol but in the end it all worked out sweet !
On go the plenum and turbo kit....
These are the SARD 550's that i had installed previously.....but never showed a pic, so here it is. I had a problem on start up ! the injectors were leaking !!!
Turns out that the injector seals also shrink when not kept in contact with petrol !!! time for new injector seals
Here you can see the difference in the rotation of the intake bolt holes......time to cut and weld again !
In she goes and hook everything back up!
built and installed in 3 days......with excessive sleep in's involved !
ilovedrift.com
-
wazman
- Fast Driver
- Posts: 394
- Joined: Sun Feb 15, 2009 11:39 pm
Re: Wazman's NB8a
After a run in up and down Mt dandenong and around the city a bit I took my sled down to Trent at CHECKERED TUNING (spelling) for a tune.
a couple of hours later and i had 190 rwkw's !!! but he didnt want to do the Cam gear tune until after more of a run in with the new power and the cam gears require some hard high rev runs..... He wanted me to thrash it around a bit as is to make sure its all good then will chuck it back on the dyno and get that elusive 200 rwkw mark that i want.
a couple of hours later and i had 190 rwkw's !!! but he didnt want to do the Cam gear tune until after more of a run in with the new power and the cam gears require some hard high rev runs..... He wanted me to thrash it around a bit as is to make sure its all good then will chuck it back on the dyno and get that elusive 200 rwkw mark that i want.
ilovedrift.com
-
Okibi
- Speed Racer
- Posts: 10912
- Joined: Thu Aug 21, 2003 11:00 am
- Vehicle: NB SE
- Location: Perth, Western Australia
- Contact:
Re: Wazman's NB8a
Nice work! Bet it feels great to drive, can't wait to see the dyno sheets.
If you had access to a car like this, would you take it back right away? Neither would I.
Who is online
Users browsing this forum: No registered users and 6 guests


