NC 20BPP Time Attack / Track Car - Build Thread
Moderators: timk, Stu, zombie, Andrew, The American, Lokiel, -alex, miata, StanTheMan, greenMachine, ManiacLachy, Daffy
-
- Fast Driver
- Posts: 244
- Joined: Sat Nov 24, 2007 1:49 pm
- Vehicle: ND - 2 GT
- Location: Brisvegus
Renesis NC Track Car - In the Build - Updated 12 Oct 2009
Love it!
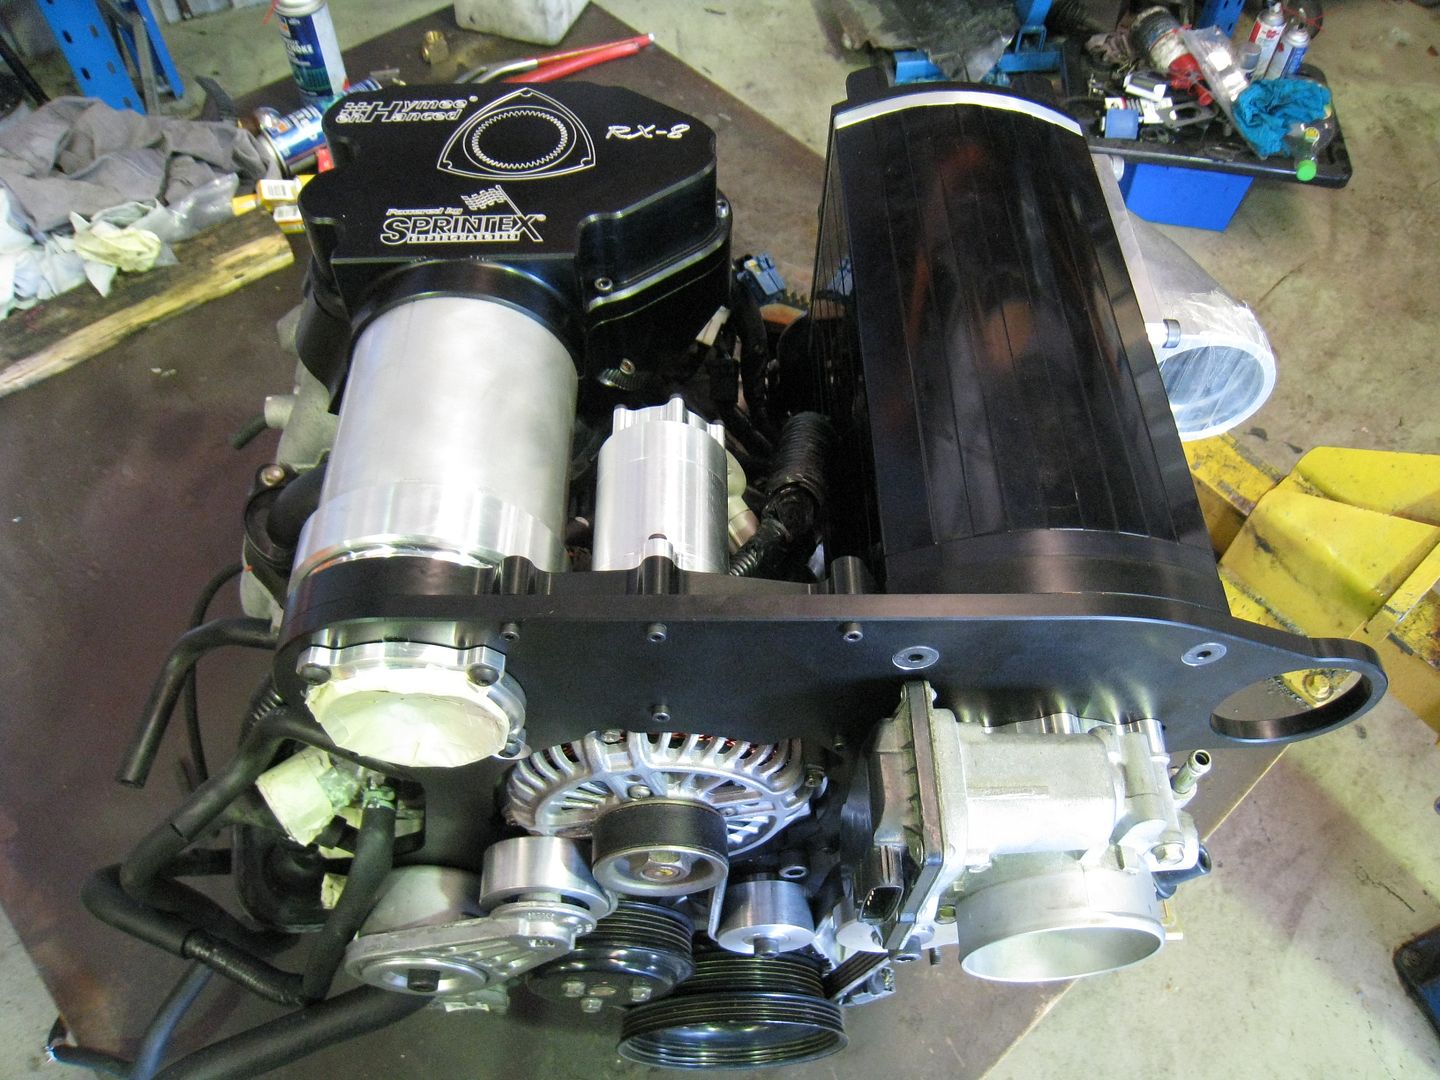
So, on the black front panel I can see a hole for intake pipe to charger, a discharge from charger forward to (not shown) intercooler, then I reckon there's a very large diameter return from the cooler to a (not shown) pipe that connects to the intake system of the engine. In between these is the coke can sized thing. Is this a BOV or bypass? If it is, is the plumbing all sandwiched between the black front plate and the bits behind? Does something attach to the back of the coke can part?
A lot of thought must have gone into all this!!
What is the ratio of displacements SC to Engine? ie what boost is predicted excluding losses?
M.
- orx626
- Forum sponsor
- Posts: 1774
- Joined: Thu Sep 23, 2004 8:26 am
- Vehicle: NC - Rotary
- Location: Brisbane - Northside
- Contact:
Renesis NC Track Car - In the Build - Updated 12 Oct 2009
sliq wrote:i'm excited can't wait orx!
Me too Sliq!!
FMS01 wrote:At first glance I thought your supercharger was "Hymen Enhanced"
Cheers,
Julian
Julian, I don't know about enhanced....it would probably be better at removing them.
Old Dude wrote:Very nice, looking good.
Cheers
Old Dude
Thanks Dale. I hope to get a good run at the project over the Xmas period.
bruce wrote:Looks so nice. Black is the new polished/chrome.
taminga16 wrote:Danny,
Thank-you for sharing your project with us. When I am in Brisbane next I will come over and wash it for you.
Regards.
Greg.
You don't have to wash it Greg. You're more than welcome to have a squiz.
16bit wrote:would this fit into a particular race category if you wanted to compete with it?
No idea James. Probably an "Open" class of some sort. I haven't built the car to any class specific recipe.
love5 wrote:It's arrived!!
Can't wait to hear it whinging......
Stu, if you can hear whinging coming from my car then my wife's probably in it! ...Just joking Sam!
She should certainly have a nice whine though!
Mokesta wrote:Love it!
So, on the black front panel I can see a hole for intake pipe to charger, a discharge from charger forward to (not shown) intercooler, then I reckon there's a very large diameter return from the cooler to a (not shown) pipe that connects to the intake system of the engine. In between these is the coke can sized thing. Is this a BOV or bypass? If it is, is the plumbing all sandwiched between the black front plate and the bits behind? Does something attach to the back of the coke can part?
A lot of thought must have gone into all this!!
What is the ratio of displacements SC to Engine? ie what boost is predicted excluding losses?
M.
Mark, it is an internal bypass valve that is vacuum actuated. Yes the porting for it is in the plate sandwich. Yes there is almost 6 years of development in the design of the supercharger kit.
If I remember the figures Hymee told me for the prototype kit, as a direct drive pulley ratio comparison, we should see at least 0.8 bar (12 psi) with the current pulley diameter. With larger injectors a smaller dríven pulley will easily deliver a higher mass air flowrate. The proof will be on the engine dyno.
Cheers,
Danny
- orx626
- Forum sponsor
- Posts: 1774
- Joined: Thu Sep 23, 2004 8:26 am
- Vehicle: NC - Rotary
- Location: Brisbane - Northside
- Contact:
Renesis NC Track Car - In the Build - Updated 12 Oct 2009
Today was indeed a "Milestone" for the Renesis NC project with the installation of the supercharger kit getting underway.
First up this morning was the removal of unnecessary components and cleaning of the engine in anticipation of the supercharger installation. The engine is from a FY 2005 JDM RX-8 and has 33,000km on it. It has been in storage for almost 12 months so it was pretty dusty. A quick hit with citrus cleaner and a pressure washer was exactly what was required as I couldn't let the engine detract from the awesomeness that was about to be bolted to it.
Upper section of inlet manifold including throttle body removed.
Removal of the oil filler neck and vacuum reservoir assembly. The vacuum reservoir and components will be reinstated at a later date.
After all the orifices were suitably protected the engine got washed and came up looking like it was on the Mazda production line awaiting fitment.
Once dried, the gearbox was removed from the engine and placed upon the workbench. The supercharger mounting plate utilises a the alternator mounting bolts and most of the water pump bolts to lock it in position. So these standard fasteners (bolts and studs) were removed.
The first item of the supercharger kit to be installed was the two piece plenum and inlet tube. Here is the lower section of plenum with it's 'O'-rings fitted.
It mates with the surfaces as shown in the next photo.
With the lower section of plenum bolted in place you can really appreciate the dimensional accuracy of the kit as the port matching was perfect.
This is the upper section of plenum awaiting its 'O'-ring to be installed.
Then things got exciting and happened really quickly and I forgot to take stage photos! Here is the belt/tensioner arrangement for the supercharger drive.
The factory ignition coils and bracket are retained and relocated further outboard by way of a bracket and two spacers.
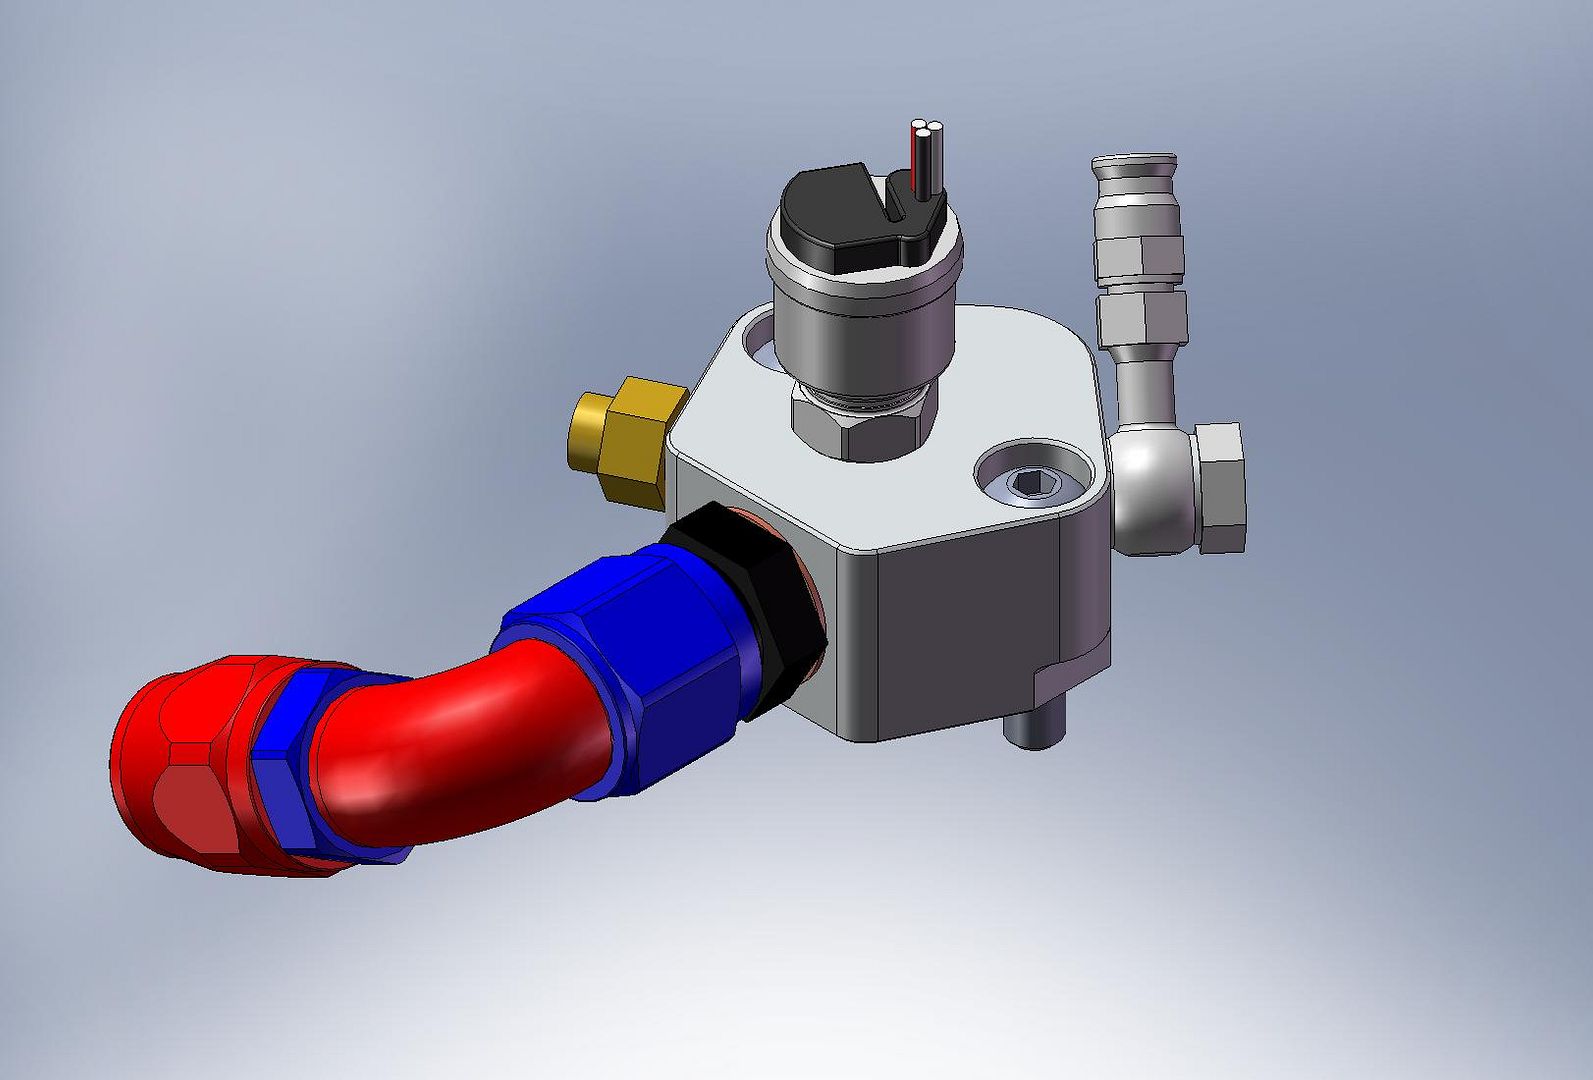
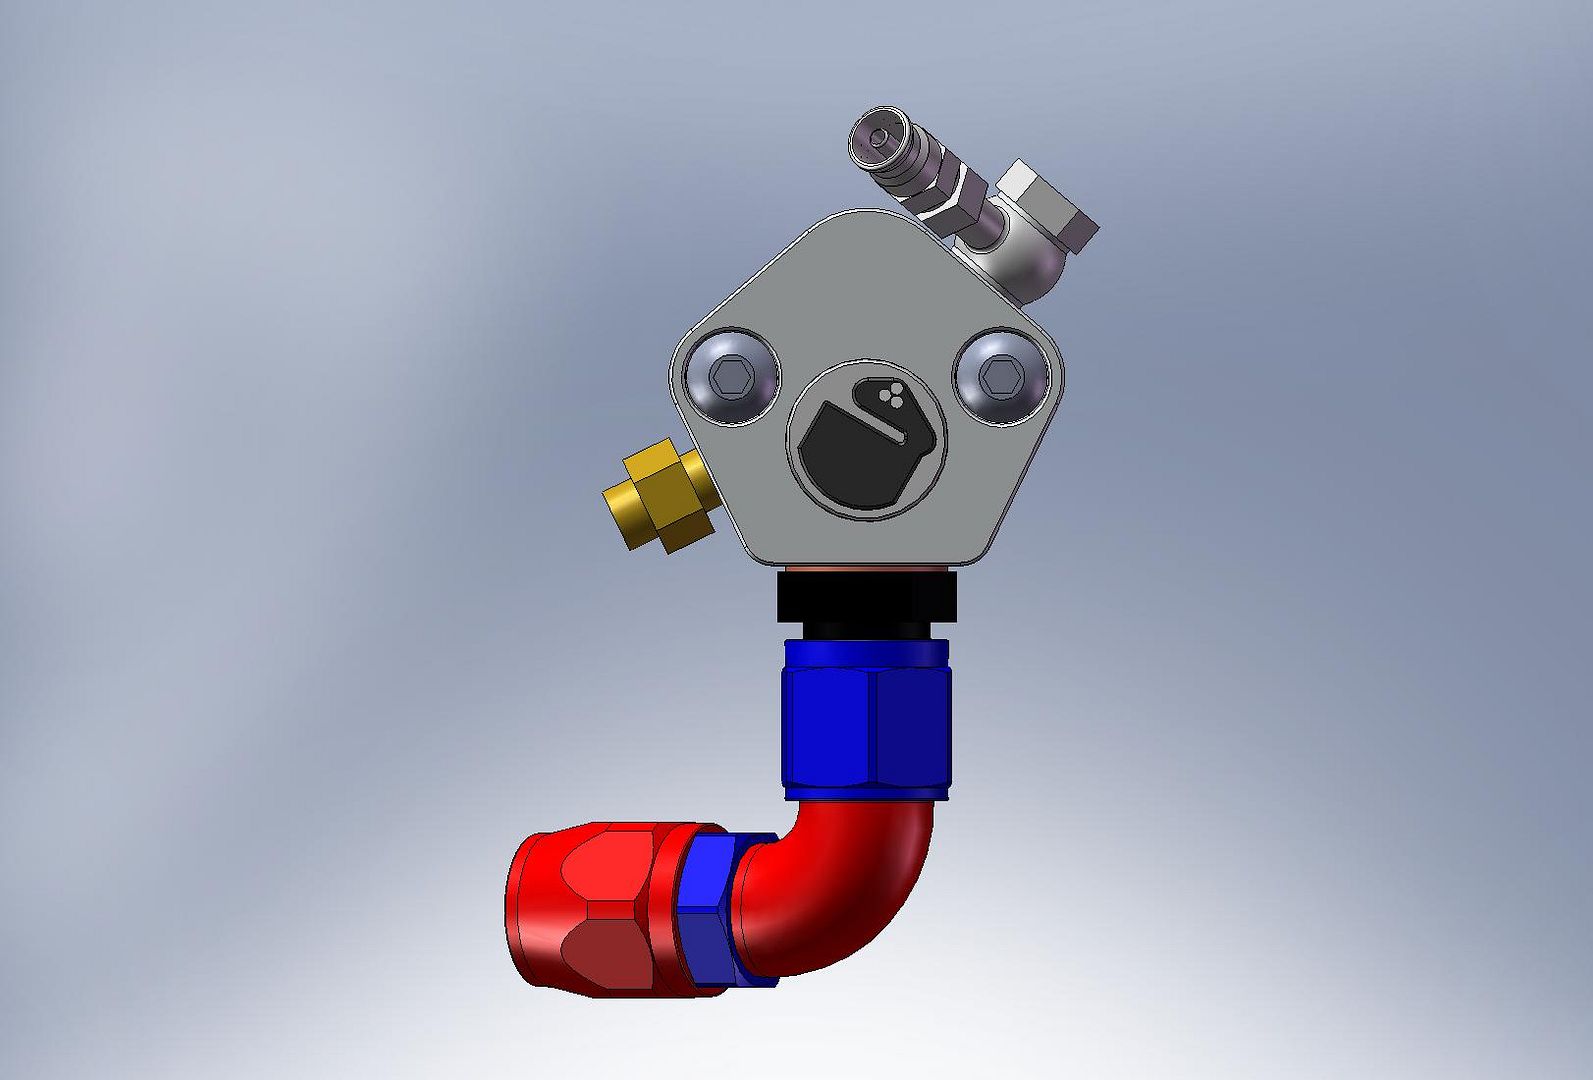
The supercharger kit uses a layshaft to transfer the drive rotation from the front belt drive arrangement to the internal gearset at the rear of the compressor. Lubrication is provided via an oil line tapping from the oil filter outlet to the sealed supercharger drive gearset and returns to the sump via an oil filler neck adaptor. The supply line is the small gauge stainless wire braided hose. The return line is not shown.
I'll let the next group of photos speak for themselves.
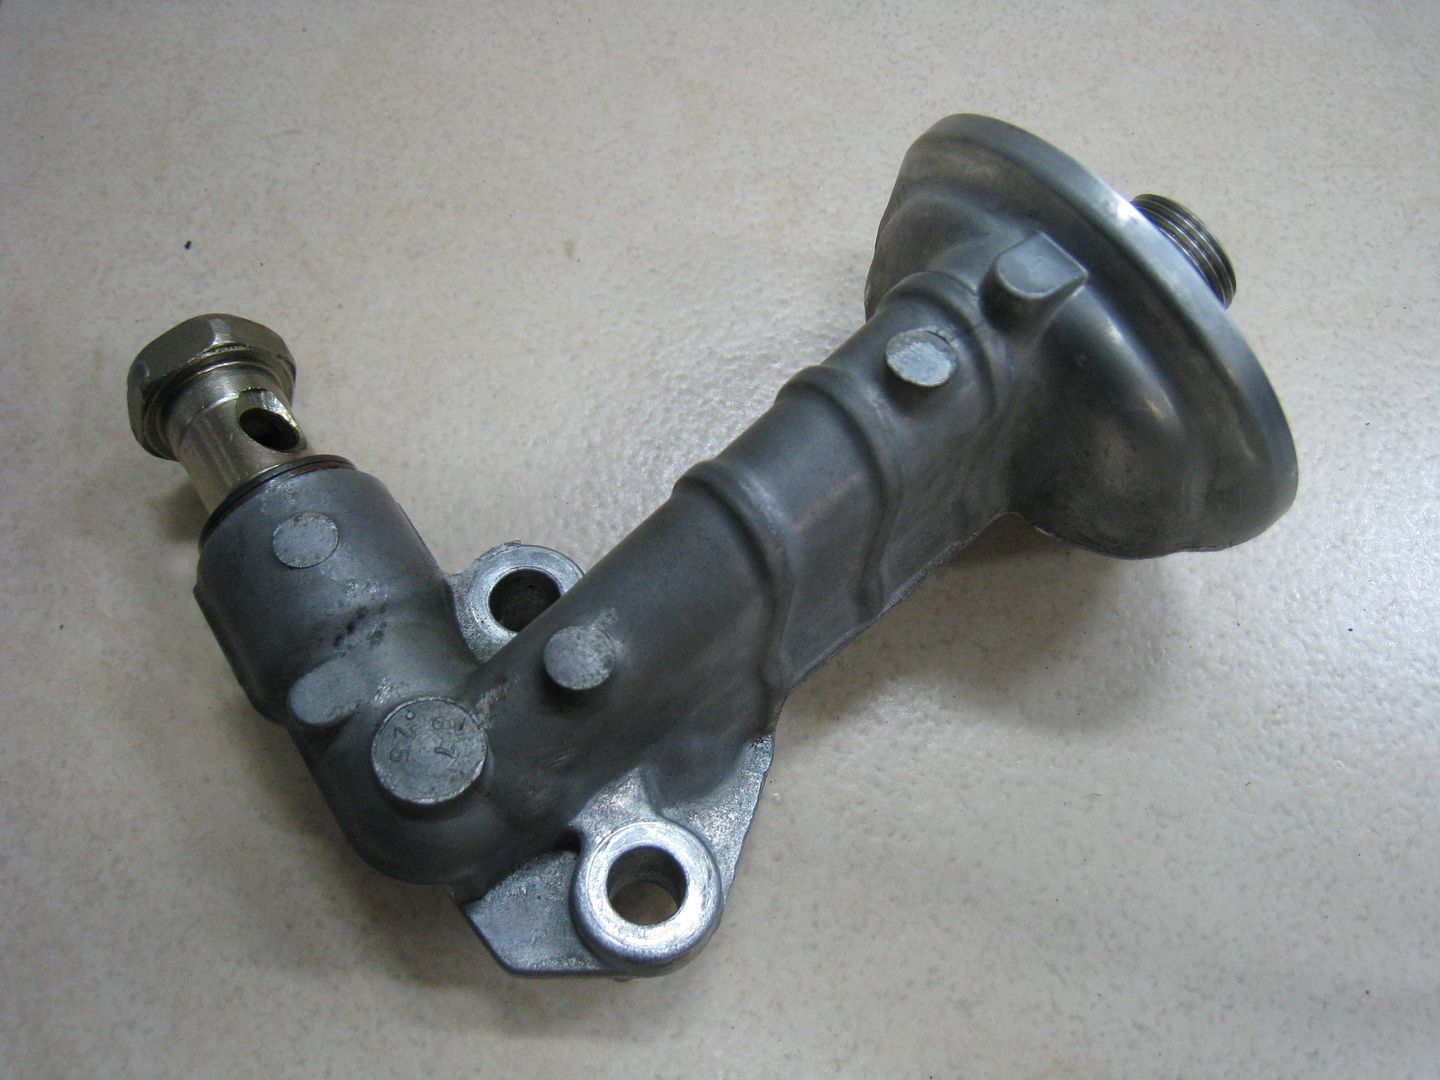
I'm still to sit down and write-up a list of items that need to be addressed before the engine can head off to the engine dyno to be tuned. So I'm not sure when it will be despatched. Two obvious items that need to be designed and manufactured are the oil filter pedestal and the oil filler neck. The necessity to replace the oil filter pedestal is only an issue on this kit as the supercharger is larger than the supercharger being used on the road-going RX-8 kits.
Cheers,
Danny
First up this morning was the removal of unnecessary components and cleaning of the engine in anticipation of the supercharger installation. The engine is from a FY 2005 JDM RX-8 and has 33,000km on it. It has been in storage for almost 12 months so it was pretty dusty. A quick hit with citrus cleaner and a pressure washer was exactly what was required as I couldn't let the engine detract from the awesomeness that was about to be bolted to it.
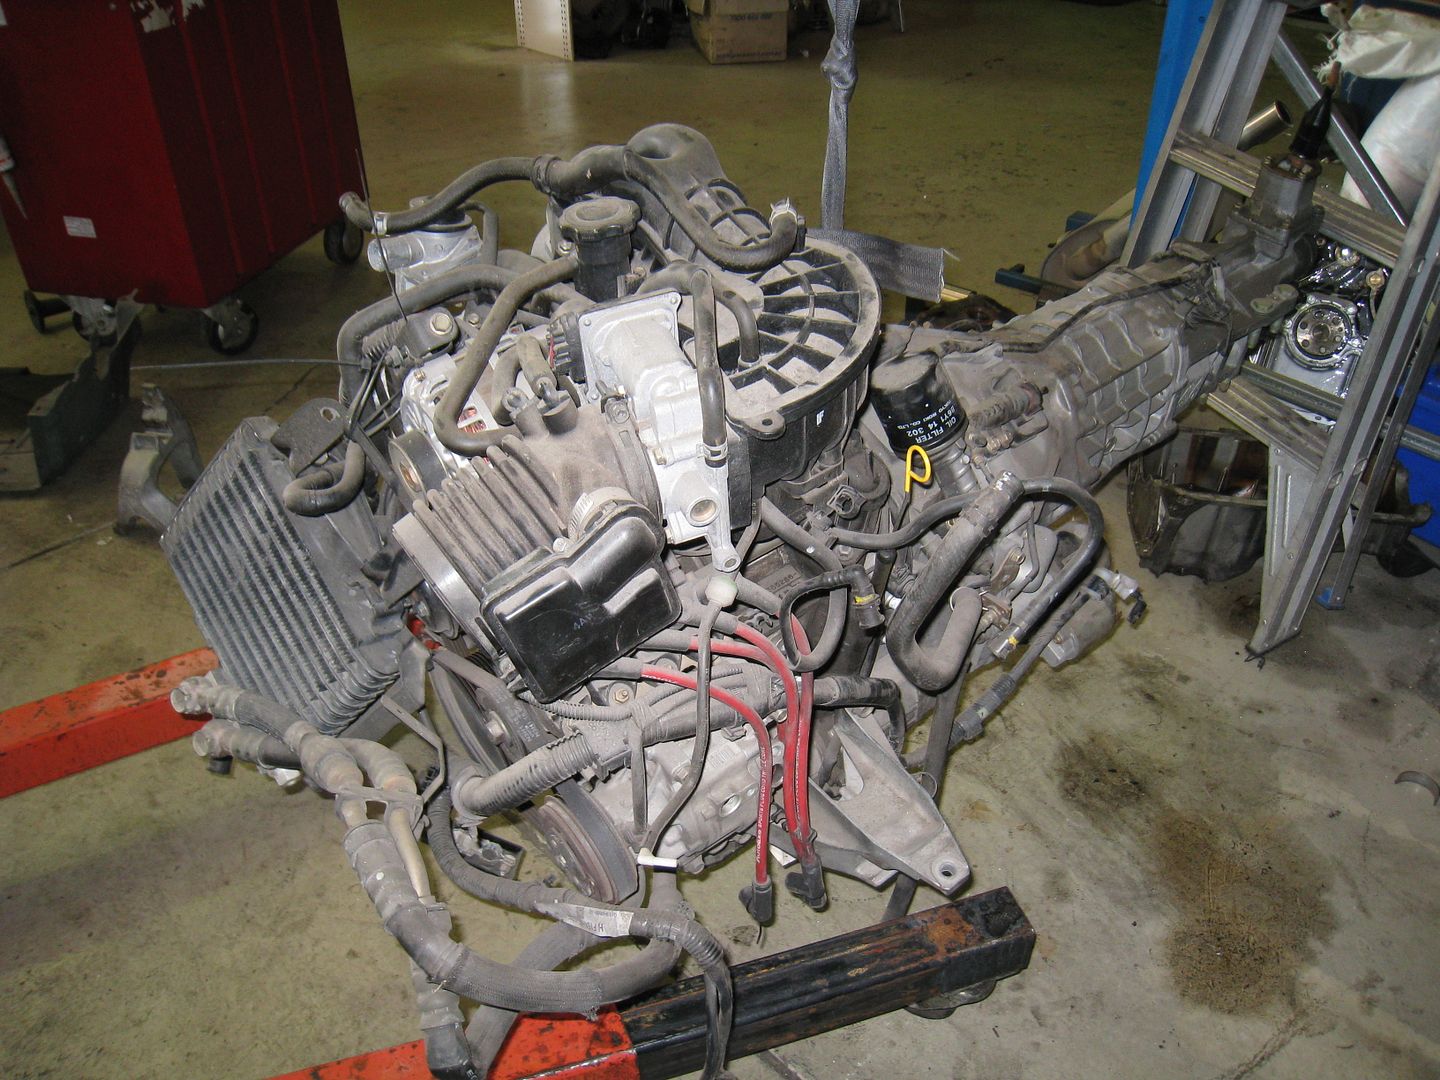
Upper section of inlet manifold including throttle body removed.
Removal of the oil filler neck and vacuum reservoir assembly. The vacuum reservoir and components will be reinstated at a later date.
After all the orifices were suitably protected the engine got washed and came up looking like it was on the Mazda production line awaiting fitment.
Once dried, the gearbox was removed from the engine and placed upon the workbench. The supercharger mounting plate utilises a the alternator mounting bolts and most of the water pump bolts to lock it in position. So these standard fasteners (bolts and studs) were removed.
The first item of the supercharger kit to be installed was the two piece plenum and inlet tube. Here is the lower section of plenum with it's 'O'-rings fitted.
It mates with the surfaces as shown in the next photo.
With the lower section of plenum bolted in place you can really appreciate the dimensional accuracy of the kit as the port matching was perfect.
This is the upper section of plenum awaiting its 'O'-ring to be installed.
Then things got exciting and happened really quickly and I forgot to take stage photos! Here is the belt/tensioner arrangement for the supercharger drive.
The factory ignition coils and bracket are retained and relocated further outboard by way of a bracket and two spacers.
The supercharger kit uses a layshaft to transfer the drive rotation from the front belt drive arrangement to the internal gearset at the rear of the compressor. Lubrication is provided via an oil line tapping from the oil filter outlet to the sealed supercharger drive gearset and returns to the sump via an oil filler neck adaptor. The supply line is the small gauge stainless wire braided hose. The return line is not shown.
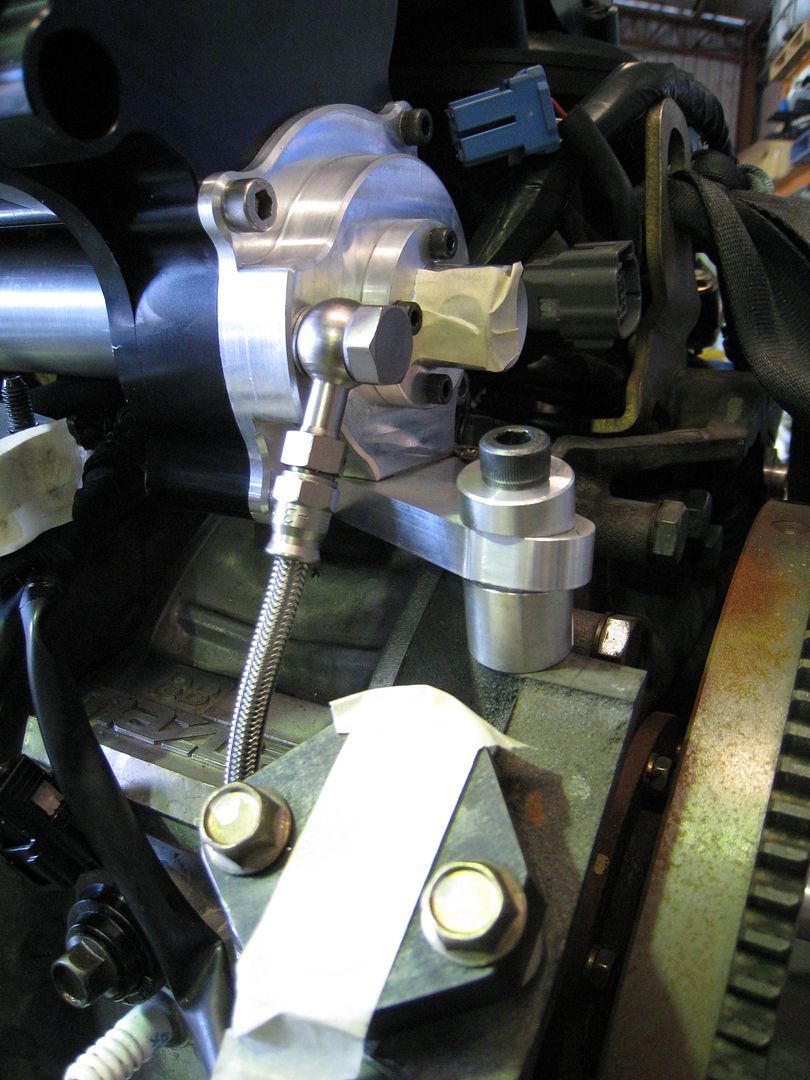
I'll let the next group of photos speak for themselves.
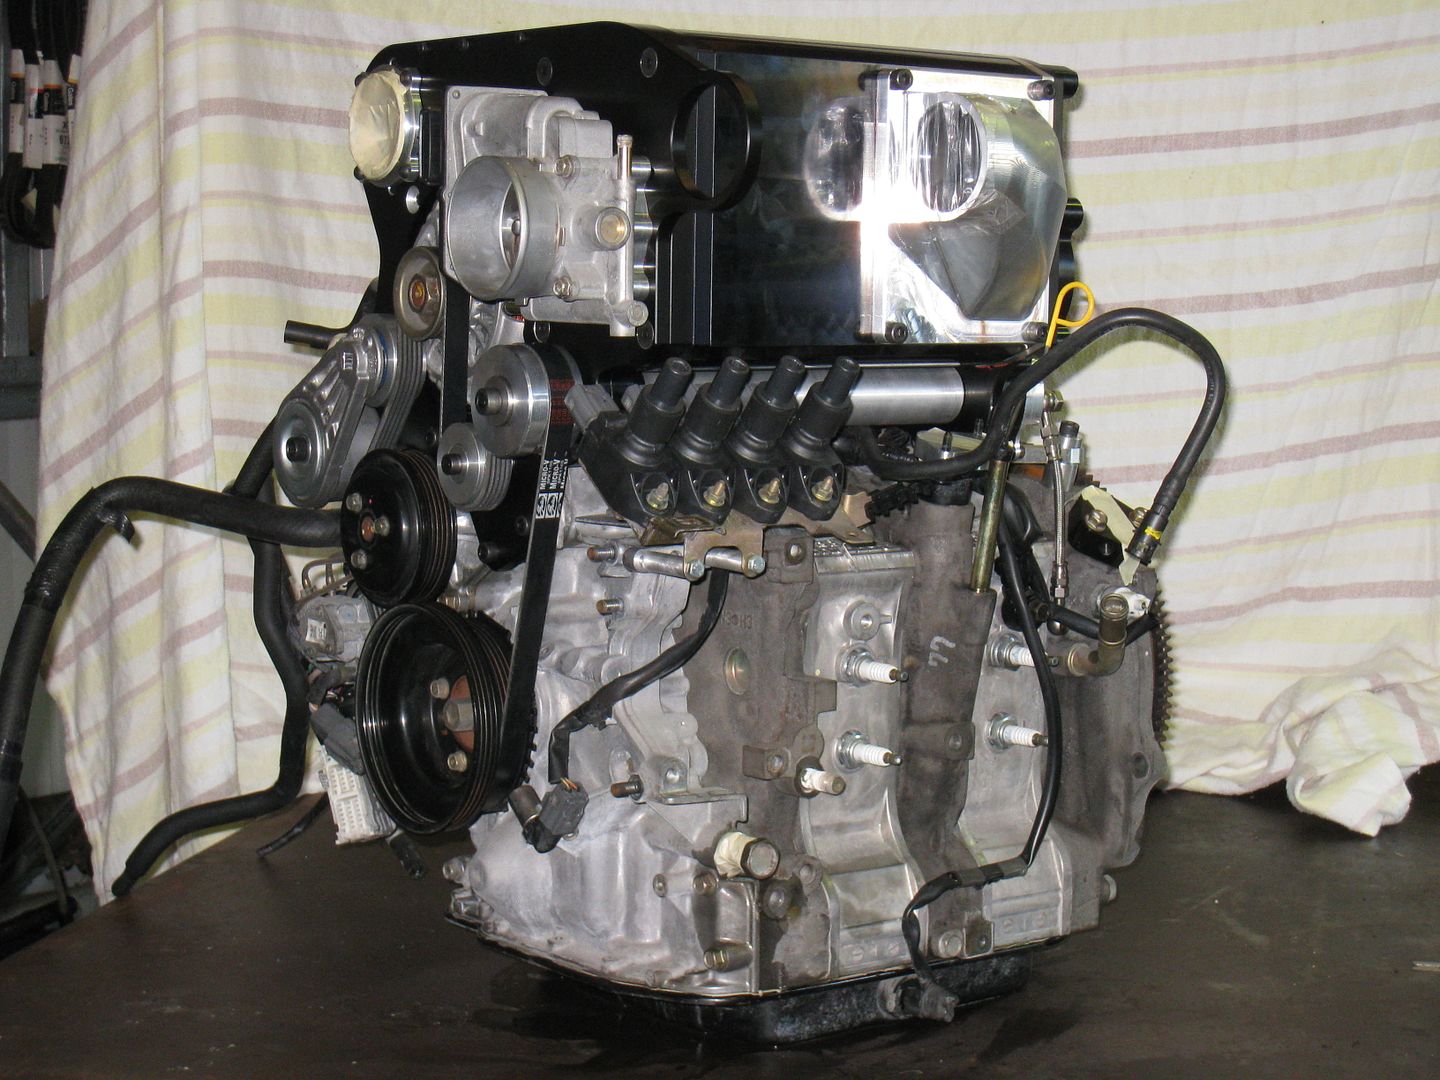
I'm still to sit down and write-up a list of items that need to be addressed before the engine can head off to the engine dyno to be tuned. So I'm not sure when it will be despatched. Two obvious items that need to be designed and manufactured are the oil filter pedestal and the oil filler neck. The necessity to replace the oil filter pedestal is only an issue on this kit as the supercharger is larger than the supercharger being used on the road-going RX-8 kits.
Cheers,
Danny
- Caffeine
- Racing Driver
- Posts: 1806
- Joined: Wed Apr 23, 2003 11:00 am
- Vehicle: NB8B
- Location: Sydney
Renesis NC Track Car - In the Build - Updated 17 Oct 2009
Supreme Blue NB8B, 1:16.98 at Wakefield when stock, but it's not stock any more...
- Okibi
- Speed Racer
- Posts: 10899
- Joined: Thu Aug 21, 2003 11:00 am
- Vehicle: NB SE
- Location: Perth, Western Australia
- Contact:
Renesis NC Track Car - In the Build - Updated 17 Oct 2009
Looks stunning Danny.
If you had access to a car like this, would you take it back right away? Neither would I.
- Old Dude
- Racing Driver
- Posts: 1166
- Joined: Tue Apr 07, 2009 8:06 pm
- Vehicle: NB8B
- Location: Gold Coast
Renesis NC Track Car - In the Build - Updated 17 Oct 2009
I Want one........
cheers
Dale
cheers
Dale
"Everybody dies......, but not everybody lives" ;-)
MX 5 2001 Grace Green
NB8B
MX 5 2001 Grace Green
NB8B
- Hammer
- Speed Racer
- Posts: 2849
- Joined: Fri Apr 25, 2003 11:00 am
- Vehicle: NB SP
- Location: Sydney
- Contact:
Renesis NC Track Car - In the Build - Updated 17 Oct 2009
I'm lovin' it.
H@mmer - 1994 Clubman | 2002 SP
GO TOPLESS!!!
GO TOPLESS!!!
-
- Racing Driver
- Posts: 502
- Joined: Wed Sep 28, 2005 1:26 pm
- Vehicle: ND - 2 GT
- Location: Western Australia
Renesis NC Track Car - In the Build - Updated 17 Oct 2009
Very nice bit of kit there and awesome port matching! Can't wait to hear it up and running.
(Another Renesis on the rack spotted in a photo?)
- orx626
- Forum sponsor
- Posts: 1774
- Joined: Thu Sep 23, 2004 8:26 am
- Vehicle: NC - Rotary
- Location: Brisbane - Northside
- Contact:
Renesis NC Track Car - In the Build - Updated 17 Oct 2009
mr_rotary wrote:Another Renesis on the rack spotted in a photo?
Well spotted!
- Okibi
- Speed Racer
- Posts: 10899
- Joined: Thu Aug 21, 2003 11:00 am
- Vehicle: NB SE
- Location: Perth, Western Australia
- Contact:
Renesis NC Track Car - In the Build - Updated 17 Oct 2009
This rotary is just to test fit the kit, the one on the shelf is his super secret race renesis with the forged pistons and high lift cams.
If you had access to a car like this, would you take it back right away? Neither would I.
-
- Fast Driver
- Posts: 244
- Joined: Sat Nov 24, 2007 1:49 pm
- Vehicle: ND - 2 GT
- Location: Brisvegus
Renesis NC Track Car - In the Build - Updated 17 Oct 2009
Did you buy one kit for the race car and one for the daily?
One of the photos shows the engine side one, the allow housings appear to have un-drilled ports between the cast iron housing's exhaust ports. Is this a legacy of earlier 13B designs? Are you going to need 5 exhaust ports at some stage to handle the air flow this thing can do?
I hope you've got some sort of tyre sponsorship worked out...
M
-
- Racing Driver
- Posts: 1692
- Joined: Thu Apr 06, 2006 7:48 pm
- Vehicle: NA6
- Location: Sydney
- Contact:
Renesis NC Track Car - In the Build - Updated 17 Oct 2009
two words,
F*cking awsome!
F*cking awsome!
http://Run-It-Hard.com - We're here to have fun!
- orx626
- Forum sponsor
- Posts: 1774
- Joined: Thu Sep 23, 2004 8:26 am
- Vehicle: NC - Rotary
- Location: Brisbane - Northside
- Contact:
Renesis NC Track Car - In the Build - Updated 17 Oct 2009
Dave!!!Okibi wrote:This rotary is just to test fit the kit, the one on the shelf is his super secret race renesis with the forged pistons and high lift cams.
Mokesta wrote:Did you buy one kit for the race car and one for the daily?
Yes. My automotive business is now specialising in the servicing and maintenance of RX-8's. So we will be offering an installation service (Drive In/Drive Out) for the supercharger kits. My RX-8 will be the get the first production kit. From it we will determine a fixed pricing schedule for the installation of the supercharger kit.
Mokesta wrote:One of the photos shows the engine side one, the allow housings appear to have un-drilled ports between the cast iron housing's exhaust ports. Is this a legacy of earlier 13B designs?
Yes, the basic casting molds are the same as the earlier housing designs....just with the peripheral exhaust port core omitted.
Mokesta wrote:Are you going to need 5 exhaust ports at some stage to handle the air flow this thing can do?
Actually, the fact that the apex seals are fully supported throughout the perimeter of the rotor housing is something that I believe to be a huge step forward over the previous rotary designs. You can have a situation with this design where the apex seals may be fractured and the engine will still function without destroying other components. This is not possible with peripheral exhaust ports. The result is normally a stuffed housing and rotor. Flow is still pretty darn good with the multi-side exhaust ports (13B-MSP).
Mokesta wrote:I hope you've got some sort of tyre sponsorship worked out...
MXHEVN wrote:two words,
F*cking awesome!
Cheers mate!
-
- Fast Driver
- Posts: 244
- Joined: Sat Nov 24, 2007 1:49 pm
- Vehicle: ND - 2 GT
- Location: Brisvegus
Renesis NC Track Car - In the Build - Updated 17 Oct 2009
OMG You DID buy two!! I was joking
-
- Driver
- Posts: 82
- Joined: Fri Jun 20, 2008 10:09 am
- Vehicle: ND - 2 GT
- Location: Gold Coast
Renesis NC Track Car - In the Build - Updated 17 Oct 2009
Going to make the ride to the train station a lot more fun!!
Previous - SP | Previous - 10AE
Who is online
Users browsing this forum: No registered users and 25 guests