Soft top cable replacement on NB

Body, Paint, Interior and Trim questions and answers

Moderators: timk, Stu, zombie, Andrew, -alex, miata

User avatar
bigdog
King of the kennel
Posts: 2233
Joined: Wed May 25, 2005 3:07 pm
Vehicle: NB SP
Location: Blue Mountains
Contact:

Soft top cable replacement on NB

Postby bigdog » Sat Feb 09, 2008 10:04 pm

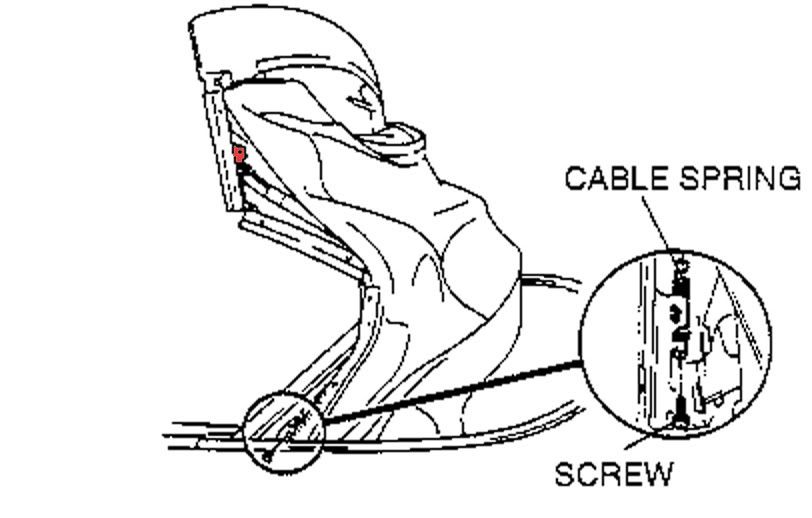
Has anyone here done this? I have had broken tension cables ever since I've owned the car - they have always annoyed me just dangling there, so thought I would replace them... but I can't figure where they attach. I have studied the various guides on the big forum, and concluded that the riveted end attached at the red point marked below

Image

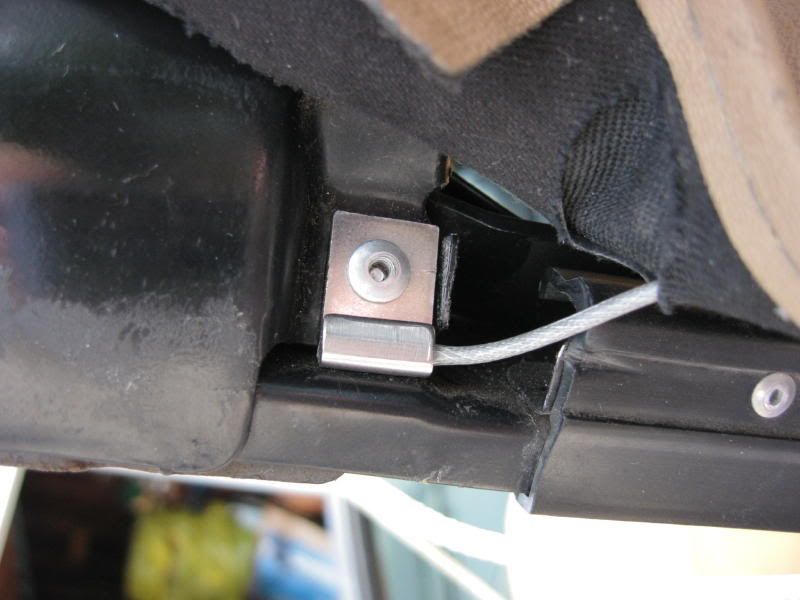
- there were plastic tabs rivetted there with nothing attached, so I figured the cables must have broken off from there, but it seems from further investigation that they run right to the front of the hood as seen in this picture:
Image

There is a hole in the side lining of the top right at the very front of the top and I can see the remains of the old cable there, so I assume I need to remove the top from the frame at this point to fit the new one. Can anyone point me in the right direction with this task? And can someone explain what the cables actually tension? :D
Image
Marvin - '02 Silver SP - BD, PSS9, Guru, Build #62 Cardomain

wun911
Speed Racer
Posts: 2114
Joined: Tue Sep 11, 2007 12:13 pm
Vehicle: ND - 2 GT
Location: Melbourne

Postby wun911 » Sun Feb 10, 2008 1:14 am

every ounce counts

User avatar
TieNN89
Speed Racer
Posts: 2012
Joined: Mon Nov 26, 2007 8:27 pm
Vehicle: NC
Location: Brisbane
Contact:

Postby TieNN89 » Sun Feb 10, 2008 1:28 am

what in the world does that cable actually do?

wun911
Speed Racer
Posts: 2114
Joined: Tue Sep 11, 2007 12:13 pm
Vehicle: ND - 2 GT
Location: Melbourne

Postby wun911 » Sun Feb 10, 2008 1:18 pm

when my cable snapped only one side snapped...

You can tell when you put the roof on which side had more tension. I think it helps to hold the sides of the roof to the frame and keep it in tight shape.

U didnt notice any leaks when the cable was snapped tho.
every ounce counts

User avatar
bigdog
King of the kennel
Posts: 2233
Joined: Wed May 25, 2005 3:07 pm
Vehicle: NB SP
Location: Blue Mountains
Contact:

Postby bigdog » Sun Feb 10, 2008 1:29 pm

Ok... that's the cable i'm talking about... how do you get to the rivet point at the front of the hood?
Image
Marvin - '02 Silver SP - BD, PSS9, Guru, Build #62 Cardomain

User avatar
green_comet
Car Detailing Guru
Posts: 1848
Joined: Tue May 24, 2005 1:41 am
Vehicle: NA8
Location: Melbourne

Postby green_comet » Sun Feb 10, 2008 8:13 pm

I think u need to remove the rubber around the window, then unscrew the metal plates behind.

wun911
Speed Racer
Posts: 2114
Joined: Tue Sep 11, 2007 12:13 pm
Vehicle: ND - 2 GT
Location: Melbourne

Postby wun911 » Sun Feb 10, 2008 11:18 pm

when you replaced your roof dint the new roof come with new cables??
every ounce counts

User avatar
bigdog
King of the kennel
Posts: 2233
Joined: Wed May 25, 2005 3:07 pm
Vehicle: NB SP
Location: Blue Mountains
Contact:

Postby bigdog » Mon Feb 11, 2008 9:23 am

Just to clarify, I am not replacing the roof, just the tension cables on my existing 6 year old roof.
Image
Marvin - '02 Silver SP - BD, PSS9, Guru, Build #62 Cardomain

wun911
Speed Racer
Posts: 2114
Joined: Tue Sep 11, 2007 12:13 pm
Vehicle: ND - 2 GT
Location: Melbourne

Postby wun911 » Mon Feb 11, 2008 10:29 am

Ohhh sorry I meant green comments new roof that he recently installed...

I was a nube and I managed to fixed this, it was even the first time I used a rivit gun. The only tool I didnt have was a very short philips head screw driver.

You will need this stubby screw driver to unscrew the spring that the cable is attached to.

The only other anoying thing was threading the new wire though the hole, took a couple of goes. (open and close the roof a few times as your threading the cable though helps a lot)
every ounce counts

User avatar
green_comet
Car Detailing Guru
Posts: 1848
Joined: Tue May 24, 2005 1:41 am
Vehicle: NA8
Location: Melbourne

Postby green_comet » Mon Feb 11, 2008 11:04 am

Lol green comment, i think im going to change my name to that..

User avatar
Andrew
Speed Racer
Posts: 2630
Joined: Wed Apr 23, 2003 11:00 am
Vehicle: NC

Postby Andrew » Sat Feb 16, 2008 5:29 pm


User avatar
Ajay
Racing Driver
Posts: 901
Joined: Mon Dec 11, 2006 6:07 pm
Vehicle: NA6
Location: Western Sydney, NSW
Contact:

Re:

Postby Ajay » Sat Feb 16, 2008 6:16 pm

green_comet wrote:Lol green comment, i think im going to change my name to that..


hahaha :lol:
Image


Return to “MX5 Body, Paint, Interior & Trim”

Who is online

Users browsing this forum: No registered users and 133 guests