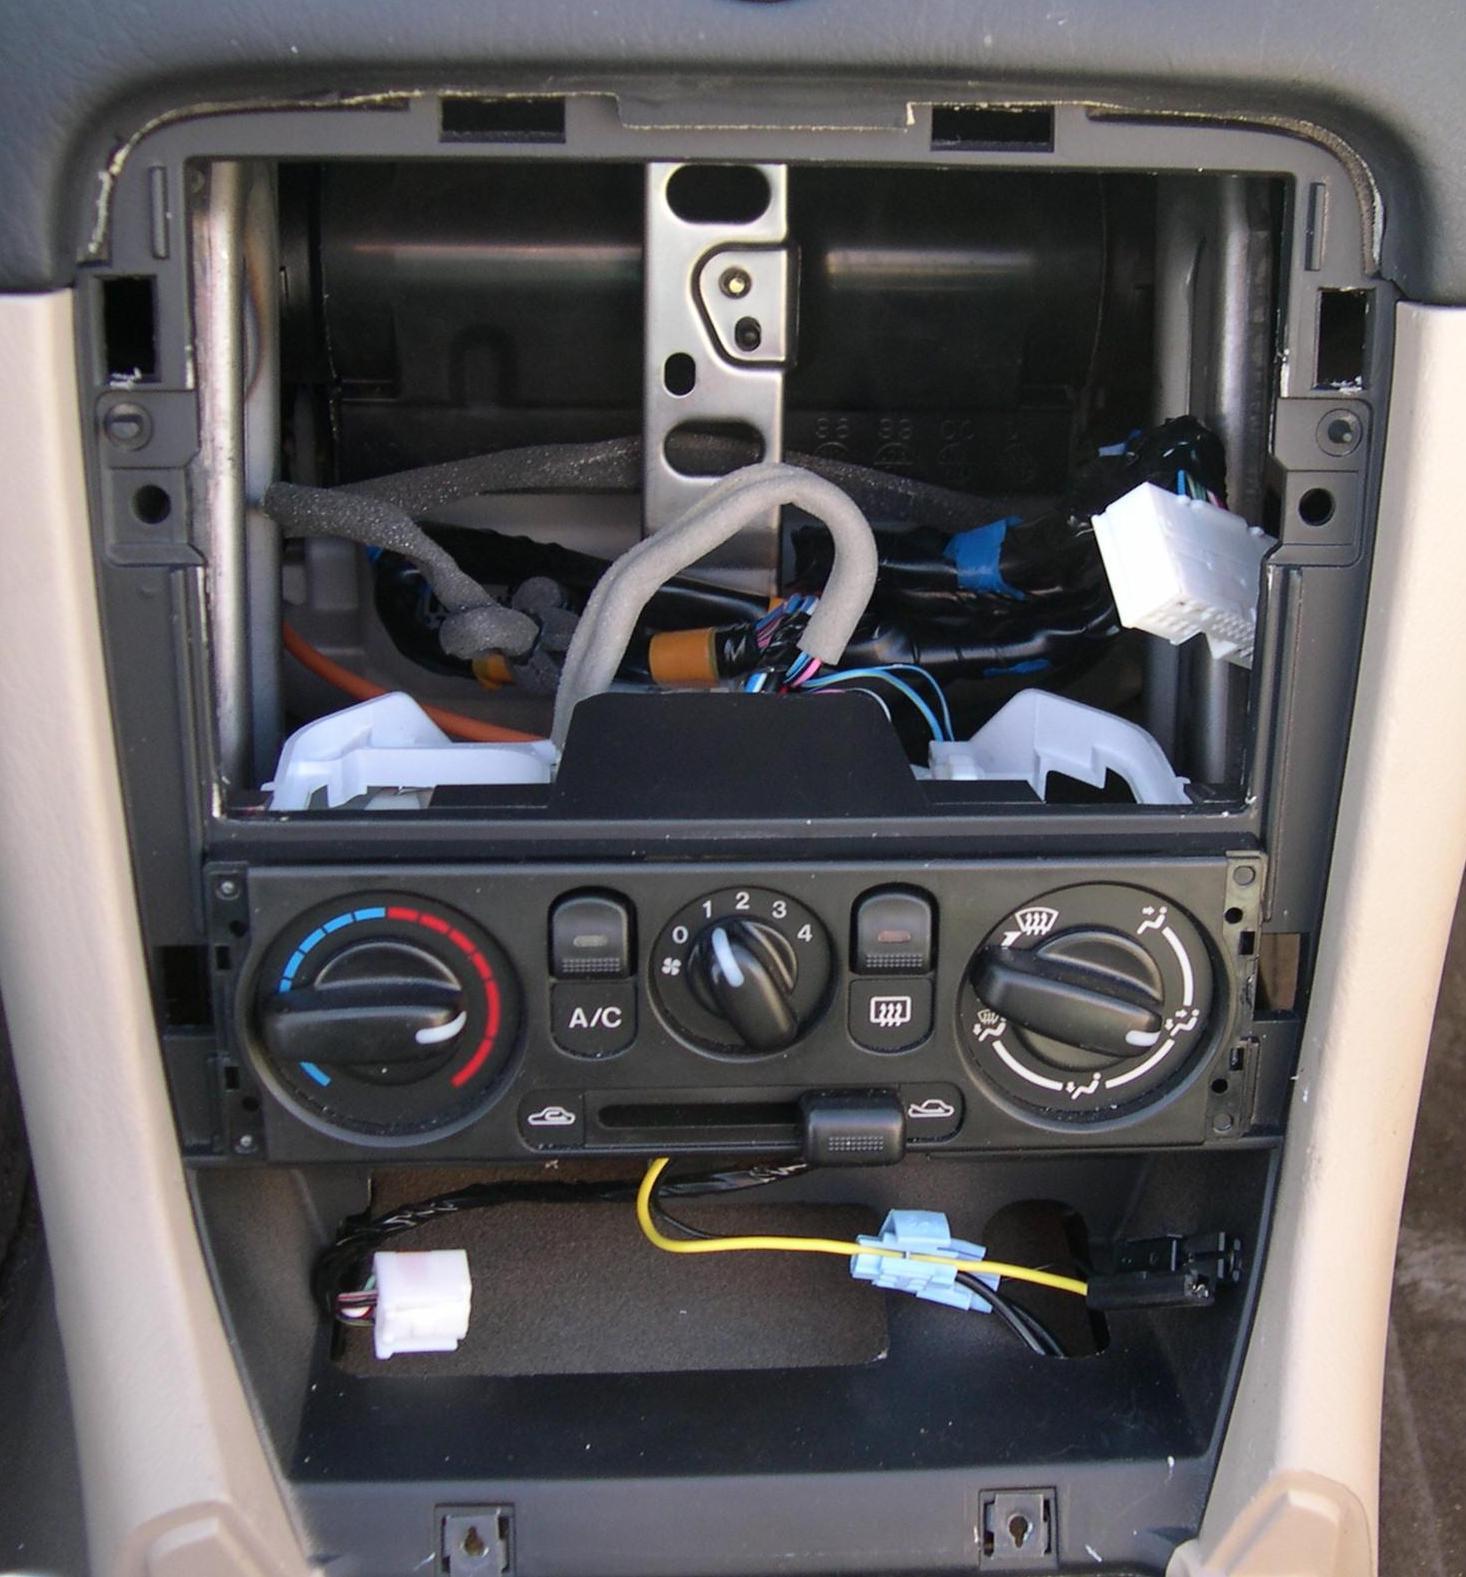
The Idiots guide to replacing a stereo in the NB8B
Moderators: timk, Stu, zombie, Andrew, -alex, miata
- Incognito
- Driver
- Posts: 56
- Joined: Sat Oct 27, 2007 12:45 am
- Vehicle: NB SP
- Location: International Space Station
The Idiots guide to replacing a stereo in the NB8B
Introduction:
I decided to install the radio myself for the following reasons:
1, the last time I had a head unit installed the dash was butchered. Remember radio installers get paid by the unit, not by the hour. Simple economics dictates that they will take shortcuts.
2, I wanted to save some money.
3, I wanted to learn more about my car and the audio system in it.
This is called the idiots guide, well mainly because I had no automotive repair skills or knowledge.
Requirements
One new Stereo (kinda obvious eh?)
Mx-5 to OEM Wiring adapter Harness (You don't have to get the harness, but life will be easier both now and later down the track)
Head Unit to OEM Wiring adapter Harness (You don't have to get the harness, but life will be easier both now and later down the track)
Replacement Fascia (Highly recommend Metra Part 99-7505 (MAZDA MULTI 1994-05) it matches plastic colour of the HVAC controls and it almost matches the texture)
1 x Philips Head ScrewDriver
1 x Flathead screw driver
2 x Ford Radio Removal Tools, or substitute coat hangers, nails, allen keys, or a friend who knows what they are doing.
Upgraded the security recently on your 5?
Part 1: Preparation
Put the roof down to give yourself more room. (Only if applicable)
Empty out cup holders, storage box, cubby holes of unnecessary items.
Eject any CD's from your Stereo. Hard to get them out once the power is off.
1. Use a phillips screwdriver to unscrew the two screws in the storage box (by your elbow).
2. Unscrew the Gearknob
3. Next, pop open the covers on the two screws on each side of the console by your knee. Use a phillips screwdriver to unscrew the two screws.
4. Pry the window switches up with a thin, wide screwdriver.
Introduction:
I decided to install the radio myself for the following reasons:
1, the last time I had a head unit installed the dash was butchered. Remember radio installers get paid by the unit, not by the hour. Simple economics dictates that they will take shortcuts.
2, I wanted to save some money.
3, I wanted to learn more about my car and the audio system in it.
This is called the idiots guide, well mainly because I had no automotive repair skills or knowledge.
Requirements
One new Stereo (kinda obvious eh?)
Mx-5 to OEM Wiring adapter Harness (You don't have to get the harness, but life will be easier both now and later down the track)
Head Unit to OEM Wiring adapter Harness (You don't have to get the harness, but life will be easier both now and later down the track)
Replacement Fascia (Highly recommend Metra Part 99-7505 (MAZDA MULTI 1994-05) it matches plastic colour of the HVAC controls and it almost matches the texture)
1 x Philips Head ScrewDriver
1 x Flathead screw driver
2 x Ford Radio Removal Tools, or substitute coat hangers, nails, allen keys, or a friend who knows what they are doing.
Upgraded the security recently on your 5?
Part 1: Preparation
Put the roof down to give yourself more room. (Only if applicable)
Empty out cup holders, storage box, cubby holes of unnecessary items.
Eject any CD's from your Stereo. Hard to get them out once the power is off.
1. Use a phillips screwdriver to unscrew the two screws in the storage box (by your elbow).
2. Unscrew the Gearknob
3. Next, pop open the covers on the two screws on each side of the console by your knee. Use a phillips screwdriver to unscrew the two screws.
4. Pry the window switches up with a thin, wide screwdriver.
Last edited by Incognito on Mon Nov 05, 2007 1:21 am, edited 1 time in total.
- Incognito
- Driver
- Posts: 56
- Joined: Sat Oct 27, 2007 12:45 am
- Vehicle: NB SP
- Location: International Space Station
5. Disconnect the power connector on the window switch unit and squeeze the tabs on the black connector anchoring this cable to the console to release it.
6. unscrew the screw beneath it.
7. Lift the console at the front, open the storage box, and guide the boot and petrol levers through the rubber flap as you pull the console forward.
Now you can remove the trim surrounding the radio and HVAC controls. Here's how to remove the trim:
8. Unscrew the two screws at the bottom of the trim.
9. Now pry the surround out, starting from the bottom.
10. When all the clips have released, unclip the lighter power connector.
11. Now set the surround aside.
Part 2: Head Unit Removal
Now here's how to remove the head unit:
1. On each side of the radio are long covers that look like part of the radio face but aren't. Use a narrow flat screwdriver to pry these off from the bottom and top.
2. When they release, you will see 5 round holes on each side of the radio. You should use two sets of \"radio puller\" tools to pull the unit out, but if you don't have these, you can use 8 nails. Just stick them into four holes on each side (skip one of the two that are right near each other) and the clip holding the radio in place will release.
3. Then pull the unit out. It will come out a few inches and feel like it doesn't want to come further. Just pull harder.
4. The whole thing will come out and you can unplug the antenna and the other connections. The connection bundle is released with a lever on the bottom.
If you are having difficulty, try these links for information:
http://www.555subaru.co.uk/cdupgrade.htm
http://www.i-hacked.com/content/view/213/45/
http://www.miata.net/garage/nbaudio
- Incognito
- Driver
- Posts: 56
- Joined: Sat Oct 27, 2007 12:45 am
- Vehicle: NB SP
- Location: International Space Station
Part 3: Installing the new stereo:
1, Read the manual for the new stereo, if you haven't already.
2, Re-Read the manual, you would have skipped or missed something important.
3, Connect the Mx-5 to OEM Wiring adaptor Harness, be careful!. (I managed to bend the aerial pin, and had to straighten it and try again)
4, Connect the Head Unit to OEM Wiring adaptor Harness to the Mx-5 to OEM Wiring adaptor Harness. (I trust you ordered this)
5, Plug the Head Unit to OEM Wiring adaptor Harness into your new stereo. (I trust you ordered this)
6, Plug the Antenna Lead into the antenna socket on your new stereo.
7, Test the system to make sure it is fully functional.
8, Install the Metra Fascia Kit to your requirements (instructions can be downloaded here:
http://documents.victorytechnologies.co ... 9-7505.pdf)
Finally reinstall the interior in the reverse order that you took it out. (Makes Sense doesn't it)
Here is what my stereo install is looking like, I am waiting on a cable to link iPod to Head unit so haven't fully installed head unit yet.
Some Good Mx-5 Stereo Links that I came across:
http://www.miata.net/garage/nbaudio *miata net, enough said, I used there guide for most of my install*
http://www.ryda.com.au/ *good prices to start with when haggling with local stores*
http://www.metraonline.com/products.aspx *fascia kits*
http://www.mx5parts.co.uk/product_info. ... c4f9ca7045 *mx-5 to OEM wiring harness*
- fastfreddygassit
- Waitin' for a mate
- Posts: 1773
- Joined: Sat Jun 25, 2005 8:00 pm
- Vehicle: NB SE
- Location: Waitin' for a mate in Melbourne somewhere
- Contact:
- Boags
- Speed Racer
- Posts: 3533
- Joined: Thu Nov 10, 2005 6:25 pm
- Vehicle: NB SP
- Location: Brisvegas
- Contact:
I saw beer and smokes but no mention to this in your guide... Is brand/strength important?
Boags
PS - GREAT WRITE-UP!
Boags
PS - GREAT WRITE-UP!
Spartan Motor Sport : http://www.SpartanMS.com.au
- fastfreddygassit
- Waitin' for a mate
- Posts: 1773
- Joined: Sat Jun 25, 2005 8:00 pm
- Vehicle: NB SE
- Location: Waitin' for a mate in Melbourne somewhere
- Contact:
Re:
Boags'MX5 wrote:I saw beer and smokes but no mention to this in your guide... Is brand/strength important?
I think that incognito has actually given up smoking.
Maybe the stress of the install
(see how long he lasts on patches.......)
- Stu
- Racing Driver
- Posts: 909
- Joined: Sun Jan 08, 2006 9:38 pm
- Vehicle: NB8B
- Location: Melbourne
- Contact:
Re:
fastfreddygassit wrote:Thanks Incognito,
That is a very comprehensive guide. Good work!
Mind you, those fore-arms in some of the photos look vaguely familiar??
Nah, good stuff mate, the new headunit looks sh!t-hot!!!
x2
- meanmx
- Racing Driver
- Posts: 1493
- Joined: Mon Aug 14, 2006 11:41 pm
- Vehicle: NB8B
- Location: Point Cook, Melbourne
There is only one person I know that is that anally retentive. Great job though and your reseach has obviously paid off by making the install really really easy. Well done. Now what am I and Freddy going to do with our spare time????
Ben
Ben
2014 VW Mk7 Golf R
2001 Black NB8B viewtopic.php?f=57&t=58136
1986 Mazda Luce Royal Classic (13BT Mazda 929)
2001 Black NB8B viewtopic.php?f=57&t=58136
1986 Mazda Luce Royal Classic (13BT Mazda 929)
- Incognito
- Driver
- Posts: 56
- Joined: Sat Oct 27, 2007 12:45 am
- Vehicle: NB SP
- Location: International Space Station
Re:
meanmx wrote:There is only one person I know that is that anally retentive. Great job though and your reseach has obviously paid off by making the install really really easy. Well done. Now what am I and Freddy going to do with our spare time????
Ben
Who are you calling anally retentive?
You and the rest of the Victorian crew can do what you naturally do on a Thursday night!
The answer to the question of Life, the Universe and Everything is not 42..... it is MX5.
- Alf
- Racing Driver
- Posts: 578
- Joined: Thu Apr 24, 2003 11:00 am
- Vehicle: ND - 2 GT
- Location: Frankston, Vic
- Contact:
Nice write-up and pics, but are you sure part 1 is neccessary. I seem to remember from my NB8A that I didn't take out the console.
I'm doing an install this w/e and I've just pried off the two long covers of which you write with a plastic butter knife, without removing the console or the surround, and it looks like the OEM H/U will slide out without interference.
Will let you know how it goes.
Cheers,
Alf
I'm doing an install this w/e and I've just pried off the two long covers of which you write with a plastic butter knife, without removing the console or the surround, and it looks like the OEM H/U will slide out without interference.
Will let you know how it goes.
Cheers,
Alf
2015 ND MT GT Crystal White Pearl Mica (pic to come)
- marcusus
- Speed Racer
- Posts: 2919
- Joined: Thu Jul 13, 2006 12:07 am
- Vehicle: NB8A
Re:
Alf wrote:Nice write-up and pics, but are you sure part 1 is neccessary. I seem to remember from my NB8A that I didn't take out the console.
It's not necessary, but it helps a lot. And considering it isn't difficult at all to remove the console, it's worth the extra 10 minutes it takes to take apart / reassemble it to have the easy access.
- Alf
- Racing Driver
- Posts: 578
- Joined: Thu Apr 24, 2003 11:00 am
- Vehicle: ND - 2 GT
- Location: Frankston, Vic
- Contact:
Yepp, had the old one out, tried the fit of a new HU, and put the new one back in in under 10 minutes. Made the tools to depress the springy thingies out of 4 bits of bent wire coathanger, perfect. All without pulling out the console.
Pulling the glove box out provides easy access to the rear of the unit (for a double jointed, anorexic piano player).
Cheers,
Alf
Pulling the glove box out provides easy access to the rear of the unit (for a double jointed, anorexic piano player).
Cheers,
Alf
2015 ND MT GT Crystal White Pearl Mica (pic to come)
Who is online
Users browsing this forum: No registered users and 19 guests