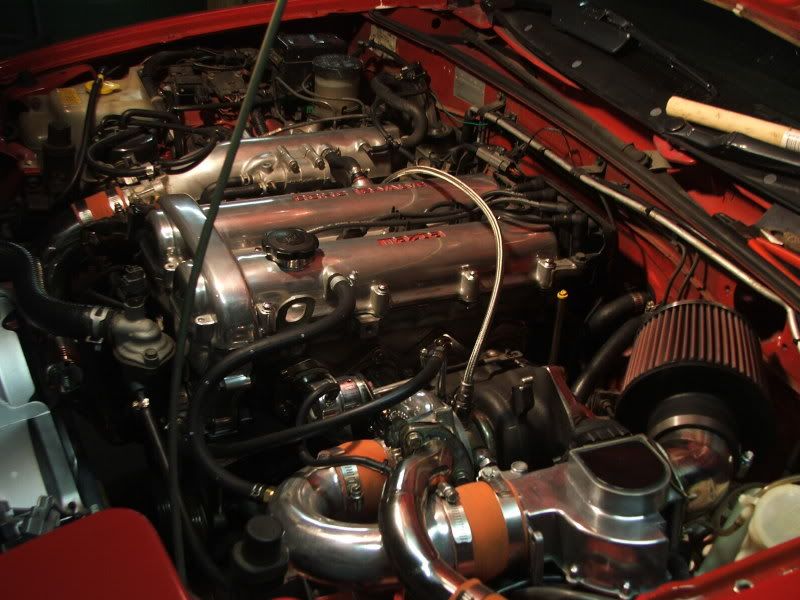
The DIY of Bling - as promised in the for sale section

Body, Paint, Interior and Trim questions and answers

Moderators: timk, Stu, zombie, Andrew, -alex, miata

User avatar
Uncle Arthur
Dodgy Award Benefactor
Posts: 1802
Joined: Wed Apr 23, 2003 11:00 am
Vehicle: ND - 2 GT
Location: Doesn't matter where I'm from-it's that your daughter is with me that's the biggest concern :D
Contact:

The DIY of Bling - as promised in the for sale section

Postby Uncle Arthur » Mon May 21, 2007 10:21 pm

For anyone who wants to polish - it's easy.

Start with the object you want polished - AFM, rocker cover, turbo housing......

Seeing as there's lots of alloy under the bonnet of the 5, there's plenty to choose from.....

Start with the skanky old bit of metal you want shiny..... eg. turbo:

Image

The first process is sanding - anywhere from a 400 grit to an 800 grit is fine - you want to take all the cast marks and remove the 'burry' surface. You can use the dry paper to start but a cheap car polish also works very well as the cutting paste - it mixes with the microfine metal sandings and makes an even better and smoother abrasive. If you dont want to sand by hand, a mouse (detail) sander works very well.

This rocker cover shows a half and half stage - I've polished one side using the method I'll describe below, and the other half is just at the sanding stage.

Image

Once you have the metal surface 'smooth' you need to start to buff out the sanding scratches - you do it exactly the same way as you would polishing the paintwork. A cheap polishing kit from the hardware is a good investment and makes the job easier. Apply polishing paste to the polishing wheel (ragmop) or to a soft rag, and start polishing..... it is hard work, and you need to keep at it, but it will shine up.

I took this turbo from the pic above to this below:

Image

Image

Image

And here's the rocker cover end - it was just as you see it on the car from the factory:

Image

You can also use a ragmop attached to a bench grinder - this is how most workshops will do it - I have and use both, depending on the details I'm after.

There's a few here who have successfully blinged their cars - perhaps a few others can add their $0.02 here.......
Founder of the QLD Chapter of the Honourable Brothers of Dodgy.

Benefactor of the Perpetual Dodgy award - Inaugural year 2007.

User avatar
Ajay
Racing Driver
Posts: 901
Joined: Mon Dec 11, 2006 6:07 pm
Vehicle: NA6
Location: Western Sydney, NSW
Contact:

Postby Ajay » Mon May 21, 2007 10:29 pm

your a champion..!

Cheers
Image

User avatar
Ajay
Racing Driver
Posts: 901
Joined: Mon Dec 11, 2006 6:07 pm
Vehicle: NA6
Location: Western Sydney, NSW
Contact:

Postby Ajay » Mon May 21, 2007 10:31 pm

and what kind of paint are we using for the MAZDA lettering..

obviously mine will be yellow

by the way.. i will be going to get all these parts tomorrow.. :D :D and spending lots of time on this
Image

dv8one
Driver
Posts: 59
Joined: Mon Apr 10, 2006 9:31 pm
Vehicle: NA6
Location: South Australia

Postby dv8one » Mon May 21, 2007 10:53 pm

getting a cheap bench grinder and a buffing wheel from bunnings can also save alot of time!

User avatar
Ajay
Racing Driver
Posts: 901
Joined: Mon Dec 11, 2006 6:07 pm
Vehicle: NA6
Location: Western Sydney, NSW
Contact:

Postby Ajay » Mon May 21, 2007 10:58 pm

how much would these cost?
Image

User avatar
Uncle Arthur
Dodgy Award Benefactor
Posts: 1802
Joined: Wed Apr 23, 2003 11:00 am
Vehicle: ND - 2 GT
Location: Doesn't matter where I'm from-it's that your daughter is with me that's the biggest concern :D
Contact:

Postby Uncle Arthur » Tue May 22, 2007 11:07 am

About $30-$50 - but get the highest wattage version they have - mine is a 250W (I think???), and it could really do with some extra grunt for proper polishing work. Aim for about 350W I think.....

Bunnings, Supercheap - any of the above.
Founder of the QLD Chapter of the Honourable Brothers of Dodgy.

Benefactor of the Perpetual Dodgy award - Inaugural year 2007.

User avatar
Bevan
Speed Racer
Posts: 2599
Joined: Tue Nov 16, 2004 8:18 pm
Vehicle: ND - 2 GT
Location: N-West Sydney

Postby Bevan » Tue May 22, 2007 11:20 am

Ooooh, I might do this when I do my timing belt change! :D

User avatar
Ajay
Racing Driver
Posts: 901
Joined: Mon Dec 11, 2006 6:07 pm
Vehicle: NA6
Location: Western Sydney, NSW
Contact:

Postby Ajay » Tue May 22, 2007 1:51 pm

ok.. so got up nice and early today.. HA 10:30 :D

went down to bunning asking about that power tool.. they said they dont have it.. so i went to super cheap.. same deal..

what is it a am asking for exactly?..


so i ended up getting some 400 wet n dry and started to do it by hand.. below is a photo taken after 20 mins of hard work lol

Image

is there a better way to do this or does this seem ok?..

and what exactly is the power tool needed for... is that to get the marks off after.. am i fine to keep using the 400 grit until the whole cover looks like the left side :lol:

Cheers
Ajay
Image

User avatar
Ajay
Racing Driver
Posts: 901
Joined: Mon Dec 11, 2006 6:07 pm
Vehicle: NA6
Location: Western Sydney, NSW
Contact:

Postby Ajay » Tue May 22, 2007 1:53 pm

and what kind of paint do i use for the lettering?.. and where can this be purchased

Cheers
Ajay
Image

User avatar
PT
Racing Driver
Posts: 1188
Joined: Sat May 21, 2005 7:11 pm
Vehicle: NB8B
Location: Brisbane
Contact:

Postby PT » Tue May 22, 2007 2:14 pm

We use pork fat to polish alloy here at work....
2001 Mazda MX-5 NB8B- http://www.mx5cartalk.com/forum/viewtopic.php?f=57&t=61506

Past:
2005 Mazda MX-5 SE
1991 Mazda MX-5 NA6

User avatar
Andy Wana
Fast Driver
Posts: 362
Joined: Tue Sep 26, 2006 11:16 pm
Vehicle: ND - 2 GT
Location: Sydney, Australia

Re:

Postby Andy Wana » Tue May 22, 2007 2:30 pm

PT wrote:We use pork fat to polish alloy here at work....


Classy ...
I ♥ asymmetry

User avatar
Astroboysoup
Racing Driver
Posts: 825
Joined: Thu Jun 10, 2004 1:06 am
Vehicle: ND - 2 GT
Location: Adelaide, Australia
Contact:

Re:

Postby Astroboysoup » Tue May 22, 2007 2:33 pm

PT wrote:We use pork fat to polish alloy here at work....


you serious?
AustCars.net - It's like Facebook but for cars!

User avatar
Ajay
Racing Driver
Posts: 901
Joined: Mon Dec 11, 2006 6:07 pm
Vehicle: NA6
Location: Western Sydney, NSW
Contact:

Postby Ajay » Tue May 22, 2007 2:38 pm

well im going back down the road to get more 400 wet and dry lol
Image

User avatar
PT
Racing Driver
Posts: 1188
Joined: Sat May 21, 2005 7:11 pm
Vehicle: NB8B
Location: Brisbane
Contact:

Postby PT » Tue May 22, 2007 2:45 pm

Certainly am....

and canola oil when sanding...

I swear to god, the honest truth.
2001 Mazda MX-5 NB8B- http://www.mx5cartalk.com/forum/viewtopic.php?f=57&t=61506

Past:
2005 Mazda MX-5 SE
1991 Mazda MX-5 NA6

User avatar
Uncle Arthur
Dodgy Award Benefactor
Posts: 1802
Joined: Wed Apr 23, 2003 11:00 am
Vehicle: ND - 2 GT
Location: Doesn't matter where I'm from-it's that your daughter is with me that's the biggest concern :D
Contact:

Re:

Postby Uncle Arthur » Tue May 22, 2007 3:10 pm

mx5_boy wrote:ok.. so got up nice and early today.. HA 10:30 :D

went down to bunning asking about that power tool.. they said they dont have it.. so i went to super cheap.. same deal..

what is it a am asking for exactly?..


so i ended up getting some 400 wet n dry and started to do it by hand.. below is a photo taken after 20 mins of hard work lol

is there a better way to do this or does this seem ok?..

and what exactly is the power tool needed for... is that to get the marks off after.. am i fine to keep using the 400 grit until the whole cover looks like the left side :lol:

Cheers
Ajay


That progress photo is exactly what you should expect.

The tools you require are:

A metal polishing kit to fit a power drill, and or bench grinder,

and a bench grinder.

For finishing I use the Meguiars Metal Polish cause it smells nicer than pork fat, but they all do the same thing. Fine abrasive - basically the same thing as a compond such as Meguiars Scratch X.

Yep - it will be hard work, but the results are worth it :)
Founder of the QLD Chapter of the Honourable Brothers of Dodgy.

Benefactor of the Perpetual Dodgy award - Inaugural year 2007.


Return to “MX5 Body, Paint, Interior & Trim”

Who is online

Users browsing this forum: No registered users and 153 guests