ABS Front Hub Replacement - Cheap
Posted: Sat Mar 12, 2011 5:48 pm
DISCLAIMER
If you believe this job should only be done by an authorised dealer or professional using genuine Mazda parts specifically manufactured for your car, please move on as there is nothing of interest here.
This information is provided in good faith.
If you chose to use this information, you do so at your own risk.
If you have an ABS equipped MX5 NB that requires a replacement front hub, have some mechanical ability and want to save some money for minimal effort, read on-
BACKGROUND
The MX5 front hubs/bearings are not adjustable and non serviceable. If it is worn, the hub and bearings are replaced as a unit.
The genuine hub is good for in excess of 100,000 km however when they do wear out, many are replaced with after-market copies due to cost.
Many of these after-market copies are wearing out within 30,000 km, some sooner.
General opinion is that the genuine Mazda hub is the best value.
To replace my front hub, I ordered a genuine NB8A non-ABS hub (Part# NA01-33-04X) for $200ish from a Mazda dealership.
Out of curiosity, I asked about the genuine ABS equipped hub (Part# NA23-33-04XA) and was also advised that it was around $500ish
REMOVING THE HUB
A guide to the removal and replacement of the front hub can be found HERE and is the same for the NA and the NB.
CAUTION
This process will only work for genuine Mazda hubs!
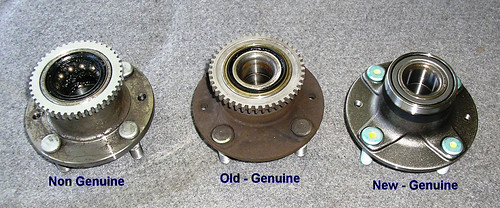
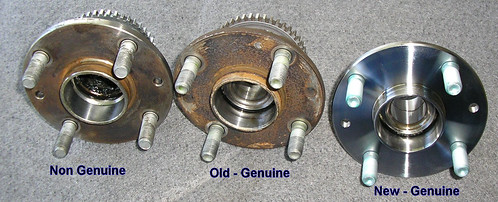
The below photo's shows the 3 different hubs I was working with, note the difference between the non-genuine and the genuine hubs, the ABS rings have a different inner diameter.
THE PROCESS
Remove the hub as per the guide above and give the old one a clean.
If you have access to a press, being careful to avoid damaging the ring, press it off the old hub and then press it onto the new hub.
Refit the hub and you’re done
If you don’t have access to a press, place the hub in a vice or similar and gently tap the ring off the hub using a hammer and piece of wood. Remember that all you want is the ring, preferably undamaged.
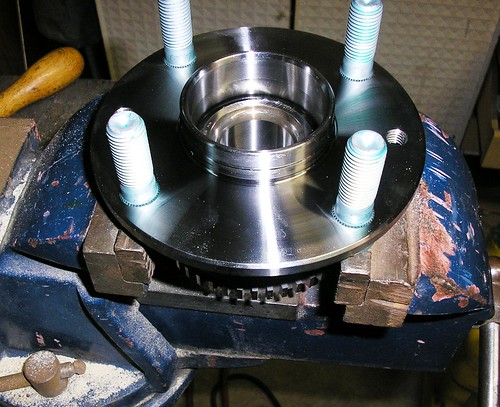
(this is the new hub in position as the ring popped off the old hub before I could get a photo)
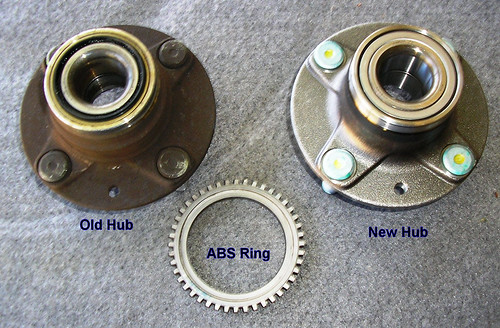
Note the difference between the cheaper non-ABS hub and the ABS equipped hub, you can clearly see why Mazda charge the extra money.
Invert the new hub and tap the ABS ring on using a piece of wood until it is flush.
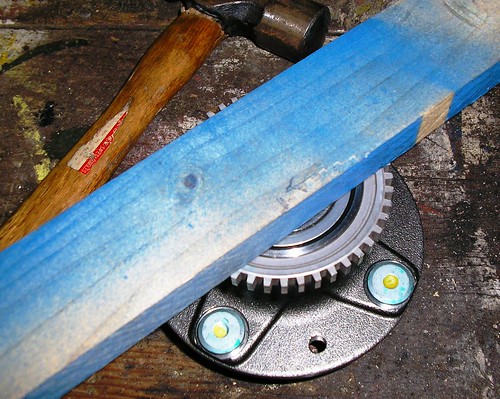
Dry mount the hub onto the stub axle and spin to ensure the ABS ring is running true, adjust if required.
That’s it, you’re done
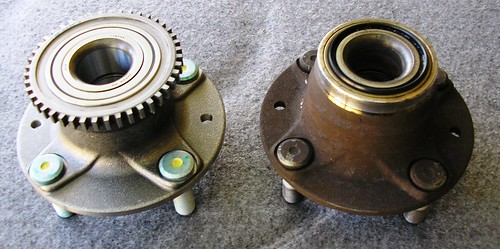
Reassemble the hub as per the above instructions
Full size photo's can be found here
If you are or have replaced your hub with either a genuine or non-genuine hub, you might want to keep the old ABS ring.
A sad sign when you need to include a disclaimer on a "how to guide"
If you believe this job should only be done by an authorised dealer or professional using genuine Mazda parts specifically manufactured for your car, please move on as there is nothing of interest here.
This information is provided in good faith.
If you chose to use this information, you do so at your own risk.
If you have an ABS equipped MX5 NB that requires a replacement front hub, have some mechanical ability and want to save some money for minimal effort, read on-
BACKGROUND
The MX5 front hubs/bearings are not adjustable and non serviceable. If it is worn, the hub and bearings are replaced as a unit.
The genuine hub is good for in excess of 100,000 km however when they do wear out, many are replaced with after-market copies due to cost.
Many of these after-market copies are wearing out within 30,000 km, some sooner.
General opinion is that the genuine Mazda hub is the best value.
To replace my front hub, I ordered a genuine NB8A non-ABS hub (Part# NA01-33-04X) for $200ish from a Mazda dealership.
Out of curiosity, I asked about the genuine ABS equipped hub (Part# NA23-33-04XA) and was also advised that it was around $500ish
REMOVING THE HUB
A guide to the removal and replacement of the front hub can be found HERE and is the same for the NA and the NB.
CAUTION
This process will only work for genuine Mazda hubs!
The below photo's shows the 3 different hubs I was working with, note the difference between the non-genuine and the genuine hubs, the ABS rings have a different inner diameter.


THE PROCESS
Remove the hub as per the guide above and give the old one a clean.
If you have access to a press, being careful to avoid damaging the ring, press it off the old hub and then press it onto the new hub.
Refit the hub and you’re done
If you don’t have access to a press, place the hub in a vice or similar and gently tap the ring off the hub using a hammer and piece of wood. Remember that all you want is the ring, preferably undamaged.

(this is the new hub in position as the ring popped off the old hub before I could get a photo)

Note the difference between the cheaper non-ABS hub and the ABS equipped hub, you can clearly see why Mazda charge the extra money.
Invert the new hub and tap the ABS ring on using a piece of wood until it is flush.

Dry mount the hub onto the stub axle and spin to ensure the ABS ring is running true, adjust if required.
That’s it, you’re done

Reassemble the hub as per the above instructions
Full size photo's can be found here
If you are or have replaced your hub with either a genuine or non-genuine hub, you might want to keep the old ABS ring.
A sad sign when you need to include a disclaimer on a "how to guide"