Ahh, didn't realise you were keeping 2f. I've been told the manilfold itself become a weak point for power in the fwd applications so hopefully the rwd is better.
How did you measure the temperature? I was hoping to get temps well below 100, so that will be a bit disappointing for me. Did the car have overheating problems before?
Cheers
Sent from my GT-I9100 using Tapatalk 2
The Roadster NA Journey Begins
Moderators: timk, Stu, -alex, miata, StanTheMan, greenMachine, ManiacLachy, Daffy, zombie, Andrew, The American, Lokiel
-
sailaholic
- Speed Racer
- Posts: 3511
- Joined: Thu May 19, 2011 3:38 pm
- Vehicle: NA8
- Location: Brisbane
-
Magpie
- Speed Racer
- Posts: 7468
- Joined: Fri Feb 11, 2011 12:49 pm
- Vehicle: NA6
- Location: Purga, QLD
Re: The Roadster NA Journey Begins
Well it has been a quite month, however the car is about to go back to MX5 plus for a few jobs
1. Install 6 speed and clutch
2. Have fabricated a loop around the drive shaft to comply with CAMS
2. Install DL-32 Innovate data logger
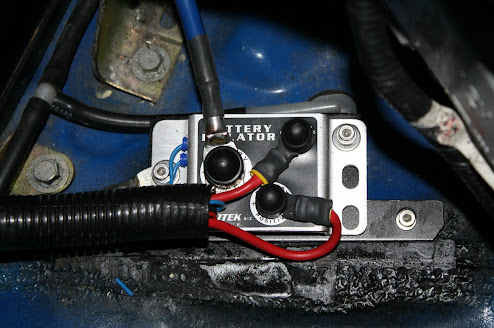
3. Install Cartek battery isolator (to comply with CAMS)
When MX5 plus is finished the car will be getting the headlight vent covers (the ones that a few people are having problems with) as well as 2 aero catches and a fire extinguisher (to comply with CAMS).
With luck it will all be done before the next track day.
1. Install 6 speed and clutch
2. Have fabricated a loop around the drive shaft to comply with CAMS
2. Install DL-32 Innovate data logger
3. Install Cartek battery isolator (to comply with CAMS)
When MX5 plus is finished the car will be getting the headlight vent covers (the ones that a few people are having problems with) as well as 2 aero catches and a fire extinguisher (to comply with CAMS).
With luck it will all be done before the next track day.
-
Magpie
- Speed Racer
- Posts: 7468
- Joined: Fri Feb 11, 2011 12:49 pm
- Vehicle: NA6
- Location: Purga, QLD
Re: The Roadster NA Journey Begins
Well ithas been a while so update time.
In addition to the previous mods it now has a PWR Radiator/Oil cooler combo as well as a temp 1.6 engine (the other one gave up the ghost due to overheating).
Garage Vary front and rear wind deflectors:


Radiator Oil Combo (custom shroud photos to come)


Cartek Isolator

Innovate Gauges and Data Logger


Rims

Rear Strut Brace

Brake Ducts

Photos


In addition to the previous mods it now has a PWR Radiator/Oil cooler combo as well as a temp 1.6 engine (the other one gave up the ghost due to overheating).
Garage Vary front and rear wind deflectors:
Radiator Oil Combo (custom shroud photos to come)
Cartek Isolator
Innovate Gauges and Data Logger
Rims
Rear Strut Brace
Brake Ducts
Photos
-
Magpie
- Speed Racer
- Posts: 7468
- Joined: Fri Feb 11, 2011 12:49 pm
- Vehicle: NA6
- Location: Purga, QLD
Re: The Roadster NA Journey Begins
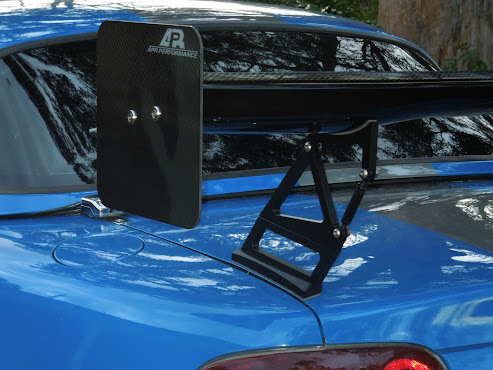
Well this is the last thing to be purchased and installed (I still have to put on the replacement number plate) on the car before the engine upgrade, an APR Wing from 949 Racing (http://949racing.com/Supermiata-GTC-200-wing.aspx. It arrived 4 days after being posted, install took about 60 mins max (I did it myself for once).
The car will be going in to have the wind deflectors installed and the rest of the painting done. Next update in a few weeks.
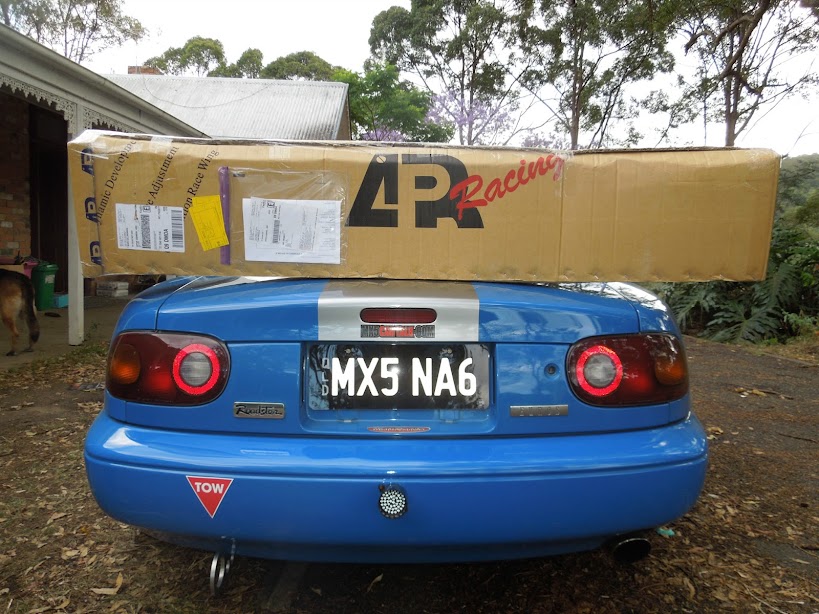
Unpacked

Tools

Holes marked/drilled


Wing attached to mounts

Almost finished

Finished and all tight angle set to zero


From the inside

From the front

All the photos are here https://plus.google.com/u/0/#photos/115769813738304087848/albums/5808350530461597681
The car will be going in to have the wind deflectors installed and the rest of the painting done. Next update in a few weeks.
Unpacked
Tools
Holes marked/drilled
Wing attached to mounts
Almost finished
Finished and all tight angle set to zero
From the inside
From the front
All the photos are here https://plus.google.com/u/0/#photos/115769813738304087848/albums/5808350530461597681
-
Magpie
- Speed Racer
- Posts: 7468
- Joined: Fri Feb 11, 2011 12:49 pm
- Vehicle: NA6
- Location: Purga, QLD
Re: The Roadster NA Journey Begins
Front flare install, it looks like hitting that kangaroo has caused some deformation with the fitting of the front flares. The rear are perfect as is the front drivers side, but the passenger front has issues so the front flares have been put on hold till I can leave it at the shop for a bit longer.
Front Drivers:


Front Passengers:


Front Drivers:
Front Passengers:
-
Magpie
- Speed Racer
- Posts: 7468
- Joined: Fri Feb 11, 2011 12:49 pm
- Vehicle: NA6
- Location: Purga, QLD
Re: The Roadster NA Journey Begins
Rear Garage Vary wind deflectors and silver paint almost finished (rear bumper, rear wind deflectors and doors)...


-
Kev05

- Racing Driver
- Posts: 1456
- Joined: Sat May 19, 2012 11:24 pm
- Vehicle: NB8A
- Location: Brisbane
Re: The Roadster NA Journey Begins
Is that going to be a permanent fixture or only for track days?
It's going to turn heads at the next club run.
-
Magpie
- Speed Racer
- Posts: 7468
- Joined: Fri Feb 11, 2011 12:49 pm
- Vehicle: NA6
- Location: Purga, QLD
Re: The Roadster NA Journey Begins
Yeah it is a tad on the large size, however will more than likley be used on track days and maybe a club run 
The only issue will be the mounts will still be there when it is taken off due to the holes in the boot that were drilled to mount it.
Other good news is the engine build is starting very soon, install should be early 2013 ready for the second club track day (the first one I'll be at work at the moment).
-
Magpie
- Speed Racer
- Posts: 7468
- Joined: Fri Feb 11, 2011 12:49 pm
- Vehicle: NA6
- Location: Purga, QLD
Re: The Roadster NA Journey Begins
Well, some good news my panel beater got the front flares on, so the outside is almost complete.
Still to go is a front splitter, rear diffuser, garage vary bonnet and headlight covers, but that is next years job.
Other good news is engine build is starting so pennies will be diverted towards that.
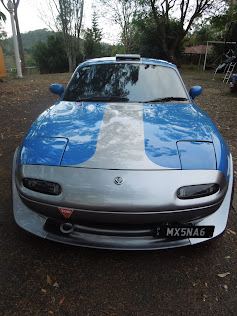
So this is the history of the outside build:
When purchased

BC Coilovers, roll bar, 6UL's

Garage Vary front lip, silver nose, hardtop, silver stripe, window tinting, number plate, smoke parking/indicators

Garage Vary front/rear wind deflectors, more silver paint and rear wing


https://plus.google.com/photos/115769813738304087848/albums/5813595740673108625
Still to go is a front splitter, rear diffuser, garage vary bonnet and headlight covers, but that is next years job.
Other good news is engine build is starting so pennies will be diverted towards that.
So this is the history of the outside build:
When purchased
BC Coilovers, roll bar, 6UL's
Garage Vary front lip, silver nose, hardtop, silver stripe, window tinting, number plate, smoke parking/indicators
Garage Vary front/rear wind deflectors, more silver paint and rear wing
https://plus.google.com/photos/115769813738304087848/albums/5813595740673108625
-
Magpie
- Speed Racer
- Posts: 7468
- Joined: Fri Feb 11, 2011 12:49 pm
- Vehicle: NA6
- Location: Purga, QLD
Re: The Roadster NA Journey Begins
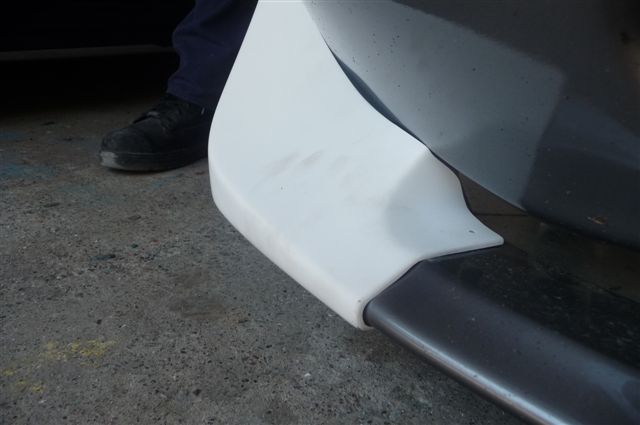
Well a parcel arrived today:

and inside:


Safety First

Lets begin (remove 4 nuts)


Attach Bracket

Attach diffuser (need to remove the 2 bolts first - no photo of that step sorry)

Oooops tow hook in way

A few minutes with a die grinder
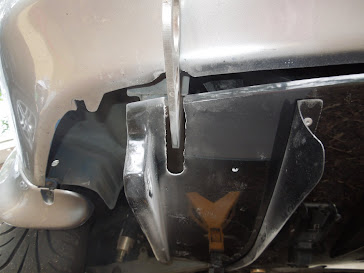
4 screws into the bracket later

Finished job


Also getting ready to go fishing on Sunday

and inside:
Safety First
Lets begin (remove 4 nuts)
Attach Bracket
Attach diffuser (need to remove the 2 bolts first - no photo of that step sorry)
Oooops tow hook in way
A few minutes with a die grinder
4 screws into the bracket later
Finished job
Also getting ready to go fishing on Sunday
-
Magpie
- Speed Racer
- Posts: 7468
- Joined: Fri Feb 11, 2011 12:49 pm
- Vehicle: NA6
- Location: Purga, QLD
Re: The Roadster NA Journey Begins
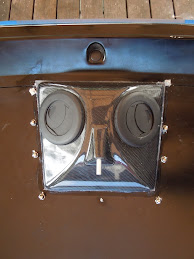
When I got home on 19/12/12 I also had a parcel waiting....


Custom Gauge Faces from Rev Limiter
Lets begin


Wave goodbye to the old...

The new and the old


First Needle done

Just the fuel one to go

Fuel done

All done


This was actually a very easy job. However I would suggest that yoiu have a few disposal gloves on hand. Speedo is spot on by the GPS, RPM is spot on at 5,000 when the first shift light comes on. I will try and get some night shots (orange lights) sometime soon. The needles on the rev and spped take a little getting used to, but I do like them and will just have to drive more to get used to them.
Also I have cut a template out for the roof vent (to make sure I can match the shape of the vent), this job has me nervous.

Custom Gauge Faces from Rev Limiter
Lets begin
Wave goodbye to the old...
The new and the old
First Needle done
Just the fuel one to go
Fuel done
All done
This was actually a very easy job. However I would suggest that yoiu have a few disposal gloves on hand. Speedo is spot on by the GPS, RPM is spot on at 5,000 when the first shift light comes on. I will try and get some night shots (orange lights) sometime soon. The needles on the rev and spped take a little getting used to, but I do like them and will just have to drive more to get used to them.
Also I have cut a template out for the roof vent (to make sure I can match the shape of the vent), this job has me nervous.
-
koop21
- Fast Driver
- Posts: 297
- Joined: Tue Aug 23, 2011 12:31 am
- Vehicle: NA6
- Location: Sydney
Re: The Roadster NA Journey Begins
hey magpie, are you still playing on purchasing the Jenvey ITB kit?
-
Jeo

- Speed Racer
- Posts: 3659
- Joined: Thu Jun 26, 2008 9:33 am
- Vehicle: NB8B
- Location: Canberra
Re: The Roadster NA Journey Begins
What's the diffuser?
-
Magpie
- Speed Racer
- Posts: 7468
- Joined: Fri Feb 11, 2011 12:49 pm
- Vehicle: NA6
- Location: Purga, QLD
Re: The Roadster NA Journey Begins
Yes they are back on my plan, just need to sort the funding out and the cost. I have a quote from Jenvey however not all the parts are available till early Jan 2013 so I have time to think long and hard... I have gone off 2f as I'm going over the allowed bore size so ITB's are a possibility now.
The diffuser is from Rev 9 http://rev9autosport.com/na/exterior/jet-stream-rear-diffuser.html. I have hardly dríven the car since putting it in so no thoughts on it yet. I will wait till the next track day before I comment. I have a few other aero mods to do, a front splitter like Charlie's and some airtabs for the hardtop.
koop21 wrote:hey magpie, are you still playing on purchasing the Jenvey ITB kit?
The diffuser is from Rev 9 http://rev9autosport.com/na/exterior/jet-stream-rear-diffuser.html. I have hardly dríven the car since putting it in so no thoughts on it yet. I will wait till the next track day before I comment. I have a few other aero mods to do, a front splitter like Charlie's and some airtabs for the hardtop.
Jeo wrote:What's the diffuser?
-
Magpie
- Speed Racer
- Posts: 7468
- Joined: Fri Feb 11, 2011 12:49 pm
- Vehicle: NA6
- Location: Purga, QLD
Re: The Roadster NA Journey Begins
Well after a lunch out with the family I decided to do the roof vent (no I don't drink).
Hardtop ready to be operated on

Template made and attached...


Point of no return, holes drilled and cuts made...
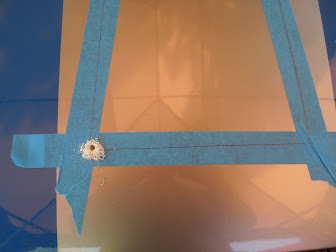


The vent that will be going in


Here is where things went 'difficult'. I was planing to use stainless rivets however my rivet tool was not suitable for the size I wanted to use. The only other rivets I had were too small... (you can see one in the middle top).
Also the hardtop has fall both front to back and left to right. I allowed for the front to back but not the left to right... So I switched over to some large domed bolts and used dome nuts on the inside of the hardtop. I need to get a decent rivet gun and finish off the front of the vent and get it to sit flush with the roof (where the blue tape is). I also used some marine grade silastic on the roof before I put the vent in.


From the inside. I need to replace two of the nuts with dome heads, that will be after I close the gap at the front.
And the final view

Verdict.
It was a simple job but the left right curve of the hardtop required a change of plans as the rivets I was planning to use failed. Maybe next time I should do a job when there are places open to buy replacement tools or larger rivets...
I have not dríven it yet and I'm not sure if I actually like it, it had better grow on me as it will be a pain to fix the hardtop. The only thing I noticed was that the mesh vibrtated when I closed the doors so this may need to be sorted out in the future, plus I need to run a drain pipe from the back of the vent to one of the drain holes. However It should keep the cab cool on track days so it is more functional than a beauty mod.
However as some stores are open tomorrow and I hve visitors over I may have to put the vistors off and finish the MX5.
All the photos are here https://plus.google.com/photos/115769813738304087848/albums/5825804442852251281
Hardtop ready to be operated on
Template made and attached...
Point of no return, holes drilled and cuts made...
The vent that will be going in
Here is where things went 'difficult'. I was planing to use stainless rivets however my rivet tool was not suitable for the size I wanted to use. The only other rivets I had were too small... (you can see one in the middle top).
Also the hardtop has fall both front to back and left to right. I allowed for the front to back but not the left to right... So I switched over to some large domed bolts and used dome nuts on the inside of the hardtop. I need to get a decent rivet gun and finish off the front of the vent and get it to sit flush with the roof (where the blue tape is). I also used some marine grade silastic on the roof before I put the vent in.
From the inside. I need to replace two of the nuts with dome heads, that will be after I close the gap at the front.
And the final view
Verdict.
It was a simple job but the left right curve of the hardtop required a change of plans as the rivets I was planning to use failed. Maybe next time I should do a job when there are places open to buy replacement tools or larger rivets...
I have not dríven it yet and I'm not sure if I actually like it, it had better grow on me as it will be a pain to fix the hardtop. The only thing I noticed was that the mesh vibrtated when I closed the doors so this may need to be sorted out in the future, plus I need to run a drain pipe from the back of the vent to one of the drain holes. However It should keep the cab cool on track days so it is more functional than a beauty mod.
However as some stores are open tomorrow and I hve visitors over I may have to put the vistors off and finish the MX5.
All the photos are here https://plus.google.com/photos/115769813738304087848/albums/5825804442852251281
Who is online
Users browsing this forum: No registered users and 8 guests


