Nemo's NA6

Chat to do with your MX5/Miata/Eunos Garage Ride(s).

Moderators: timk, Stu, zombie, Andrew, The American, Lokiel, -alex, miata, StanTheMan, greenMachine, ManiacLachy, Daffy

User avatar
PaulF
Racing Driver
Posts: 1812
Joined: Fri Jan 28, 2011 5:55 pm
Vehicle: NA6
Location: Newcastle, NSW

Re: Nemo's NA6

Postby PaulF » Thu Nov 03, 2011 11:33 pm

Nemo wrote:They're M1028/Vitaloni. Was originally planning on painting them red, however after having them on the car for the last week not sure anymore, seems to work well with the black hard top imo. Opinions?

Keep them as is, and paint the windscreen surround black to match the hard top. :)

evil_weevil
Racing Driver
Posts: 1401
Joined: Wed Nov 19, 2008 2:50 pm
Vehicle: NA8

Re: Nemo's NA6

Postby evil_weevil » Fri Nov 04, 2011 10:27 am

nice!
what other go fast bits did you get?
Looking for an SVT motor for this:
viewtopic.php?f=73&t=62834

mitch_f1
Racing Driver
Posts: 858
Joined: Wed Jun 17, 2009 8:59 pm
Vehicle: NA6
Location: Sydney

Re: Nemo's NA6

Postby mitch_f1 » Sat Nov 05, 2011 11:23 pm

PaulF wrote:Keep them as is, and paint the windscreen surround black to match the hard top. :)


I second this notion!

Nemo
Fast Driver
Posts: 171
Joined: Sat May 22, 2010 8:51 pm
Vehicle: NA6
Location: Sydney

Re: Nemo's NA6

Postby Nemo » Thu Nov 24, 2011 7:58 pm

Think i'll keep the mirrors black but unsure about painting the a pillars.

Small update.

Image

Went over to Mitch's last night to do a couple of things. Got a hold of his digital compression tester and read 187-180psi across all four cylinders.

According to the workshop manual it was 192psi brand new and anything >135psi is acceptable so either did something wrong or I'm a happy camper. Plan to do a leak down test soon as I save up for some final bits and pieces.

evil_weevil
Racing Driver
Posts: 1401
Joined: Wed Nov 19, 2008 2:50 pm
Vehicle: NA8

Re: Nemo's NA6

Postby evil_weevil » Thu Nov 24, 2011 8:24 pm

nice one!

my last comp test was around 170-175 across all 4
Looking for an SVT motor for this:
viewtopic.php?f=73&t=62834

Hjt
Speed Racer
Posts: 2499
Joined: Thu Jan 13, 2011 12:46 pm
Vehicle: NB8A

Re: Nemo's NA6

Postby Hjt » Thu Nov 24, 2011 10:49 pm

My two favourite RC cars!

User avatar
-alex
Racing Driver
Posts: 1492
Joined: Wed Feb 27, 2008 11:38 am
Vehicle: NA8
Location: Old Pac
Contact:

Re: Nemo's NA6

Postby -alex » Fri Nov 25, 2011 1:12 am

mmm primary colour blocks!
Image
Australian Targa Champion|Targa Australia
Sasso - 06/05/10 ♥

Nemo
Fast Driver
Posts: 171
Joined: Sat May 22, 2010 8:51 pm
Vehicle: NA6
Location: Sydney

Re: Nemo's NA6

Postby Nemo » Thu Dec 22, 2011 2:22 am

Slightly insignificant update, but still an update none the less.

Over the last couple of months I've done a bit of shopping adding to the growing pile in my bedroom. A lot of it may seem very familiar to some of you. :lol:

This included:
- ARTech Stainless Log Manifold
- Separated Gases Dump Pipe
- Custom Heater Hose Setup
- Garret GT2554r Turbo
- Water and Oil Turbo Lines etc
- Bosch 570cc Injectors
- Walbro 255lph Fuel Pump and Fuel Pressure Regulator
- Custom Coolant reroute
- Intercooler and Piping
- HKS BOV
- Speedflow Fittings
- 2.5 " Stainless Exhaust with High Flow Cat
- 52mm ASI Aluminium Radiator
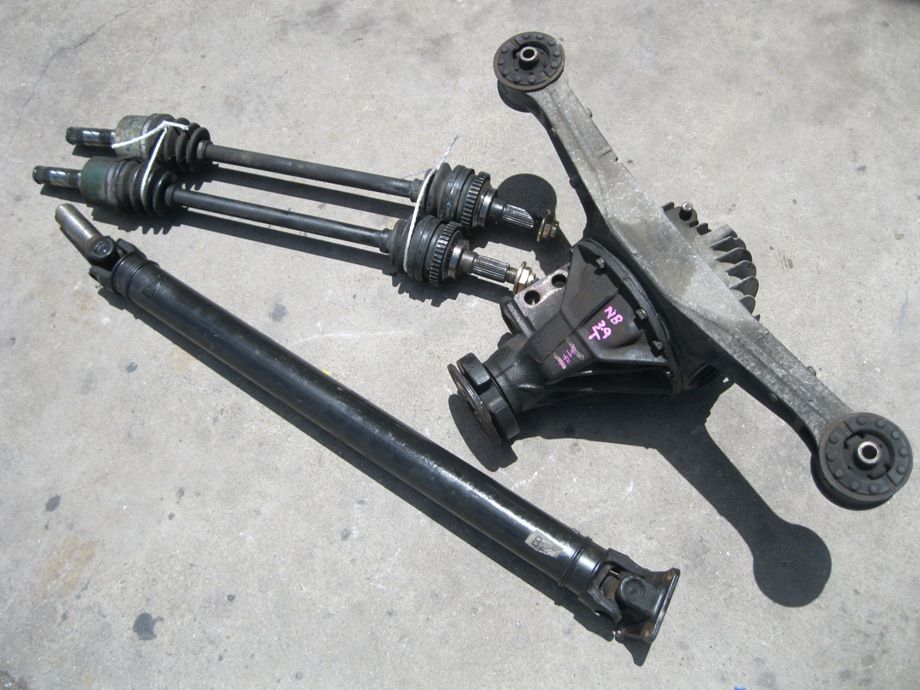
- 3.9 Torsen Diff with Drive Shafts etc
- Innovate LC1 Wideband
- Boost, Oil Temp and Water Temp Gauges
- Flyin Miata Butterfly Brace

Still on the way is a Haltech ECU and a new clutch.

Still on my wish list are some wider track wheels, some brand new semis and a CF hard top.

Going away shortly after the new year, so decided to make a start on some of the work so can get straight into the turbo once I come back home.

Couple of days off work so decided to try and get the following things done:
- Install new radiator
- Install coolant reroute
- Rip out the air con
- Dummy fit intercooler

Day started off with a visit to Hornsby Auto Electrical to get my air con degassed. Only took 5-10 minutes cos there was barely any gas in there at all. :lol: Token workshop photo.
Image

Later in the evening after much procrastination and last minute Christmas shopping I finally got around to starting on the car. Drained the coolant and got the radiator out easy enough. Didn't really run into any unexpected problems, drained coolant looked fine as did the hoses etc.

Went to trial fit the fan on the new radiator and noticed it didn't quite line up properly. Only 3 of the 4 holes lined up perfectly.
Image

Wasn't by much though so got the drill out and slightly widened the hole on the fan shroud. As I was tightening up the bolts to make sure all fit fine I managed to snap one of the old bolts I was reusing. :evil:
Image
What is left of it stuck in the new radiator. There's a bit of thread sticking out still so may just use a nut to secure the fan. Not much thread though so don't know how long it'll last on there lol. I'd imagine 3 bolts should be enough though.

At this point started having a look around trying to fit the coolant reroute. It's rerouted to go to the back of the motor but still not 100% sure on how to go about it. Have now found and read some instructions for the M-Tuned coolant reroute though and its making it a bit clearer.

Got a bit distracted and started ripping off the front bar and crash pad in order to dummy fit the intercooler. Put on the cold side intercooler piping to the intake and ran into a couple of issues.

One of the silicon joiners seems rather close to the alternator belt/pulley to me. Moved some of the joiners around a bit to try and get more clearance, there's about 10-15mm now and hoping that's enough to survive some off field excursions at Wakefield. :lol:

Also realized the air con condenser was in the way of where the intercooler was to be mounted. Haven't touched/removed any of the air con system yet so decided to spray the intercooler black and call it a night. Once that's out of the way will be able to make up some brackets.
Image

So out of the 4 things I set out to do, I completed none of them. Need to get it done tomorrow otherwise I shall be walking to work on Friday. :lol:

User avatar
Jeo
Speed Racer
Posts: 3654
Joined: Thu Jun 26, 2008 9:33 am
Vehicle: NB8B
Location: Canberra

Re: Nemo's NA6

Postby Jeo » Thu Dec 22, 2011 3:00 pm

Lols, sounds famailar.

NIcely done mate. Keen to see it progress.

evil_weevil
Racing Driver
Posts: 1401
Joined: Wed Nov 19, 2008 2:50 pm
Vehicle: NA8

Re: Nemo's NA6

Postby evil_weevil » Thu Dec 22, 2011 3:56 pm

turbo eh???

nice!!!!!!!!!!!!
Looking for an SVT motor for this:
viewtopic.php?f=73&t=62834

Nemo
Fast Driver
Posts: 171
Joined: Sat May 22, 2010 8:51 pm
Vehicle: NA6
Location: Sydney

Re: Nemo's NA6

Postby Nemo » Sat Dec 24, 2011 1:12 am

Haven't had too much time to work on the car and my diff came in a bit earlier then expected so just going to take my time with everything...not going to try get it on the road before I go away.

Started off late yesterday afternoon by removing the air con. Took the compressor and the bracket out. Relatively simple, just a couple of bolts. Later found out that apparently I need to replace one of the bolts that was holding the bracket otherwise I'll get a leak as it clamps the oil pump to the block. Can't just re-use the one I took out, way too long without the bracket there.

Next out was the condenser. With the condenser out it freed up room to make the brackets and dummy mount the intercooler. Having never played around with a turbo car before I wasn't really sure of the best way to make the bracket. Tried looking around on the internet without much luck. Didn't find much apart from the bracket from the Flyin' Miata turbo kit.
Image
Wasn't a big fan as I'd say there'd be a fair bit of movement hanging so far down from the radiator support.

First started off by cutting an angled aluminium bar down to size and mounting it on he bottom condenser brackets.
Image

So pretty happy with it so far, decided to chuck on the front bar quickly to make sure it cleared everything etc.
Image
As you can see was way too low.

Cut up some straight 3mm aluminium bar to use between the upper and lower condenser brackets and was going to bolt the intercooler somewhere between there. The bottom and lower mounting points aren't exactly flush so I had to slightly bend the bar.

Me being me, I just guestimated 10cm higher should do the trick without actually taking measurements etc. Quickly found out it didn't and the intercooler now fouls the lower bracket.
Image
Not good. So re-drilled some holes 2cm lower...left it a bit close. Only a couple of mm clearance now. Will re make these brackets a bit later.
Image

Threw the front bar back on.
Image
Much better. With the piping connected in place it seems rather stable, a little bit of movement without though. May remake it using thicker angled bar.

Pretty happy with how the intercooler brackets turned out. Plenty of room there to mount an oil cooler etc as well with the same bracket. If anyone has any suggestions on any improvements I can make let me know.

Slid in the radiator to make sure to make sure the intercooler etc cleared it. All good in that regard...however upon sliding the radiator in I soon realized it is slightly bowed.
Image
Oh well, can't expect too much for an ebay radiator.

Finished ripping out all the lines for the air con. Got a bit frustrated trying to keep all the hard lines in tact so ended up bending them something savage to get it out lol. Still have the bigger hard line to take out. Only have one spanner/shifter big enough to undo the fitting on the firewall to the evaporator box. Leaving the evaporator box in for now, will remove later when I get around to fitting the gauges.

Decided to call it a night there.

My to do list before I go away now looks like:
- Dummy fit intercooler. Done
- Rip out Air Con. Done
- Finish installing new radiator and coolant reroute.
- Install Torsen Diff.
- Install Flyin' Miata Butterfly brace.
- Dummy fit gauges.
- Rip out soft top.

Will be interesting to try get done before Jan 4th with the hollidays...we'll see how we go haha. :lol:

Nemo
Fast Driver
Posts: 171
Joined: Sat May 22, 2010 8:51 pm
Vehicle: NA6
Location: Sydney

Re: Nemo's NA6

Postby Nemo » Thu Dec 29, 2011 10:47 pm

Combination of being busy with the holidays and laziness, didn't get a chance to work on the car until today.

Eren/Red Devil came over today to give me a hand with putting in the torsen diff. Massive thanks for that.
Image

All started off well, got the drivers side hub bolt off fine, then came to the passengers side.
Image
As you can see someone had previously smashed in the key way. Sat there for a good 20 minutes trying to get it undone but nothing.

Woke up Dan/Scarecrow and luckily he had a dremel I could borrow. Thanks again!

So got to cutting the key way out. All good, should now be fine right? Nope. Next managed to snap a 1/2" breaker bar trying to crack the nut. Luckily Eren had a 3/4" breaker bar at home so went and got that and I bought a 3/4" socket for $25.50 to use one time :( .

First two hours of work and no actual progress with the car. :(

Once we got the passengers hub bolt off all went rather smoothly, just was a bit fiddly with the PPF.

Got the diff in all fine, now just need to fill up it up with some diff oil and should be good to go. :D

After we got that done we started playing around with the coolant reroute. After fiddling and failing at reaching some of the bolts at the back of the motor we called it a day.

Got a pretty clear idea on everything with the reroute and the custom heater hose now, just unsure about one of the plugs/senders on the remote thermostat, hoping to figure out once I get going with it.

My to do list before Jan 4th:

- Dummy fit intercooler. Done
- Rip out Air Con. Done
- Finish installing new radiator and coolant reroute.
- Install Torsen Diff. Done
- Install Flyin' Miata Butterfly brace.
- Dummy fit gauges.
- Rip out soft top.

Staying optimistic. :lol:

Hjt
Speed Racer
Posts: 2499
Joined: Thu Jan 13, 2011 12:46 pm
Vehicle: NB8A

Re: Nemo's NA6

Postby Hjt » Fri Dec 30, 2011 12:23 am

I'm willing to help remove the soft-top one arvo if you want some help!

Nemo
Fast Driver
Posts: 171
Joined: Sat May 22, 2010 8:51 pm
Vehicle: NA6
Location: Sydney

Re: Nemo's NA6

Postby Nemo » Fri Dec 30, 2011 10:27 am

Hjt wrote:I'm willing to help remove the soft-top one arvo if you want some help!


Sounds good! I will msg you later. Any days in particular you're free?

User avatar
NitroDann
Forum sponsor
Posts: 10280
Joined: Thu Nov 05, 2009 12:10 pm
Vehicle: NA6
Location: Newcastle NSW
Contact:

Re: Nemo's NA6

Postby NitroDann » Fri Dec 30, 2011 10:36 am

Will your car end up looking like mine? :)

Dann
http://www.NitroDann.com

speed wrote:If I was to do it again, I wouldn't even consider the supercharger.


Return to “MX5 Garage Chat”

Who is online

Users browsing this forum: No registered users and 38 guests