MattR wrote:Just one thing to say.......
Told ya so!!!!!!!!!
The Roadster NA Journey Begins
Moderators: timk, Stu, -alex, miata, StanTheMan, greenMachine, ManiacLachy, Daffy, zombie, Andrew, The American, Lokiel
-
corners

- Racing Driver
- Posts: 1127
- Joined: Mon Aug 20, 2007 1:33 pm
- Vehicle: ND - Supercharged
- Location: Brisbane, QLD
Re: The Roadster NA Journey Begins
Steampunk wrote: Oh you've got Ohlins? You must like drugs too!!!
-
Magpie
- Speed Racer
- Posts: 7468
- Joined: Fri Feb 11, 2011 12:49 pm
- Vehicle: NA6
- Location: Purga, QLD
Re: The Roadster NA Journey Begins
Well the car had its wings clipped today, from this

to this


Wing will only go on now when the car is on the trailer or for very special occasions. I'm sort of sad, but at least it looks a little less 'pull me over please'. I might see if there is a non-functional low profile wing that has the same spacing as the real one and put that on for 'show'. However I will then have to put up with the 'that wing does nothing' comments or 'why don't you get a real one', but, I will know the truth
to this
Wing will only go on now when the car is on the trailer or for very special occasions. I'm sort of sad, but at least it looks a little less 'pull me over please'. I might see if there is a non-functional low profile wing that has the same spacing as the real one and put that on for 'show'. However I will then have to put up with the 'that wing does nothing' comments or 'why don't you get a real one', but, I will know the truth
-
Lokiel

- Forum legend
- Posts: 4126
- Joined: Thu May 28, 2009 2:39 pm
- Vehicle: NB SE
- Location: Brisbania
Re: The Roadster NA Journey Begins
Unfortunately the wing really does scream "pull me over" - at least it still looks good without the wing.
I was always amazed that Charlie managed to avoid getting pulled over every time he drove near a cop car.
I was always amazed that Charlie managed to avoid getting pulled over every time he drove near a cop car.
Don't worry about dying, worry about not living!
Garage Thread: http://www.mx5cartalk.com/forum/viewtopic.php?f=57&t=76716
Garage Thread: http://www.mx5cartalk.com/forum/viewtopic.php?f=57&t=76716
-
sailaholic
- Speed Racer
- Posts: 3511
- Joined: Thu May 19, 2011 3:38 pm
- Vehicle: NA8
- Location: Brisbane
-
MattR

- Racing Driver
- Posts: 1305
- Joined: Wed Feb 25, 2009 11:26 pm
- Vehicle: NA6
- Location: Brisbane
Re: The Roadster NA Journey Begins
Magpie wrote:plohl wrote:1157kg is pretty heavy
Ouch, somebody had to add it up, however I never will post the car weight without the driverplohl wrote:1With the squirming under braking, have you looked at your shock settings? Might be getting too much weight transfer to the front.
At the moment there is more rebound in the rear so that the weight transfer from front to back is slowed once braking is almost complete. My logic is so that the front does not unload too quick.
Maybe softer spring rates on the front could be tested?
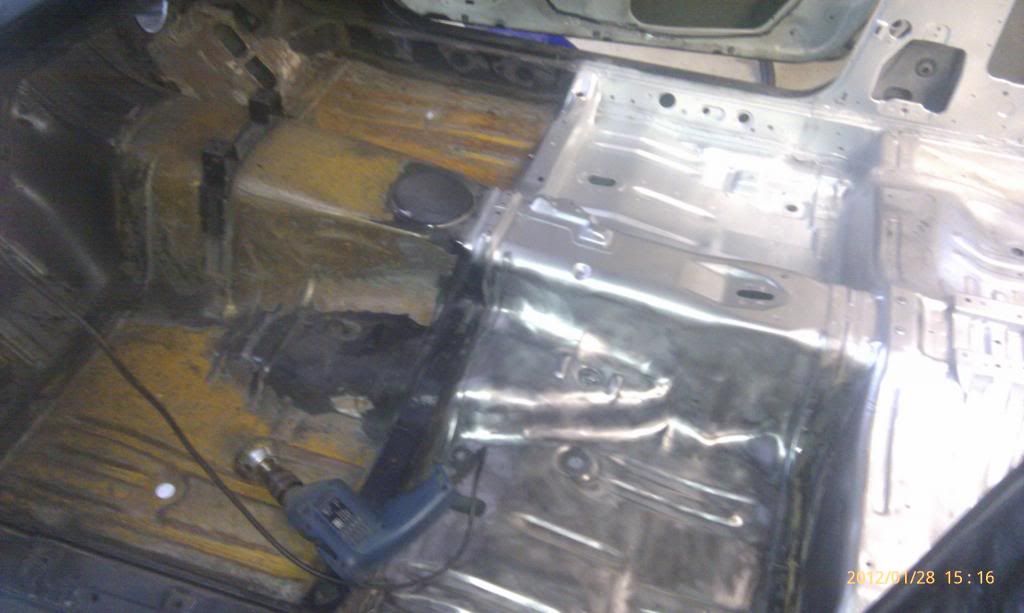
And now it's on its way to being a proper race car, here is step one in the weight reduction........
A couple of photos for inspiration Mark, this is how far you could be going to get weight out
Removing all the interior sound deadener
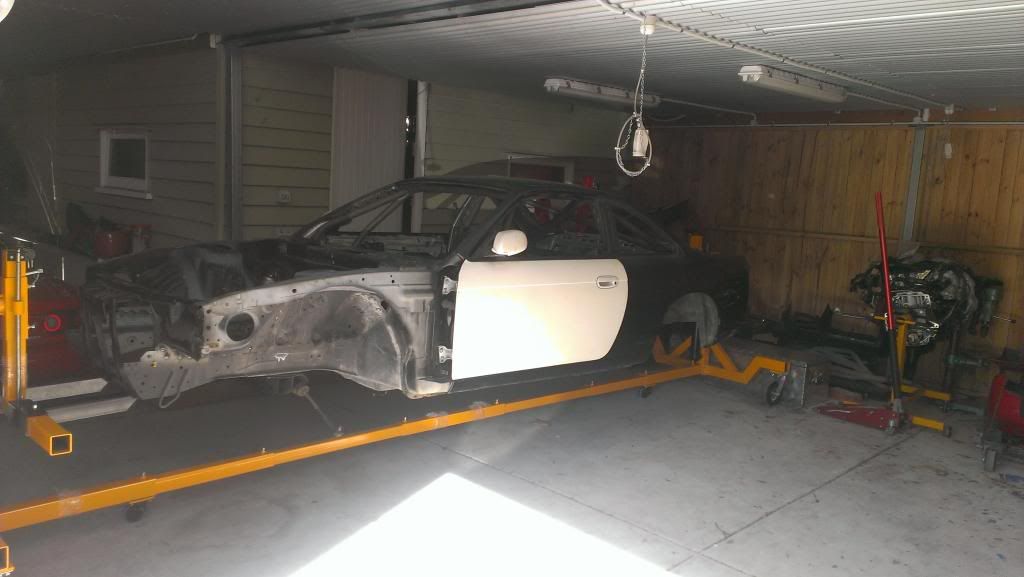
On it's rotisserie to start the exterior clean up.
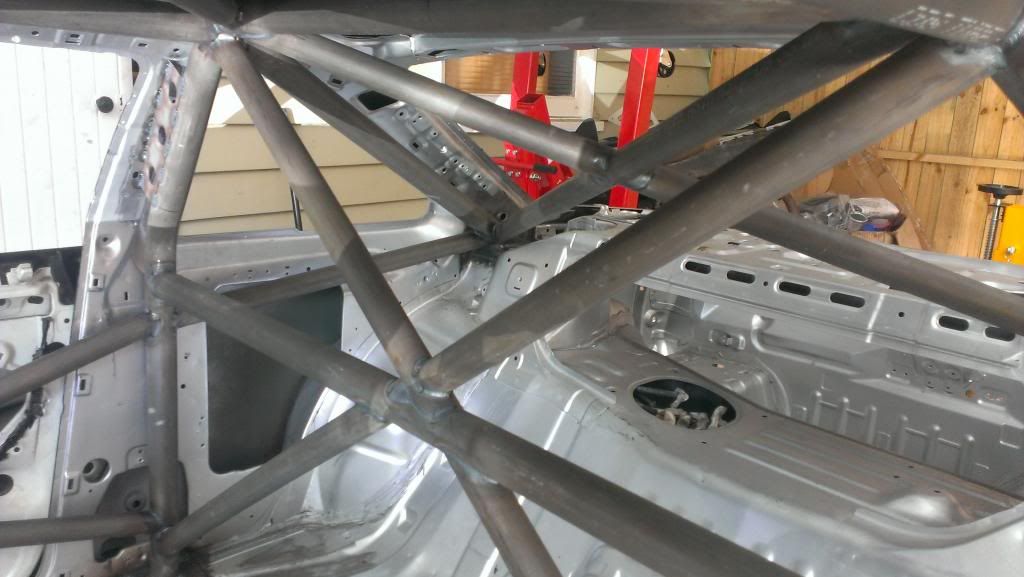
And the Interior before final clean and paint with KBS rust preventative paint in white
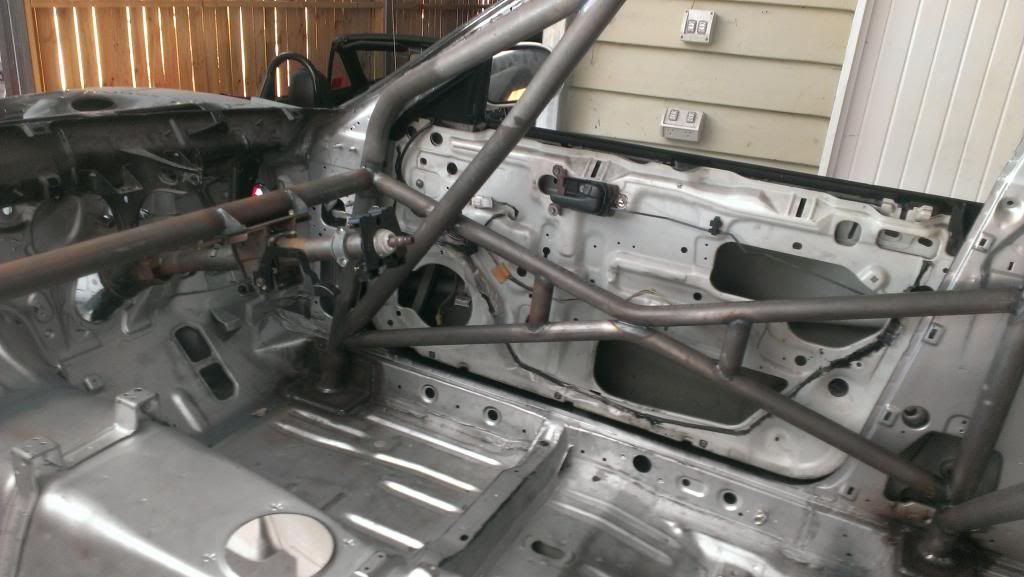
So just a bit of inspiration, or you can show how far you could have gone with the build to get back into the good books......
-
Magpie
- Speed Racer
- Posts: 7468
- Joined: Fri Feb 11, 2011 12:49 pm
- Vehicle: NA6
- Location: Purga, QLD
Re: The Roadster NA Journey Begins
MattR is your car road registered? Well mine still is and while it stays that way the radio, carpet and brake booster remain! The radio should go because it can't really be heard and the antenna is not even hooked up. Any weight saving will be done by the driver
After the QR Night Sprints I may reassess the direction of the car, so anything is possible
After the QR Night Sprints I may reassess the direction of the car, so anything is possible
-
MattR
- Racing Driver
- Posts: 1305
- Joined: Wed Feb 25, 2009 11:26 pm
- Vehicle: NA6
- Location: Brisbane
Re: The Roadster NA Journey Begins
Come over to the dark side....... 
You know you want to...................
You know you want to...................
-
Magpie
- Speed Racer
- Posts: 7468
- Joined: Fri Feb 11, 2011 12:49 pm
- Vehicle: NA6
- Location: Purga, QLD
Re: The Roadster NA Journey Begins
By the way, the cage looks the part, can it be CAMS certified? Also, as much as this hurts, the inside does look good without the carpet!
-
MattR
- Racing Driver
- Posts: 1305
- Joined: Wed Feb 25, 2009 11:26 pm
- Vehicle: NA6
- Location: Brisbane
Re: The Roadster NA Journey Begins
Mark, the cage was built to be CAMS certified, just have to chase up Dave for the paperwork before I lodge the application for the CAMS logbook when it is a lot more complete.
In those shots the interior has just been sprayed with cheap cold gal paint to keep the surface rust away as it sat for about 2 years. The next step for the prep is to get rid of all the deadener and paint from the underside and wheel wells and then strip the interior of the cold gal paint and recoat using KBS in the white colour both inside and out and the cage. So I will have a few fun weekends annoying the neighbours with grinders and drills fitted with stripping wheels and wire brushes.
In those shots the interior has just been sprayed with cheap cold gal paint to keep the surface rust away as it sat for about 2 years. The next step for the prep is to get rid of all the deadener and paint from the underside and wheel wells and then strip the interior of the cold gal paint and recoat using KBS in the white colour both inside and out and the cage. So I will have a few fun weekends annoying the neighbours with grinders and drills fitted with stripping wheels and wire brushes.
-
Magpie
- Speed Racer
- Posts: 7468
- Joined: Fri Feb 11, 2011 12:49 pm
- Vehicle: NA6
- Location: Purga, QLD
Re: The Roadster NA Journey Begins
Could you sand/soda blast instead of grinding? I may as well learn from your mistakes if I have to go down that path...
-
sailaholic
- Speed Racer
- Posts: 3511
- Joined: Thu May 19, 2011 3:38 pm
- Vehicle: NA8
- Location: Brisbane
Re: The Roadster NA Journey Begins
Cage ='no road rego.
Be absolutely sure about what you want from the car before taking steps past a point of no return.
Personally I'd have wanted to do a full season of competitive Motorsport and loved it before converting a road car I'd put that much effort into (albeit for track type use) to track only.
Also, I found someone who will engineer itbs no problem.
Sent from my iPhone using Tapatalk
-
plohl

- Racing Driver
- Posts: 1922
- Joined: Wed Oct 14, 2009 12:13 am
- Vehicle: NA8
- Location: Brisbane
Re: The Roadster NA Journey Begins
Magpie wrote:Could you sand/soda blast instead of grinding? I may as well learn from your mistakes if I have to go down that path...
Sand blasting is super messy... I think you spend about double the time cleaning up.
Cheers,
plohl
plohl
-
MattR
- Racing Driver
- Posts: 1305
- Joined: Wed Feb 25, 2009 11:26 pm
- Vehicle: NA6
- Location: Brisbane
Re: The Roadster NA Journey Begins
Magpie wrote:Could you sand/soda blast instead of grinding? I may as well learn from your mistakes if I have to go down that path...
Wire brush will take the paint off super quick as its only a light coat, same for underneath and the wheel wells.
With soda blasting you have to get the shell down to a bare, and I mean bare, shell. Nothing in it nothing attached, and then it has to etch primed pretty much straight away.
With me working at home with the wire wheels and stripping wheels it will be cheaper, less messy and easier in the long run. Will just take some time. The KBS paint I will be using is the Australian version of POR15 so I don't have to worry about the surface rust that will form in the time between cleaning and painting. Though I do plan to do it in sections so the metal is not left unprotected for more than a couple of days.
The only bit of the shell that will be done in "automotive" paint will be the roof, rear quarters and hanging panels.
It will be very white before the sign writing and striping is completed.
-
Magpie
- Speed Racer
- Posts: 7468
- Joined: Fri Feb 11, 2011 12:49 pm
- Vehicle: NA6
- Location: Purga, QLD
Re: The Roadster NA Journey Begins
sailaholic wrote:Personally I'd have wanted to do a full season of competitive Motorsport and loved it before converting a road car I'd put that much effort into (albeit for track type use) to track only. Tapatalk
That is the plan, I want to make sure that having a track only car is what I REALLY want. I would also have to either keep the Red NA or fix the Fiat X19 up as a daily so yep not a decision I'm going to make quickly.
-
Magpie
- Speed Racer
- Posts: 7468
- Joined: Fri Feb 11, 2011 12:49 pm
- Vehicle: NA6
- Location: Purga, QLD
Re: The Roadster NA Journey Begins
Changed out the slotted rotors with EBC green on the front and stock pads on the rear for stock rotors (machined) and QFM A1RM pads all round.
This is also part of my next journey which is starting to learn how to do a lot of the little jobs myself and the trigger to give the car a once over before track and checking that everything is still attached and in working order. The other reason was to find out why a part of rear drivers side disc was being 'missed' by the pad.
After the car was jacked up and put on stands the fun begins:
Before

Clip reference photos


Since the rotors were being replaced both the calliper bolts were removed. This side was more difficult than the other side as the 14mm bolt turned the slider pin as well. A narrow 17mm spanner can be used to hold it (slider pin) while an impact gun (14mm socket) was used. 14mm came out with no problems!

caliper removed


Caliper bracket bolts being removed

Here is why this job needs to be done, one of the slider pins was jammed and had no grease, it was a pain to get out! I will be ordering some new slider pins on Monday and will install when I change the rotors back.
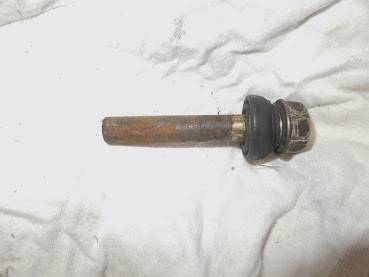

Reference photo of slider pins and which hole they came from. After this they were greased with proper brake caliper grease, which by the way ants like the Bendix brand of grease...

Old pads new pads

Fronts now done, time for the rear!

Rear brakes wound out! Covering bolt removed.
4mm allen key exposed. Turn anti clockwise to wind calipers back, keep an eye on the brake fluid container!

Hopefully you will not find this! The top one is from mine, the bottom one is from my old NA6 calipers which is the exact same as the one in the NB8B brakes! Lucky for me...


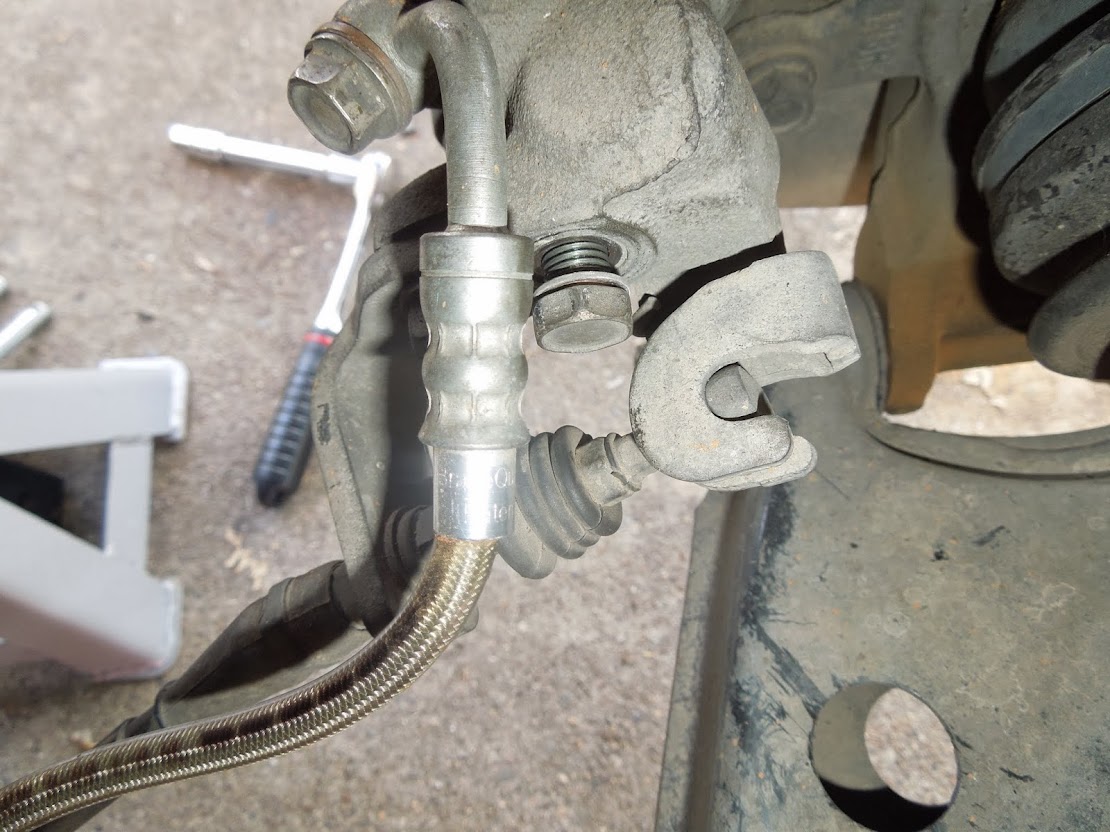
Cap on lower caliper bolt removed, caliper bolt removed


Caliper removed

New rotor installed, slider pins greased and caliper installed. Then the 4mm allen key is turned clockwise until the pads contact the rotors then it is backed out 1/3 of a turn.

Time to bed the pads in. I'm lucky the dead end road I am on is 1km long so 10 laps at medium/hard braking from 60 to 5. Then let the brakes cool down and then every 500m medium to hard braking from 60 to 5 another 10 times.
Right Rear after 2nd bedding in session, there was a little smoke from this so I need to check it again. Temp is caliper.


Left Rear


Right Front


Left Front


Feedback is that the brakes have a little more bite, however I have not pushed the brakes yet so I will have to wait till the next track session to give more feedback.
This is also part of my next journey which is starting to learn how to do a lot of the little jobs myself and the trigger to give the car a once over before track and checking that everything is still attached and in working order. The other reason was to find out why a part of rear drivers side disc was being 'missed' by the pad.
After the car was jacked up and put on stands the fun begins:
Before
Clip reference photos
Since the rotors were being replaced both the calliper bolts were removed. This side was more difficult than the other side as the 14mm bolt turned the slider pin as well. A narrow 17mm spanner can be used to hold it (slider pin) while an impact gun (14mm socket) was used. 14mm came out with no problems!
caliper removed
Caliper bracket bolts being removed
Here is why this job needs to be done, one of the slider pins was jammed and had no grease, it was a pain to get out! I will be ordering some new slider pins on Monday and will install when I change the rotors back.
Reference photo of slider pins and which hole they came from. After this they were greased with proper brake caliper grease, which by the way ants like the Bendix brand of grease...
Old pads new pads
Fronts now done, time for the rear!
Rear brakes wound out! Covering bolt removed.
4mm allen key exposed. Turn anti clockwise to wind calipers back, keep an eye on the brake fluid container!
Hopefully you will not find this! The top one is from mine, the bottom one is from my old NA6 calipers which is the exact same as the one in the NB8B brakes! Lucky for me...
Cap on lower caliper bolt removed, caliper bolt removed
Caliper removed
New rotor installed, slider pins greased and caliper installed. Then the 4mm allen key is turned clockwise until the pads contact the rotors then it is backed out 1/3 of a turn.
Time to bed the pads in. I'm lucky the dead end road I am on is 1km long so 10 laps at medium/hard braking from 60 to 5. Then let the brakes cool down and then every 500m medium to hard braking from 60 to 5 another 10 times.
Right Rear after 2nd bedding in session, there was a little smoke from this so I need to check it again. Temp is caliper.
Left Rear
Right Front
Left Front
Feedback is that the brakes have a little more bite, however I have not pushed the brakes yet so I will have to wait till the next track session to give more feedback.
Who is online
Users browsing this forum: No registered users and 2 guests


