Dirty Little Secret - Living the Roadster Life

Chat to do with your MX5/Miata/Eunos Garage Ride(s).

Moderators: timk, Stu, zombie, Andrew, The American, Lokiel, -alex, miata, StanTheMan, greenMachine, ManiacLachy, Daffy

re99ie
Fast Driver
Posts: 129
Joined: Wed Apr 14, 2010 4:19 am

Re: Dirty Little Secret - Living the Roadster Life

Postby re99ie » Mon Jun 20, 2011 7:54 pm

-alex wrote:Thanks soooooo much for posting this.!
Very helpful in moving forward with my install.


no worries.

here is something that maybe useful to many when it comes to hose leaks.

Rescue Tape

It all started after I replaced my old radiator, which died in the heat of battle ie Trackday, and found a leak somewhere at the back of the engine - can't take the pressure (pun intended maybe perhaps :wink: ).

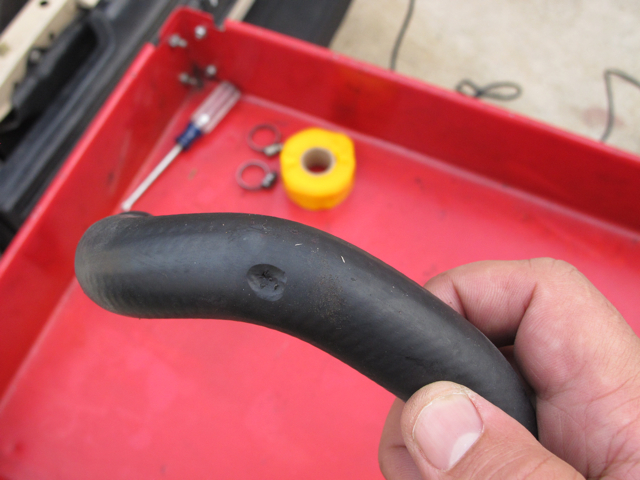
Anyways, I found that the left heater hose has a bit of a splice about an inch near the firewall. It is small enough not to poor all the radiator's contents but big enough to empty the reservoir in one short trip. I found my self using duck tape and other means to slow down the leak until I found this

Image

It is basically a Silicon based self amalgamating tape - ie it adheres to itself.

this tape

vs

this type of holes
Image

are no match.

It took me a few goes as I found it difficult to remove the heater hose without further damaging it or cutting it out of the heater core but found that I can do it in layers instead of following the instruction of using one continuous big layer.

Image

NO LEAKS :o
Dirty Little Secret
part 1, part 2, part 3
roadsterlife.net - the road is my paper, the roadster is my pen, and the journey is my story

re99ie
Fast Driver
Posts: 129
Joined: Wed Apr 14, 2010 4:19 am

Re: Dirty Little Secret - Living the Roadster Life

Postby re99ie » Mon Jun 20, 2011 8:21 pm

taking a break from DIYing her, I took the opportunity to partake on the 2 for 1 Twilight Trackday at EC

A day at EC

Image

It will be my first EC on her and it will be my first timed event as well at EC. All of the previous drive I've done at EC were through Burrows Day in my previous Yellow IS200 aka Banana.

Image

Firstly, she is a lot quicker than the Banana.

I found myself using an instructor for the first two session fixing my lines as having more power means I can't just leave my foot on the accelerator anymore. :oops:

We concentrated on Turn 1 and Turn 2 most of the day.

Turn 1, aim is how late we can turn in using the same amount of braking. We started at 200 marker and ending up just before 100 marker. I found myself getting too comfortable with 140 corner speed around turn 1 but I think I can go a we bit quicker than that in the RE001s.

Turn 2 in the other hand, needed rework. Before, I was braking head on and turning as late as possible making a right angle turn to the inside exit apex of turn 2. Instead, Tom (instructor) got me to do the triangle turn but turning aiming the car towards the the inside entry apex, doing most of my braking then and turning sharply midway on the lane and aim for the inside exit apex gradually powering the car towards the entry apex of turn 3.

Only during my final session (3rd) that I managed to get those two turns connected at speed with a final lap my PB of 2m11s. I think a little more time, I can get her down below 2m10s and with a semis under 2min (optimistic much?!?! ;) )

Image

Image

Image
Dirty Little Secret
part 1, part 2, part 3
roadsterlife.net - the road is my paper, the roadster is my pen, and the journey is my story

re99ie
Fast Driver
Posts: 129
Joined: Wed Apr 14, 2010 4:19 am

Re: Dirty Little Secret - Living the Roadster Life

Postby re99ie » Mon Jun 20, 2011 8:23 pm

after the Twilight EC, I found myself a couple of unused Spreets Wakefield Open Day vouchers from forum members. It also happens my Bro from UK has come for a visit - I always wanted for him to experience a track day.

Trackday with my Bro

Being in UK, my bro has limited access to any sort of vehicles and as an induction, I made him drive her around until he is confident and comfortable with her idiosyncrasy - ie non-abs braking, non-power steering, suspension handling, and gearing.

The other reason why I wanted to take my bro to the track is to play with our 70-200mm lenses and do some panning shots - practice for our Singapore F1 trip.

Being an Open Day and only a few weeks left till the voucher expires, we found the track being run at its max (or more than) - around 20 cars per session.

We missed the first session, as we decided to have a sit down breaky at the Goulburn central.

I went out first just to get the feel for her as I haven't dríven her on a dry wakefield track before, so i didn't really know what to expect.

I found that I can stay on 3rd most of the way and some spots I just have to lift off instead of brake.

Just as I was getting used to her the session is over. I did another session around the track as my bro is still gathering courage to brake his virgin trackday experience.

Just before lunch, I managed to persuade him to take the helm and go for it.

Image
My advise to him is to drive at his pace and just be mindful of who is behind you. He drove her around gingerly at first but managed to get some pace but not enough to avoid holding up a few cars till they find the opportunity to go around him.

After a well deserve lunch, I went out with one mission - try get a fast lap (although no one is timing)
Managed to get a few clear laps, being at the front when the session started, until I found myself stuck behind some cars that I could not get around.
Once frustration creep its ugly head, I decided to change my mission - fun times!

Image

Image

Had a few laps just looking forward to turn 10.....LOLZ.

Other pics taken of me camera (some taken by me but mostly taken by Will aka Cappuccino) can be found here
Dirty Little Secret
part 1, part 2, part 3
roadsterlife.net - the road is my paper, the roadster is my pen, and the journey is my story

re99ie
Fast Driver
Posts: 129
Joined: Wed Apr 14, 2010 4:19 am

Re: Dirty Little Secret - Living the Roadster Life

Postby re99ie » Mon Jun 20, 2011 8:52 pm

A few weekends ago, I excitedly joined the Mx5 Breakfast Club and Austin Heally Owners Club for their annual winter morning drive to Mudgee called "Brass Monkey".

Brass Monkey 2011

The run has only one rule - Top Down.

The event started at the M4 truck stop with a meeting time of 6am and a 6:30 departure. About 60 cars on the starting point, but only a few Austin Healey in attendance.

In attendance with me, who I knew, were Matt aka Coffeeboss (NC), Melvin (other white Na), John (NB SP), and Kelly (BRG NA)

On the start of the drive, one of the Mini spurted lots of dark smoke within 10mins. Looks like a catastrophic.

took us a solid 2hrs to get to our destination, breakfast point.

Image
@ Mudgee

Matt and I got to the breakfast point just behind the lead pack.

Kelly and Melvin eventually managed to join us, but it seems Kelly ended up spurting out smoke as well - Major Heater Hose Leak. She basically got no coolant and had to top up.

We left the group and grab a scrumptious breakie at the Butcher's Cafe

Image

Image

After the epic meal, we jointly dissected Kelly's Heater Hose and find a way to fix it. In my possession is a "Rescue Tape" (Silicon Self Amalgamating Tape) that I used to temporarily fix my heater hose and the tape seems to be doing its job after 1 month on it. We tried the tape on the Kelly's heater hose but we couldn't tape the hose properly as the damage was too close to the engine side of the hose. Only way is get the hose out.

John had to cut the hose for it jimmy out of the pipes, and by then they where too short to put back in.

So John and Matt ended up getting a replacement hose from Supercheap (luckily there is one nearby)

After using some determination, we managed to replace the hose and we were off to Bathurst.

But on the way Matt and I notice this Rail Road bridge, so we sneakily made a U-turn but we knew the rest of the gang will figure it out :twisted:

Took some quick snaps before the arrival of the armada.

Image
Coffeebo$$

Image
The Car Formerly known as "Sake"

the rest of the group

Image
John

Image
Melvin

Image
Kelly

Group Shots
Image

Image

After the group shots, we continued our trek to Bathurst. Oh, its my first time there :mrgreen:

Once we got to Bathurst, we said our farewells to Kelly and John and headed to the top of the mountain.

Image
Bathurst Top of Mt Panaroma

We continued on and took some panning shots

Image

Image

Image

Image

What an epic roadsterlife day -13 hours, top down, sipping 2 full tanks of fuel, learned how to replace a heater hose and first Mt Panorama. :cool:
Dirty Little Secret
part 1, part 2, part 3
roadsterlife.net - the road is my paper, the roadster is my pen, and the journey is my story

re99ie
Fast Driver
Posts: 129
Joined: Wed Apr 14, 2010 4:19 am

Re: Dirty Little Secret - Living the Roadster Life

Postby re99ie » Mon Jun 20, 2011 9:07 pm

some photos I took during the EvoNat / JDMST EOMM of my car in it. My car looks like a Gaijin around those black beauties.

Image

Image

Image

Image
Dirty Little Secret
part 1, part 2, part 3
roadsterlife.net - the road is my paper, the roadster is my pen, and the journey is my story

re99ie
Fast Driver
Posts: 129
Joined: Wed Apr 14, 2010 4:19 am

Re: Dirty Little Secret - Living the Roadster Life

Postby re99ie » Mon Jun 20, 2011 9:15 pm

Worm Drive Installation

Worm drive kit is like a long screw that brings the window up and down. The motor turn the screw to move the window up and down.

Purchased from Mx5part.co.uk -

As per usual, lack of maintenance (ie lubing the cables) of the standard power windows will eventually succumb to "My window is so fat, when it jumped for joy....it got stuck!"

This is the story of when I first installed it.
************************************* FLASH BACK TIME ***********************************

installed the worm drive tonight...and what a farking mission it was.

thanks to Dad for the second pair of hands and my mate Ray for helping the relocation of the central locking.

Question is "Is it worth it" ...all I can say time will tell.

So far the kit is good but instruction is next to zilch. Oh and I didn't take any photos during the install as I forgot...got caught in the moment of fustration, Dad trying hurry it up, and Mom keeps reminding me to eat dinner. I guess they knew I wouldn't stop till I fix the thing. Also doesn't help when the whole family decided to come over for a visit and cook dinner.

Anyways, taking the old unit was not that hard but I had enough time to research it and found all the bolts required to be removed. The window was the hardest to remove and put back on. Took us a few times to install the window due some alignment issue - a bitch of a process

Anyways, we managed to install the kit but was scratching our heads why it wasn't going all the way up and all the way down.

First, we found that the forward window stopper guide was getting caught in the worm mechanism elbow and getting stuck on the way down. The next is the worm mechanism rubber hose curled up and was also catching the forward window stopper guide on the way up. I can fix the latter by uncurling the hose. But the forward window stopper guide needs be shaved a few millimetres to clear any obstructions.

After the parents left me with my half opening window, I decided to start the car up so I can move the car to better light. Then the real cause manifested.......battery was going flat...car would not start....doh!!!!!!

after realising this, I decided to get some dinner in me so I can restart my own strength and brains. After dinner, I went straight to my Brother's place to borrow his jumper leads (mine is still in a black NA8 that I'm minding at the parentals which is 45minutes away).

After jump starting Toaster, eureka! the whole window works like a charm. But the issue of not going down completely due to the forward window stopper guide was still hitting the kit. Only if I had a dremel.

Anyways, Ray came over to grab his wheels and help me finish the install. We found a way to relocate the central locking by putting a few speedholes on the door.

The window still needs to be calibrated as it wiggles backwards or forward when it goes up and down. I think something is still not aligned properly.

Also my jeans is now all tarred up after I kneels on the plastic cover with black tar, but I'm happy my car is almost back to normal.

so I went inside to join the family for dinner and planned to not touch the window tonight anymore but before I did all this, I visited Bunnings and bought me a set of filer.

After dinner, I couldn't help myself and went down stairs to pull out the plastic window stopper guide. The white round thing between the regulator and central locking unit.

Image

after a few rub of the file, the bastard is now clearing the worm elbow. A spray of lithium grease on the plastic window stopper guide and everything is good to go.

Image

Image


The SPEED TEST

http://s65.photobucket.com/albums/h230/re99ie/JTYPE/Roadster/?action=view&current=MVI_2203.mp4
Dirty Little Secret
part 1, part 2, part 3
roadsterlife.net - the road is my paper, the roadster is my pen, and the journey is my story

re99ie
Fast Driver
Posts: 129
Joined: Wed Apr 14, 2010 4:19 am

Re: Dirty Little Secret - Living the Roadster Life

Postby re99ie » Mon Jun 20, 2011 9:19 pm

Weather or Not

It is always good to go for a drive no matter what weather is out there.

One morning I decided to join two Roadsterlife member Taz and Matt on their Brunch at Berry.

It was a late start so enough for me to get a good night sleep. :)

Matt with his wife and I arrived at the initial meeting point with plenty of time to take a few snaps while we wait for Taz and his wife.

Image

Image

It didn’t take long till Taz and his wife to arrived with “Black Betty” - NA8 Special S.

Image

After a few more snaps and chit chat we were off to Stanwell Top Lookout in Sydney’s Royal National Park.

As the weather being drizzly and gloomy, the road was pretty much empty.

Our destination was empty as well. We snapped up some photos and enjoyed the scenery uninterrupted.

Image

Image

Image

After a few snaps, we were off to Berry via Princess Highway.

Got a bit naughty and found some opportunity to take some driving shots of Taz and Matt on our way to Berry.

Image

Image

Image

Once we got to Berry, parking for both NA was waiting for us.

Image

Once we polished our brunch (mine was Chorizo on Homemade Baked Beans and Poached egg ontop of a Sourdough) and a few chats here and there, we all made our separate ways.

Taz and his wife took off to Kiama for fish and chips while Matt with his wife and I made our way to another local winding road called Jamberoo Rd.

After Matt and his wife joined me in a spirited drive through Jamberoo Rd. We eventually parted at Albion Park as they head up Macquarie Pass to meet up with Matt’s Parents.

I, in the other hand, made my cautious drive through Wollongong and made my way back to the Royal National Park via Helensburg.

I decided to do a quick snap at Stanwell Tops Lookout before I head home for the day.

Image

Weather or Not - this is Roadster Life
Dirty Little Secret
part 1, part 2, part 3
roadsterlife.net - the road is my paper, the roadster is my pen, and the journey is my story

2EZEM8

Re: Dirty Little Secret - Living the Roadster Life

Postby 2EZEM8 » Tue Jun 21, 2011 1:34 am

love how much detail and time you put into your car and also your posts.

are the tail light covers custom made?

@ndrew
Fast Driver
Posts: 157
Joined: Sat Jul 15, 2006 8:33 pm
Vehicle: NC
Location: Melbourne

Re: Dirty Little Secret - Living the Roadster Life

Postby @ndrew » Tue Jun 21, 2011 9:53 am

ahh...so that's the NA you purchased! Looks great :D

User avatar
PaulF
Racing Driver
Posts: 1807
Joined: Fri Jan 28, 2011 5:55 pm
Vehicle: NA6
Location: Newcastle, NSW

Re: Dirty Little Secret - Living the Roadster Life

Postby PaulF » Tue Jun 21, 2011 12:38 pm

2EZEM8 wrote:are the tail light covers custom made?

I believe they're Garage Vary items.

User avatar
NitroDann
Forum sponsor
Posts: 10280
Joined: Thu Nov 05, 2009 12:10 pm
Vehicle: NA6
Location: Newcastle NSW
Contact:

Re: Dirty Little Secret - Living the Roadster Life

Postby NitroDann » Tue Jun 21, 2011 12:57 pm

Paul is right. I believe rev9 has them in stock.

Dann
http://www.NitroDann.com

speed wrote:If I was to do it again, I wouldn't even consider the supercharger.

re99ie
Fast Driver
Posts: 129
Joined: Wed Apr 14, 2010 4:19 am

Re: Dirty Little Secret - Living the Roadster Life

Postby re99ie » Tue Jun 21, 2011 7:45 pm

2EZEM8 wrote:love how much detail and time you put into your car and also your posts.

are the tail light covers custom made?


thanks, a few of the Roadsterlife admins have put their two cents on many of the posts. Also helps when I have two of the great story tellers - Coffeeboss and Babalouie, to look up too.

also, go to garage vary to know more about the tail light

Image
Dirty Little Secret
part 1, part 2, part 3
roadsterlife.net - the road is my paper, the roadster is my pen, and the journey is my story

User avatar
wazman
Fast Driver
Posts: 394
Joined: Sun Feb 15, 2009 11:39 pm

Re: Dirty Little Secret - Living the Roadster Life

Postby wazman » Wed Jun 22, 2011 7:41 pm

Sideways ! nice !

Great pics, thanks for sharing :beer:
ilovedrift.com

re99ie
Fast Driver
Posts: 129
Joined: Wed Apr 14, 2010 4:19 am

Re: Dirty Little Secret - Living the Roadster Life

Postby re99ie » Wed Jun 22, 2011 10:15 pm

^ cheers , would love to take to her to skidpan...never been. :oops:

some more pics during a CUBE meet

Image

Image

Image
Dirty Little Secret
part 1, part 2, part 3
roadsterlife.net - the road is my paper, the roadster is my pen, and the journey is my story

re99ie
Fast Driver
Posts: 129
Joined: Wed Apr 14, 2010 4:19 am

Re: Dirty Little Secret - Living the Roadster Life

Postby re99ie » Wed Jun 22, 2011 11:02 pm

Another Babs Garage Night Story:

One Friday, I managed to book, another NA8 owner, Karl and I with some Garage time at Babs.

Aim for the night is to change to replace the gear and diff oil, bleed the brakes and if we have enough time bleed the brakes and change the gear boots.

I started with the diff and gear oil replacement while Karl replaced his gear boots.

We commence by raising the rear of Toaster, took us a few tries to find a suitable/safe way to jack her up.

Image

once she was up, I started unbolting the top bolt- didn't take much effort especially Babs have frequently done this to Toaster before. Same as the top bolt, the bottom bolt came off with ease.

Image

bottom of the battered brace.

Image

while waiting for the diff oil to drip out, Babs showed me the wonder of fast bleed one way brake nipple (http://www.speedbleeder.com/). It is awesome, but forgot to take pics.

You basically turn a screw to open the one way valve, and insert a tube with a plastic bag on the end of it. Press the brake pedal 10-15 times per corner and don't forget to fill the reservoir when it is half full to avoid introducing air in the brakelines.

Filling in the Diff with oil was not difficult, the Royal Purple bottle has a built in nipple. Bolt the lower nut on and just squeeze the bottle's content into the upper bolt hole. The only way to know you put enough is when the fluid overflows out of the hole.

once all the diff is plugged and rear of Toaster lowered, we then raised her front to access the gearbox plugs.

similar to the diff, the gearbox has two bolts - lower bolt for drain and upper (passenger side) bolt for the new oil to go into. No pics on this one as well.

I took us around 1hr to change the gearbox oil but mostly were done waiting for the thick oil to drip out.
Due to the restricted space around the gearbox, we used a 0.5ltr pump to tranfer the content of the Royal Purple bottle into the gearbox upper hole.

Image

As I was more familiar with the oil change, and Karl has now experience gear boot replacement, we (Karl) decided that I will change Karl's gearbox oil and he will change my gear boot. Good thing Babs around to make sure Karl is not putting any of "Karl Tax" on my car (ie ƒü¢k ups).

Image

Image

the two devastated boots. Left is Karl's and right is mine, not as molested as Karl's.

Image

Changing the gearboots and oil made gearbox feel my tighter and solid.

after a few days sitting in the garage, I saw leaks on the floor that looks like diff oil. ended up finding some drippage out of the nuts.
Image

I've placed a card board underneath the car and waited for a few days to see if any leaks reappear but didn't find any drop marks on it. Cleaned it again and took the her for a spin around the Eastern Burbs and got back not to find a single sign of diff oil leak. The leak must have been the residue of our change oil night at Babs Garage.
Dirty Little Secret
part 1, part 2, part 3
roadsterlife.net - the road is my paper, the roadster is my pen, and the journey is my story


Return to “MX5 Garage Chat”

Who is online

Users browsing this forum: No registered users and 170 guests