Fatty's dummies guide on: How to install a Stebel air horn
Moderators: timk, Stu, -alex, miata, zombie, Andrew
- sliq
- Speed Racer
- Posts: 3414
- Joined: Sat Jan 13, 2007 12:33 am
- Vehicle: ND - 2 GT
- Location: Sydney
- Contact:
Fatty's dummies guide on: How to install a Stebel air horn
I don't know how to wire mine up.. Everyone's giving mixed instructions.. So would anyone care for a precise write-up of installing one of these? (preferably with photos)? Tbro? anyone? Thanks! 
Last edited by sliq on Mon Jul 14, 2008 10:05 am, edited 1 time in total.
i can't brain today.. i have the dumb..
-
Fatty
- Speed Racer
- Posts: 3175
- Joined: Fri Feb 03, 2006 10:39 am
- Vehicle: NA6
- Location: Melbourne
ok i'll have a crack at this.
this is for an NA6. I have used the wiring diagram supplied with the horn, along with the great advice posted by Tbro in the other thread as my guide.
Tbro has advised that the 12v source i am using is fused. however we do not know exactly what fuse it is using , tbro says \"this wire is only HOT when ignition is on so will probably be the wiper or horn fuse. All connectors on Mazdas are protected by fuses or circuit breakers.\"
thanks terry / tbro for all the advice!
OK.
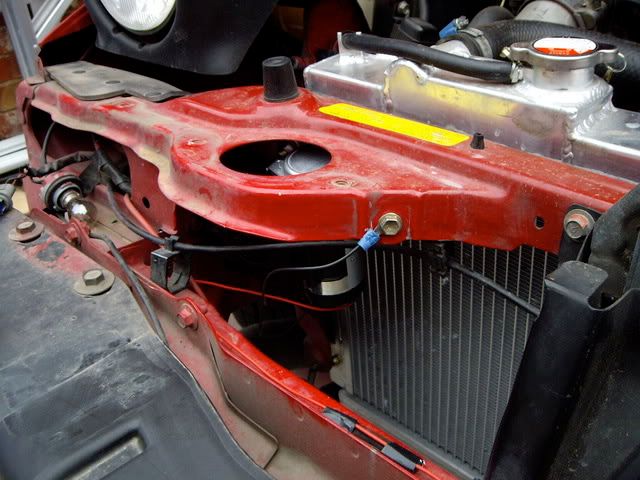
first up this is the standard horn , before i have touched anything. i think there is supposed to be 2 horns as there is an unused horn plug on the right hand side. maybe that is why my standard horn sounds so pissweak. note i have removed the nose, but this is not neccesary at all. i removed it for another reason alltogether, but it probably did make the job a bit easier.
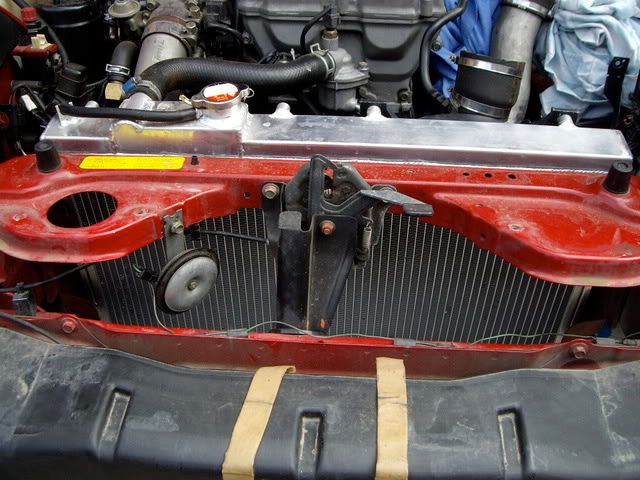
so in the above photo you can see the green /red horn wire running across the front of the car, held in place by a few plastic clips. unclip these clips, unbolt the old horn, and unclip the wire from the old horn.
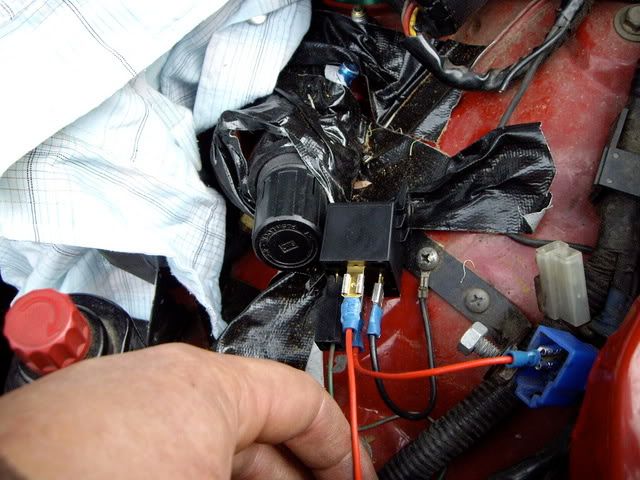
feed all the wire back thru the opening under the headlight. just follow it back from where it came and poke all the wire thru to the engine bay just behind the passenger side headlight. now, the lucky thing is that the clip on the end of the wire matches up with the relay. there are 4 terminals on the relay, clip the wire onto terminal 86 as shown below
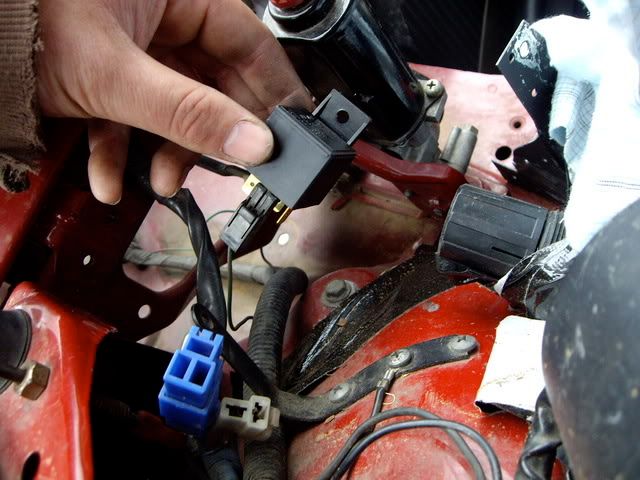
in the above photo you can also see the blue connector that you are going to use for your 12v. this is an extra terminal that mazda kindly put there so that you can power your timing light or whatever when you are working on the car. take the plug off the end to expose the 12v terminal.
now you will need this stuff to make some wires. go to jaycar, dick smith , go lo etc etc...
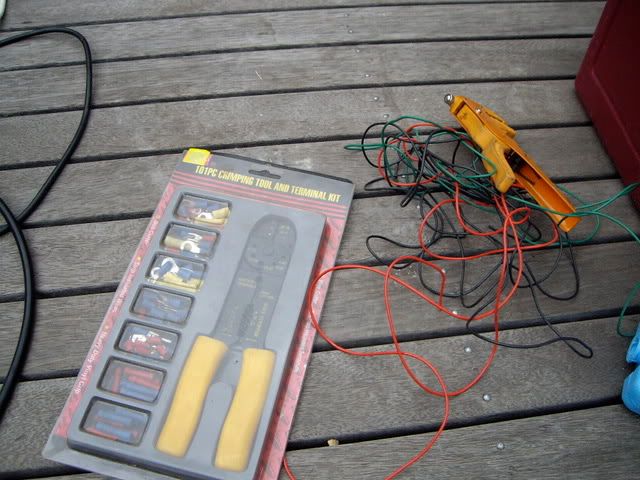
make yourself a wire to run from the 12v source, to terminal 30 on the relay. your terminal kit will have different sized connectors, make sure you use the right ones.
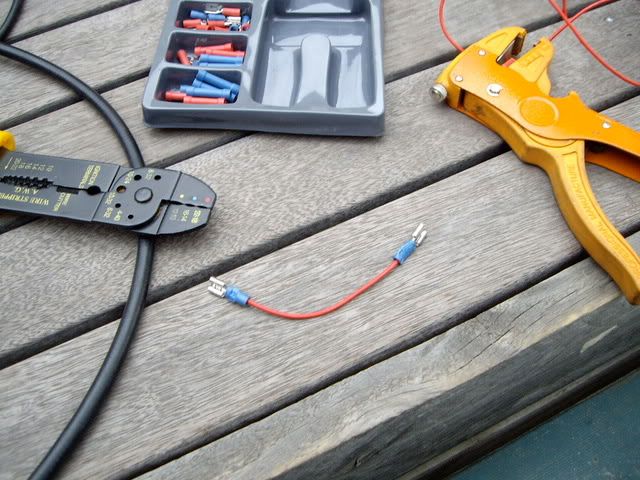
and then connect the 12v up to terminal 30 on the relay
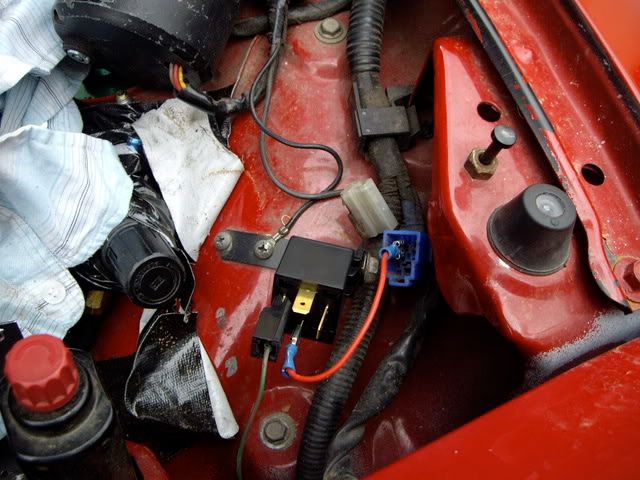
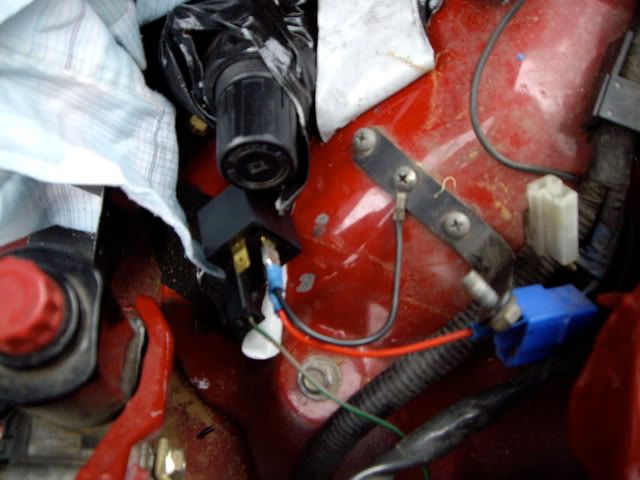
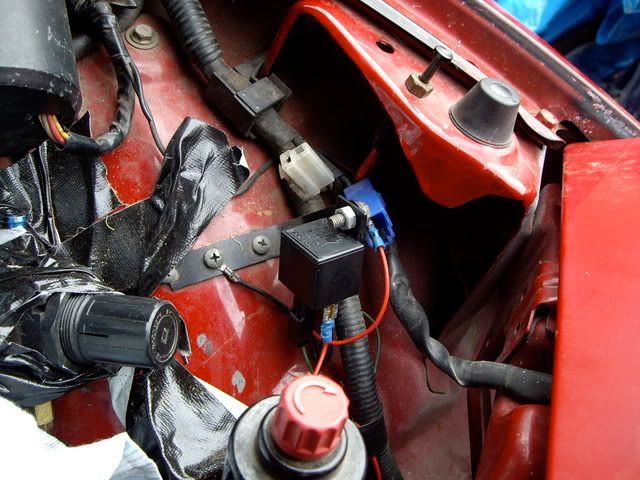
in the above photo just behind the relay you can see an earth point for an old unused alarm on my car. i am going to steal this wire for my ground. your car will not have this wire but you can use any old earth point, it doesn't matter. so i just cut that wire, put a terminal clip on it and attach it to terminal 85 on the relay
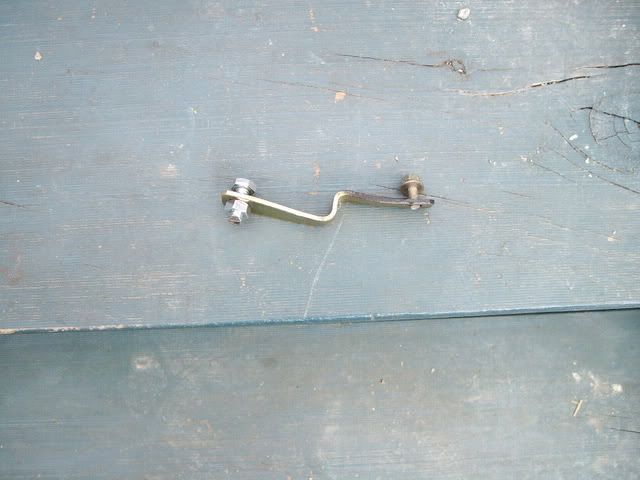
ok now you need to start thinking about where you are going to mount the horn . . again this is up to you. tbro and 1red5 made a really awesome bracket in the other thread. mine is just a peice of bent metal but it does the job. i took an angle grinder to the bolt supplied with the horn, as i found it was too long.
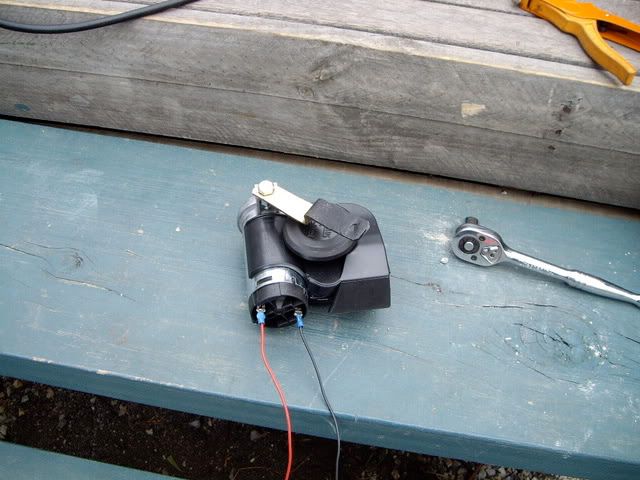
here it is all ready to go. i have also attached the wires to the horn. keep the wires nice and long and then you can neaten them up at the other end, once the horn is in place.
this is for an NA6. I have used the wiring diagram supplied with the horn, along with the great advice posted by Tbro in the other thread as my guide.
Tbro has advised that the 12v source i am using is fused. however we do not know exactly what fuse it is using , tbro says \"this wire is only HOT when ignition is on so will probably be the wiper or horn fuse. All connectors on Mazdas are protected by fuses or circuit breakers.\"
thanks terry / tbro for all the advice!
OK.
first up this is the standard horn , before i have touched anything. i think there is supposed to be 2 horns as there is an unused horn plug on the right hand side. maybe that is why my standard horn sounds so pissweak. note i have removed the nose, but this is not neccesary at all. i removed it for another reason alltogether, but it probably did make the job a bit easier.

so in the above photo you can see the green /red horn wire running across the front of the car, held in place by a few plastic clips. unclip these clips, unbolt the old horn, and unclip the wire from the old horn.
feed all the wire back thru the opening under the headlight. just follow it back from where it came and poke all the wire thru to the engine bay just behind the passenger side headlight. now, the lucky thing is that the clip on the end of the wire matches up with the relay. there are 4 terminals on the relay, clip the wire onto terminal 86 as shown below

in the above photo you can also see the blue connector that you are going to use for your 12v. this is an extra terminal that mazda kindly put there so that you can power your timing light or whatever when you are working on the car. take the plug off the end to expose the 12v terminal.
now you will need this stuff to make some wires. go to jaycar, dick smith , go lo etc etc...

make yourself a wire to run from the 12v source, to terminal 30 on the relay. your terminal kit will have different sized connectors, make sure you use the right ones.

and then connect the 12v up to terminal 30 on the relay

in the above photo just behind the relay you can see an earth point for an old unused alarm on my car. i am going to steal this wire for my ground. your car will not have this wire but you can use any old earth point, it doesn't matter. so i just cut that wire, put a terminal clip on it and attach it to terminal 85 on the relay

ok now you need to start thinking about where you are going to mount the horn . . again this is up to you. tbro and 1red5 made a really awesome bracket in the other thread. mine is just a peice of bent metal but it does the job. i took an angle grinder to the bolt supplied with the horn, as i found it was too long.

here it is all ready to go. i have also attached the wires to the horn. keep the wires nice and long and then you can neaten them up at the other end, once the horn is in place.

Last edited by Fatty on Sat Apr 05, 2008 5:37 pm, edited 1 time in total.
-
Fatty
- Speed Racer
- Posts: 3175
- Joined: Fri Feb 03, 2006 10:39 am
- Vehicle: NA6
- Location: Melbourne
now the horn is secured in place. i have used one of the mounting points for the aircon, seeing as how my aircon has just been removed (this is why the nose is off my car) . you can put yours anywhere you like. the black wire from the horn is the earth, i have cut it to the right length and attached it to the mounting point for the old horn (this would have acted as an earth for the old horn, so at least i know it is a reliable earth connection). the red wire is the +12v for the horn, and you can see how i have run it back to the relay using the same path as where the wiring for the old horn used to be. i even used the same plastic clips.
now i just cut the red wire to the right length, add a terminal clip and connect it to the relay at terminal 87. (please ignore all the gaffer tape and mess... that is another project i'm working on... )
)
now secure it. again , i am using a fastening point for my relay that you don't have. but put it wherever you like, for example where tbro / 1red5 put it in the other thread.
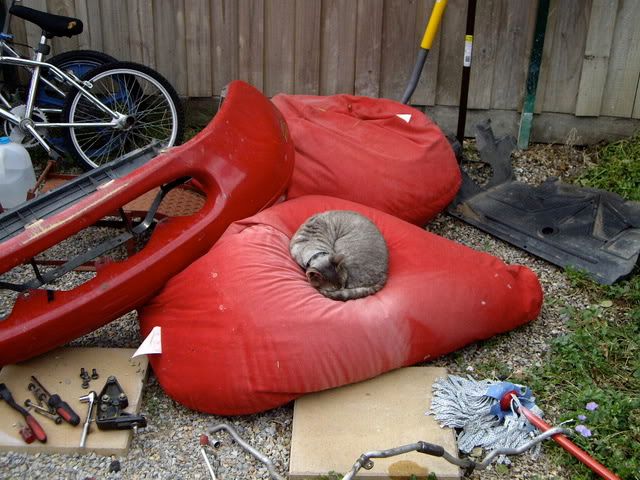
finally i'd just like to add that it's bloody hard to find good help these days. my useless apprentice, barny, fell asleep on the job!!!
BEEP BEEP !!

now i just cut the red wire to the right length, add a terminal clip and connect it to the relay at terminal 87. (please ignore all the gaffer tape and mess... that is another project i'm working on...

now secure it. again , i am using a fastening point for my relay that you don't have. but put it wherever you like, for example where tbro / 1red5 put it in the other thread.

finally i'd just like to add that it's bloody hard to find good help these days. my useless apprentice, barny, fell asleep on the job!!!

BEEP BEEP !!
-
tbro
- Racing Driver
- Posts: 1125
- Joined: Thu Jul 26, 2007 5:46 pm
- Vehicle: NA6
- Location: North Brisbane
Fatty
Bloody good job with the photos and commentry.
Just a bit of advise. The blue plug you removed for the power source, if you remove the blue cover from a female spade terminal, you can then push in the terminal into the plastic plug. Its a little bit tricky but with a bit of patience it will go in. Then refit plug and away you go, then when you want to use timing light etc simply unplug and access to splade is easy.
Again well done .
Terry
- green_comet
- Car Detailing Guru
- Posts: 1848
- Joined: Tue May 24, 2005 1:41 am
- Vehicle: NA8
- Location: Melbourne
- sliq
- Speed Racer
- Posts: 3414
- Joined: Sat Jan 13, 2007 12:33 am
- Vehicle: ND - 2 GT
- Location: Sydney
- Contact:
- Steampunk
- Speed Racer
- Posts: 4670
- Joined: Wed Oct 10, 2007 9:16 am
- Vehicle: NA6
- Location: Southside of Breeze-bane
Andrew, reckon this is worthy of a place in the \"Tech Archive\" section? 
Great write-up James.
Just want to once again give credit where credit is due. Terry did all the installation for me, all I did was ask annoying questions
Thanks again Terry.
Some engine-bay bling, as a small token of my gratitude, comin' your way soon ;)
Great write-up James.
Just want to once again give credit where credit is due. Terry did all the installation for me, all I did was ask annoying questions
Thanks again Terry.
Some engine-bay bling, as a small token of my gratitude, comin' your way soon ;)

- sliq
- Speed Racer
- Posts: 3414
- Joined: Sat Jan 13, 2007 12:33 am
- Vehicle: ND - 2 GT
- Location: Sydney
- Contact:
ahh drats, ran out of time to do it this arvo.. started to go dark and started to rain! anyhow..
has anyone tried doing the install for an NB8B? there seems to be a sh*tload of sticky taping where all the brown wire goes... makes life hard (unless u've removed the front bar like fatty has). not too sure what needs to be ripped out with all that tape.. hrmm..
has anyone tried doing the install for an NB8B? there seems to be a sh*tload of sticky taping where all the brown wire goes... makes life hard (unless u've removed the front bar like fatty has). not too sure what needs to be ripped out with all that tape.. hrmm..
i can't brain today.. i have the dumb..
- bensale
- Racing Driver
- Posts: 1984
- Joined: Tue Sep 11, 2007 7:38 pm
- Vehicle: NA6
- Location: Melbourne Australia
- Contact:
I cant see the pictures yet due to school internet  but thank you so much. When I get the time to do the install that will be invaluable. Thanks again, you're a champion!
www.othersideproductions.com
NA6-Phillip Island 1:57.7, Winton 1:42.9, Winton Short 1:12.4, Sandown 1:35.2, Wakefield 1.15.9, Nurburgring 9:17.0
NA6-Phillip Island 1:57.7, Winton 1:42.9, Winton Short 1:12.4, Sandown 1:35.2, Wakefield 1.15.9, Nurburgring 9:17.0
- Andrew
- Speed Racer
- Posts: 2630
- Joined: Wed Apr 23, 2003 11:00 am
- Vehicle: NC
Re:
sliq wrote:has anyone tried doing the install for an NB8B? there seems to be a sh*tload of sticky taping where all the brown wire goes... makes life hard (unless u've removed the front bar like fatty has). not too sure what needs to be ripped out with all that tape.. hrmm..
will see what i can do with little time and even less day light.
-
manga_blue
- Forum Guru
- Posts: 4897
- Joined: Mon Apr 24, 2006 7:27 pm
- Vehicle: NA8
- Location: Moruya, NSW
Nice job with the airhorn, James, but the peripheral images remind me of something ...
.... did you ever watch the Red Green Show? The first episode I saw was how to convert your Chevvy to gull-wing doors. He did a drive-by with a tractor to remove the doors, axed two slots in the roof above the doors and fastened the tops of the doorframes to the roof with about 100ft of gaff tape, \"the handyman's secret weapon\". You could do a guest slot.
.... did you ever watch the Red Green Show? The first episode I saw was how to convert your Chevvy to gull-wing doors. He did a drive-by with a tractor to remove the doors, axed two slots in the roof above the doors and fastened the tops of the doorframes to the roof with about 100ft of gaff tape, \"the handyman's secret weapon\". You could do a guest slot.
’95 NA8
-
RG.net
- Racing Driver
- Posts: 1692
- Joined: Thu Apr 06, 2006 7:48 pm
- Vehicle: NA6
- Location: Sydney
- Contact:
jesus! thats alot of work for a horn, when installing my horn
(its not a stebel or whatever) i removed my front bumper (for other reasons, but needed to because my radiator cowl is attatched to it, bloodly panel beaters!) disconnected both horns at the front, found out which ran whilst the car was off and no keys in the ignition (in my case it was the passenger side), plugged the brown wire into the positive, and made an earth onto the stock horn bracket, now my car goes AOOOOGAH!
(its not a stebel or whatever) i removed my front bumper (for other reasons, but needed to because my radiator cowl is attatched to it, bloodly panel beaters!) disconnected both horns at the front, found out which ran whilst the car was off and no keys in the ignition (in my case it was the passenger side), plugged the brown wire into the positive, and made an earth onto the stock horn bracket, now my car goes AOOOOGAH!
http://Run-It-Hard.com - We're here to have fun!
- sliq
- Speed Racer
- Posts: 3414
- Joined: Sat Jan 13, 2007 12:33 am
- Vehicle: ND - 2 GT
- Location: Sydney
- Contact:
ALMOST got crushed by a truck today.. same thing that happened with Wun..
the truck was literally 2cm away from my right mirror.. the %^&*( truckie either didn't bother to check his mirrors/blindspots or he just didn't see me.. that probably takes the cake when it comes to big accidents avoided..


the truck was literally 2cm away from my right mirror.. the %^&*( truckie either didn't bother to check his mirrors/blindspots or he just didn't see me.. that probably takes the cake when it comes to big accidents avoided..
i can't brain today.. i have the dumb..
- Hammer
- Speed Racer
- Posts: 2849
- Joined: Fri Apr 25, 2003 11:00 am
- Vehicle: NB SP
- Location: Sydney
- Contact:
What a coincidence ... I just ordered a Stebel Nautilus Compact Dual Air Horn for my NB last week. I should be receiving it sometime this week.
I'm also contemplating at fitting it myself. But after looking at this thread, it might be best that I just pay MX5 Mania the $70 they charge to fit the darn thing.
Is the location of the NB horn in the same spot as the NA in the pics on this thread?
I'm also contemplating at fitting it myself. But after looking at this thread, it might be best that I just pay MX5 Mania the $70 they charge to fit the darn thing.
Is the location of the NB horn in the same spot as the NA in the pics on this thread?
H@mmer - 1994 Clubman | 2002 SP

GO TOPLESS!!!
GO TOPLESS!!!
Return to “MX5 Audio, Electronics & Lighting”
Who is online
Users browsing this forum: No registered users and 5 guests


