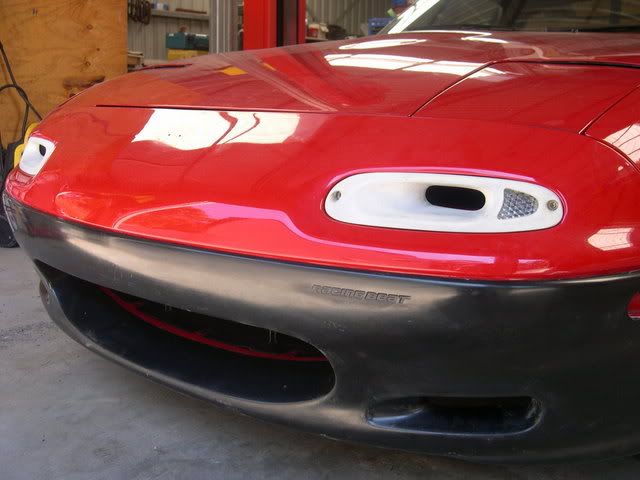
Front Bumper Restoration - warning: lots of pics
Moderators: timk, Stu, zombie, Andrew, -alex, miata
- Jimmy
- Fast Driver
- Posts: 451
- Joined: Tue Mar 20, 2007 7:19 pm
- Vehicle: ND - 2 GT
- Location: Canberra
Front Bumper Restoration - warning: lots of pics
Just another write up (mainly pics) for those interested.
Not sure if this generic to all red NA6 fives but my bumper was looking really sad. No matter how many times id polish it, 2 days later it would look faded and completely out of place. The bumper really isnt in the best of conditions, it has shrink makrs on each side, holes from the old number plate bracket and a cracked front lip to the bumper. (all i can say were not me but the previous owner) Anywho, im going to Tassy this coming week and want her to be looking her absolute best coz i want to get some nice pictures. So... ive decided to restore the bumper the best i can and give it another coat of paint. Ideally i need a new bumper but ive got nothing to loose.
Same process as my side skirt restoration except this time there is no need to strip the paint. Chances are im going to be sanding and then painting directly over as it is a nice clean surface.
Here's what ive done so far. A nice sand down and bog. Ive also glued up the crack in the bottom of the bumper. I forgot to take pics but ill take more in the morning to show the repaired crack.
Tomorrow (sat) will be the sanding and painting day, i hope to get at least 3 coats on if the weather permits. Sunday should be further painting and maybe start a light sand. The mazda decal hasn't arrived yet so it will be going on later.
More pics to come Sat night. Fingers crossed...
Jimmy
Not sure if this generic to all red NA6 fives but my bumper was looking really sad. No matter how many times id polish it, 2 days later it would look faded and completely out of place. The bumper really isnt in the best of conditions, it has shrink makrs on each side, holes from the old number plate bracket and a cracked front lip to the bumper. (all i can say were not me but the previous owner) Anywho, im going to Tassy this coming week and want her to be looking her absolute best coz i want to get some nice pictures. So... ive decided to restore the bumper the best i can and give it another coat of paint. Ideally i need a new bumper but ive got nothing to loose.
Same process as my side skirt restoration except this time there is no need to strip the paint. Chances are im going to be sanding and then painting directly over as it is a nice clean surface.
Here's what ive done so far. A nice sand down and bog. Ive also glued up the crack in the bottom of the bumper. I forgot to take pics but ill take more in the morning to show the repaired crack.
Tomorrow (sat) will be the sanding and painting day, i hope to get at least 3 coats on if the weather permits. Sunday should be further painting and maybe start a light sand. The mazda decal hasn't arrived yet so it will be going on later.
More pics to come Sat night. Fingers crossed...
Jimmy
Last edited by Jimmy on Sun Nov 25, 2007 10:34 pm, edited 1 time in total.
- Jimmy
- Fast Driver
- Posts: 451
- Joined: Tue Mar 20, 2007 7:19 pm
- Vehicle: ND - 2 GT
- Location: Canberra
Re:
MXkal wrote:careful you dont crack that bog, Front bar is a fair bit more flexable than ordinary body filler.
Thanks for the heads up. Most of what you see will be coming off as the number plate dents are reasonable shallow. I just went a bit overboard with the bog. I mixed up too much and it seemed like such a waste to not use it so i thought id put it all on (knowing that ill be sanding it off) so that i get my moneys worth
- Jimmy
- Fast Driver
- Posts: 451
- Joined: Tue Mar 20, 2007 7:19 pm
- Vehicle: ND - 2 GT
- Location: Canberra
Bog sanded back. A flexible sander was used to match the curve of the bumper.
I used a piece of dowel to match the groove
And then came the paint.
Then a sand. First with 1200 then with 2000
It bleeds...
Autpoglym Paint renovator
This was rushed a bit due to my lack of time.
All work was by hand, no random orbital sanders or alike, just elbow grease.
Clear coat has only just gone on. Am leaving over night to harden.
Final result tomorrow night (sunday)
- Jimmy
- Fast Driver
- Posts: 451
- Joined: Tue Mar 20, 2007 7:19 pm
- Vehicle: ND - 2 GT
- Location: Canberra
PowerPlus Classic Red from Autobarn. Went through 4 cans. Its not a perfect colour match due to colour fade but its close enough. Total cost is $60 (4x PowerPlus cans, 1 large can of clear coat, bog, flexi sander, sand paper) I recommend anyone attempting this to mask of high ridges and panel joins to prevent \"burning through the paint\" when sanding, cutting and polishing and especially when using a random orbital sander/polisher. Come back and do them carefully later by hand.
Last edited by Jimmy on Mon Nov 26, 2007 12:13 pm, edited 1 time in total.
- Jimmy
- Fast Driver
- Posts: 451
- Joined: Tue Mar 20, 2007 7:19 pm
- Vehicle: ND - 2 GT
- Location: Canberra
Clear Coat unsanded
Clear coat sanded with 1200, then 2000
And the final result. Autoglym Paint Renovator was used followed by Meguires Step 3 Polish x2. Unfortunately it was about to rain so i didnt bother to wash the car coz it would only get dirty again. So please excuse all the dust, dirt and grime, it will be washed/polished soon! All in all, not bad for a weekends work Its not perfect but a huge improvement on what it was, would you agree?
So in comparison:
Before (silly me forgot to take a photo before i sanded it but u can see the damage from the old number plate bracket.
And after
[/img]
Last edited by Jimmy on Sun Nov 25, 2007 10:33 pm, edited 1 time in total.
- Ajay
- Racing Driver
- Posts: 901
- Joined: Mon Dec 11, 2006 6:07 pm
- Vehicle: NA6
- Location: Western Sydney, NSW
- Contact:
- Jimmy
- Fast Driver
- Posts: 451
- Joined: Tue Mar 20, 2007 7:19 pm
- Vehicle: ND - 2 GT
- Location: Canberra
- Ajay
- Racing Driver
- Posts: 901
- Joined: Mon Dec 11, 2006 6:07 pm
- Vehicle: NA6
- Location: Western Sydney, NSW
- Contact:
- bruce
- Speed Racer
- Posts: 7708
- Joined: Fri Apr 25, 2003 11:00 am
- Vehicle: NA8 - Turbo
- Location: Victoria
- Contact:
Return to “MX5 Body, Paint, Interior & Trim”
Who is online
Users browsing this forum: No registered users and 151 guests