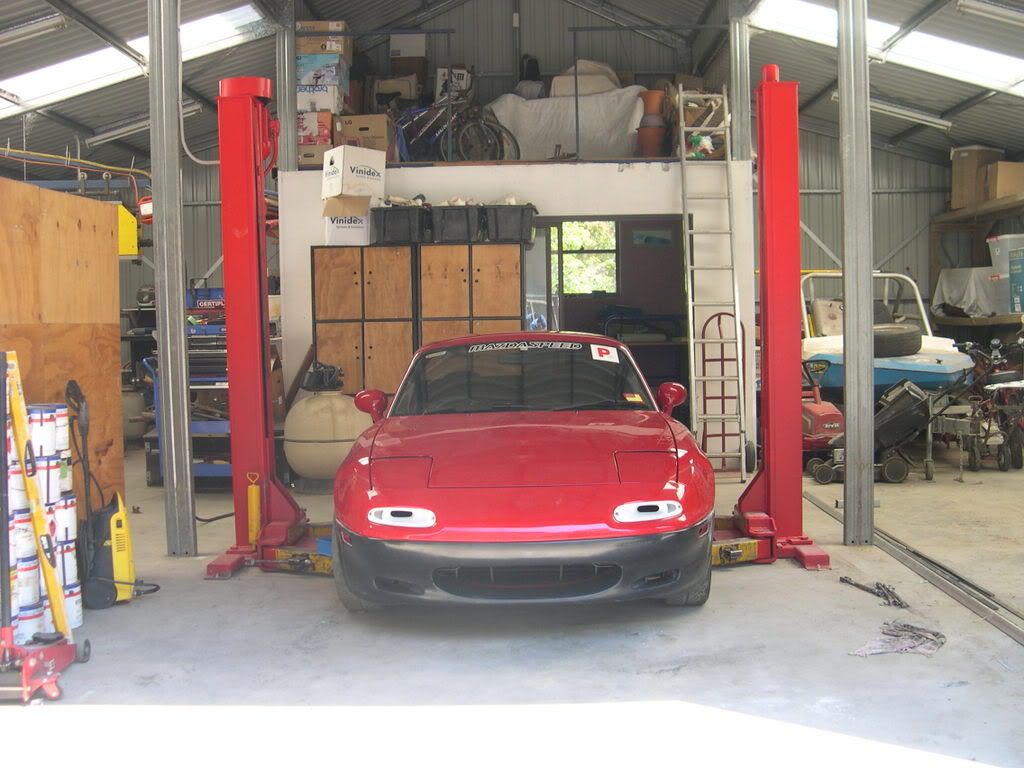
RB Type 1 nose - fittment

Body, Paint, Interior and Trim questions and answers

Moderators: timk, Stu, zombie, Andrew, -alex, miata

User avatar
Ajay
Racing Driver
Posts: 901
Joined: Mon Dec 11, 2006 6:07 pm
Vehicle: NA6
Location: Western Sydney, NSW
Contact:

RB Type 1 nose - fittment

Postby Ajay » Thu Nov 15, 2007 10:11 am

Hey guys

just did a search but couldnt find the answers to exactly what i was after..

im interested in purchasing the RB type 1 nose to compliment my new sideskirts (thanks boyracer :))

now what im curious to know is how it actually attaches.. i know its a half bar does it attach just below the parker lights??.. (Andrew you might be able to answer that one for me..) because i have some dents scratches on bar (where the old number plate bracket was) and want to make sure it will cover this...


and the final 3 questions

and ARE THEY HARD TO FIT??.. and how exactly is this done??
do you need to remove or cut any part of the orignal front bar?
Is the mouth opening the exact same as the original?..

thanks heaps for your help guys

Cheers
Ajay
Image

Fatty
Speed Racer
Posts: 3175
Joined: Fri Feb 03, 2006 10:39 am
Vehicle: NA6
Location: Melbourne

Postby Fatty » Thu Nov 15, 2007 6:43 pm

you know how the NA has a indent / groove thing around the bumper, half way up? well the RB has a \"lip\" that sits over / into the groove.

i'm keen to get some tips and answers as well, i bought mine ages ago but haven't got around to fitting it yet :roll:

Juffa
Racing Driver
Posts: 1751
Joined: Sun Apr 27, 2003 11:00 am
Vehicle: ND - 2 GT
Location: Bayside - Melbourne
Contact:

Postby Juffa » Thu Nov 15, 2007 8:58 pm

I seem to remember seeing some info on the Racing Beat website. Something bout them supplying a template as to where the holes need to be drilled to attach the new nose. I suggest trying the big forum as there is a better chance that someone there has fitted the type 1 nose.

J
Former owner of Mailbu Stacey, Smurfette and Tweety.

User avatar
Lucky_Luke
Fast Driver
Posts: 348
Joined: Tue Mar 07, 2006 10:45 pm
Vehicle: NC
Location: Adelaide
Contact:

Postby Lucky_Luke » Fri Nov 16, 2007 9:29 am

Hey guys,
They fit on easy as, its done in maybe half an hour, less if your holes are already done.
Mines been held in place for the last 6 years by 2 screws in the upper side of the front mouth and 2 screws in each front wheel arch into the plastic bumper. along with some double side tape just below the groove that Fatty was talking about it makes for a perfect snug fit. The whole thing just flexes and sort of clips on.

The only thing you have to do which you may not want to is cut the original plastic bar where the intakes are and yes the mouth is an exact fit, it just slides in the original mouth.
Alternatively i suppose, instead of cutting the bumper you could trim the fibreglass and just put some black contact or paint on the bumper behind the hole, probably wouldnt look the same though.

If you guys want some specific pics let me know, cause i dont have any on me atm.

L.

MXkal
Driver
Posts: 67
Joined: Fri Oct 12, 2007 10:14 pm
Vehicle: ND - 2 GT
Location: Central coast

Postby MXkal » Fri Nov 16, 2007 8:18 pm

funny thing about this is i just did this today. I put a nice crack in my old racnig beat type I front bar so i went to mania yesterday and picked up another. Not hard to fit at all. Push it on the front and it pretty much clips around the stock bar then u put a few self tapping screws in the wheel arch part. My old one had blobs of sikaflex around the top of it to stick it on the front but the one i put on today fits really snug i could of dríven it without any screws or anything, Not like i would though.
Overkill is an understatement.

User avatar
Ajay
Racing Driver
Posts: 901
Joined: Mon Dec 11, 2006 6:07 pm
Vehicle: NA6
Location: Western Sydney, NSW
Contact:

Postby Ajay » Fri Nov 16, 2007 10:48 pm

thanks for the info guys!..

as i said the bar is damaged anyway so i dont mind cutting away parts for the vents.. (does anyone know if mania will do this? and what they charge?) could ring them but internet is easier :)
Image

User avatar
lowmiata
Racing Driver
Posts: 848
Joined: Thu Apr 24, 2003 11:00 am
Vehicle: ND - 2 GT
Location: gone fishin
Contact:

Re:

Postby lowmiata » Sat Nov 17, 2007 9:35 am

TP13SS wrote:thanks for the info guys!..

as i said the bar is damaged anyway so i dont mind cutting away parts for the vents.. (does anyone know if mania will do this? and what they charge?) could ring them but internet is easier :)


cutting the holes in the plastic is pretty easy
lots of ways of doing it

1 clip RB bar on
2 mark holes
3 remove bar
4 cut holes
(you can cut them with a bit of clearence to you wont see it so if its not perfect it wont matter)
5 reinstall bar

and your done.

easiest way to cut the hole

I find a drill bit in a battery drill is the easiest you just carve your way along (however you need to be very carful as the drill will have a mind of its own when your trying to push it along)

otherways are with a jigsaw, melt it with a hot knife, stanly knife (this could take a while) or any other destructive tool you hve at you finger tips :shock:

best though would be a air ricipricating saw (the one with the hacksaw blade in it)
and just drill holes at your start and finish points

best bit is as it lines up in a join line you can paint it yourself with paint mixed from auto barn etc because it wont have to be 100% spot on cause the line interupts the colour :mrgreen:

definatly do it you wont look back :P
EVI15 1998 to 2008

User avatar
PUR157
Racing Driver
Posts: 967
Joined: Sun Sep 17, 2006 5:26 pm
Vehicle: Clubman
Location: Sydney, Capital of Australia
Contact:

Postby PUR157 » Sat Nov 17, 2007 3:45 pm

I'll tack on a DIY tip...

For drilling large-ish holes, use a relatively small bit to drill a pilot hole, this way when you do the big one, it has something to \"lock\" onto
Oneness of Man and Machine
Image

MXkal
Driver
Posts: 67
Joined: Fri Oct 12, 2007 10:14 pm
Vehicle: ND - 2 GT
Location: Central coast

Postby MXkal » Sun Nov 18, 2007 11:13 am

just wondering if you have the nose yet. I think i got the last one from mania the other day. Im going to glass my old one back up for a spare. If you cant find one i could sell it to ya :D
Overkill is an understatement.

MXkal
Driver
Posts: 67
Joined: Fri Oct 12, 2007 10:14 pm
Vehicle: ND - 2 GT
Location: Central coast

Postby MXkal » Sun Nov 18, 2007 11:38 am

Heres some of my pics with the RB nose i took in my garage (excuse the mess) :frown:
Image
Other pics are at http://s213.photobucket.com/albums/cc50/mxkal/
Overkill is an understatement.

User avatar
Ajay
Racing Driver
Posts: 901
Joined: Mon Dec 11, 2006 6:07 pm
Vehicle: NA6
Location: Western Sydney, NSW
Contact:

Postby Ajay » Sun Nov 18, 2007 6:47 pm

have not bought one yet.. but i will eventually get one through mania or ssv... how much would you be looking for once repaored :) send me a PM :)

(and thanks for the pics exactly what i needed)
Image


Return to “MX5 Body, Paint, Interior & Trim”

Who is online

Users browsing this forum: No registered users and 148 guests